Page 782 of 1399

EC−12
−
EMISSION CONTROL EXHAUST GAS RECIRCULATION (EGR) SYSTEM
1996 LAND CRUISER (RM451U)
HINT:
As a large amount of exhaust gas enters, the engine will misfire
slightly.
7. DISCONNECT TOYOTA HAND −HELD TESTER OR
OBD II SCAN TOOL
8. REMOVE VACUUM GAUGE
Remove the vacuum gauge, and reconnect the vacuum hoses
to the proper locations.
9. INSPECT EGR VALVE
(a) Apply vacuum directly to the EGR valve with the engine idle.
(b) Check that the engine runs rough or dies.
(c) Reconnect the vacuum hoses to the proper locations.
If no problem is found with this inspection, system is normal;
otherwise inspect each part.
10. CANCEL DIAGNOSTIC TROUBLE CODE
11. REMOVE AIR INTAKE CHAMBER (See page EM−28)
12. DISCONNECT VACUUM HOSES AND CONNECTOR
13. INSPECT VSV FOR OPEN CIRCUIT
Using an ohmmeter, check that there is continuity between the
terminals. Resistance: 30 − 34 Ω at 20° C (68°F)
If there is no continuity, replace the VSV.
14. INSPECT VSV FOR GROUND
Using an ohmmeter, check that there is no continuity between
each terminal and the body.
If there is continuity, replace the VSV.
Brought to you by BirfMark
Brought to you by BirfMark
Version 1.11 - 03/16/2010
Page 783 of 1399

(a)
(b)
(c)
−
EMISSION CONTROL EXHAUST GAS RECIRCULATION (EGR) SYSTEM
EC−13
1996 LAND CRUISER (RM451U)
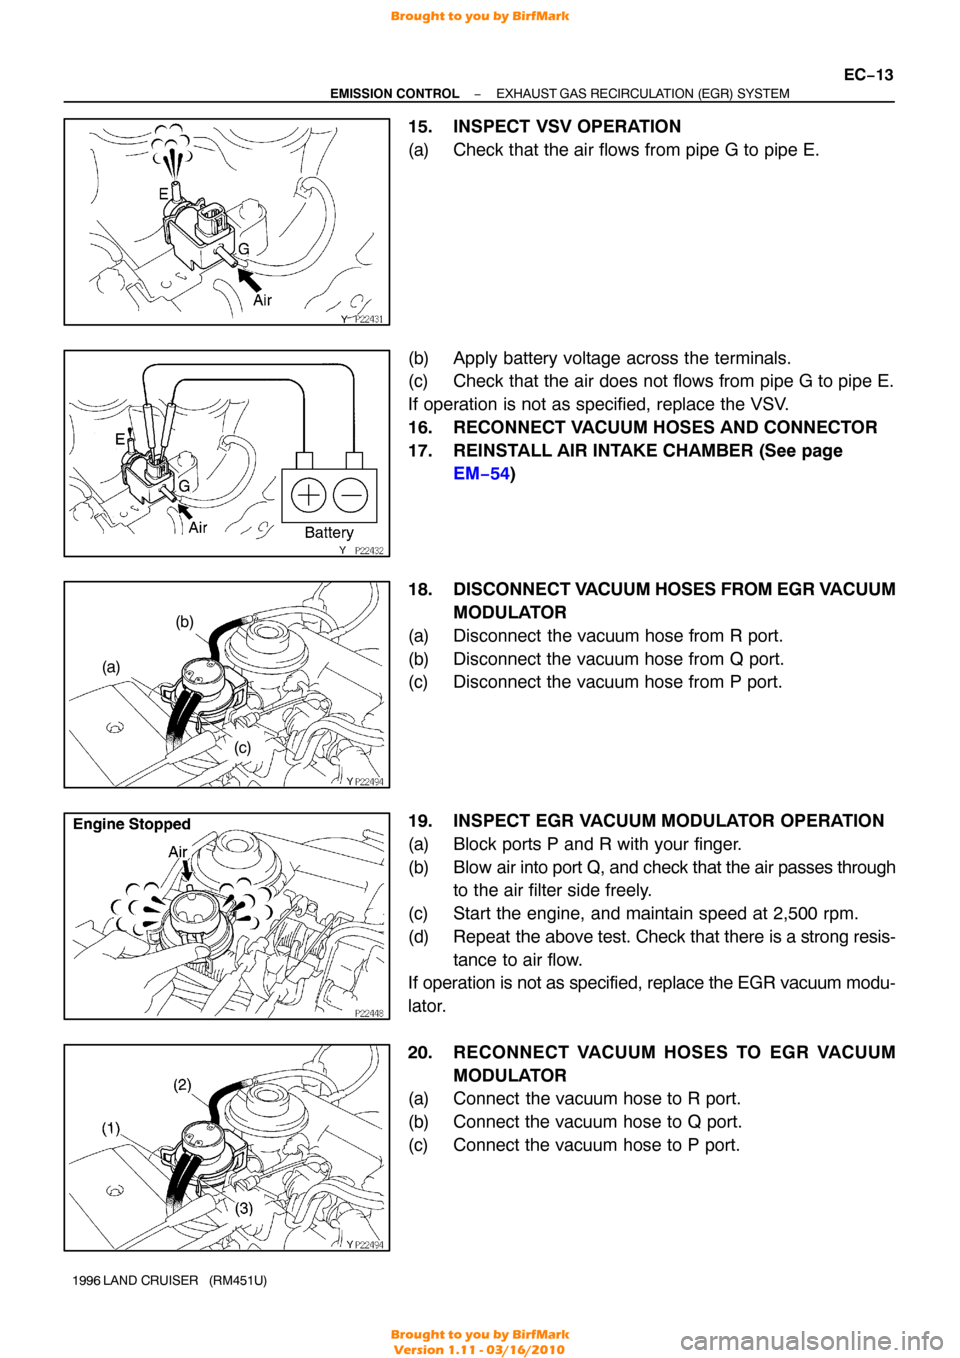
15. INSPECT VSV OPERATION
(a) Check that the air flows from pipe G to pipe E.
(b) Apply battery voltage across the terminals.
(c) Check that the air does not flows from pipe G to pipe E.
If operation is not as specified, replace the VSV.
16. RECONNECT VACUUM HOSES AND CONNECTOR
17. REINSTALL AIR INTAKE CHAMBER (See page
EM−54 )
18. DISCONNECT V ACUUM HOSES FROM EGR V ACUUM
MODULATOR
(a) Disconnect the vacuum hose from R port.
(b) Disconnect the vacuum hose from Q port.
(c) Disconnect the vacuum hose from P port.
19. INSPECT EGR VACUUM MODULATOR OPERATION
(a) Block ports P and R with your finger.
(b) Blow air into port Q, and check that the air passes through
to the air filter side freely.
(c) Start the engine, and maintain speed at 2,500 rpm.
(d) Repeat the above test. Check that there is a strong resis-
tance to air flow.
If operation is not as specified, replace the EGR vacuum modu-
lator.
20. RECONNECT VACUUM HOSES TO EGR VACUUM
MODULATOR
(a) Connect the vacuum hose to R port.
(b) Connect the vacuum hose to Q port.
(c) Connect the vacuum hose to P port.
Brought to you by BirfMark
Brought to you by BirfMark
Version 1.11 - 03/16/2010
Page 784 of 1399

EC−14
−
EMISSION CONTROL EXHAUST GAS RECIRCULATION (EGR) SYSTEM
1996 LAND CRUISER (RM451U)
21. REMOVE EGR VACUUM MODULATOR
22. REMOVE EGR VALVE
(a) Disconnect the vacuum hose from the EGR valve.
(b) Disconnect the engine wire from the clamp.
(c) Loosen the EGR pipe union nut.
(d) Remove the 2 nuts holding the EGR valve to the air intake
chamber.
(e) Using 2 nuts, remove the 2 stud bolts, EGR valve and gasket.
23. INSPECT EGR VALVE
Check for sticking and heavy carbon deposits.
If a problem is found, replace the valve.
24. REINSTALL EGR VALVE
(a) Using 2 nuts, temporarily install a new gasket, and EGR valve with the 2 stud bolts.
Torque: 9 N·m (90 kgf·cm, 78 in.·lbf)
(b) Install the 2 nuts holding the EGR valve to the air intake
chamber.
Torque: 18 N·m (180 kgf·cm, 13 ft·lbf)
(c) Tighten the union nut of the EGR pipe. Torque: 64 N·m (650 kgf·cm, 47 ft·lbf)
(d) Connect the engine wire to the clamp.
(e) Connect the vacuum hose to the EGR valve.
25. REINSTALL EGR VACUUM MODULATOR
Torque: 18 N·m (185 kgf·cm, 13 ft·lbf)
Brought to you by BirfMark
Brought to you by BirfMark
Version 1.11 - 03/16/2010
Page 813 of 1399

EM1E3−01
EM−28
−
ENGINE MECHANICAL CYLINDER HEAD
1996 LAND CRUISER (RM451U)
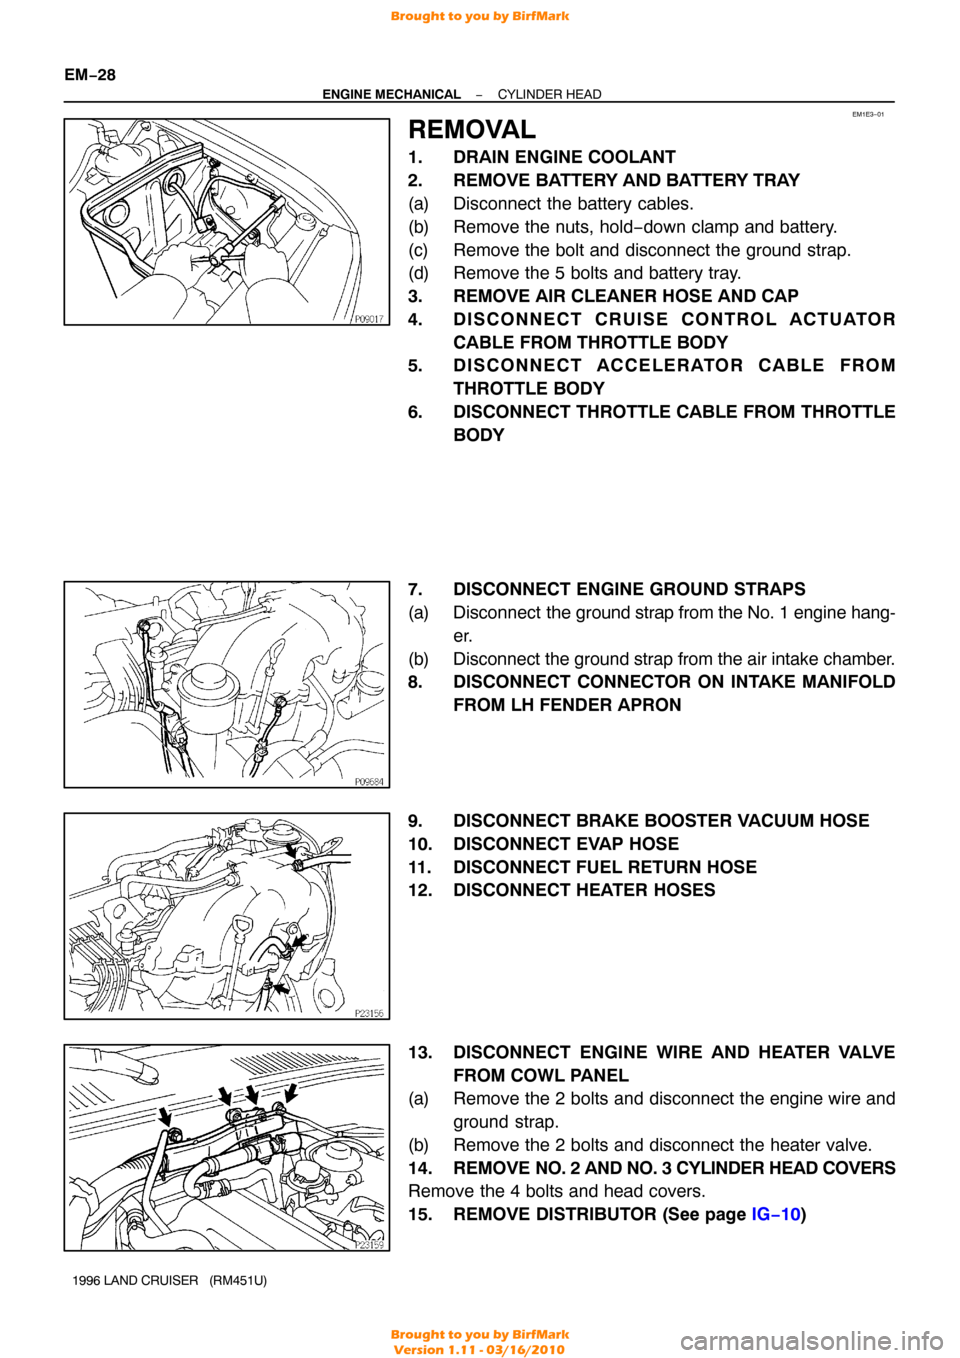
REMOVAL
1. DRAIN ENGINE COOLANT
2. REMOVE BATTERY AND BATTERY TRAY
(a) Disconnect the battery cables.
(b) Remove the nuts, hold −down clamp and battery.
(c) Remove the bolt and disconnect the ground strap.
(d) Remove the 5 bolts and battery tray.
3. REMOVE AIR CLEANER HOSE AND CAP
4. DISCONNECT CRUISE CONTROL ACTUATOR CABLE FROM THROTTLE BODY
5. DISCONNECT ACCELERATOR CABLE FROM
THROTTLE BODY
6. DISCONNECT THROTTLE CABLE FROM THROTTLE BODY
7. DISCONNECT ENGINE GROUND STRAPS
(a) Disconnect the ground strap from the No. 1 engine hang-
er.
(b) Disconnect the ground strap from the air intake chamber.
8. DISCONNECT CONNECTOR ON INTAKE MANIFOLD FROM LH FENDER APRON
9. DISCONNECT BRAKE BOOSTER VACUUM HOSE
10. DISCONNECT EVAP HOSE
11. DISCONNECT FUEL RETURN HOSE
12. DISCONNECT HEATER HOSES
13. DISCONNECT ENGINE WIRE AND HEATER VALVE FROM COWL PANEL
(a) Remove the 2 bolts and disconnect the engine wire and
ground strap.
(b) Remove the 2 bolts and disconnect the heater valve.
14. REMOVE NO. 2 AND NO. 3 CYLINDER HEAD COVERS
Remove the 4 bolts and head covers.
15. REMOVE DISTRIBUTOR (See page IG−10 )
Brought to you by BirfMark
Brought to you by BirfMark
Version 1.11 - 03/16/2010
Page 815 of 1399

EM−30
−
ENGINE MECHANICAL CYLINDER HEAD
1996 LAND CRUISER (RM451U)
(b) Disconnect the connectors.
(1) Disconnect the knock sensor connector.
(2) Disconnect the oil level sensor connector.
(3) Disconnect the 2 connectors from the transmission.
(4) Disconnect the starter connector.
(c) Disconnect the 2 heated oxygen sensor connectors.
(d) Disconnect the PNP switch connector.
(e) Remove the 2 bolts and disconnect the engine wire from the intake manifold and cylinder block.
(f) Disconnect the PCV hose from the PCV valve.
(g) Remove the bolt holding the engine wire to the intake manifold.
(h) Disconnect the connectors. (1) Disconnect the connector for the emission controlvalve set assembly.
(2) Disconnect the 3 injector connectors.
(i) Disconnect the engine wire clamp.
(j) Disconnect the engine wire clamp.
(k) Disconnect the connectors.
(1) Disconnect the 3 injector connectors.
(2) Disconnect the EGR gas temp. sensor connector.
(l) Disconnect the clamp of the No. 6 injector wire from the bracket.
(m) Disconnect the engine wire from the cylinder head and in-
take manifold.
25. DISCONNECT NO. 2 WATER BYPASS PIPE
Remove the 3 bolts, and disconnect the bypass pipe from the
cylinder head.
Brought to you by BirfMark
Brought to you by BirfMark
Version 1.11 - 03/16/2010
Page 846 of 1399

−
ENGINE MECHANICAL CYLINDER HEAD
EM−61
1996 LAND CRUISER (RM451U)
14. INSTALL HEATER PIPE
Install a new gasket, the heater pipe and ground cable with the
2 bolts and 2 nuts.
Torque:
20 N·m (200 kgf·cm, 14 ft·lbf) for bolt:
21 N·m (210 kgf·cm, 15 ft·lbf) for nut
15. INSTALL NO. 1 AND NO. 2 EXHAUST MANIFOLDS
(a) Install 2 new gaskets, No. 1 exhaust manifold and No. 2
exhaust manifold with the 13 nuts.
Torque: 39 N·m (400 kgf·cm, 29 ft·lbf)
(b) Install the No. 1 heat insulator and No. 2 heat insulator with the 6 bolts.
Torque: 19 N·m (195 kgf·cm, 14 ft·lbf)
16. INSTALL FRONT EXHAUST PIPE
(a) Install 2 new gaskets and the front exhaust pipe with the 4 nuts.
Torque: 63 N·m (630 kgf·cm, 46 ft·lbf)
(b) Install the No. 1 support bracket with the 2 bolts. Torque: 24 N·m (240 kgf·cm, 17 ft·lbf)
(c) Connect the clamp and tighten the clamp bolt.
Torque: 19.5 N·m (195 kgf·cm, 14 ft·lbf)
(d) Connect the front exhaust pipe to the rear TWC with a new gasket, 2 bolts and 2 nuts.
Torque: 46 N·m (470 kgf·cm, 34 ft·lbf)
17. CONNECT NO. 2 WATER BYPASS PIPE
Connect the bypass pipe to the cylinder head with the 3 bolts.
Torque: 20 N·m (200 kgf·cm, 14 ft·lbf)
18. CONNECT ENGINE WIRE
(a) Place the engine wire on the intake manifold.
(b) Connect the connectors. (1) Connect the 3 injector connectors.
(2) Connect the EGR gas temp. sensor connector.
(c) Connect the clamp of the No.6 injector wire to the bracket.
(d) Connect the engine wire clamp.
(e) Connect the engine wire clamp.
(f) Connect the connectors. (1) Connect the connector for the emission control
valve set assembly.
(2) Connect the 3 injector connectors.
(g) Install the bolt holding the engine wire to the intake man- ifold.
Brought to you by BirfMark
Brought to you by BirfMark
Version 1.11 - 03/16/2010
Page 848 of 1399

−
ENGINE MECHANICAL CYLINDER HEAD
EM−63
1996 LAND CRUISER (RM451U)
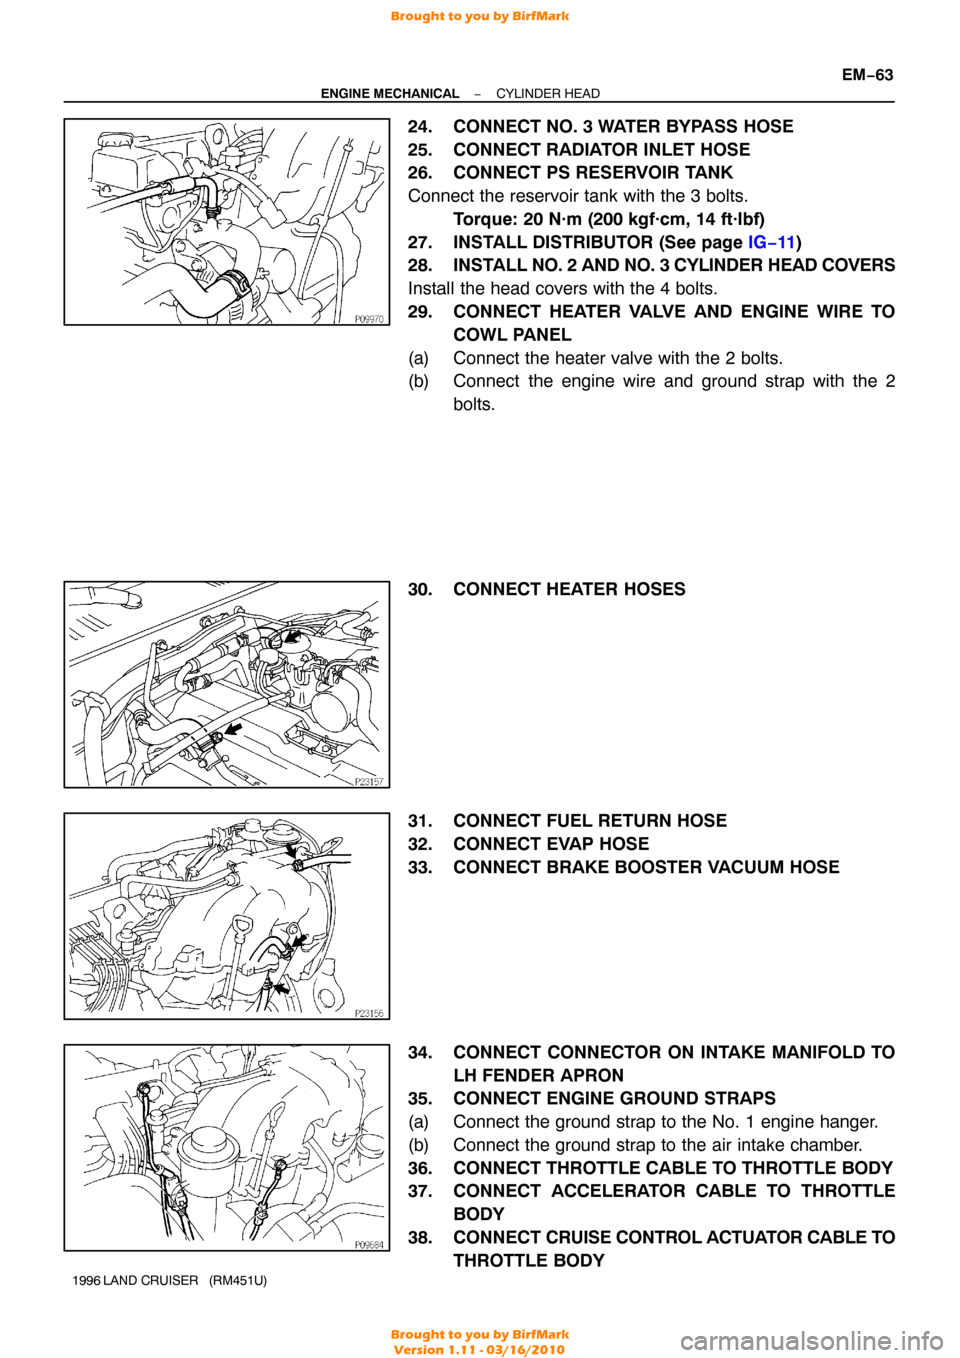
24. CONNECT NO. 3 WATER BYPASS HOSE
25. CONNECT RADIATOR INLET HOSE
26. CONNECT PS RESERVOIR TANK
Connect the reservoir tank with the 3 bolts.
Torque: 20 N·m (200 kgf·cm, 14 ft·lbf)
27. INSTALL DISTRIBUTOR (See page IG−11)
28. INSTALL NO. 2 AND NO. 3 CYLINDER HEAD COVERS
Install the head covers with the 4 bolts.
29. CONNECT HEATER VALVE AND ENGINE WIRE TO COWL PANEL
(a) Connect the heater valve with the 2 bolts.
(b) Connect the engine wire and ground strap with the 2 bolts.
30. CONNECT HEATER HOSES
31. CONNECT FUEL RETURN HOSE
32. CONNECT EVAP HOSE
33. CONNECT BRAKE BOOSTER VACUUM HOSE
34. CONNECT CONNECTOR ON INTAKE MANIFOLD TO LH FENDER APRON
35. CONNECT ENGINE GROUND STRAPS
(a) Connect the ground strap to the No. 1 engine hanger.
(b) Connect the ground strap to the air intake chamber.
36. CONNECT THROTTLE CABLE TO THROTTLE BODY
37. CONNECT ACCELERATOR CABLE TO THROTTLE
BODY
38. CONNECT CRUISE CONTROL ACTUATOR CABLE TO
THROTTLE BODY
Brought to you by BirfMark
Brought to you by BirfMark
Version 1.11 - 03/16/2010
Page 854 of 1399
EM1ED−02
−
ENGINE MECHANICAL ENGINE UNIT
EM−69
1996 LAND CRUISER (RM451U)
REMOVAL
1. DRAIN ENGINE COOLANT
2. DRAIN ENGINE OIL
3. REMOVE HOOD
4. REMOVE BATTERY AND BATTERY TRAY
(a) Disconnect the battery cables.
(b) Remove the nuts, hold−down clamp and battery.
(c) Remove the bolt and disconnect the ground strap.
(d) Remove the 5 bolts and battery tray.
5. REMOVE RADIATOR GRILLE
Remove the 5 screws, clip and radiator grille.
6. REMOVE RADIATOR (See page CO−14 )
7. DISCONNECT OIL COOLER HOSE FROM OIL COOL- ER PIPE
8. REMOVE AIR CLEANER HOSE AND CAP
9. REMOVE AIR CLEANER CASE
10. DISCONNECT CRUISE CONTROL ACTUATOR CABLE FROM THROTTLE BODY
11. DISCONNECT ACCELERATOR CABLE FROM THROTTLE BODY
12. DISCONNECT HEATER HOSES
Brought to you by BirfMark
Brought to you by BirfMark
Version 1.11 - 03/16/2010