Page 804 of 1399
EM1EB−01
−
ENGINE MECHANICAL TIMING CHAIN
EM−19
1996 LAND CRUISER (RM451U)
INSTALLATION
1. SET CRANKSHAFT
Turn the crankshaft until the set key on crankshaft facing down-
ward.
2. INSTALL PUMP DRIVE SHAFT GEAR
3. INSTALL OIL PUMP DRIVE SHAFT GEAR
(a) Apply a light coat of engine oil on the shaft portion of the
gear.
(b) Install the gear.
4. INSTALL CRANKSHAFT ROTOR
5. INSTALL OIL JET
Install the oil jet with the bolt. Torque: 20 N·m (200 kgf·cm, 14 ft·lbf)
6. INSTALL CHAIN TENSIONER SLIPPER AND VIBRA- TION DAMPER
(a) Install the damper with the 2 bolts.
Torque: 20 N·m (200 kgf·cm, 14 ft·lbf)
(b) Using a 10 mm hexagon wrench, install the slipper with the bolt.
Torque: 69 N·m (700 kgf·cm, 51 ft·lbf)
Brought to you by BirfMark
Brought to you by BirfMark
Version 1.11 - 03/16/2010
Page 808 of 1399

−
ENGINE MECHANICAL TIMING CHAIN
EM−23
1996 LAND CRUISER (RM451U)
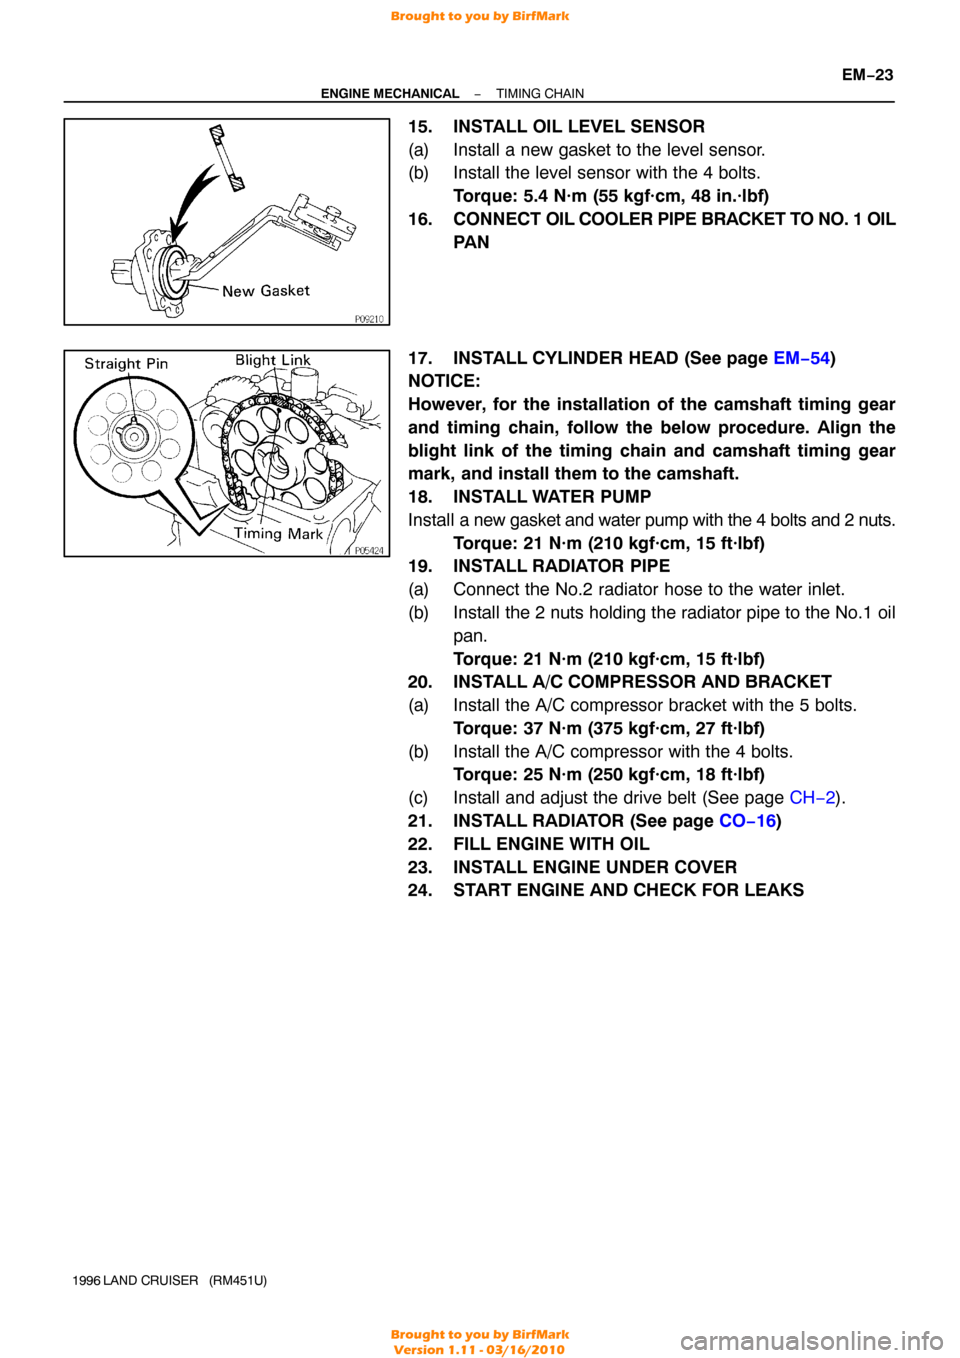
15. INSTALL OIL LEVEL SENSOR
(a) Install a new gasket to the level sensor.
(b) Install the level sensor with the 4 bolts.
Torque: 5.4 N·m (55 kgf·cm, 48 in.·lbf)
16. CONNECT OIL COOLER PIPE BRACKET TO NO. 1 OIL
PA N
17. INSTALL CYLINDER HEAD (See page EM−54 )
NOTICE:
However, for the installation of the camshaft timing gear
and timing chain, follow the below procedure. Align the
blight link of the timing chain and camshaft timing gear
mark, and install them to the camshaft.
18. INSTALL WATER PUMP
Install a new gasket and water pump with the 4 bolts and 2 nuts.
Torque: 21 N·m (210 kgf·cm, 15 ft·lbf)
19. INSTALL RADIATOR PIPE
(a) Connect the No.2 radiator hose to the water inlet.
(b) Install the 2 nuts holding the radiator pipe to the No.1 oil
pan.
Torque: 21 N·m (210 kgf·cm, 15 ft·lbf)
20. INSTALL A/C COMPRESSOR AND BRACKET
(a) Install the A/C compressor bracket with the 5 bolts.
Torque: 37 N·m (375 kgf·cm, 27 ft·lbf)
(b) Install the A/C compressor with the 4 bolts. Torque: 25 N·m (250 kgf·cm, 18 ft·lbf)
(c) Install and adjust the drive belt (See page CH−2).
21. INSTALL RADIATOR (See page CO−16 )
22. FILL ENGINE WITH OIL
23. INSTALL ENGINE UNDER COVER
24. START ENGINE AND CHECK FOR LEAKS
Brought to you by BirfMark
Brought to you by BirfMark
Version 1.11 - 03/16/2010
Page 818 of 1399

P22143A16076
2 Dot Marks
−
ENGINE MECHANICAL CYLINDER HEAD
EM−33
1996 LAND CRUISER (RM451U)
(d) Remove the camshaft timing gear and chain from the in-
take camshaft and leave on the slipper and damper.
35. REMOVE CAMSHAFTS
NOTICE:
Since the thrust clearance of the camshaft is small, the
camshaft must be kept level while it is being removed. If the
camshaft is not kept level, the portion of the cylinder head
receiving the shaft thrust may crack or be damaged, caus-
ing the camshaft to seize or break. To avoid this, the follow-
ing steps should be carried out.
(a) Remove the exhaust camshaft. (1) Bring the service bolt hole of the driven sub −gear
upward by turning the hexagon wrench head por-
tion of the exhaust camshaft with a wrench.
(2) Secure the exhaust camshaft sub −gear to the main
gear with a service bolt.
Recommended service bolt:
Thread diameter6 mm
Thread pitch1.0 mm
Bolt length16 − 20 mm (0.63 − 0.79 in.)
HINT:
When removing the camshaft, make sure that the torsional
spring force of the sub −gear has been eliminated by the above
operation.
(3) Set the timing mark (2 dot marks) of the camshaftdriven gear at approx. 35 ° angle by turning the
hexagon wrench head portion of the intake cam-
shaft with a wrench.
(4) Lightly push the camshaft towards the rear without applying excessive force.
(5) Loosen and remove the No. 1 bearing cap bolts, al-
ternately loosening the left and right bolts uniformly.
Brought to you by BirfMark
Brought to you by BirfMark
Version 1.11 - 03/16/2010
Page 819 of 1399

P22567A16077
2 Dot Marks
EM−34
−
ENGINE MECHANICAL CYLINDER HEAD
1996 LAND CRUISER (RM451U)
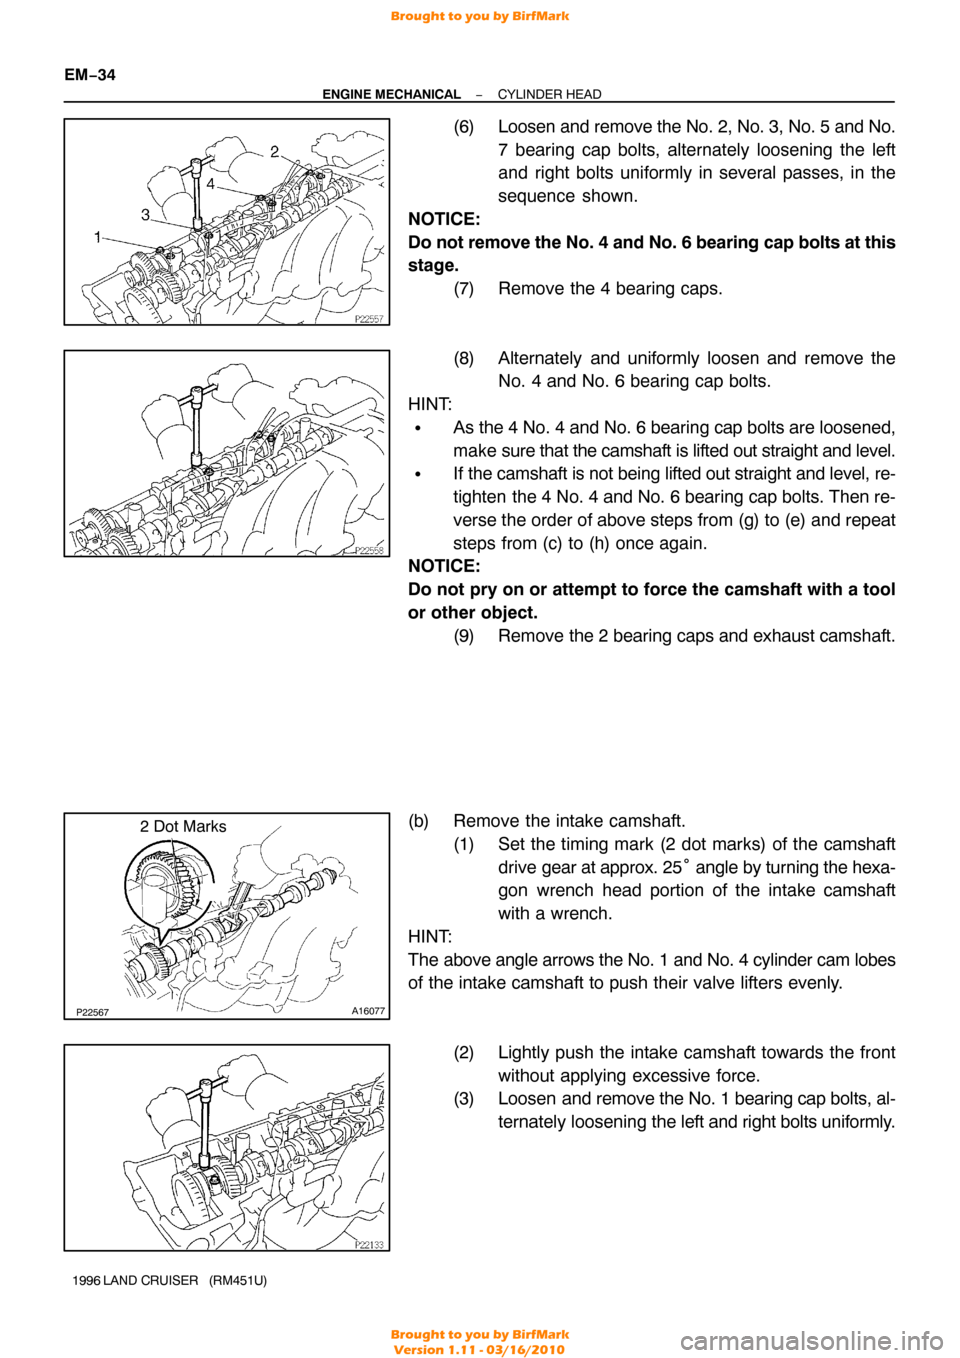
(6) Loosen and remove the No. 2, No. 3, No. 5 and No.
7 bearing cap bolts, alternately loosening the left
and right bolts uniformly in several passes, in the
sequence shown.
NOTICE:
Do not remove the No. 4 and No. 6 bearing cap bolts at this
stage. (7) Remove the 4 bearing caps.
(8) Alternately and uniformly loosen and remove theNo. 4 and No. 6 bearing cap bolts.
HINT:
�As the 4 No. 4 and No. 6 bearing cap bolts are loosened,
make sure that the camshaft is lifted out straight and level.
�If the camshaft is not being lifted out straight and level, re-
tighten the 4 No. 4 and No. 6 bearing cap bolts. Then re-
verse the order of above steps from (g) to (e) and repeat
steps from (c) to (h) once again.
NOTICE:
Do not pry on or attempt to force the camshaft with a tool
or other object.
(9) Remove the 2 bearing caps and exhaust camshaft.
(b) Remove the intake camshaft. (1) Set the timing mark (2 dot marks) of the camshaftdrive gear at approx. 25 ° angle by turning the hexa-
gon wrench head portion of the intake camshaft
with a wrench.
HINT:
The above angle arrows the No. 1 and No. 4 cylinder cam lobes
of the intake camshaft to push their valve lifters evenly.
(2) Lightly push the intake camshaft towards the frontwithout applying excessive force.
(3) Loosen and remove the No. 1 bearing cap bolts, al-
ternately loosening the left and right bolts uniformly.
Brought to you by BirfMark
Brought to you by BirfMark
Version 1.11 - 03/16/2010
Page 828 of 1399

P03849
Overall Length
EM0255
P04415
−
ENGINE MECHANICAL CYLINDER HEAD
EM−43
1996 LAND CRUISER (RM451U)
(d) Check the valve overall length.
Standard overall length:
Intake98.4 mm (3.874 in.)
Exhaust97.4 mm (3.854 in.)
Minimum overall length:
Intake97.9 mm (3.854 in.)
Exhaust97.4 mm (3.835 in.)
If the overall length is less than minimum, replace the valve.
(e) Check the surface of the valve stem tip for wear.
If the valve stem tip is worn, resurface the tip with a grinder or
replace the valve.
NOTICE:
Do not grind off more than minimum.
7. INSPECT AND CLEAN VALVE SEATS
(a) Using a 45° carbide cutter, resurface the valve seats.
Remove only enough metal to clean the seats.
(b) Check the valve seating position. Apply a light coat of prussian blue (or white lead) to the
valve face. Lightly press the valve against the seat. Do not
rotate valve.
(c) Check the valve face and seat for the following:
�If blue appears 360 ° around the face, the valve is
concentric. If not, replace the valve.
�If blue appears 360 ° around the valve seat, the
guide and face are concentric. If not, resurface the
seat.
�Check that the seat contact is in the middle of the
valve face with these width:
Intake1.2 − 1.6 mm (0.047 − 0.063 in.)
Exhaust1.0 − 1.4 mm (0.039 − 0.055 in.)
Brought to you by BirfMark
Brought to you by BirfMark
Version 1.11 - 03/16/2010
Page 835 of 1399
EM−50
−
ENGINE MECHANICAL CYLINDER HEAD
1996 LAND CRUISER (RM451U)
2. REPLACE SPARK PLUG TUBE GASKETS
(a) Using a screwdriver, pry out the tube gasket.
(b) Using SST and a hammer, tap in a new tube gasket as
shown in the illustration.
SST 09950 −60010 (09951 −00480), 09950 −70010
(09951 −07150)
(c) Apply a light coat of MP grease to the gasket lip.
Brought to you by BirfMark
Brought to you by BirfMark
Version 1.11 - 03/16/2010
Page 838 of 1399

−
ENGINE MECHANICAL CYLINDER HEAD
EM−53
1996 LAND CRUISER (RM451U)
(d) Using a plastic−faced hammer, lightly tap the valve stem
tip to ensure a proper fit.
7. INSTALL VALVE LIFTERS AND SHIMS
(a) Install the valve lifter and shim.
(b) Check that the valve lifter rotates smoothly by hand.
8. INSTALL ACCELERATOR CABLE BRACKET AND THROTTLE CABLE BRACKET
9. INSTALL 2 ENGINE WIRE CLAMP BRACKETS
10. INSTALL NO. 1 AND NO. 2 ENGINE HANGERS Torque: 41 N·m (420 kgf·cm, 30 ft·lbf)
11. INSTALL NO. 1 WATER BYPASS HOSE
12. ASSEMBLE AIR INTAKE CHAMBER AND INTAKE MANIFOLD ASSEMBLY
(a) Install 2 new gaskets and the air intake chamber with the
6 bolts and 2 nuts.
Torque: 21 N·m (210 kgf·cm, 15 ft·lbf)
(b) Connect the vacuum sensing hose to the fuel pressure regulator.
13. INSTALL AIR INTAKE CHAMBER AND INTAKE MAN- IFOLD ASSEMBLY
(a) Place a new gasket so that the rear mark is toward the rear side.
(b) Install the intake manifold with the 10 bolts and 2 nuts.
Torque: 21 N·m (210 kgf·cm, 15 ft·lbf)
(c) Connect the 2 vacuum hoses to the TVV.
14. INSTALL HEATER INLET PIPE AND HOSE
Install the heater hose to the cylinder head, and connect the
pipe to the intake manifold with the 2 bolts. Torque: 21 N·m (210 kgf·cm, 15 ft·lbf)
15. INSTALL EGR PIPE
(a) Temporarily install the union nut to the EGR valve.
(b) Install a new gasket and the EGR pipe to the cylinder head with the 2 bolts.
Torque: 21 N·m (210 kgf·cm, 15 ft·lbf)
(c) Tighten the union nut. Torque: 78 N·m (800 kgf·cm, 58 ft·lbf)
16. INSTALL WATER OUTLET
Install a new gasket and the water outlet with the 2 nuts. Torque: 21 N·m (210 kgf·cm, 15 ft·lbf)
17. INSTALL GENERATOR BRACKET
Install the generator bracket with the 2 bolts. Torque: 43 N·m (440 kgf·cm, 32 ft·lbf)
Brought to you by BirfMark
Brought to you by BirfMark
Version 1.11 - 03/16/2010
Page 839 of 1399

EM1E7−01
EM−54
−
ENGINE MECHANICAL CYLINDER HEAD
1996 LAND CRUISER (RM451U)
INSTALLATION
1. INSTALL CYLINDER HEAD AND INTAKE MANIFOLD ASSEMBLY
(a) Place the cylinder head on the cylinder head. (1) Apply seal packing to the 2 locations as shown.
Seal packing: Part No. 08826−00080 or equivalent
NOTICE:
Do not apply too much seal packing
(2) Place a new cylinder head gasket in position on the
cylinder block.
NOTICE:
Be careful of the installation direction. (3) Place the cylinder head in position on the cylinderhead gasket.
(b) Install the cylinder head bolts.
HINT:
�The cylinder head bolts are tightened in 3 progressive
steps (steps (b), (d) and (e)).
�If any cylinder head bolt is broken or deformed, replace
it.
(1) Apply a light coat of engine oil on the threads and under the heads of the cylinder head bolts.
(2) Install and uniformly tighten the 14 cylinder head
bolts and plate washers in several passes, in the se-
quence shown.
Torque: 39 N·m (400 kgf·cm, 29 ft·lbf)
If any of the cylinder head bolts does not meet the torque speci-
fication, replace the cylinder head bolt.
(3) Mark the front of the cylinder head bolt head withpaint.
(4) Retighten the cylinder head bolts by 90 ° in the nu-
merical order shown.
(5) Retighten the cylinder head bolts by an additional 90°.
(6) Check that the painted mark is now facing rearward.
Brought to you by BirfMark
Brought to you by BirfMark
Version 1.11 - 03/16/2010