Page 798 of 1399
EM1E9−01
−
ENGINE MECHANICAL TIMING CHAIN
EM−13
1996 LAND CRUISER (RM451U)
REMOVAL
1. DRAIN ENGINE OIL
2. DRAIN ENGINE COOLANT
3. REMOVE ENGINE UNDER COVER
4. REMOVE RADIATOR (See page CO−14 )
5. DISCONNECT A/C COMPRESSOR AND BRACKET
(a) Loosen the idler pulley nut and adjusting bolt, and remove
the drive belt.
(b) Remove the 4 mounting bolts, and disconnect the com- pressor from the bracket.
HINT:
Put aside the compressor, and suspend it.
(c) Remove the 5 bolts and A/C compressor bracket.
6. REMOVE RADIATOR PIPE
(a) Disconnect the No. 2 radiator hose from the water inlet.
(b) Remove the 2 nuts and radiator pipe.
7. REMOVE WATER PUMP
Remove the 4 bolts, 2 nuts, water pump and gasket.
8. REMOVE CYLINDER HEAD (See page EM−28 )
Brought to you by BirfMark
Brought to you by BirfMark
Version 1.11 - 03/16/2010
Page 813 of 1399

EM1E3−01
EM−28
−
ENGINE MECHANICAL CYLINDER HEAD
1996 LAND CRUISER (RM451U)
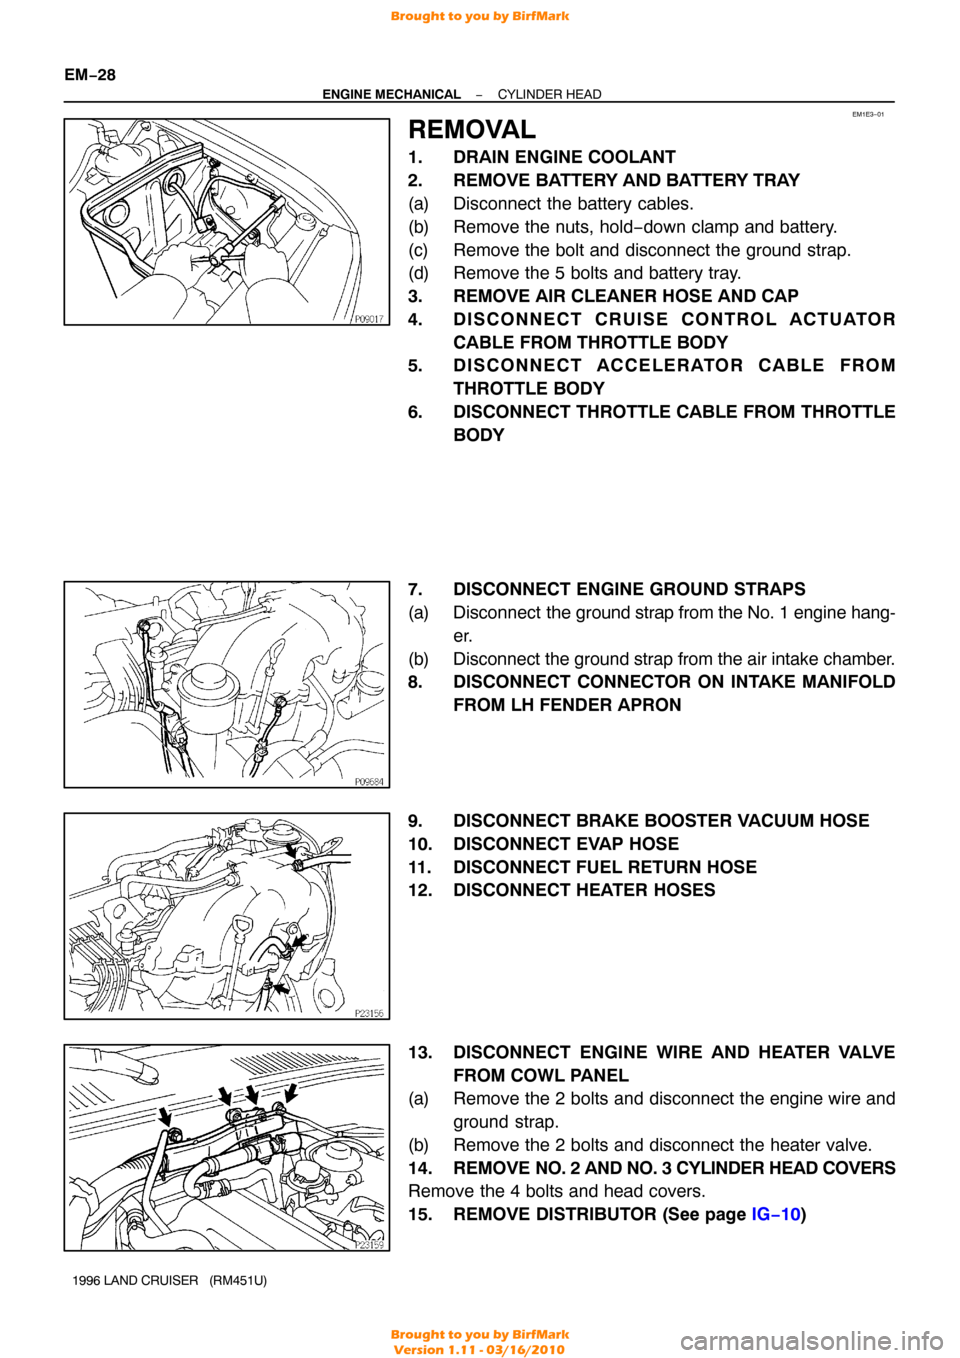
REMOVAL
1. DRAIN ENGINE COOLANT
2. REMOVE BATTERY AND BATTERY TRAY
(a) Disconnect the battery cables.
(b) Remove the nuts, hold −down clamp and battery.
(c) Remove the bolt and disconnect the ground strap.
(d) Remove the 5 bolts and battery tray.
3. REMOVE AIR CLEANER HOSE AND CAP
4. DISCONNECT CRUISE CONTROL ACTUATOR CABLE FROM THROTTLE BODY
5. DISCONNECT ACCELERATOR CABLE FROM
THROTTLE BODY
6. DISCONNECT THROTTLE CABLE FROM THROTTLE BODY
7. DISCONNECT ENGINE GROUND STRAPS
(a) Disconnect the ground strap from the No. 1 engine hang-
er.
(b) Disconnect the ground strap from the air intake chamber.
8. DISCONNECT CONNECTOR ON INTAKE MANIFOLD FROM LH FENDER APRON
9. DISCONNECT BRAKE BOOSTER VACUUM HOSE
10. DISCONNECT EVAP HOSE
11. DISCONNECT FUEL RETURN HOSE
12. DISCONNECT HEATER HOSES
13. DISCONNECT ENGINE WIRE AND HEATER VALVE FROM COWL PANEL
(a) Remove the 2 bolts and disconnect the engine wire and
ground strap.
(b) Remove the 2 bolts and disconnect the heater valve.
14. REMOVE NO. 2 AND NO. 3 CYLINDER HEAD COVERS
Remove the 4 bolts and head covers.
15. REMOVE DISTRIBUTOR (See page IG−10 )
Brought to you by BirfMark
Brought to you by BirfMark
Version 1.11 - 03/16/2010
Page 854 of 1399
EM1ED−02
−
ENGINE MECHANICAL ENGINE UNIT
EM−69
1996 LAND CRUISER (RM451U)
REMOVAL
1. DRAIN ENGINE COOLANT
2. DRAIN ENGINE OIL
3. REMOVE HOOD
4. REMOVE BATTERY AND BATTERY TRAY
(a) Disconnect the battery cables.
(b) Remove the nuts, hold−down clamp and battery.
(c) Remove the bolt and disconnect the ground strap.
(d) Remove the 5 bolts and battery tray.
5. REMOVE RADIATOR GRILLE
Remove the 5 screws, clip and radiator grille.
6. REMOVE RADIATOR (See page CO−14 )
7. DISCONNECT OIL COOLER HOSE FROM OIL COOL- ER PIPE
8. REMOVE AIR CLEANER HOSE AND CAP
9. REMOVE AIR CLEANER CASE
10. DISCONNECT CRUISE CONTROL ACTUATOR CABLE FROM THROTTLE BODY
11. DISCONNECT ACCELERATOR CABLE FROM THROTTLE BODY
12. DISCONNECT HEATER HOSES
Brought to you by BirfMark
Brought to you by BirfMark
Version 1.11 - 03/16/2010
Page 914 of 1399
LU0KG−02
−
LUBRICATION OIL PUMP
LU−5
1996 LAND CRUISER (RM451U)
REMOVAL
HINT:
When repairing the oil pump, the oil pan and strainer should be
removed and cleaned.
1. DRAIN ENGINE OIL
2. REMOVE ENGINE UNDER COVER
3. DRAIN ENGINE COOLANT
4. REMOVE RADIATOR (See page CO−14 )
5. DISCONNECT A/C COMPRESSOR AND BRACKET
(a) Loosen the idler pulley nut and adjusting bolt, and remove
the drive belt.
(b) Remove the 4 mounting bolts, and disconnect the com- pressor from the bracket.
HINT:
Put aside the compressor, and suspend it.
(c) Remove the 5 bolts and A/C compressor bracket.
6. REMOVE RADIATOR PIPE
(a) Disconnect the No.2 radiator hose from the water inlet.
(b) Remove the 2 nuts and radiator pipe.
7. REMOVE WATER PUMP
Remove the 4 bolts, 2 nuts, water pump and gasket.
8. REMOVE CYLINDER HEAD (See page EM−28 )
9. DISCONNECT OIL COOLER PIPE BRACKET FROM NO.1 OIL PAN
Brought to you by BirfMark
Brought to you by BirfMark
Version 1.11 - 03/16/2010
Page 925 of 1399
LU0KK−02
LU−16
−
LUBRICATION OIL COOLER
1996 LAND CRUISER (RM451U)
REMOVAL
1. DRAIN ENGINE COOLANT
2. REMOVE AIR CLEANER CAP AND HOSE
3. REMOVE FRONT EXHAUST PIPE
(a) Disconnect the heated oxygen sensor connector.
(b) Remove the 2 nuts and 2 bolts holding the front exhaust pipe to the rear TWC.
(c) Disconnect the front exhaust pipe, and remove the gas- ket.
(d) Loosen the clamp bolt and disconnect the clamp from the
No.1 support bracket.
(e) Remove the 2 bolts and No.1 support bracket.
(f) Remove the 4 nuts, front exhaust pipe and 2 gaskets.
4. REMOVE NO.1 EXHAUST MANIFOLD
(a) Remove the 3 bolts and No.1 heat insulator.
(b) Remove the 6 nuts, exhaust manifold and gasket.
Brought to you by BirfMark
Brought to you by BirfMark
Version 1.11 - 03/16/2010
Page 1212 of 1399
SF1EN−01
SF−26
−
SFI INJECTOR
1996 LAND CRUISER (RM451U)
REMOVAL
1. DRAIN ENGINE COOLANT
2. DISCONNECT CRUISE CONTROL ACTUATOR CABLE
3. DISCONNECT ACCELERATOR CABLE
4. DISCONNECT THROTTLE CABLE
5. DISCONNECT NO.2 PCV HOSE
6. DISCONNECT AIR CLEANER HOSE
7. REMOVE EGR VACUUM MODULATOR AND VALVE (See page EC−10 )
8. REMOVE BOLT HOLDING HEATER INLET PIPE AND AIR INTAKE CHAMBER
9. DISCONNECT NO.1 PCV HOSE
10. DISCONNECT VACUUM SENSING HOSE
11. DISCONNECT NO.2 WATER BYPASS HOSE
12. DISCONNECT EVAP HOSE
13. DISCONNECT BRAKE BOOSTER HOSE
14. DISCONNECT THROTTLE POSITION SENSOR CON- NECTOR
15. DISCONNECT IDLE AIR CONTROL VALVE CONNEC-
TOR
16. DISCONNECT CONNECTOR FOR EMISSION CON- TROL VALVE SET ASSEMBLY
17. DISCONNECT EGR GAS TEMP. SENSOR CONNEC-
TOR
Brought to you by BirfMark
Brought to you by BirfMark
Version 1.11 - 03/16/2010
Page 1231 of 1399
SF1EW−04
−
SFI THROTTLE BODY
SF−45
1996 LAND CRUISER (RM451U)
REMOVAL
1. DRAIN ENGINE COOLANT
2. DISCONNECT NO.2 PCV HOSE
3. DISCONNECT AIR CLEANER HOSE
4. DISCONNECT CONTROL CABLES FROM THROTTLE
BODY
5. DISCONNECT THROTTLE POSITION SENSOR CON-
NECTOR
6. DISCONNECT IDLE AIR CONTROL VALVE CONNEC- TOR
7. REMOVE THROTTLE BODY
(a) Disconnect the EVAP hose.
(b) Disconnect the 3 vacuum hoses.
(c) Disconnect the No.2 water bypass hose.
(d) Remove the 4 bolts, and disconnect the throttle body from
the air intake chamber.
Torque: 21 N·m (210 kgf·cm, 15 ft·lbf)
(e) Remove the throttle body gasket.
HINT:
At the time of installation, plaese refer to the following items.
install a new gasket on the air intake chamber.
(f) Disconnect the No.1 water bypass hose from the throttle
body, and remove the throttle body.
(g) Disconnect the No.2 water bypass hose from the throttle
body.
Brought to you by BirfMark
Brought to you by BirfMark
Version 1.11 - 03/16/2010
Page 1313 of 1399

SS1ET−01
SS−12
−
SERVICE SPECIFICATIONS SFI
1996 LAND CRUISER (RM451U)
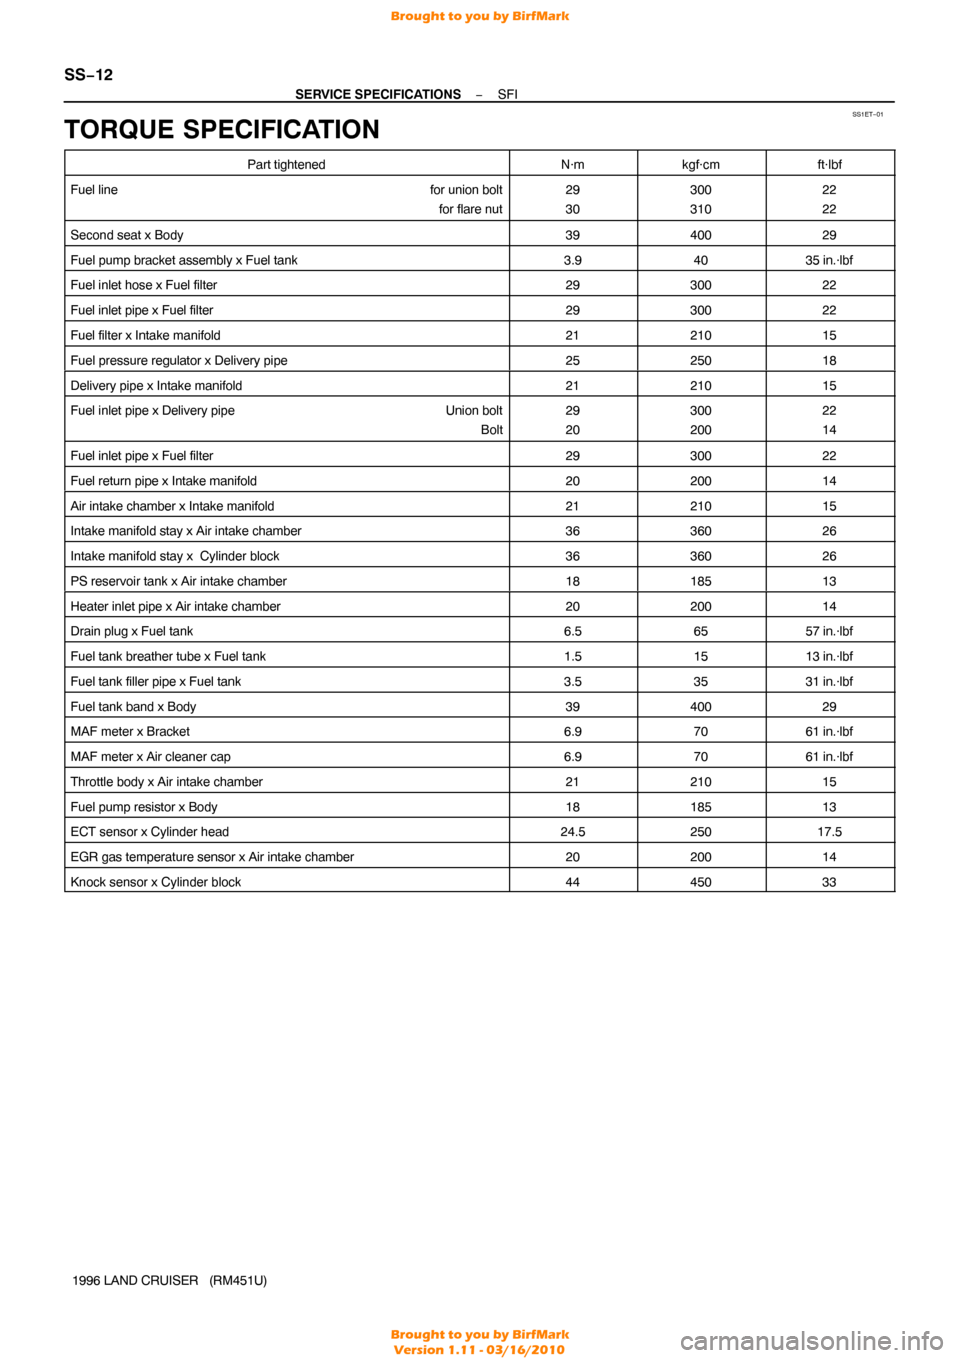
TORQUE SPECIFICATION
Part tightenedN·mkgf·cmft·lbf
Fuel line for union bolt
for flare nut29
30300
31022
22
Second seat x Body3940029
Fuel pump bracket assembly x Fuel tank3.94035 in.·lbf
Fuel inlet hose x Fuel filter2930022
Fuel inlet pipe x Fuel filter2930022
Fuel filter x Intake manifold2121015
Fuel pressure regulator x Delivery pipe2525018
Delivery pipe x Intake manifold2121015
Fuel inlet pipe x Delivery pipe Union bolt
Bolt29
20300
20022
14
Fuel inlet pipe x Fuel filter2930022
Fuel return pipe x Intake manifold2020014
Air intake chamber x Intake manifold2121015
Intake manifold stay x Air intake chamber3636026
Intake manifold stay x Cylinder block3636026
PS reservoir tank x Air intake chamber1818513
Heater inlet pipe x Air intake chamber2020014
Drain plug x Fuel tank6.56557 in.·lbf
Fuel tank breather tube x Fuel tank1.51513 in.·lbf
Fuel tank filler pipe x Fuel tank3.53531 in.·lbf
Fuel tank band x Body3940029
MAF meter x Bracket6.97061 in.·lbf
MAF meter x Air cleaner cap6.97061 in.·lbf
Throttle body x Air intake chamber2121015
Fuel pump resistor x Body1818513
ECT sensor x Cylinder head24.525017.5
EGR gas temperature sensor x Air intake chamber2020014
Knock sensor x Cylinder block4445033
Brought to you by BirfMark
Brought to you by BirfMark
Version 1.11 - 03/16/2010