Page 1196 of 1399

REMOVAL
CAUTION:
Do not smoke or work near an open flame when working on
the fuel pump.
1. REMOVE SECOND SEATS
Torque: 39 N·m (400 kg")
SF1EH−02
−
SFI FUEL PUMP
SF−11
1996 LAND CRUISER (RM451U)
REMOVAL
CAUTION:
Do not smoke or work near an open flame when working on
the fuel pump.
1. REMOVE SECOND SEATS
Torque: 39 N·m (400 kgf·cm, 29 ft·lbf)
2. REMOVE SCUFF PLATE
3. REMOVE SIDE GARNISH
4. REMOVE STEP PLATE
5. DISCONNECT FLOOR MATS
6. REMOVE FLOOR SERVICE HOLE COVER
Remove the 3 screws and service hole cover.
7. DISCONNECT FUEL PIPE AND HOSE FROM FUEL
PUMP BRACKET
CAUTION:
Remove the fuel filter cap to prevent the fuel from flowing
out.
(a) Disconnect the fuel pump and sender gauge connector.
HINT:
At the time of installation, plaese refer to the following items.
Check for fuel leakage.
(b) Remove the union bolt and gaskets, and disconnect the outlet pipe from the pump bracket.
Torque: 29 N·m (300 kgf·cm, 22 ft·lbf)
(c) Disconnect the return hose from the pump bracket.
8. REMOVE FUEL PUMP BRACKET ASSEMBLY FROM
FUEL TANK
(a) Remove the 8 bolts.
Torque: 3.9 N·m (40 kgf·cm, 35 in.·lbf)
(b) Pull out the pump bracket assembly.
NOTICE:
�Do not damage the fuel pump filter.
�Be careful that the arm of the sender gauge should
not bent.
(c) Remove the gasket from the pump bracket.
Brought to you by BirfMark
Brought to you by BirfMark
Version 1.11 - 03/16/2010
Page 1198 of 1399
SF1EI−03
−
SFI FUEL PUMP
SF−13
1996 LAND CRUISER (RM451U)
DISASSEMBLY
1. REMOVE FUEL PUMP FROM FUEL PUMP BRACKET
(a) Pull off the lower side of the fuel pump from the pump
bracket.
(b) Disconnect the fuel pump connector.
(c) Disconnect the fuel hose from the fuel pump, and remove
the fuel pump.
(d) Remove the rubber cushion from the fuel pump.
2. REMOVE FUEL PUMP FILTER FROM FUEL PUMP
(a) Using a small screwdriver, remove the clip.
HINT:
At the time of installation, plaese refer to the following items.
install the pump filter with a new clip.
(b) Pull out the pump filter.
3. REMOVE FUEL SENDER GAUGE FROM FUEL PUMP BRACKET
(a) Remove the 3 screws and disconnect the lead wires from
the pump bracket.
(b) Remove the 2 screws and sender gauge.
Brought to you by BirfMark
Brought to you by BirfMark
Version 1.11 - 03/16/2010
Page 1199 of 1399

INSPECTION
1. REMOVE SECOND SEATS
2. REMOVE SCUFF PLATE
3. REMOVE SIDE GARNISH
4. REMOVE STEP PLATE
5. DISCONNECT FLOOR MATS
6. REMOVE")
SF1EG−02
SF−14
−
SFI FUEL PUMP
1996 LAND CRUISER (RM451U)
INSPECTION
1. REMOVE SECOND SEATS
2. REMOVE SCUFF PLATE
3. REMOVE SIDE GARNISH
4. REMOVE STEP PLATE
5. DISCONNECT FLOOR MATS
6. REMOVE FLOOR SERVICE HOLE COVER
Remove the 3 screws and service hole cover.
7. DISCONNECT FUEL PUMP AND SENDER GAUGE CONNECTOR
8. INSPECT FUEL PUMP RESISTANCE
Using an ohmmeter, measure the resistance between the ter-
minals 5 and 6. Resistance: 0.2 − 3.0 Ω at 20°C (68°F)
If the resistance is not as specified, replace the fuel pump.
9. INSPECT FUEL PUMP OPERATION
Connect the positive (+) lead from the battery to terminal 6 of
the connector, and the negative ( −) lead to terminal 5. Check
that the fuel pump operates.
NOTICE:
�These tests must be performed quickly (within 10 se-
conds) to prevent the coil from burning out.
�Keep the fuel pump as far away from the battery as
possible.
�Always perform switching at the battery side.
If operation is not as specified, replace the fuel pump.
10. RECONNECT FUEL PUMP AND SENDER GAUGE CONNECTOR
Brought to you by BirfMark
Brought to you by BirfMark
Version 1.11 - 03/16/2010
Page 1204 of 1399
SF1EM−01
−
SFI FUEL PRESSURE REGULATOR
SF−19
647
Author�: Date�:
1996 LAND CRUISER (RM451U)
FUEL PRESSURE REGULATOR
ON−VEHICLE INSPECTION
INSPECT FUEL PRESSURE (See page SF−1 )
Brought to you by BirfMark
Brought to you by BirfMark
Version 1.11 - 03/16/2010
Page 1206 of 1399
SF0Y0−06
−
SFI FUEL PRESSURE REGULATOR
SF−21
1996 LAND CRUISER (RM451U)
REMOVAL
1. DISCONNECT VACUUM SENSING HOSE FROM FUEL
PRESSURE REGULATOR
2. DISCONNECT FUEL RETURN HOSE FROM FUEL PRESSURE REGULATOR
CAUTION:
Put a shop towel under the pressure regulator.
3. REMOVE FUEL PRESSURE REGULATOR
(a) Loosen the lock nut, and remove the pressure regulator.
(b) Remove the O−ring from the pressure regulator.
Brought to you by BirfMark
Brought to you by BirfMark
Version 1.11 - 03/16/2010
Page 1207 of 1399
SF0Y1−06
SF−22
−
SFI FUEL PRESSURE REGULATOR
1996 LAND CRUISER (RM451U)
INSTALLATION
1. INSTALL FUEL PRESSURE REGULATOR
(a) Fully loosen the lock nut on the pressure regulator.
(b) Apply a light coat of gasoline to a new O −ring, and install
it to the pressure regulator.
(c) Insert the pressure regulator into the delivery pipe by hand completely.
(d) Turn the pressure regulator counterclockwise until the fuel outlet port faces in the direction indicated in the il-
lustration.
(e) Tighten the lock nut. Torque: 25 N·m (250 kgf·cm, 18 ft·lbf)
2. CONNECT FUEL RETURN HOSE TO FUEL PRES-
SURE REGULATOR
3. CONNECT V ACUUM SENSING HOSE TO FUEL PRES-
SURE REGULATOR
4. START ENGINE AND CHECK FOR FUEL LEAKAGE
Brought to you by BirfMark
Brought to you by BirfMark
Version 1.11 - 03/16/2010
Page 1208 of 1399
SF0Y1−06
SF−22
−
SFI FUEL PRESSURE REGULATOR
1996 LAND CRUISER (RM451U)
INSTALLATION
1. INSTALL FUEL PRESSURE REGULATOR
(a) Fully loosen the lock nut on the pressure regulator.
(b) Apply a light coat of gasoline to a new O −ring, and install
it to the pressure regulator.
(c) Insert the pressure regulator into the delivery pipe by hand completely.
(d) Turn the pressure regulator counterclockwise until the fuel outlet port faces in the direction indicated in the il-
lustration.
(e) Tighten the lock nut. Torque: 25 N·m (250 kgf·cm, 18 ft·lbf)
2. CONNECT FUEL RETURN HOSE TO FUEL PRES-
SURE REGULATOR
3. CONNECT V ACUUM SENSING HOSE TO FUEL PRES-
SURE REGULATOR
4. START ENGINE AND CHECK FOR FUEL LEAKAGE
Brought to you by BirfMark
Brought to you by BirfMark
Version 1.11 - 03/16/2010
Page 1209 of 1399
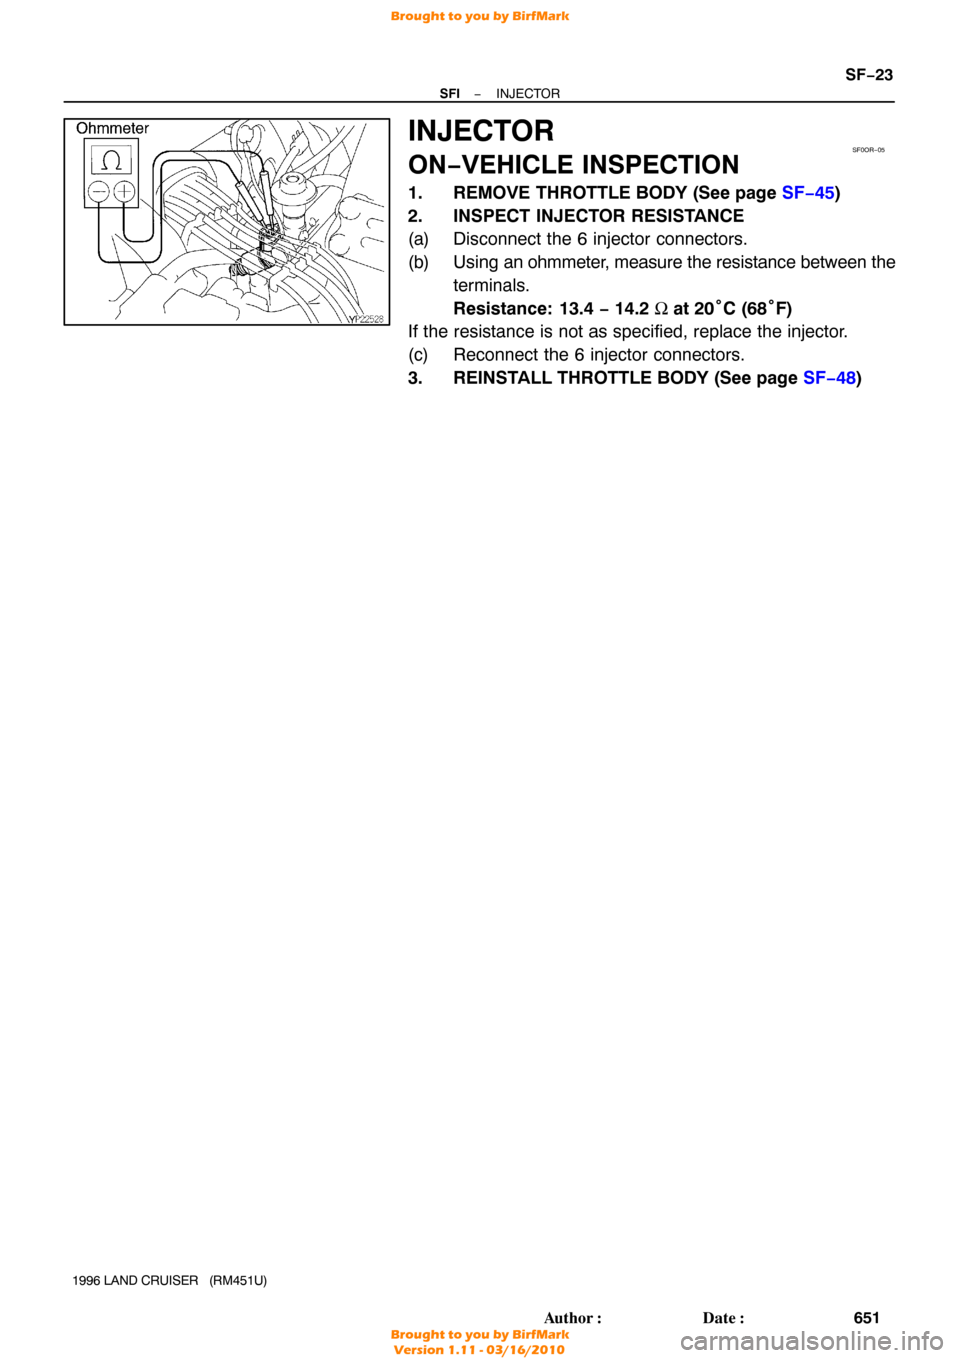
SF0OR−05
−
SFI INJECTOR
SF−23
651
Author�: Date�:
1996 LAND CRUISER (RM451U)
INJECTOR
ON−VEHICLE INSPECTION
1. REMOVE THROTTLE BODY (See page SF−45)
2. INSPECT INJECTOR RESISTANCE
(a) Disconnect the 6 injector connectors.
(b) Using an ohmmeter, measure the resistance between the
terminals.
Resistance: 13.4 − 14.2 Ω at 20°C (68°F)
If the resistance is not as specified, replace the injector.
(c) Reconnect the 6 injector connectors.
3. REINSTALL THROTTLE BODY (See page SF−48)
Brought to you by BirfMark
Brought to you by BirfMark
Version 1.11 - 03/16/2010

DISASSEMBLY
1. REMOVE FUEL PUMP FROM FUEL PUMP BRACKET
(a) Pull off the lower side of the fuel pump from the pump
bracket.
(b) Disconn")

REMOVAL
1. DISCONNECT VACUUM SENSING HOSE FROM FUEL
PRESSURE REGULATOR
2. DISCONNECT FUEL RETURN HOSE FROM FUEL PRESSUR")

INSTALLATION
1. INSTALL FUEL PRESSURE REGULATOR
(a) Fully loosen the lock nut on the pressure regulator.
(b) Apply a lig")

INSTALLATION
1. INSTALL FUEL PRESSURE REGULATOR
(a) Fully loosen the lock nut on the pressure regulator.
(b) Apply a lig")