Page 1069 of 2890
G4M0259
6) Invert both ST1 and housing.
7) Using ST2, press inner oil seal into housing until it
touches bottom.
ST1 927430000 HOUSING STAND
ST2 927460000 OIL SEAL INSTALLER
G4M0260
8) Using ST1 and ST2, press sub seal into place.
ST1 927430000 HOUSING STAND
ST2 927460000 OIL SEAL INSTALLER
9) Apply sufficient grease to oil seal lip.
Specified grease:
SHELL 6459N
CAUTION:
�If specified grease is not available, remove bearing
grease and apply Auto Rex A instead.
�Do not mix different types of grease.
G4M0261
10) Install back plate to rear housing.
Tightening torque:
52±6 N⋅m (5.3±0.6 kg-m, 38.3±4.3 ft-lb)
G4M0262
11) Using ST1 and ST2, press bearing into hub.
ST1 927080000 HUB STAND
ST2 927450000 HUB INSTALLER
21
4-2SERVICE PROCEDURE
2. Rear Axle (AWD Model)
Page 1070 of 2890
E: INSTALLATION
1) Connect rear housing assembly and strut assembly.
CAUTION:
Use a new self-locking nut.
Tightening torque:
147±15 N⋅m (15±1.5 kg-m, 108±11 ft-lb)
2) Fit BJ (bell joint) to rear housing splines.
CAUTION:
Be careful not to damage inner oil seal lip.
G4M0245
3) Connect rear housing assembly to lateral link assembly.
CAUTION:
Use a new self-locking nut.
Tightening torque:
137±20 N⋅m (14±2 kg-m, 101±14 ft-lb)
G4M0246
4) Connect rear housing assembly to trailing link assem-
bly.
CAUTION:
Use a new self-locking nut.
Tightening torque:
98 — 127 N⋅m (10 — 13 kg-m, 72 — 94 ft-lb)
5) Connect parking brake cable to parking brake.
Disc brake: Perform steps 6) through 8).
6) Install disc rotor on rear housing assembly.
G4M0240
7) Install disc brake caliper on back plate.
Tightening torque:
52±6 N⋅m (5.3±0.6 kg-m, 38.3±4.3 ft-lb)
G4M0266
8) Install rear speed sensor to back plate (only vehicle
equipped with A.B.S.).
22
4-2SERVICE PROCEDURE
2. Rear Axle (AWD Model)
Page 1071 of 2890

Drum brake: Perform steps 9) through 11).
9) Clean brake pipe connection. Using a flare-nut wrench,
connect brake pipe to wheel cylinder.
10) Connect parking brake cable to lever.
11) Install brake drum on rear housing assembly.
12) Bleed air from brake system.
13) Adjust parking brake lever stroke by turning adjuster.
14) Move brake lever back to apply brakes. While
depressing brake pedal, tighten axle nut using a socket
wrench. Lock axle nut after tightening.
Tightening torque:
186±20 N⋅m (19±2 kg-m, 137±14 ft-lb)
CAUTION:
�Use a new axle nut.
�Always tighten axle nut before installing wheel on
vehicle. If wheel is installed and comes in contact with
ground when axle nut is loose, wheel bearings may be
damaged.
�Be sure to tighten axle nut to specified torque. Do
not overtighten it as this may damage wheel bearing.
15) Install wheel and tighten wheel nuts to specified
torque.
Tightening torque:
88±10 N⋅m (9±1 kg-m, 65±7 ft-lb)
3. Rear Axle (FWD Model)
A: REMOVAL
1) Disconnect ground cable from battery.
2) Jack-up vehicle, and remove rear wheel cap and
wheels.
CAUTION:
Be sure to loosen and retighten axle nut after remov-
ing wheel from vehicle. Failure to follow this rule may
damage wheel bearings.
3) Pry hub cap off with a screwdriver placed between it
and hub.
4) Unlock axle nut.
5) Remove axle nut using a socket wrench. Remove
washer.
CAUTION:
Do not re-use old axle nut. Replace with a new one.
NOTE:
Temporarily tighten axle nut to hold hub in place.
23
4-2SERVICE PROCEDURE
2. Rear Axle (AWD Model) - 3. Rear Axle (FWD Model)
Page 1072 of 2890

Drum brake: Perform steps 9) through 11).
9) Clean brake pipe connection. Using a flare-nut wrench,
connect brake pipe to wheel cylinder.
10) Connect parking brake cable to lever.
11) Install brake drum on rear housing assembly.
12) Bleed air from brake system.
13) Adjust parking brake lever stroke by turning adjuster.
14) Move brake lever back to apply brakes. While
depressing brake pedal, tighten axle nut using a socket
wrench. Lock axle nut after tightening.
Tightening torque:
186±20 N⋅m (19±2 kg-m, 137±14 ft-lb)
CAUTION:
�Use a new axle nut.
�Always tighten axle nut before installing wheel on
vehicle. If wheel is installed and comes in contact with
ground when axle nut is loose, wheel bearings may be
damaged.
�Be sure to tighten axle nut to specified torque. Do
not overtighten it as this may damage wheel bearing.
15) Install wheel and tighten wheel nuts to specified
torque.
Tightening torque:
88±10 N⋅m (9±1 kg-m, 65±7 ft-lb)
3. Rear Axle (FWD Model)
A: REMOVAL
1) Disconnect ground cable from battery.
2) Jack-up vehicle, and remove rear wheel cap and
wheels.
CAUTION:
Be sure to loosen and retighten axle nut after remov-
ing wheel from vehicle. Failure to follow this rule may
damage wheel bearings.
3) Pry hub cap off with a screwdriver placed between it
and hub.
4) Unlock axle nut.
5) Remove axle nut using a socket wrench. Remove
washer.
CAUTION:
Do not re-use old axle nut. Replace with a new one.
NOTE:
Temporarily tighten axle nut to hold hub in place.
23
4-2SERVICE PROCEDURE
2. Rear Axle (AWD Model) - 3. Rear Axle (FWD Model)
Page 1073 of 2890
B4M0050A
6) Return parking brake lever and loosen adjusting nut.
(1) Disc brake: Perform steps 7) through 9).
(2) Drum brake: Perform steps 10) through 13).
G4M0268
7) Remove disc brake assembly from back plate. Suspend
disc brake assembly from strut using a wire.
G4M0269
8) Remove disc rotor from hub.
If disc rotor seizes up within hub, drive it out by installing
an 8-mm bolt in bolt hole on disc rotor.
9) Disconnect end of parking brake cable.
10) Remove brake drum from hub.
G4M0242
11) If it is difficult to remove brake drum, remove adjusting
hole cover from back plate, and then turn adjusting screw
using a slot-type screwdriver until brake shoe separates
from the drum.
24
4-2SERVICE PROCEDURE
3. Rear Axle (FWD Model)
Page 1074 of 2890
G4M0271
NOTE:
If brake drum seizes up within hub, drive it out by installing
an 8-mm bolt in bolt hole on brake drum.
12) Disconnect end of parking brake cable.
13) Using a flare-nut wrench, disconnect brake pipe from
wheel cylinder.
CAUTION:
Cover brake pipe connection to prevent entry of for-
eign particles.
G4M0273
14) Remove bolts which secure trailing link assembly to
rear spindle.
CAUTION:
Discard old self-locking nut. Replace with a new one.
G4M0272
15) Remove bolts which secure lateral link assembly to
rear spindle.
CAUTION:
Discard old self-locking nut. Replace with a new one.
G4M0249
16) Remove bolts which secure strut assembly to rear
spindle.
Remove rear spindle, back plate and hub as a unit.
G4M0275
B: DISASSEMBLY
1) Remove hub from rear spindle.
25
4-2SERVICE PROCEDURE
3. Rear Axle (FWD Model)
Page 1075 of 2890
G4M0276
2) Remove back plate from rear spindle.
G4M0277
3) Using ST, press hub bolts out.
CAUTION:
Do not hammer hub bolt since this may deform hub.
ST 927080000 HUB STAND
C: INSPECTION
Clean the removed parts and check them for wear, dam-
age and corrosion. If faulty, replace.
CAUTION:
Hub unit cannot be disassembled. If faulty, replace it
as a unit.
G4M0278
D: ASSEMBLY
1) Using ST, press new hub bolts into place.
NOTE:
�Use a 12 mm (0.47 in) hole in ST to prevent hub bolt
from tilting during installation.
�Ensure hub bolt closely contacts hub.
ST 927080000 HUB STAND
2) Completely clean dust or dirt from the mating/polished
surface of rear spindle back plate.
3) Install back plate to rear spindle.
Tightening torque:
52±6 N⋅m (5.3±0.6 kg-m, 38.3±4.3 ft-lb)
4) Charge oil seal located on the rear of hub with grease.
Specified grease:
SHELL 6459N
26
4-2SERVICE PROCEDURE
3. Rear Axle (FWD Model)
Page 1076 of 2890

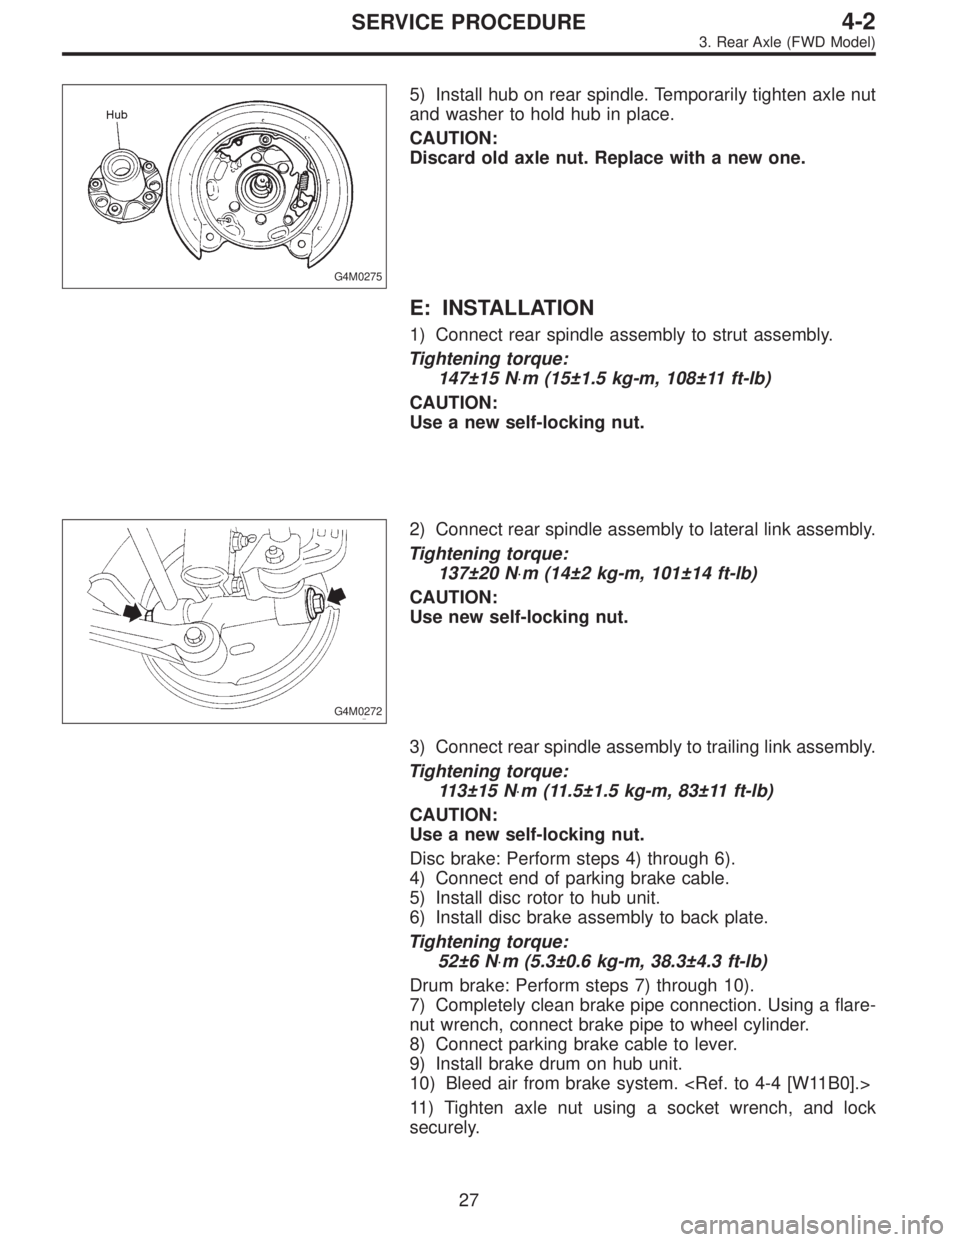
G4M0275
5) Install hub on rear spindle. Temporarily tighten axle nut
and washer to hold hub in place.
CAUTION:
Discard old axle nut. Replace with a new one.
E: INSTALLATION
1) Connect rear spindle assembly to strut assembly.
Tightening torque:
147±15 N⋅m (15±1.5 kg-m, 108±11 ft-lb)
CAUTION:
Use a new self-locking nut.
G4M0272
2) Connect rear spindle assembly to lateral link assembly.
Tightening torque:
137±20 N⋅m (14±2 kg-m, 101±14 ft-lb)
CAUTION:
Use new self-locking nut.
3) Connect rear spindle assembly to trailing link assembly.
Tightening torque:
113±15 N⋅m (11.5±1.5 kg-m, 83±11 ft-lb)
CAUTION:
Use a new self-locking nut.
Disc brake: Perform steps 4) through 6).
4) Connect end of parking brake cable.
5) Install disc rotor to hub unit.
6) Install disc brake assembly to back plate.
Tightening torque:
52±6 N⋅m (5.3±0.6 kg-m, 38.3±4.3 ft-lb)
Drum brake: Perform steps 7) through 10).
7) Completely clean brake pipe connection. Using a flare-
nut wrench, connect brake pipe to wheel cylinder.
8) Connect parking brake cable to lever.
9) Install brake drum on hub unit.
10) Bleed air from brake system.
11) Tighten axle nut using a socket wrench, and lock
securely.
27
4-2SERVICE PROCEDURE
3. Rear Axle (FWD Model)