Page 6 of 198

1 Instruments and controls
Meters and gauges ............................................ 1-2
Speedometer and odometer .............................. 1-3
Tachometer (If so equipped) .............................. 1-3
Engine coolant temperature gauge .................... 1-4
Fuel gauge ......................................................... 1-4
Instrument cluster clock (If so equipped) ........... 1-5
Warning/indicator lights and chimes .................. 1-6
Headlight and turn signal switch ...................... 1-10
Windshield wiper and washer switch ............... 1-11
Instrument brightness control ........................... 1-12
Hazard warning flasher switch ......................... 1-12
Cigarette lighter (accessory) and ash tray ....... 1-13
Cup holder (If so equipped) ............................. 1-13
Interior light and cargo light ............................. 1-14
Map light (If so equipped) ................................ 1-14
Manual window ................................................. 1-15
Power window (If so equipped) ........................ 1-15
Rear sliding window (If so equipped) ............... 1-16
Opera window (If so equipped) ........................ 1-17
Sunroof (If so equipped) .................................. 1-17
ZX
Page 10 of 198
The digital clock displays time regardless of
ignition switch position. When the ignition
key is in the ACC or ON position, the clock
illuminates.
Adjusting the time
Turn the adjust knob counterclockwise to
advance the hour display.
Turn the adjust knob clockwise to advance
the minute display.
Resetting the time
To reset the time to the time signal, push the
adjust knob.
For example, if the adjust knob is depressed
while the time is between 8:00 and 8:29, the
display resets to 8:00. If depressed while it
is between 8:30 and 8:59, the display resets
to 9:00.
Once the power supply is disconnected, the
clock starts to operate from the time 1:00. It
may be necessary to adjust the time.
SIC0047A
INSTRUMENT CLUSTER CLOCK
(If so equipped)
1-5
ZX
Page 11 of 198
Turn signal/hazard indicator lightsLow washer fluid warning lightSupplemental air bag warning light
orBrake warning light4-wheel drive indicator light
High beam indicator light``CRUISE'' indicator light
Seat belt reminder light and chimeOverdrive off indicator light
Engine oil pressure warning lightDoor open warning light
Charge warning lightMalfunction indicator light
Low fuel warning lightorRear anti-lock brake
warning light
Checking bulbs
Apply the parking brake and turn the ignition
key to ON without starting the engine. The
following lights come on:
,,,or,
The following lights come on briefly and
then go off:
or,,
If any light fails to come on, it may indicate
a burned-out bulb or an open circuit in the
electrical system. Have the system repaired
promptly.
Turn signal/hazard indicator
lights
These lights flash when the turn signal
switch or hazard switch is turned on.
WARNING/INDICATOR
LIGHTS AND CHIMES
1-6
ZX
Page 15 of 198

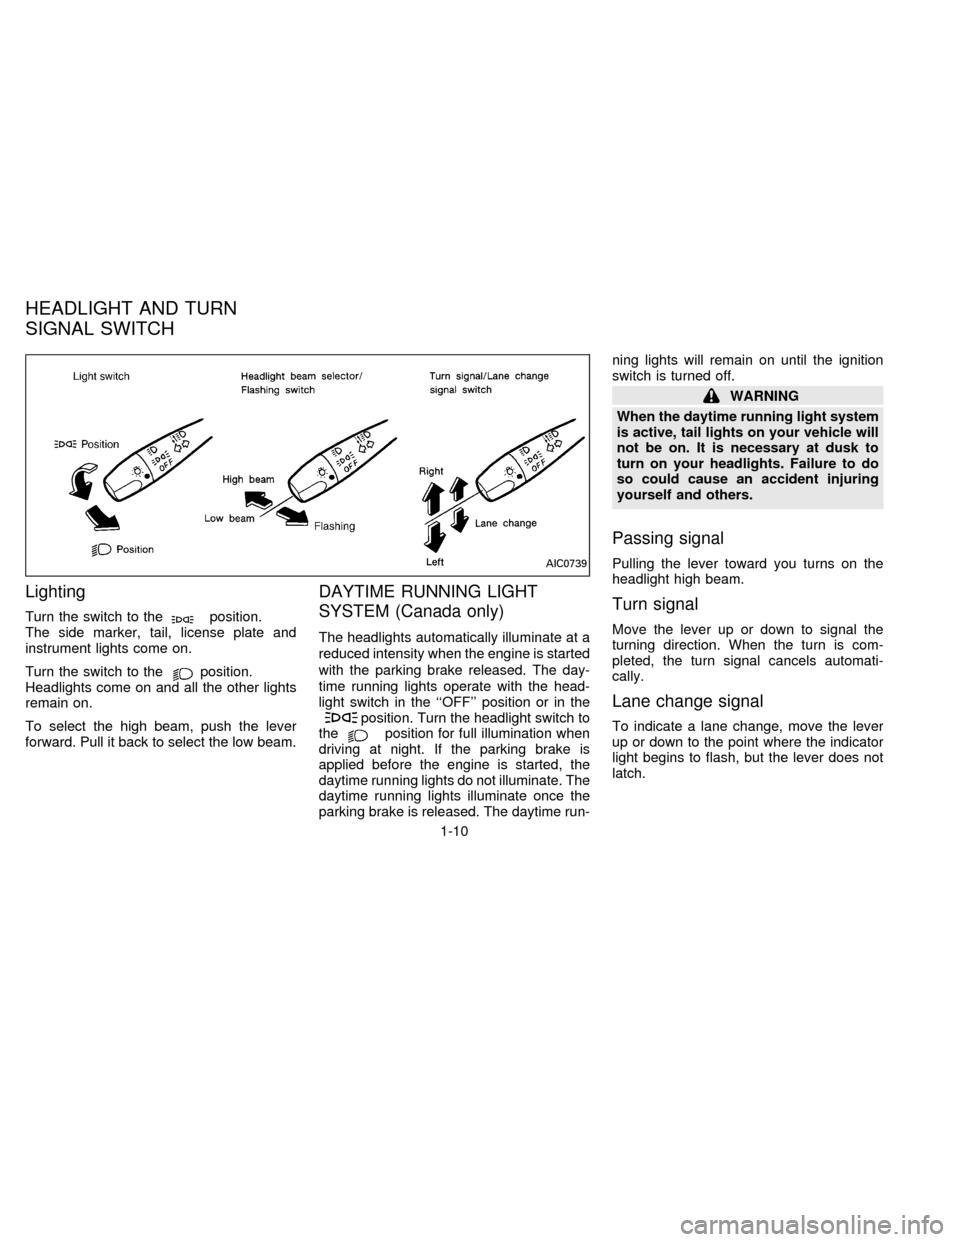
Lighting
Turn the switch to theposition.
The side marker, tail, license plate and
instrument lights come on.
Turn the switch to the
position.
Headlights come on and all the other lights
remain on.
To select the high beam, push the lever
forward. Pull it back to select the low beam.
DAYTIME RUNNING LIGHT
SYSTEM (Canada only)
The headlights automatically illuminate at a
reduced intensity when the engine is started
with the parking brake released. The day-
time running lights operate with the head-
light switch in the ``OFF'' position or in the
position. Turn the headlight switch to
theposition for full illumination when
driving at night. If the parking brake is
applied before the engine is started, the
daytime running lights do not illuminate. The
daytime running lights illuminate once the
parking brake is released. The daytime run-ning lights will remain on until the ignition
switch is turned off.
WARNING
When the daytime running light system
is active, tail lights on your vehicle will
not be on. It is necessary at dusk to
turn on your headlights. Failure to do
so could cause an accident injuring
yourself and others.
Passing signal
Pulling the lever toward you turns on the
headlight high beam.
Turn signal
Move the lever up or down to signal the
turning direction. When the turn is com-
pleted, the turn signal cancels automati-
cally.
Lane change signal
To indicate a lane change, move the lever
up or down to the point where the indicator
light begins to flash, but the lever does not
latch.
AIC0739
HEADLIGHT AND TURN
SIGNAL SWITCH
1-10
ZX
Page 17 of 198
The instrument brightness control operates
when the light switch is in theorposition.
Turn the control to adjust the brightness of
the instrument panel lights.Push the switch on to warn other drivers
when you must stop or park under emer-
gency conditions. All turn signal lights flash.
WARNING
cWhen stalled or stopped on the road-
way under emergency conditions,
move the vehicle well off the road.cDo not use the hazard warning flash-
ers while moving on the highway
unless unusual circumstances force
you to drive so slowly that your ve-
hicle might become a hazard to other
traffic.
cSome state laws may prohibit the
use of the hazard warning flasher
switch while driving.
cTurn signals do not work when the
hazard warning flasher lights are on.
The flasher can be actuated with the ignition
switch in any position.
SIC0052SIC0050
INSTRUMENT BRIGHTNESS
CONTROLHAZARD WARNING FLASHER
SWITCH
1-12
ZX
Page 63 of 198
To turn the radio on, turn the ignition key to
ACC or ON. If you listen to the radio with the
engine not running, turn the key to the ACC
position.
Radio reception is affected by station signal
strength, distance from radio transmitter,
buildings, bridges, mountains and other ex-
ternal influences. Intermittent changes in
reception quality normally are caused by
these external influences.
AHA0606
RADIO
3-10
ZX
Page 64 of 198

AM-FM ELECTRONIC TUNING
RADIO WITH CASSETTE
PLAYER
RADIO OPERATION
Push the ON-OFF/VOL knob to turn the
radio on. Push the ON-OFF/VOL button
once more to turn the radio off.
Turn the ON-OFF/VOL knob to adjust the
volume.
Inserting a cassette tape into the cassette
player while the radio is on turns the radio
off and turns the cassette player on.
Pushing the ON-OFF/VOL knob while the
cassette tape is playing turns the cassette
player off.
Clock Operation
By pressing the CLOCK button, you can
alternate the clock and the radio/cassette
tape options in the display.
Clock Set
Depressing the CLOCK and thebut-
tons together sets hours. Depressing the
CLOCK and
buttons together sets min-
utes.
Clock Priority Mode
In this mode the clock is shown in the
display. If any radio or cassette tape func-
tions are activated, the radio (or cassette
tape) display illuminates for ten seconds
then returns to the clock mode.
NOTE:
After clock adjustment, the radio is in the
clock priority mode.
Radio/cassette tape priority mode
In this mode, the radio station illuminates in
the display during radio operation. During
cassette tape operation, TAPE illuminates
in the display.
Selecting the desired band
Push the band select button (FM/AM) to
change from AM to FM reception.
The stereo indicator illuminates during FM
stereo reception. When the stereo broad-cast signal is weak, the radio automatically
changes from stereo to monaural reception.
Tuning
WARNING
The radio should not be tuned while
driving in order that full attention may
be given to the driving operation.
Manual tuning
Push down either manual tuning button
or.
SEEK tuning
Push the SEEK/SCAN tuning button
for less than 1.5 seconds. SEEK tun-
ing begins from low to high frequencies and
stops at the next broadcasting station. Push
the button again for less than 1.5 seconds,
and the next highest broadcasting station is
tuned. Once the highest broadcasting sta-
tion is reached, the radio continues in the
SEEK mode at the lowest broadcast station.
SCAN tuning
Push the SEEK/SCAN tuning button
for more than 1.5 seconds. SCAN
3-11
ZX
Page 107 of 198

If you have a flat tire, follow the instructions
below:
Stopping the vehicle
1. Safely move the vehicle off the road
away from traffic.
2. Turn on the hazard warning flashers.
3. Park on a level surface and apply the
parking brake. Shift the manual transmis-
sion into Reverse (R) (automatic trans-
mission in P).
WARNING
The transfer control lever must
be in the 2H, 4H or 4L position.
Never place it in the N position. Other-
wise, the vehicle could roll unexpect-
edly even if the manual transmission is
in gear.
4. Turn off the engine.
WARNING
cMake sure that the parking brake is
securely applied and the manual
transmission is shifted into Reverse
(R) (automatic transmission in P).
cNever change tires when the vehicle
is on a slope, ice or a slippery area.
This is dangerous.
cNever change tires if oncoming traf-
fic is close to your vehicle. Wait for
professional road assistance.
cRaise the hood to warn other traffic
and to signal professional road as-
sistance personnel that you require
assistance.
cHave all passengers get out of the
vehicle and stand in a safe place
away from traffic and clear of the
vehicle.
Blocking wheels
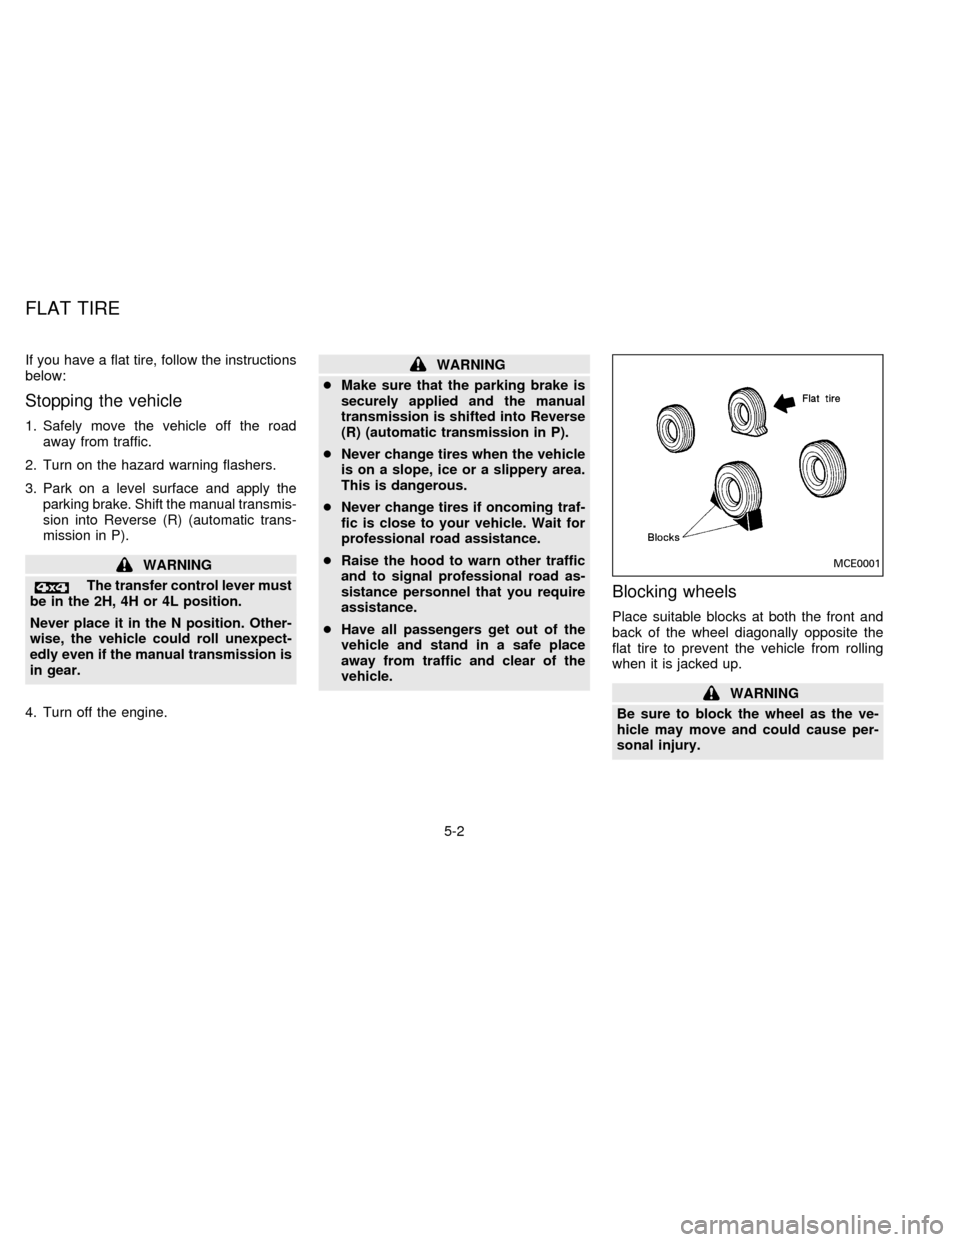
Place suitable blocks at both the front and
back of the wheel diagonally opposite the
flat tire to prevent the vehicle from rolling
when it is jacked up.
WARNING
Be sure to block the wheel as the ve-
hicle may move and could cause per-
sonal injury.
MCE0001
FLAT TIRE
5-2
ZX