1996 NISSAN FRONTIER flat tire
[x] Cancel search: flat tirePage 80 of 198
2) Turn the ignition key slightly in the ON
direction.
3) Turn the key toward the LOCK position.
4) Remove the key.
The shift lever is designed so it cannot be
moved out of P and into any of the other
gear positions if the ignition key is turned to
OFF or if the key is removed from the
switch.The shift lever can be moved if the
ignition switch is in the ACC position.
The shift lever can also be moved if the
ignition switch is in the ON position and
the foot brake pedal is depressed.
WARNING
cTo lock the steering wheel, remove
the key. To unlock the steering
wheel, insert the key and turn it gen-
tly while rotating the steering wheel
slightly right and left.
cNever remove the key while driving.
If the key is removed, the steering
wheel will lock. This may cause the
driver to lose control of the vehicle
and could result in serious vehicle
damage or personal injury.
Key positions
LOCK Normal parking position (0)
OFF (Manual transmission model) (1)
The engine can be turned off without locking
the steering wheel. When removing the key
from the key cylinder, push the key release
button at this position and turn the key to
LOCK.
ACC (Accessories) (2)
This position activates electrical accesso-
ries such as the radio when the engine is
not running.
ON (Normal operating position) (3)
This position turns on the ignition system
and electrical accessories.
START (4)
This position starts the engine. As soon as
the engine has started, release the key. It
automatically returns to the ON position.cMake sure the area around the vehicle is
clear.
cCheck fluid levels such as engine oil,
coolant, brake and clutch fluid, and win-
dow washer fluid as frequently as pos-
sible, at least whenever you refuel.
cCheck that all windows and lights are
clean.
cVisually inspect tires for their appearance
and condition. Also check tires for proper
inflation.
cLock all doors.
cPosition seat and adjust head restraints.
cAdjust inside and outside mirrors.
cFasten seat belts and ask all passengers
to do likewise.
cCheck the operation of warning lights
when key is turned to the ON (3) position.
BEFORE STARTING THE
ENGINE
4-5
ZX
Page 89 of 198
cKeep your engine tuned up.
cFollow the recommended periodic main-
tenance schedule.
cKeep the tires inflated at the correct
pressure. Low pressure increases tire
wear and wastes fuel.
cKeep the front wheels in correct align-
ment. Improper alignment increases tire
wear and lowers fuel economy.
cAir conditioner operation lowers fuel
economy. Use the air conditioner only
when necessary.
cWhen cruising at highway speeds, it is
more economical to use the air condi-
tioner and leave the windows closed to
reduce drag.
c
Use 4H or 4L position only when neces-
sary. 4-wheel drive operation lowers fuel
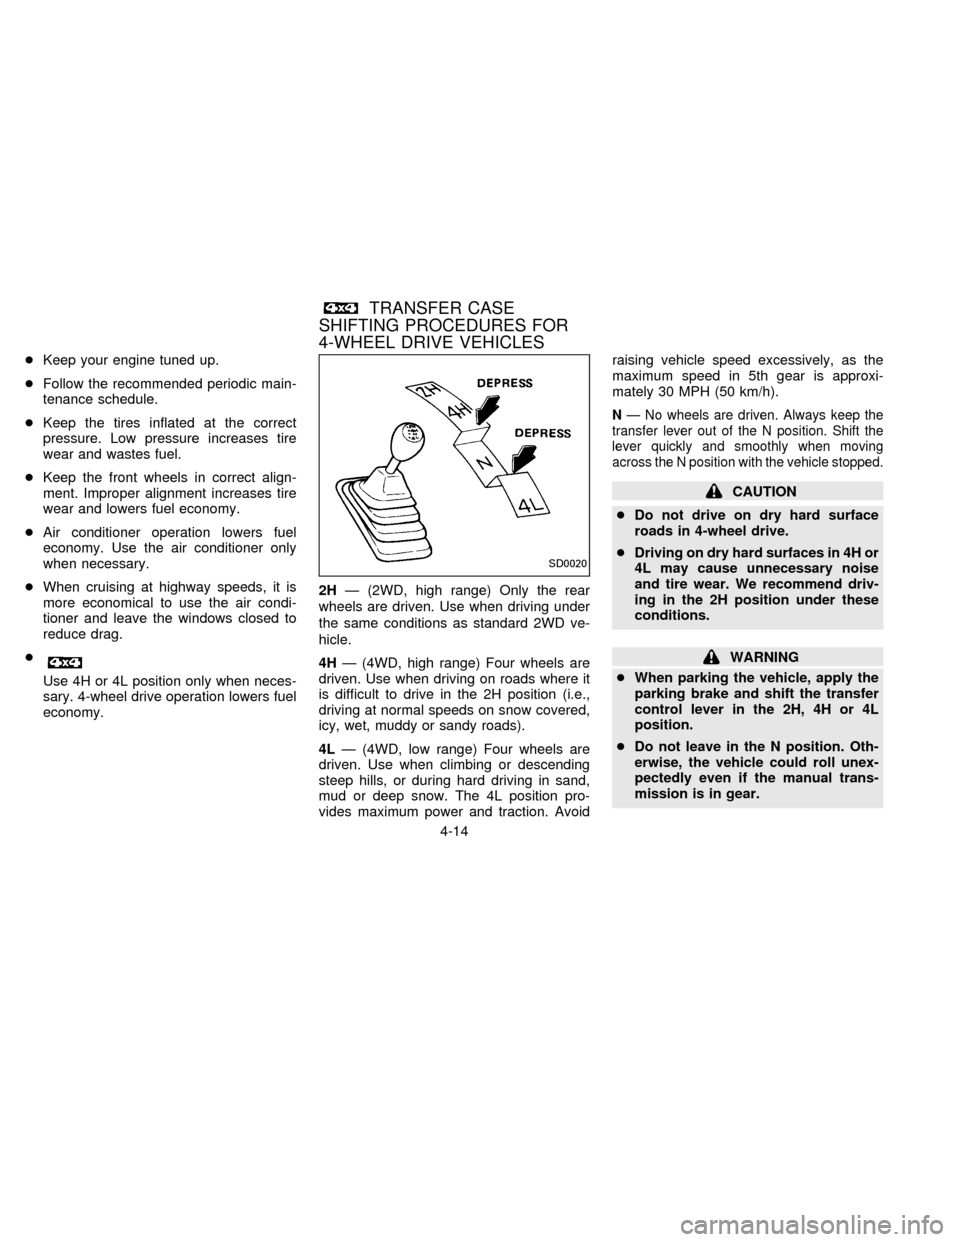
economy.2HÐ (2WD, high range) Only the rear
wheels are driven. Use when driving under
the same conditions as standard 2WD ve-
hicle.
4HÐ (4WD, high range) Four wheels are
driven. Use when driving on roads where it
is difficult to drive in the 2H position (i.e.,
driving at normal speeds on snow covered,
icy, wet, muddy or sandy roads).
4LÐ (4WD, low range) Four wheels are
driven. Use when climbing or descending
steep hills, or during hard driving in sand,
mud or deep snow. The 4L position pro-
vides maximum power and traction. Avoidraising vehicle speed excessively, as the
maximum speed in 5th gear is approxi-
mately 30 MPH (50 km/h).
NÐ No wheels are driven. Always keep the
transfer lever out of the N position. Shift the
lever quickly and smoothly when moving
across the N position with the vehicle stopped.
CAUTION
cDo not drive on dry hard surface
roads in 4-wheel drive.
cDriving on dry hard surfaces in 4H or
4L may cause unnecessary noise
and tire wear. We recommend driv-
ing in the 2H position under these
conditions.
WARNING
cWhen parking the vehicle, apply the
parking brake and shift the transfer
control lever in the 2H, 4H or 4L
position.
cDo not leave in the N position. Oth-
erwise, the vehicle could roll unex-
pectedly even if the manual trans-
mission is in gear.
SD0020
TRANSFER CASE
SHIFTING PROCEDURES FOR
4-WHEEL DRIVE VEHICLES
4-14
ZX
Page 99 of 198
Tire inflation pressure
Periodically check the pressure in all tires,
including the spare, with a gauge. Adjust to
the specified pressure if necessary. Tire
pressures are shown on the tire placard
affixed to the glove box.
Tire chain
Tire chains must be installed only on the
rear wheels and not on the front wheels.
Do not drive with tire chains on paved roads
which are clear of snow. Driving with chains
in such conditions can cause damage to the
various mechanisms of the vehicle due to
some overstress. When driving on clear
paved roads, be sure to change to 2WD.
CAUTION
Do not park the vehicle over flammable
materials such as dry grass, waste pa-
per or rags, as they may burn easily.
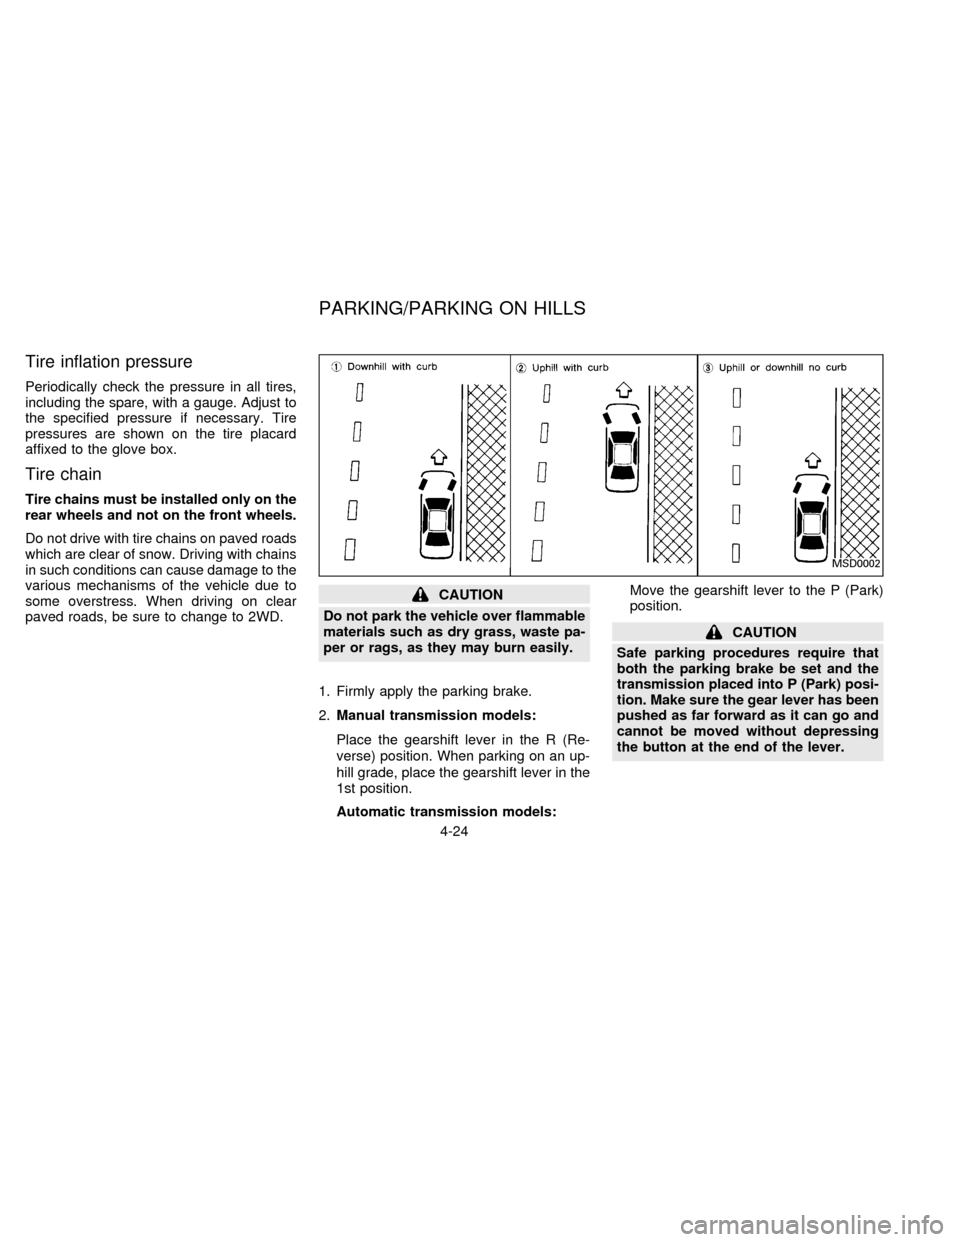
1. Firmly apply the parking brake.
2.Manual transmission models:
Place the gearshift lever in the R (Re-
verse) position. When parking on an up-
hill grade, place the gearshift lever in the
1st position.
Automatic transmission models:Move the gearshift lever to the P (Park)
position.
CAUTION
Safe parking procedures require that
both the parking brake be set and the
transmission placed into P (Park) posi-
tion. Make sure the gear lever has been
pushed as far forward as it can go and
cannot be moved without depressing
the button at the end of the lever.
MSD0002
PARKING/PARKING ON HILLS
4-24
ZX
Page 103 of 198

before operating the vehicle. For details,
see ``Changing Engine Coolant'' in the ``Do-
it-yourself operations'' section.
Tire equipment
1. SUMMER tires are of a tread design to
provide superior performance on dry
pavement. However, the performance of
these tires will be substantially reduced
in snowy and icy conditions. If you oper-
ate your vehicle on snowy or icy roads,
NISSAN recommends the use on all four
wheels of MUD & SNOW or ALL SEA-
SON tires. Please consult your NISSAN
dealer for the tire type, size, speed rating
and availability information.
2. For additional traction on icy roads, stud-
ded tires may be used. However, some
provinces and states prohibit their use.
Check local, state and provincial laws
before installing studded tires.
Skid and traction capabilities of studded
snow tires, on wet or dry surfaces, may
be poorer than that of non-studded snow
tires.
3. Tire chains may be used if desired. Use
of tire chains may be prohibited accord-
ing to location. Check the local lawsbefore installing tire chains. When install-
ing tire chains, make sure they are of
proper size for the tires on your vehicle
and are installed according to the chain
manufacturer's suggestions.Use only
SAE Class ``S'' chains.Other types
may damage your vehicle. Use chain
tensioners when recommended by the
tire chain manufacturer to ensure a tight
fit. Loose end links of the tire chain must
be secured or removed to prevent the
possibility of whipping action damage to
the fenders or undercarriage. If possible,
avoid fully loading your vehicle when
using tire chains. In addition, drive at a
reduced speed, otherwise, your vehicle
may be damaged and/or vehicle handling
and performance may be adversely af-
fected. Never install tire chains on a
TEMPORARY USE ONLY spare tire. Do
not use tire chains on dry roads.
Special winter equipment
It is recommended that the following items
be carried in the vehicle during winter:
1. A scraper and stiff-bristled brush to re-
move ice and snow from the windows
and wiper blades.2. A sturdy, flat board to be placed under
the jack to give it firm support.
3. A shovel to dig the vehicle out of snow-
drifts.
4. Extra window washer fluid to refill the
reservoir tank.
Driving on snow or ice
cWet ice (32ÉF, 0ÉC and freezing rain),
very cold snow, or ice can be slick and
very hard to drive on. The vehicle will
have a lot less traction or ``grip'' under
these conditions. Try to avoid driving
on wet ice until the road is salted or
sanded.
cWhatever the condition, drive with
caution and accelerate gently. If accel-
erated too fast, the drive wheels will
spin and will lose even more traction.
cAllow more stopping distance under
these conditions. Braking should be
started sooner than on dry pavement.
cAllow greater following distances on
slippery roads.
cWatch for slippery spots (glare ice).
These may appear on an otherwise
4-28
ZX
Page 106 of 198

5 In case of emergency
Flat tire ............................................................... 5-2
Pantograph type jack ......................................... 5-5
Screw type jack .................................................. 5-6
Jump starting ...................................................... 5-8
Push starting ...................................................... 5-9
If your vehicle overheats .................................... 5-9
Tow truck towing .............................................. 5-10
Vehicle recovery ............................................... 5-12
ZX
Page 107 of 198
If you have a flat tire, follow the instructions
below:
Stopping the vehicle
1. Safely move the vehicle off the road
away from traffic.
2. Turn on the hazard warning flashers.
3. Park on a level surface and apply the
parking brake. Shift the manual transmis-
sion into Reverse (R) (automatic trans-
mission in P).
WARNING
The transfer control lever must
be in the 2H, 4H or 4L position.
Never place it in the N position. Other-
wise, the vehicle could roll unexpect-
edly even if the manual transmission is
in gear.
4. Turn off the engine.
WARNING
cMake sure that the parking brake is
securely applied and the manual
transmission is shifted into Reverse
(R) (automatic transmission in P).
cNever change tires when the vehicle
is on a slope, ice or a slippery area.
This is dangerous.
cNever change tires if oncoming traf-
fic is close to your vehicle. Wait for
professional road assistance.
cRaise the hood to warn other traffic
and to signal professional road as-
sistance personnel that you require
assistance.
cHave all passengers get out of the
vehicle and stand in a safe place
away from traffic and clear of the
vehicle.
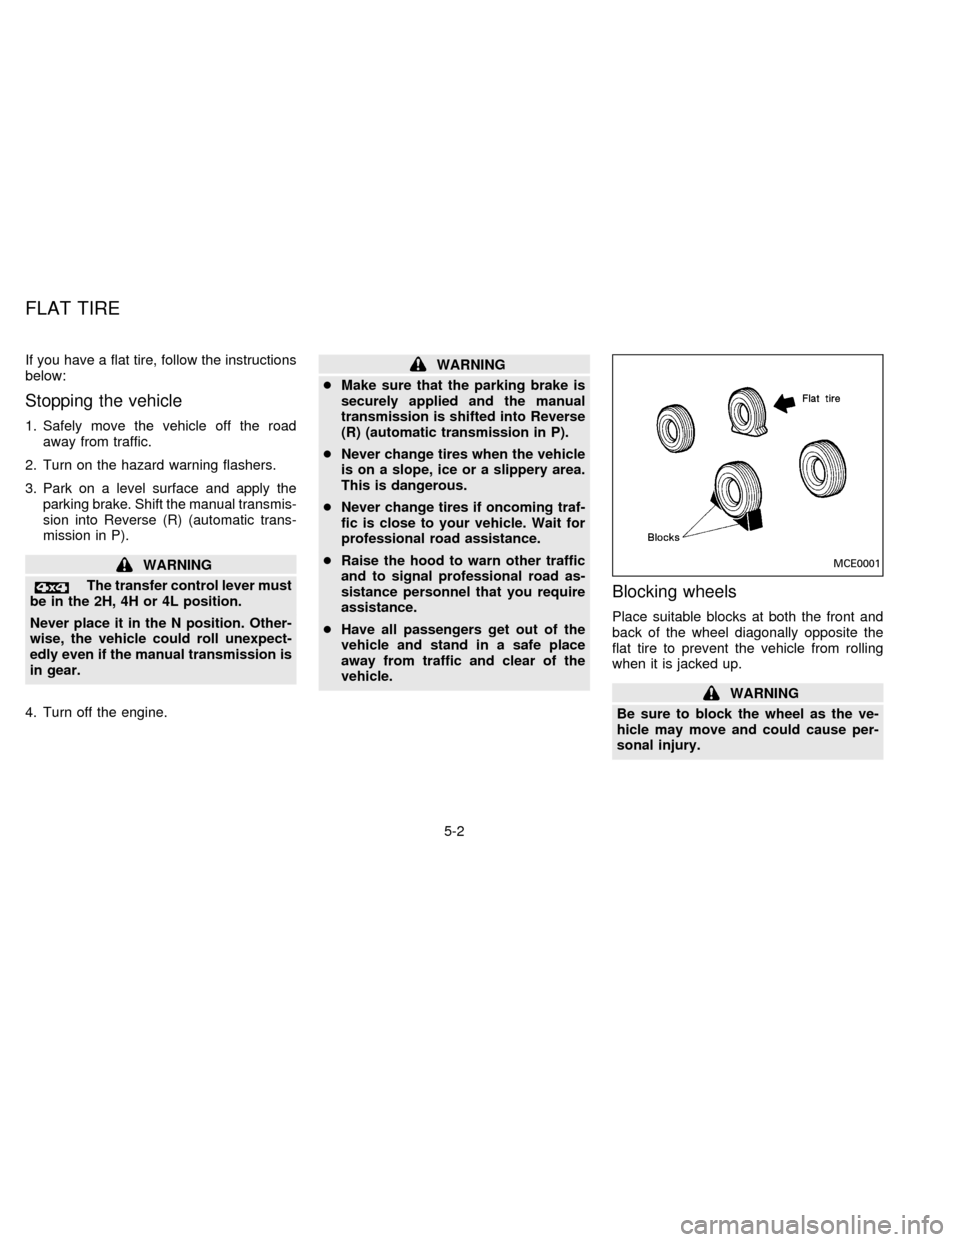
Blocking wheels
Place suitable blocks at both the front and
back of the wheel diagonally opposite the
flat tire to prevent the vehicle from rolling
when it is jacked up.
WARNING
Be sure to block the wheel as the ve-
hicle may move and could cause per-
sonal injury.
MCE0001
FLAT TIRE
5-2
ZX
Page 110 of 198

Jacking up the vehicle and remov-
ing the wheel
Identify the type of jack supplied with
your truck.
You will find one of two types of jacks
installed in your vehicle, a pantograph (scis-
sor) type jack or a screw (bottle) type jack.
Always refer to the proper illustrations for
the correct placement and jack-up points for
your specific vehicle model and jack type.
To help avoid personal injury, carefully
read the following instructions.1. On 4-wheel drive models with a screw
type jack, put the adapter stored in the
tool bag on the jack when jacking up the
front side.
Do not use the jack adapter for the
rear.
2. Place the jack directly under the jack-up
point.
The jack should be used on level, firm
ground.
3. Loosen each wheel nut on the flat tire
one or two turns by turning counterclock-
wise with the wheel nut wrench.Do not remove the wheel nuts until the
tire is off the ground.
4. Carefully raise the vehicle until the flat
tire clears the ground. Remove the wheel
nuts, and then remove the wheel. Do not
remove the brake drum with the wheel.
ACE0700
PANTOGRAPH TYPE JACK
5-5
ZX
Page 112 of 198
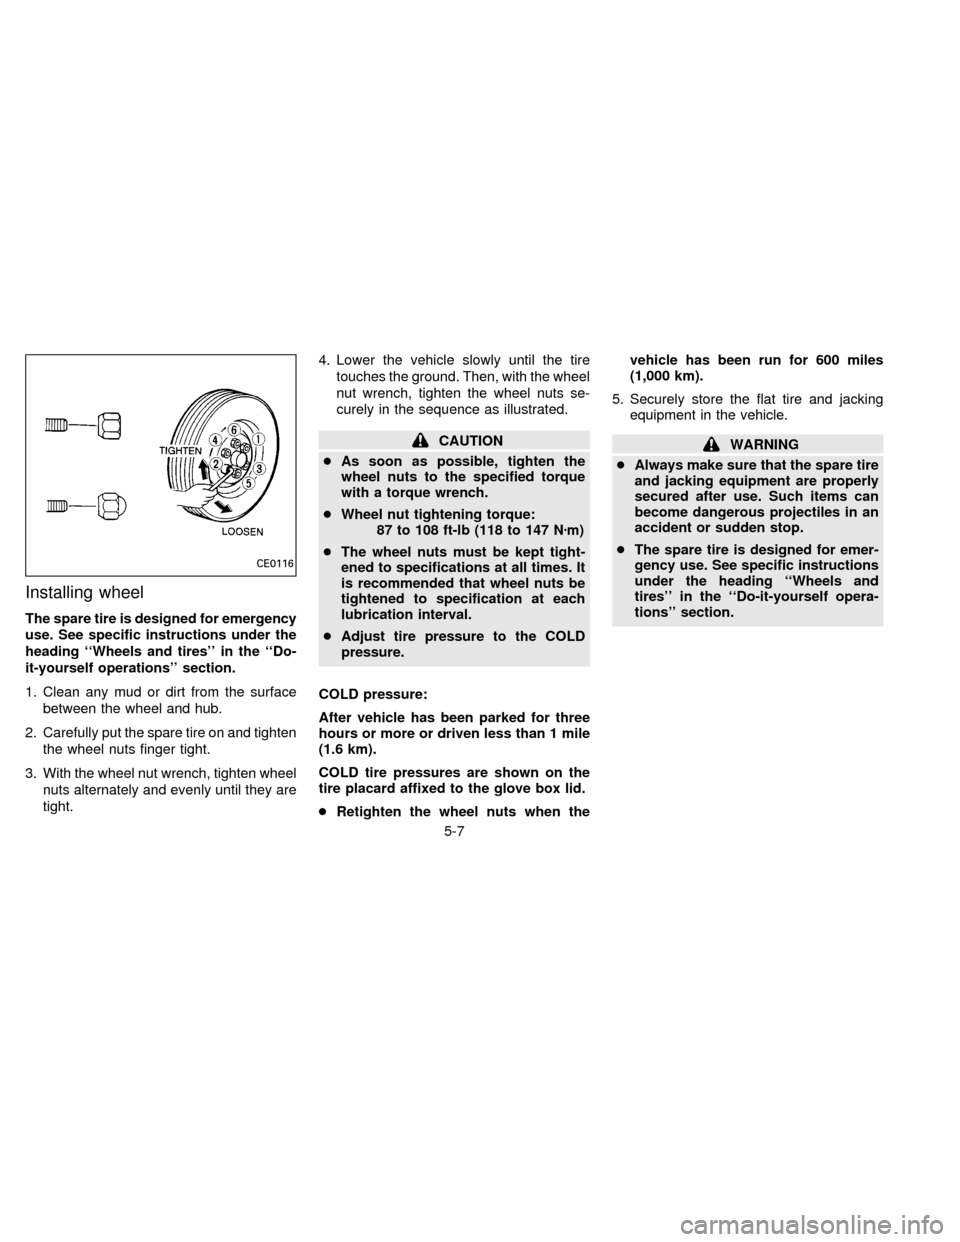
Installing wheel
The spare tire is designed for emergency
use. See specific instructions under the
heading ``Wheels and tires'' in the ``Do-
it-yourself operations'' section.
1. Clean any mud or dirt from the surface
between the wheel and hub.
2. Carefully put the spare tire on and tighten
the wheel nuts finger tight.
3. With the wheel nut wrench, tighten wheel
nuts alternately and evenly until they are
tight.4. Lower the vehicle slowly until the tire
touches the ground. Then, with the wheel
nut wrench, tighten the wheel nuts se-
curely in the sequence as illustrated.
CAUTION
cAs soon as possible, tighten the
wheel nuts to the specified torque
with a torque wrench.
cWheel nut tightening torque:
87 to 108 ft-lb (118 to 147 Nzm)
cThe wheel nuts must be kept tight-
ened to specifications at all times. It
is recommended that wheel nuts be
tightened to specification at each
lubrication interval.
cAdjust tire pressure to the COLD
pressure.
COLD pressure:
After vehicle has been parked for three
hours or more or driven less than 1 mile
(1.6 km).
COLD tire pressures are shown on the
tire placard affixed to the glove box lid.
cRetighten the wheel nuts when thevehicle has been run for 600 miles
(1,000 km).
5. Securely store the flat tire and jacking
equipment in the vehicle.WARNING
cAlways make sure that the spare tire
and jacking equipment are properly
secured after use. Such items can
become dangerous projectiles in an
accident or sudden stop.
cThe spare tire is designed for emer-
gency use. See specific instructions
under the heading ``Wheels and
tires'' in the ``Do-it-yourself opera-
tions'' section.
CE0116
5-7
ZX