1996 NISSAN ALTIMA stop start
[x] Cancel search: stop startPage 2 of 183

Welcome To The World Of NISSAN
Your new Nissan is the result of our dedication to
produce the finest in safe, reliable and economi-
cal transportation. Your vehicle is the product of
a successful worldwide company that manufac-
tures cars and trucks in over 20 countries and
distributes them in 150 nations.
Nissan vehicles are designed and manufactured
by Nissan Motor Co., Ltd. which was founded in
Tokyo, Japan in 1933, and Nissan affiliates world
wide, collectively growing to become the fourth
largest automaker in the world. In addition to cars
and trucks, Nissan also makes textile machinery,
forklift trucks, marine engines, boats and other
products.
Nissan has made a substantial and growing
investment in North America, starting with the
opening of Nissan Motor Corporation in U.S.A. in
1960, continuing with the production of some
cars and trucks at one of the world's mostmodern manufacturing facilities in Smyrna, Ten-
nessee, vehicle styling at Nissan Design Interna-
tional in San Diego, California, and engineering
at Nissan Research and Development in Farm-
ington Hills, Michigan.
Nissan Motor Corporation in U.S.A. and its deal-
ers employ about 50,000 Americans.
Nissan is also a substantial contributor to the
Canadian economy. Nissan Canada Inc. and its
200 dealers and suppliers employ approximately
4,000 people. These include company employ-
ees and the staffs of Nissan dealers all across
Canada. In addition, many Canadians work for
companies that supply Nissan and Nissan deal-
ers with materials and services ranging from the
operation of port facilities and transportation ser-
vices, to the supply of lubricants, parts and
accessories.Nissan pioneered the use of electronics and
computers in automobiles, and has led the indus-
try in improving both performance and fuel effi-
ciency through new engine designs and the use
of synthetic materials to reduce vehicle weight.
The company has also developed ways to build
quality into its vehicles at each stage of the
production process, both through extensive use
of automation and Ð most importantly Ð
through an awareness thatpeopleare the cen-
tral element in quality control.
From the time the parts arrived from our suppli-
ers until you took delivery of your new Nissan,
dozens of checks were made to ensure that only
the best job was being done in producing and
delivering your vehicle. Nissan also takes great
care to ensure that when you take your Nissan to
your dealer for maintenance, the service techni-
cian will perform his work according to the quality
standards that have been established by the
factory.
Safety has also been built into your Nissan. As
you know, seat belts are an integral part of the
safety systems that will help protect you and your
passengers in the event of a sudden stop or an
accident. We urge you to use the belts every time
you drive the vehicle.
The Nissan story of growth and achievement
reflects our major goal: to provide you, our
customer, with a vehicle that is built with quality
and craftsmanship Ð a product that we can be
proud to build and you can be proud to own.
AFW0001
The inside pages of this manual contain
a minimum of 50% recycled fibers,
including 10% post-consumer fibers.
ZX
Page 10 of 183
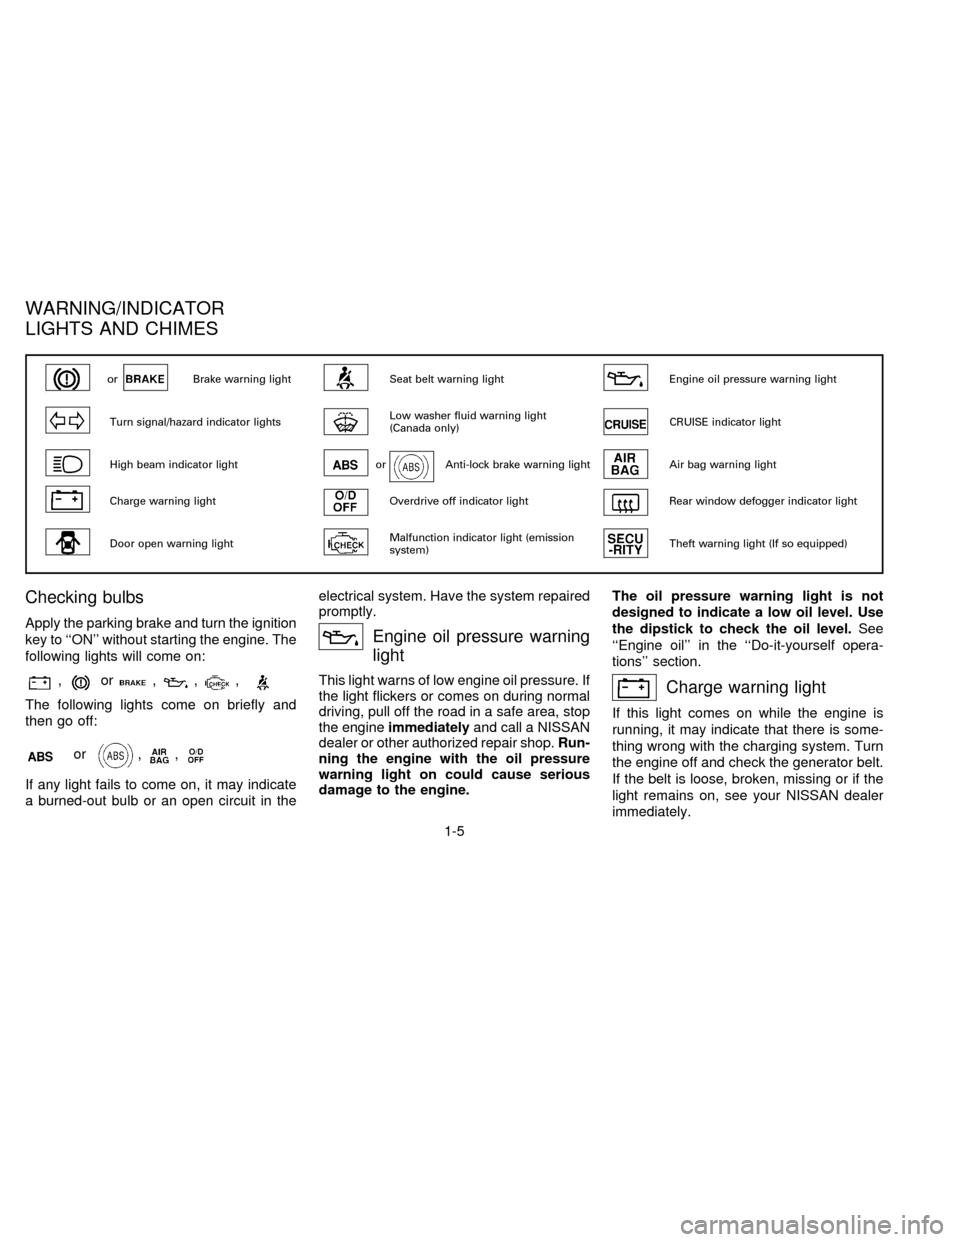
Checking bulbs
Apply the parking brake and turn the ignition
key to ``ON'' without starting the engine. The
following lights will come on:
,or,,,
The following lights come on briefly and
then go off:
or,,
If any light fails to come on, it may indicate
a burned-out bulb or an open circuit in theelectrical system. Have the system repaired
promptly.
Engine oil pressure warning
light
This light warns of low engine oil pressure. If
the light flickers or comes on during normal
driving, pull off the road in a safe area, stop
the engineimmediatelyand call a NISSAN
dealer or other authorized repair shop.Run-
ning the engine with the oil pressure
warning light on could cause serious
damage to the engine.The oil pressure warning light is not
designed to indicate a low oil level. Use
the dipstick to check the oil level.See
``Engine oil'' in the ``Do-it-yourself opera-
tions'' section.Charge warning light
If this light comes on while the engine is
running, it may indicate that there is some-
thing wrong with the charging system. Turn
the engine off and check the generator belt.
If the belt is loose, broken, missing or if the
light remains on, see your NISSAN dealer
immediately.
orBrake warning lightSeat belt warning lightEngine oil pressure warning light
Turn signal/hazard indicator lightsLow washer fluid warning light
(Canada only)CRUISE indicator light
High beam indicator lightorAnti-lock brake warning lightAir bag warning light
Charge warning lightOverdrive off indicator lightRear window defogger indicator light
Door open warning lightMalfunction indicator light (emission
system)Theft warning light (If so equipped)
WARNING/INDICATOR
LIGHTS AND CHIMES
1-5
ZX
Page 11 of 183
CAUTION
Do not continue driving if the belt is
loose, broken or missing.
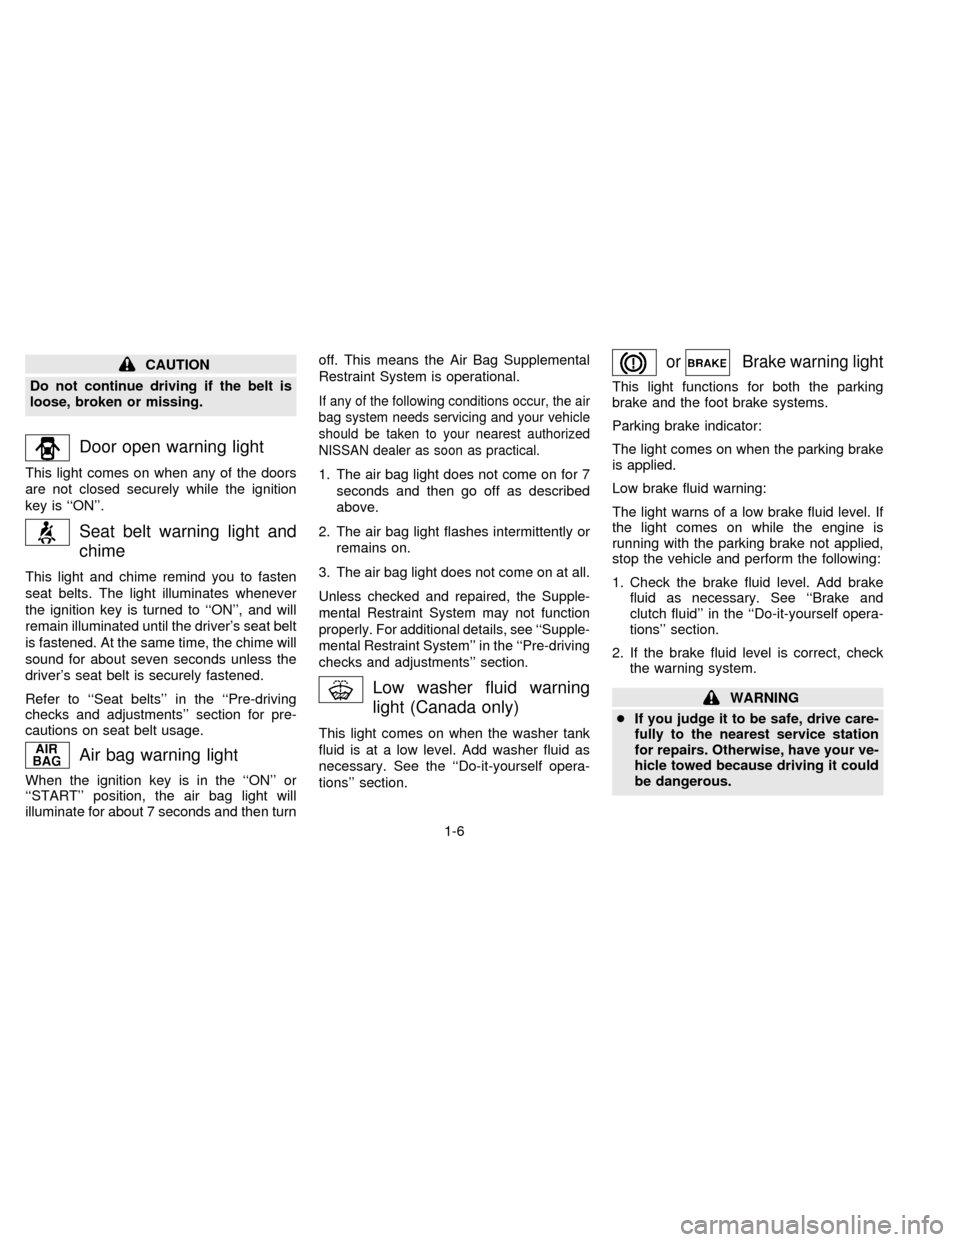
Door open warning light
This light comes on when any of the doors
are not closed securely while the ignition
key is ``ON''.
Seat belt warning light and
chime
This light and chime remind you to fasten
seat belts. The light illuminates whenever
the ignition key is turned to ``ON'', and will
remain illuminated until the driver's seat belt
is fastened. At the same time, the chime will
sound for about seven seconds unless the
driver's seat belt is securely fastened.
Refer to ``Seat belts'' in the ``Pre-driving
checks and adjustments'' section for pre-
cautions on seat belt usage.
Air bag warning light
When the ignition key is in the ``ON'' or
``START'' position, the air bag light will
illuminate for about 7 seconds and then turnoff. This means the Air Bag Supplemental
Restraint System is operational.
If any of the following conditions occur, the air
bag system needs servicing and your vehicle
should be taken to your nearest authorized
NISSAN dealer as soon as practical.
1. The air bag light does not come on for 7
seconds and then go off as described
above.
2. The air bag light flashes intermittently or
remains on.
3. The air bag light does not come on at all.
Unless checked and repaired, the Supple-
mental Restraint System may not function
properly. For additional details, see ``Supple-
mental Restraint System'' in the ``Pre-driving
checks and adjustments'' section.
Low washer fluid warning
light (Canada only)
This light comes on when the washer tank
fluid is at a low level. Add washer fluid as
necessary. See the ``Do-it-yourself opera-
tions'' section.
orBrake warning light
This light functions for both the parking
brake and the foot brake systems.
Parking brake indicator:
The light comes on when the parking brake
is applied.
Low brake fluid warning:
The light warns of a low brake fluid level. If
the light comes on while the engine is
running with the parking brake not applied,
stop the vehicle and perform the following:
1. Check the brake fluid level. Add brake
fluid as necessary. See ``Brake and
clutch fluid'' in the ``Do-it-yourself opera-
tions'' section.
2. If the brake fluid level is correct, check
the warning system.
WARNING
cIf you judge it to be safe, drive care-
fully to the nearest service station
for repairs. Otherwise, have your ve-
hicle towed because driving it could
be dangerous.
1-6
ZX
Page 14 of 183

Theft warning system operation
The warning system will give the following
alarm:
cThe headlights blink and the horn sounds
intermittently. In addition, the starter mo-
tor will not operate.
cThe alarm automatically turns off after 2
to 3 minutes; however, the alarm will
reactivate if the vehicle is tampered with
again. The alarm can be shut off by
unlocking a door or trunk lid with the key.
The alarm is activated by:
cOpening the door or trunk lid without
using the key (even if the door is un-
locked by releasing the door inside lock
switch) or opening the trunk lid by oper-
ating the opener lever.
cOpening the hood.
cPushing in or pulling out of the key
cylinder on the door or trunk lid.
How to stop the alarm
The alarm will stop only by unlocking a door
or the trunk lid with the key. The alarm will
not stop if the ignition switch is turned to
``ACC'' or ``ON''.If the system does not operate as de-
scribed above, have it checked by your
NISSAN dealer.
Push the lever down to operate the wind-
shield wipers. Pull the lever toward you to
operate the washer.
Intermittent operation can be adjusted from
2 to approximately 20 seconds by turning
the knob (Type B only).
AIC0079
WINDSHIELD WIPER AND
WASHER SWITCH
1-9
ZX
Page 16 of 183
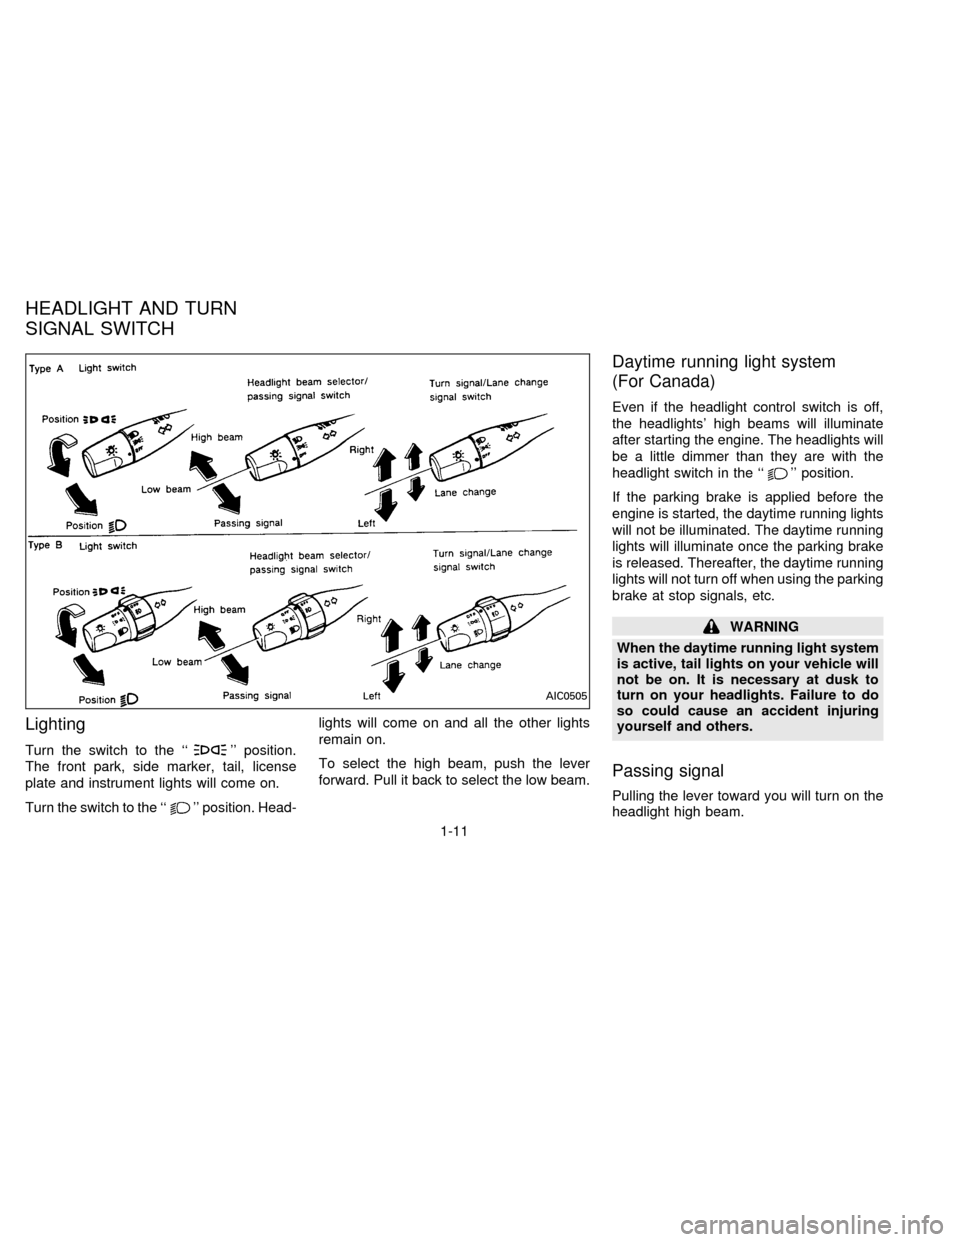
Lighting
Turn the switch to the ``'' position.
The front park, side marker, tail, license
plate and instrument lights will come on.
Turn the switch to the ``
'' position. Head-lights will come on and all the other lights
remain on.
To select the high beam, push the lever
forward. Pull it back to select the low beam.
Daytime running light system
(For Canada)
Even if the headlight control switch is off,
the headlights' high beams will illuminate
after starting the engine. The headlights will
be a little dimmer than they are with the
headlight switch in the ``
'' position.
If the parking brake is applied before the
engine is started, the daytime running lights
will not be illuminated. The daytime running
lights will illuminate once the parking brake
is released. Thereafter, the daytime running
lights will not turn off when using the parking
brake at stop signals, etc.
WARNING
When the daytime running light system
is active, tail lights on your vehicle will
not be on. It is necessary at dusk to
turn on your headlights. Failure to do
so could cause an accident injuring
yourself and others.
Passing signal
Pulling the lever toward you will turn on the
headlight high beam.
AIC0505
HEADLIGHT AND TURN
SIGNAL SWITCH
1-11
ZX
Page 20 of 183
WARNING
Avoid abrupt starting and braking
when the cup holder is being used to
prevent spilling the drink. If the liquid is
hot it can scald you or your passenger.
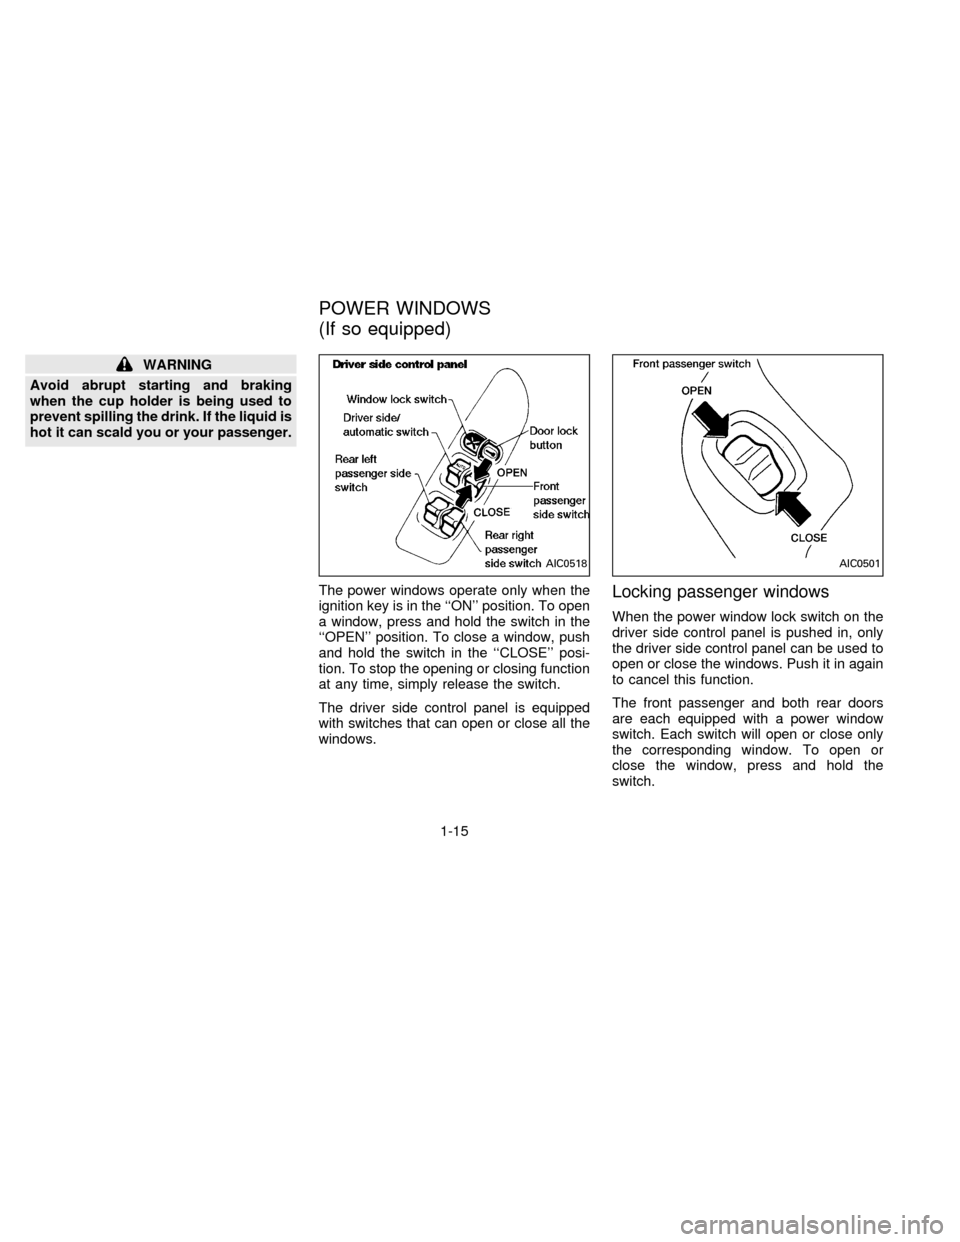
The power windows operate only when the
ignition key is in the ``ON'' position. To open
a window, press and hold the switch in the
``OPEN'' position. To close a window, push
and hold the switch in the ``CLOSE'' posi-
tion. To stop the opening or closing function
at any time, simply release the switch.
The driver side control panel is equipped
with switches that can open or close all the
windows.
Locking passenger windows
When the power window lock switch on the
driver side control panel is pushed in, only
the driver side control panel can be used to
open or close the windows. Push it in again
to cancel this function.
The front passenger and both rear doors
are each equipped with a power window
switch. Each switch will open or close only
the corresponding window. To open or
close the window, press and hold the
switch.
AIC0518AIC0501
POWER WINDOWS
(If so equipped)
1-15
ZX
Page 60 of 183
Ð Air flows from center and side
ventilators and foot outlets.
Ð Air flows mainly from foot outlets.
Ð Air flows from defroster outlets
and foot outlets.
Ð Air flows mainly from defroster
outlets.
Temperature control lever
This lever allows you to adjust the tempera-
ture of the outlet air.
Air recirculation button
OFF position:
Outside air is drawn into the passenger
compartment and distributed through the
selected outlet.
Use this position for normal heater or air
conditioning operation.
ON position (Indicator light on):
Interior air is recirculated inside the vehicle.
Push the air recirculation button to the ``ON''
position when driving on a dusty road or to
avoid traffic fumes and for maximum cooling
when using the air conditioning.
WARNING
Do not use the recirculation mode for
long periods as it may cause the inte-
rior air to become stale and the win-
dows to fog up.
Air conditioning button
(If so equipped)
This button is provided only on vehicles
equipped with air conditioning.
Start the engine, move the fan control dial to
the desired (1 to 4) position and push the
A/C button to turn on the air conditioning.
The indicator light will come on when the air
conditioning is on. To stop the air condition-
ing, push the switch again to return it to its
original position.
The air conditioning cooling function op-
erates only when the engine is running.
WARNING
Positioning of the heating or air condi-
tioning controls should not be done
while driving, in order that full attention
may be given to the driving operation.
HEATER OPERATION
Heating
This mode is used to direct heated air from
the floor outlets. Some air will also come
from the defrost vents.
1. Push the air recirculation button to the
``OFF'' position for normal heating.
2. Push the ``
'' button in.
3. Move the fan control dial to the desired
position.
4. Move the temperature control lever to the
desired position between the middle and
the ``HOT'' position.
Ventilation
This mode directs outside air from the side
and center vents.
1. Push the air recirculation button to the
``OFF'' position.
2. Push the ``
'' button in.
3. Move the fan control dial to the desired
position.
4. Move the temperature control lever to the
desired position.
3-3
ZX
Page 76 of 183
POWERbutton with the cassette tape still in
the player, the tape will resume playing
when the POWER button is pushed once
again.
TAPE button
cWhen this button is pushed with the
system turned off and a tape loaded, the
system will come on and the tape will
play.
cWhen this button is pushed with either
the radio or compact disc turned on and
the tape loaded, the compact disc or the
radio will automatically be turned off and
the tape will play.
While the tape is playing, pushing the TAPE
button stops tape play. Pushing the button
again resumes tape play.
FF (fast forward), REW (rewind)
button
Push the FF (fast forward) button to fast
forward the tape. To rewind the tape, push
the REW (rewind) button. Either the indica-
tor light ``
'' or ``'' will come on when
the FF or REW function is started. To stop
the FF or REW function, press the TAPE
button.
Automatic Program Search (APS)
FF, APS REW button
When the APS FF button is pushed while
the tape is being played, the next program
will start to play from the beginning. Push
the APS FF button several times to skip
through programs. The tape will advance
the number of times the button is pushed
(up to 9 programs).
When the APS REW button is pushed once,
the program being played starts over from
the beginning. Push several times to fast
rewind programs. The tape will rewind back
the number of times the button is pushed.
Either the indicator light ``
'' or
``'' will come on when the APS FF or
APS REW function is started.
This system searches for the blank intervals
between selections. If there is a blank inter-
val within one program or there is no interval
between programs, the system may not
stop in the desired or expected location.
PROG (program) button
Push the PROG (program) button to change
the tape side while the tape is being played.The cassette tape will automatically change
directions to play the other side when the
first side is completed.
Dolby NR (noise reduction)
button
Push the``DOLBY NR'' button for
Dolby NR encoded tapes to reduce high
frequency tape noise. The indicator will
come on.
Dolby NR is manufactured under license
from Dolby Laboratories Licensing Corpora-
tion. ``DOLBY NR'' and the double-D symbol
are trademarks of Dolby Laboratories Li-
censing Corporation.
TAPE EJECT button
Push this button to eject an inserted tape.
When the tape is ejected while it is being
played, the system will be turned off.
Precautions on cassette player op-
eration
cTo maintain good quality sound,
NISSAN recommends that you use
cassette tapes of 60 minutes or
shorter in length.
3-19
ZX