1996 NISSAN ALTIMA hood release
[x] Cancel search: hood releasePage 26 of 183

2 Pre-driving checks and adjustments
Key ....................................................................... 2-2
Door locks ............................................................ 2-2
Hood release ........................................................ 2-5
Glove box ............................................................. 2-5
Trunk lid lock operation ........................................ 2-6
Fuel filler lid lock operation .................................. 2-7
Front seats ........................................................... 2-9
Rear seat ............................................................ 2-11
Supplemental restraint system (air bag system). 2-12
Warning labels.................................................... 2-15
Air bag warning light .......................................... 2-16
Seat belts ........................................................... 2-17
Child restraints for infants and small children.... 2-23
Tilting steering wheel ......................................... 2-30
Outside mirror remote control ............................ 2-30
Outside mirrors ................................................... 2-30
Inside mirror ....................................................... 2-31
Vanity mirror (If so equipped) ............................ 2-31
ZX
Page 30 of 183

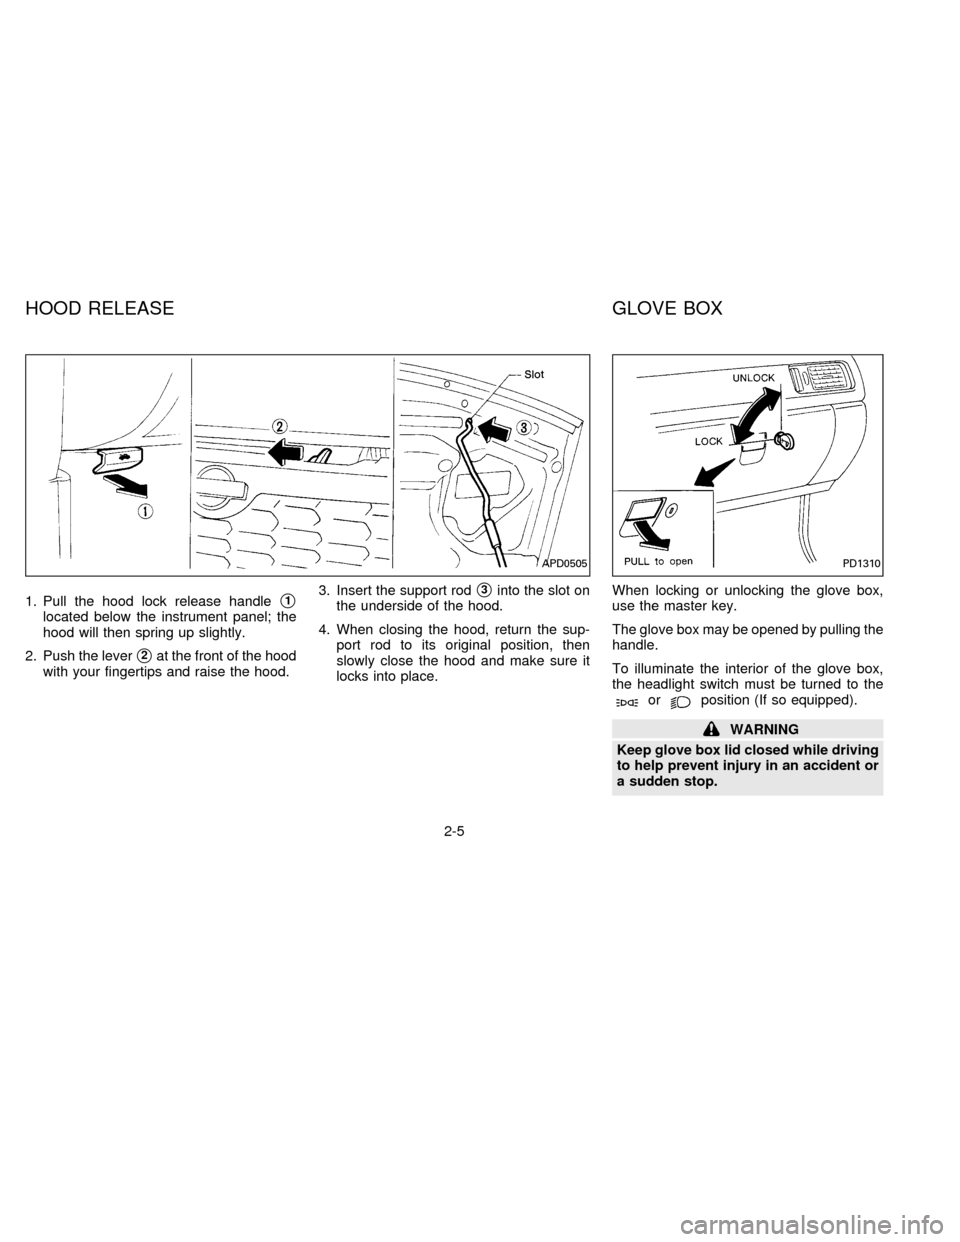
1. Pull the hood lock release handles1
located below the instrument panel; the
hood will then spring up slightly.
2. Push the lever
s2at the front of the hood
with your fingertips and raise the hood.3. Insert the support rod
s3into the slot on
the underside of the hood.
4. When closing the hood, return the sup-
port rod to its original position, then
slowly close the hood and make sure it
locks into place.When locking or unlocking the glove box,
use the master key.
The glove box may be opened by pulling the
handle.
To illuminate the interior of the glove box,
the headlight switch must be turned to the
orposition (If so equipped).
WARNING
Keep glove box lid closed while driving
to help prevent injury in an accident or
a sudden stop.
APD0505PD1310
HOOD RELEASE GLOVE BOX
2-5
ZX
Page 95 of 183

and releases hydraulic pressure (like pump-
ing the brakes very quickly). While the ac-
tuator is working, you may feel a pulsation in
the brake pedal and hear a noise or vibra-
tion from the actuator under the hood. This
is normal and indicates that the anti-lock
system is working properly. However, the
pulsation may indicate that road conditions
are hazardous and extra care is required
while driving.
Self-test feature
The anti-lock brake system is sophisticated,
with electronic sensors, electric pumps, and
hydraulic solenoids controlled by a com-
puter. The computer has a built-in diagnos-
tic feature that tests the system each time
you start the engine and move the vehicle at
a low speed in forward or reverse. When the
self-test occurs, you may hear a ``clunk''
noise and/or feel a pulsation in the brake
pedal. This is normal and is not an indica-
tion of any malfunction. If the computer
senses any malfunction, it switches the anti-
lock brake system OFF and turns on the
ABS brake warning light in the dashboard.
The brake system will then behave nor-
mally, but without anti-lock assistance.
If the light comes on during the self-test orwhile you are driving, you should take your
car to your NISSAN dealer for repair at your
earliest convenience.
WARNING
The anti-lock brake system is a sophis-
ticated device, but it cannot prevent
accidents resulting from careless or
dangerous driving techniques. It can
help maintain vehicle control during
braking on slippery surfaces, but re-
member that the stopping distance on
slippery surfaces will be longer than on
normal surfaces, even with the anti-
lock system. Stopping distances may
also be longer on rough, gravel or
snow covered roads, or if you are using
tire chains. Always maintain a safe dis-
tance from the vehicle in front of you.
Ultimately, the responsibility for safety
of self and others rests in the hands of
the driver.
Tire type and condition of tires may
also affect braking effectiveness.
cWhen replacing tires, install the
specified size of tire on all 4 wheels.cWhen installing a spare tire, make
sure it is the proper size and type as
specified on the tire placard. For tire
placard location information, refer to
ªTire placardº in the Owner's Manual
index.
Refer to ``Wheels and Tires'' in the
``Do-it-yourself operations'' section of
this manual.
4-16
ZX
Page 99 of 183

If you have a flat tire, follow the instructions
below.
Stopping the vehicle
1. Safely move the vehicle off the road
away from traffic.
2. Turn on the hazard warning flashers.
3. Park on a level surface and apply the
parking brake. Shift the manual transmis-
sion into reverse (automatic transmission
in ``P'').
4. Turn off the engine.
WARNING
cMake sure that the parking brake is
securely applied and the manual
transmission is shifted into reverse
(automatic transmission in ``P'').
cNever change tires when the vehicle
is on a slope, ice or slippery areas.
This is dangerous.
cNever change tires if oncoming traf-
fic is close to your vehicle. Wait for
professional road assistance.cRaise the hood to warn other traffic,
and to signal professional road as-
sistance personnel that you need
assistance.
cHave all passengers get out of the
vehicle and stand in a safe place,
away from traffic and clear of the
vehicle.Getting the spare tire and tools
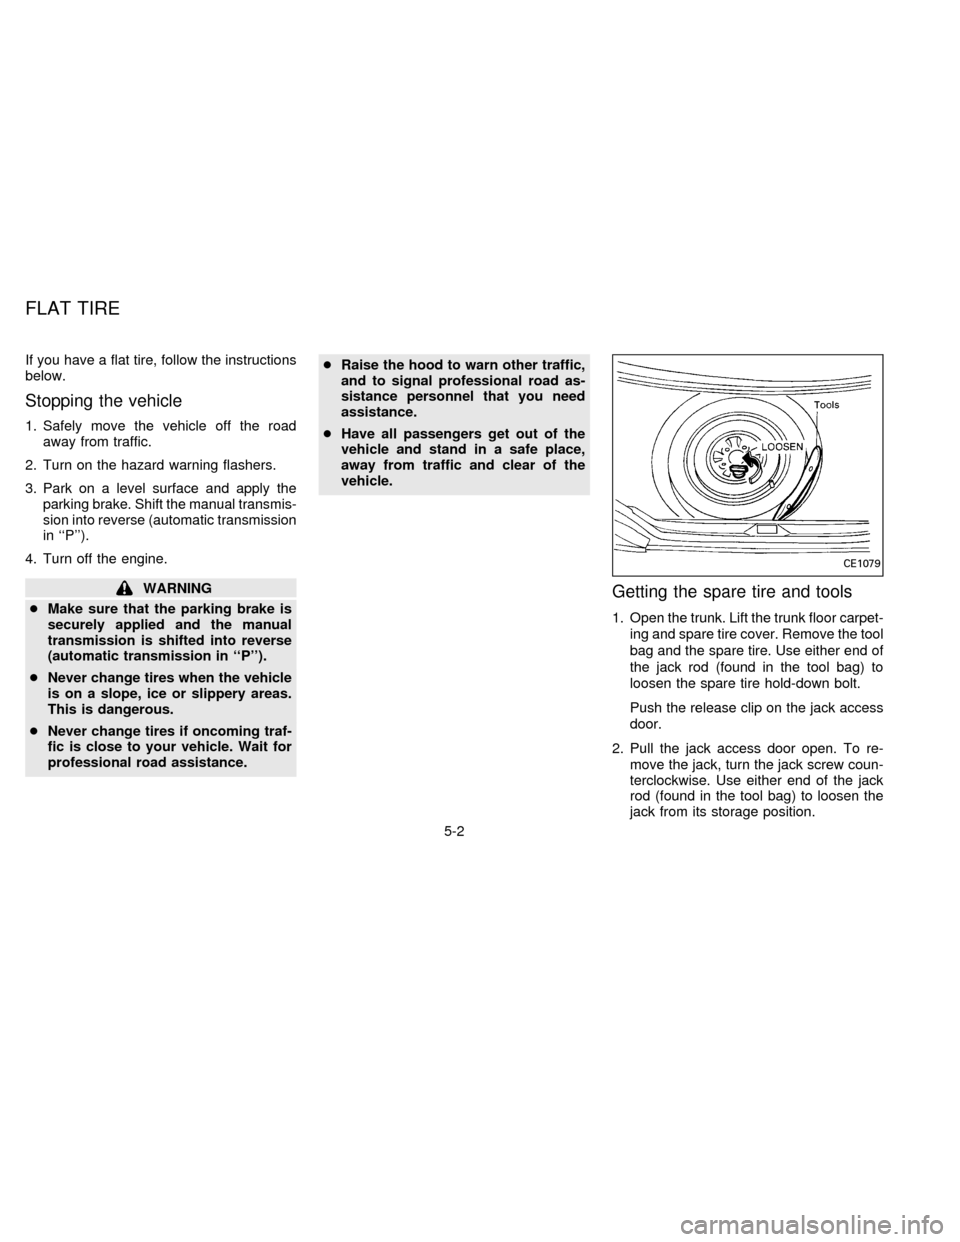
1. Open the trunk. Lift the trunk floor carpet-
ing and spare tire cover. Remove the tool
bag and the spare tire. Use either end of
the jack rod (found in the tool bag) to
loosen the spare tire hold-down bolt.
Push the release clip on the jack access
door.
2. Pull the jack access door open. To re-
move the jack, turn the jack screw coun-
terclockwise. Use either end of the jack
rod (found in the tool bag) to loosen the
jack from its storage position.
CE1079
FLAT TIRE
5-2
ZX
Page 132 of 183

CAUTION
After wiper blade replacement, return
the wiper arm to its original position.
Otherwise it may be damaged when the
engine hood is opened.
Make sure the wiper blade contacts the
glass; otherwise the arm may be dam-
aged from wind pressure.
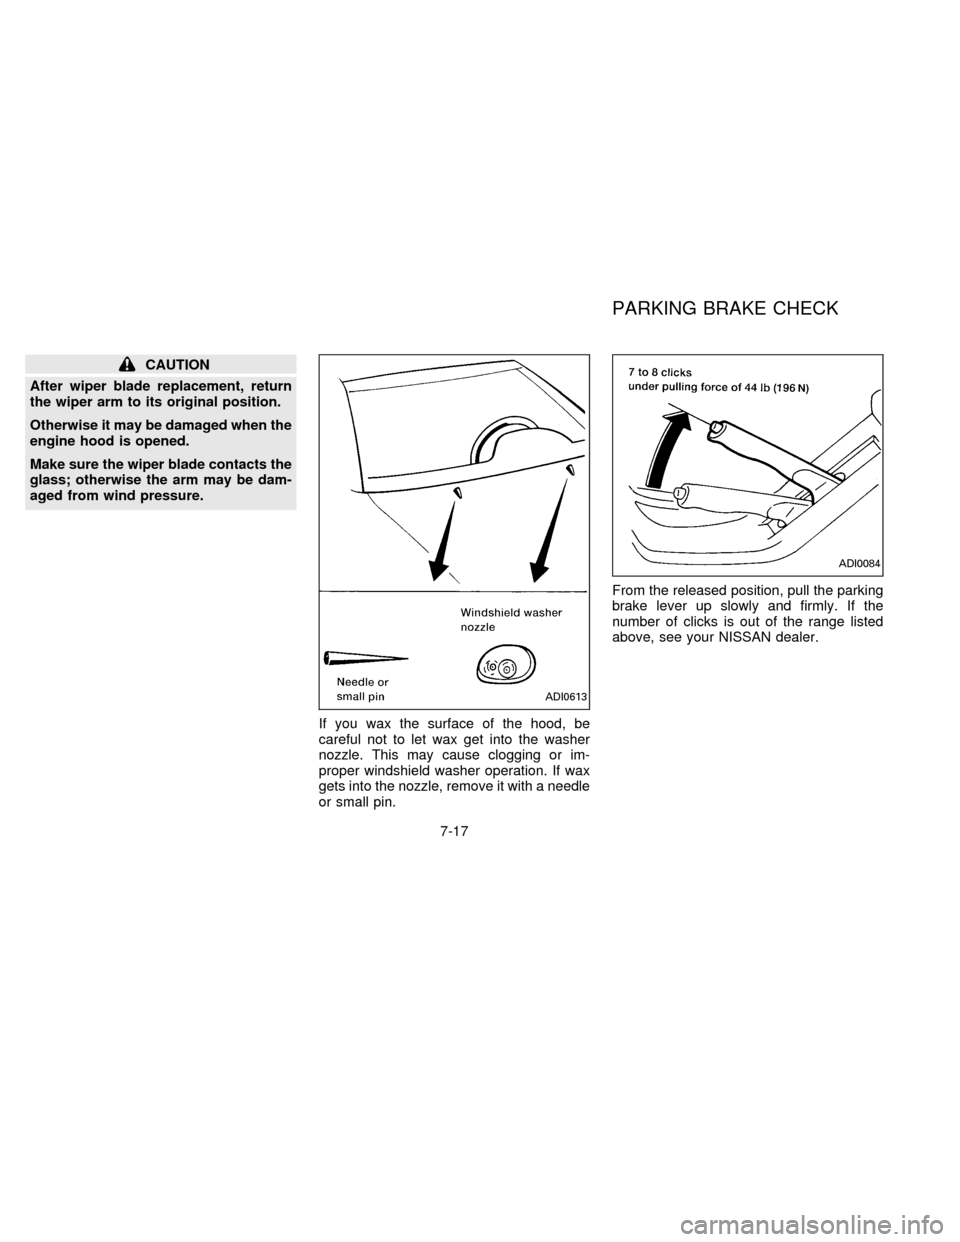
If you wax the surface of the hood, be
careful not to let wax get into the washer
nozzle. This may cause clogging or im-
proper windshield washer operation. If wax
gets into the nozzle, remove it with a needle
or small pin.From the released position, pull the parking
brake lever up slowly and firmly. If the
number of clicks is out of the range listed
above, see your NISSAN dealer.
ADI0613
ADI0084
PARKING BRAKE CHECK
7-17
ZX
Page 134 of 183

Check the brake booster function as fol-
lows:
1. With the engine off, press and release
the brake pedal several times. When
brake pedal movement (distance of
travel) remains the same from one pedal
application to the next, continue on to
next step.
2. While depressing the brake pedal, start
the engine. The pedal height should drop
a little.
3. With the brake pedal depressed, stop the
engine. Keep the pedal depressed for
about 30 seconds. The pedal height
should not change.
4. Run the engine for one minute without
depressing the brake pedal, then turn it
off. Depress the brake pedal several
times. The pedal travel distance will de-
crease gradually with each depression
as the vacuum is released from the
booster.
If the brakes do not operate properly, see
your NISSAN dealer.Press the pedal by hand and be sure the
free travel is within the limits shown above.
If free travel is out of the range shown
above, see your NISSAN dealer.
Engine compartment
If the electrical equipment does not come
on, check for an open fuse.
1. Be sure the ignition key and the headlight
switch are ``OFF''.
2. Open the engine hood.
3. Remove the fusible link cover.
4. Remove the fuse with the fuse puller.
5. If the fuse is open, replace it with a new
fuse.
ADIO528DI1313
BRAKE BOOSTER CLUTCH PEDAL FUSES
7-19
ZX
Page 150 of 183

Tire rotation*Ð Tires should be rotated
every 7,500 miles (12,000 km).
Wheel alignment and balanceÐIfthe
vehicle should pull to either side while driv-
ing on a straight and level road, or if you
detect uneven or abnormal tire wear, there
may be a need for wheel alignment.
If the steering wheel or seat vibrates at
normal highway speeds, wheel balancing
may be needed.
Windshield wiper blades*Ð Check for
cracks or wear if they do not wipe properly.
Doors and engine hoodÐ Check that all
doors and the engine hood operate prop-
erly. Also ensure all latches lock securely.
Lubricate hinges, latches, rollers and links if
necessary. Make sure that the secondary
latch keeps the hood from opening when
the primary latch is released.
When driving in areas using road salt or
other corrosive materials, check lubrication
frequently.
Lights*Ð Make sure the headlights, stop
lights, tail lights, turn signal lights, and other
lights are all operating properly and installed
securely. Also check headlight aim.INSIDE THE VEHICLE
The maintenance items listed here should
be checked on a regular basis, such as
when performing periodic maintenance,
cleaning the vehicle, etc.
Warning lights and chimesÐ Make sure
that all warning lights and buzzers/chimes
are operating properly.
Windshield wiper and washer*Ð Check
that the wipers and washer operate properly
and that the wipers do not streak.
Windshield defrosterÐ Check that the air
comes out of the defroster outlets properly
and in sufficient quantity when operating the
heater or air conditioner.
Steering wheelÐ Check for changes in
the steering conditions, such as excessive
freeplay, hard steering or strange noises.
SeatsÐ Check seat position controls such
as seat adjusters, seatback recliner, etc. to
ensure they operate smoothly and that all
latches lock securely in every position.
Check that the head restraints move up and
down smoothly and that the locks (if so
equipped) hold securely in all latched posi-
tions.Seat beltsÐ Check that all parts of the seat
belt system (for example, buckles, anchors,
adjusters and retractors) operate properly
and smoothly, and are installed securely.
Check the belt webbing for cuts, fraying,
wear or damage.
Accelerator pedalÐ Check the pedal for
smooth operation and make sure the pedal
does not catch or require uneven effort.
Keep the floor mats away from the pedal.
Clutch pedal*Ð Make sure the pedal
operates smoothly and check that it has the
proper free travel.
BrakesÐ Check that the brakes do not pull
the vehicle to one side when applied.
Brake pedal*Ð Check the pedal for
smooth operation and make sure it has the
proper distance under it when depressed
fully. Check the brake booster function. Be
certain to keep floor mats away from the
pedal.
Parking brake*Ð Check that the lever has
the proper travel and confirm that your
vehicle is held securely on a fairly steep hill
with only the parking brake applied.
8-3
ZX
Page 180 of 183

H
Hazard warning flasher switch .................. 1-13
Head restraints .......................................... 2-10
Headlight and turn signal switch ............... 1-11
Headlights .................................................. 7-21
Heater and air conditioner
Heater and air conditioner controls
(automatic) .............................................. 3-8
Heater and air conditioner controls
(manual).................................................. 3-2
Hood release ............................................... 2-5
I
Ignition switch .............................................. 4-4
Indicator lights and chimes (See warning/
indicator lights and chimes)
Inside mirror ............................................... 2-31
Instrument brightness control .................... 1-12
Interior light ................................................ 1-18
J
Jump starting ............................................... 5-7
K
Key ............................................................... 2-2L
Labels
Air conditioner specification label ......... 9-11
Warning labels (for SRS) ..................... 2-15
Emission control information label........ 9-10
Engine serial number ............................. 9-9
F.M.V.S.S.certification label ................. 9-10
Vehicle identification number plate ........ 9-9
License plate
Installing front license plate .................. 9-12
Light
Air bag warning light............................. 2-16
Brake light (See stop light)
Bulb check/instrument panel .................. 1-5
Bulb replacement.................................. 7-24
Cornering light ...................................... 1-12
Front fog light switch ........................... 1-13
Headlight and turn signal switch .......... 1-11
Headlights ............................................. 7-21
Interior light ........................................... 1-18
Light bulbs ............................................ 7-21
Spotlight ................................................ 1-19
Trunk light ............................................. 1-19
Warning/indicator lights and chimes ...... 1-5
Lock
Child safety rear door lock ..................... 2-4
Door locks............................................... 2-2
Fuel filler lid lock operation .................... 2-7
Glove box ............................................... 2-5
Power door lock...................................... 2-3Power window lock switch .................... 1-15
Trunk lid lock operation .......................... 2-6
M
Maintenance
General maintenance ............................. 8-2
Inside the vehicle.................................... 8-3
Outside the vehicle ................................. 8-2
Periodic maintenance schedules ............ 8-5
Seat belt maintenance.......................... 2-23
Under the hood and vehicle ................... 8-4
Malfunction indicator light ............................ 1-7
Manual antenna ......................................... 3-22
Manual transmission
Driving with manual transmission ........... 4-8
Manual transmission fluid ....................... 8-9
Map light (See spotlight)
Meters and gauges ...................................... 1-2
Mirror
Inside mirror.......................................... 2-31
Outside mirror remote control .............. 2-30
Outside mirrors ..................................... 2-30
Vanity mirror (If so equipped) ............... 2-31
O
Octane rating (See fuel)
Odometer ..................................................... 1-3
Oil
Capacities and recommended
fuel/lubricants.......................................... 9-2
10-3
ZX