1996 LAND ROVER DEFENDER drain bolt
[x] Cancel search: drain boltPage 56 of 455

MAINTENANCE
13
MAINTENANCE REV: 05/992.When pure diesel is emitted, retighten drain
plug.
3.Disconnect fuel inlet pipe at sedimenter. Raise
and support pipe above level of fuel tank to
prevent fuel draining from tank.
4.Support sedimenter bowl, unscrew bolt and
remove bowl.
5.Remove sedimenter element.
6.Clean all components in kerosene.
7.Fit new seals.
8.Fit element into sedimenter bowl.
9.Secure bowl to sedimenter head.
10.Fit fuel inlet pipe to sedimenter.
11.Slacken drain plug and when pure diesel is
emitted, retighten plug.
12.If necessary, prime the system.
See FUEL SYSTEM, Adjustment, Priming
the fuel system
CHECK CONDITION OF ENGINE MOUNTING
RUBBERS
CHECK SECURITY OF TOWING BRACKET
FITTINGSCARRY OUT ROAD OR ROLLER TEST
WARNING: Two wheel roller tests MUST
NOT be carried out.
For details of dynamometer testing.
See
INTRODUCTION, Information, Dynamometer
testing
Check the following components:
1.Engine for excessive noise.
2.Clutch for slip, judder or spin/drag.
3.Gear selection/noise - high/low range.
4.Steering for abnormal noise/effort.
5.Steering for free play.
6.All instruments, gauges and warning indicators.
7.Heater and air conditioning systems.
8.Heated rear screen.
9.Shock absorbers - ride irregularities.
10.Foot brake, on emergency stop, pulling to one
side, binding and pedal effort.
11.Handbrake operation.
12.Seat reclining and latching.
13.Fully extend seat belt, check operation of
retraction and latching. Inertia belts lock when
snatched or vehicle on slope.
14.Road wheel balance.
15.Transmissions for vibrations.
16.Body noises, squeaks and rattles.
17.Excessive exhaust smoke.
18.Engine idle speed.
19.Endorse service record.
20.Report any unusual features of vehicle condition
and additional work required.
ENDORSE SERVICE RECORD
Page 65 of 455

12ENGINE
6
REPAIR 42.Raise engine, and locate front engine mountings
to chassis.
43.Remove gearbox support and lower engine.
44.Tighten front engine mounting to chassis fixings
to
45 Nm (33 lbf/ft).
45.Release chains from engine lifting brackets and
remove hoist.
46.Connect oil cooler pipes to oil filter adaptor.
47.Fit vacuum hose to brake servo adaptor.
48.Secure fuel feed pipe in retaining clip on air
cleaner bracket.
49.Fit fuel lift pump pipes.
50.Connect feed and spill return pipes to injector
pump.
51.If fitted, reconnect hand throttle cable to
mounting bracket and injector pump.
52.Fit outer cable adjusting nut into injector pump
mounting bracket.
53.Fit inner throttle cable to injector pump and
secure with clevis and split pin.
54.Secure bleed hose in retaining clips on front
timing cover.
55.Fit bleed hose to thermostat housing.
56.Connect inlet and outlet hoses to power steering
pump.
57.Fit down pipe to exhaust manifold and secure
with 3 nuts.
58.Connect starter motor battery and fuse box
leads.
59.If fitted, connect EGR valve multi-plug and
vacuum pipe.
60.Secure breather pipe clip to cylinder head.
61.Connect engine harness multi-plug.
62.Fit heater plug feed wire.
63.Connect electrical feed plug at rear of cylinder
head.
64.Fit heater hoses to cylinder head and heater
rails.
65.Fit feed pipe/hose to turbo-charger and
intercooler.
66.Fit rocker cover insulation.
67.Fit radiator assembly.
See COOLING SYSTEM,
Repair, Radiator
If applicable, fit air
conditioning condenser, compressor pipes and
heater matrix hoses.
See AIR CONDITIONING,
Repair, Condenser
68.Fit bonnet.
69.Reconnect battery.CRANKSHAFT PULLEY
Service repair no - 12.21.01
Remove
1.Disconnect battery.
2.Drain coolant.
See COOLING SYSTEM,
Repair, Drain and refill cooling system
3.Remove top hose from radiator.
4.Remove intercooler to induction manifold hose.
5.Remove viscous coupling and fan.
See
COOLING SYSTEM, Repair, Viscous
coupling and fan
6.Remove fan cowl.See COOLING SYSTEM,
Repair, Fan cowl
7.Remove drive belt.See ELECTRICAL, Repair,
Auxiliary drive belt
8.Fit crankshaft pulley retainerLRT-12-080and
secure with 4 bolts.
9.Remove crankshaft pulley retaining bolt
anti-clockwise using socket and suitable long
bar.
10.Remove pulley retainer.
11.Remove pulley, if necessary using extractor
LRT-12-049with thrust pad fromLRT-12-031.
Page 66 of 455

ENGINE
7
REPAIR Refit
12.Lightly grease pulley spigot and locate pulley
onto cranshaft.
13.Fit pulley retaining bolt.
14.Fit pulley retainerLRT-12-080and secure with 4
bolts.
15.Tighten pulley nut to
80 Nm (59 lbf/ft)+90°.
16.Remove pulley retainer.
17.Fit drive belt.
See ELECTRICAL, Repair,
Auxiliary drive belt; Refit
18.Fit fan cowl.See COOLING SYSTEM, Repair,
Fan cowl
19.Fit viscous coupling and fan.See COOLING
SYSTEM, Repair, Viscous coupling and fan
20.Fit intercooler to induction manifold hose.
21.Fit radiator top hose.
22.Refill cooling system.
See COOLING SYSTEM,
Repair, Drain and refill cooling system
23.Reconnect battery.FRONT COVER PLATE AND SEAL
Service repair no - 12.65.01
Remove
1.Disconnect battery.
2.Drain coolant.
See COOLING SYSTEM,
Repair, Drain and refill cooling system
3.Remove top hose from radiator.
4.Remove intercooler to induction manifold hose.
5.Remove viscous coupling and fan.
See
COOLING SYSTEM, Repair, Viscous
coupling and fan
6.Remove fan cowl.See COOLING SYSTEM,
Repair, Fan cowl
7.Remove drive belt.See ELECTRICAL, Repair,
Auxiliary drive belt
8.Remove crankshaft pulley.See Crankshaft
pulley
9.Remove 14 bolts securing front cover plate. Note
that top 2 bolts also retain thermostat hose clips.
10.Remove cover plate complete with gasket.
11.Remove small gasket from centre bolt boss.
Seal replacement
12.Remove worn seal from cover and clean recess.
13.Support cover and fit new seal, open side fitted
into recess, using special toolLRT-12-077.
Page 67 of 455

12ENGINE
8
REPAIR Refit
14.Fit gasket to centre bolt boss.
15.Locate new gasket and fit front cover plate using
fixing bolts as shown. Tighten bolts to
25 Nm (18
lbf/ft).
1- 25 mm,2- 35 mm,3- 50 mm,4- 100 mm,5- 110
mm
16.Fit crankshaft pulley.
See Crankshaft pulley
17.Fit drive belt.See ELECTRICAL, Repair,
Auxiliary drive belt
18.Fit fan cowl.See COOLING SYSTEM, Repair,
Fan cowl
19.Fit viscous coupling and fan.See COOLING
SYSTEM, Repair, Viscous coupling and fan
20.Fit intercooler to induction manifold hose.
21.Fit top hose to radiator.
22.Refill cooling system.
See COOLING SYSTEM,
Repair, Drain and refill cooling system
23.Reconnect battery.CAMSHAFT DRIVE BELT
Service repair no - 12.65.18
Remove
1.Remove front cover plate.
See Front cover
plate
2.Position engine at TDC on No. 1 cylinder.
3.Remove blanking plug from flywheel housing
and insert timing toolLRT-12-044.
4.Engage timing tool pin with slot in flywheel.
5.Check correct alignment of timing mark on
camshaft gear and that crankshaft key aligns
with cast arrow on housing.
6.Insert pin from special toolLRT-12-045in
injection pump gear and through into pump
flange.
Page 73 of 455

12ENGINE
14
REPAIR ENGINE OIL SUMP
Service repair no - 12.60.44
Remove
1.Disconnect battery.
2.Drain engine oil.
NOTE: A chassis undertray may be fitted
on some vehicle derivatives to conform to
legal requirements. When under chassis
remove and refit procedures are required, it may
be necessary to remove the undertray and/or
integral access panels.
See CHASSIS AND BODY, Repair, Front
undertray
orSee CHASSIS AND BODY, Repair,
Rear undertray
3.Slacken sump securing bolts.
4.Break sealant around sump flange, using a
sharp knife.
5.Remove 22 bolts and withdraw sump.
Refit
6.Clean mating faces of sump, timing gear housing
and cylinder block.
7.Apply a 2,0 mm bead of 'Hylosil RTV102' to the
sump flange, ensuring bead is applied inboard of
the bolt holes.
8.Secure sump to block with 22bolts. Tighten to
25
Nm (18 lbf/ft).
9.Refill engine oil.See LUBRICANTS, FLUIDS
AND CAPACITIES, Information, Capacities
10.Reconnect battery.OIL PICK-UP STRAINER
Service repair no - 12.60.20
Remove
1.Disconnect battery.
2.Drain engine oil.
3.Remove engine oil sump.
See Engine oil
sump
4.Remove 2 bolts securing pipe support bracket to
main bearing cap fixings.
5.Remove bolts from pipe flanges.
6.Withdraw pick-up strainer assembly.
Refit
7.Postion pick-up strainer assembly, fitting a new
'O' ring seal at oil pump connection.
8.Apply Loctite 242E to threads of bolts at main
bearing cap. Fit bolts, tighten to
9 Nm (7 lbf/ft).
9.Fit bolts to pipe flanges. Tighten to25 Nm (18
lbf/ft).
10.Fit sump.See Engine oil sump
11.Reconnect battery.
Page 78 of 455

ENGINE
19
REPAIR OIL FILTER
Service repair no - 12.60.01
Remove
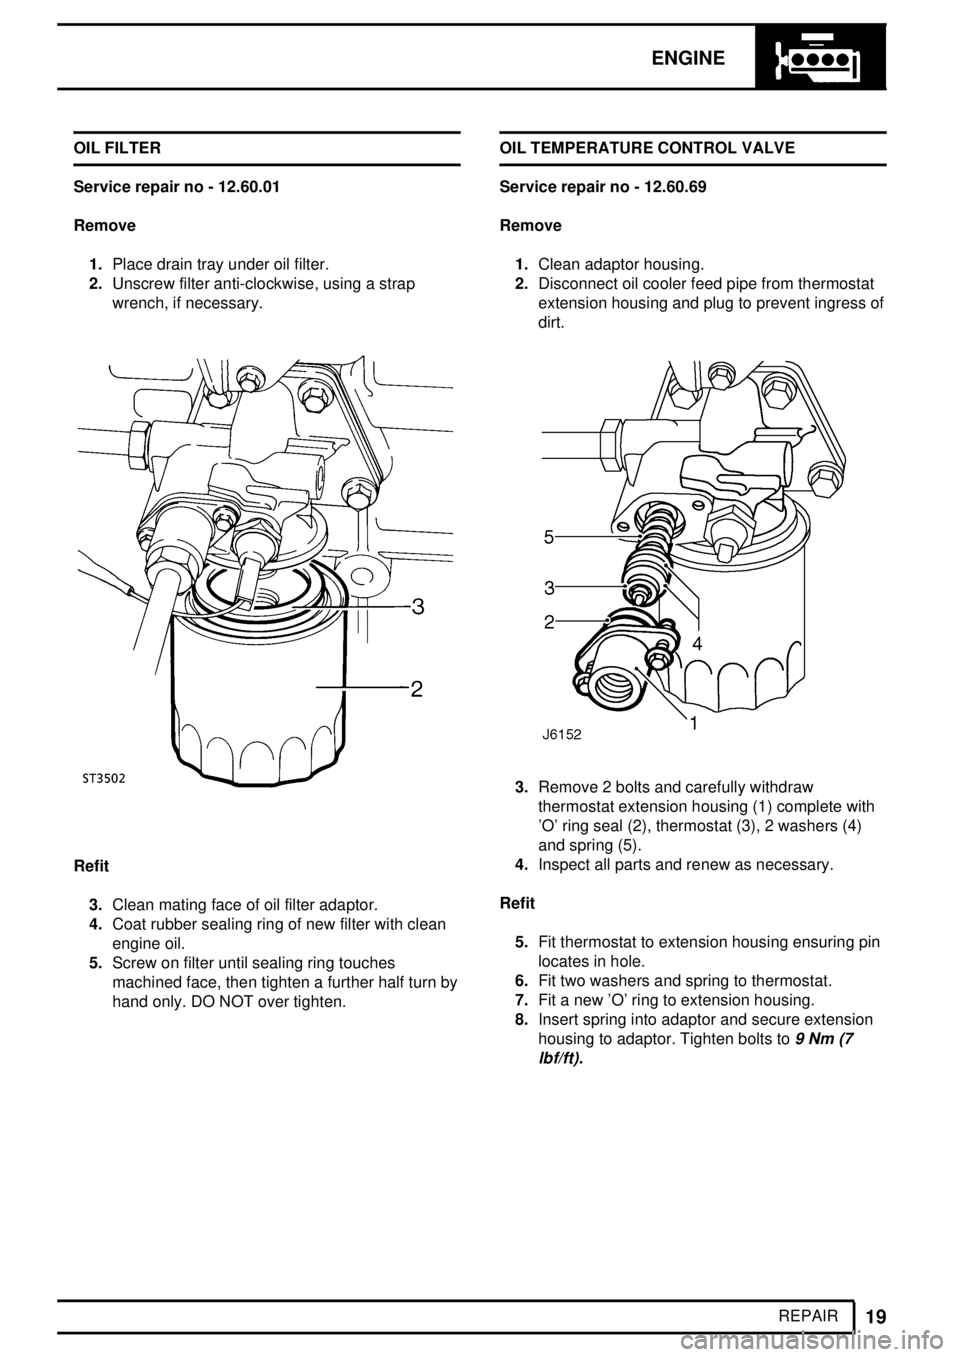
1.Place drain tray under oil filter.
2.Unscrew filter anti-clockwise, using a strap
wrench, if necessary.
Refit
3.Clean mating face of oil filter adaptor.
4.Coat rubber sealing ring of new filter with clean
engine oil.
5.Screw on filter until sealing ring touches
machined face, then tighten a further half turn by
hand only. DO NOT over tighten.OIL TEMPERATURE CONTROL VALVE
Service repair no - 12.60.69
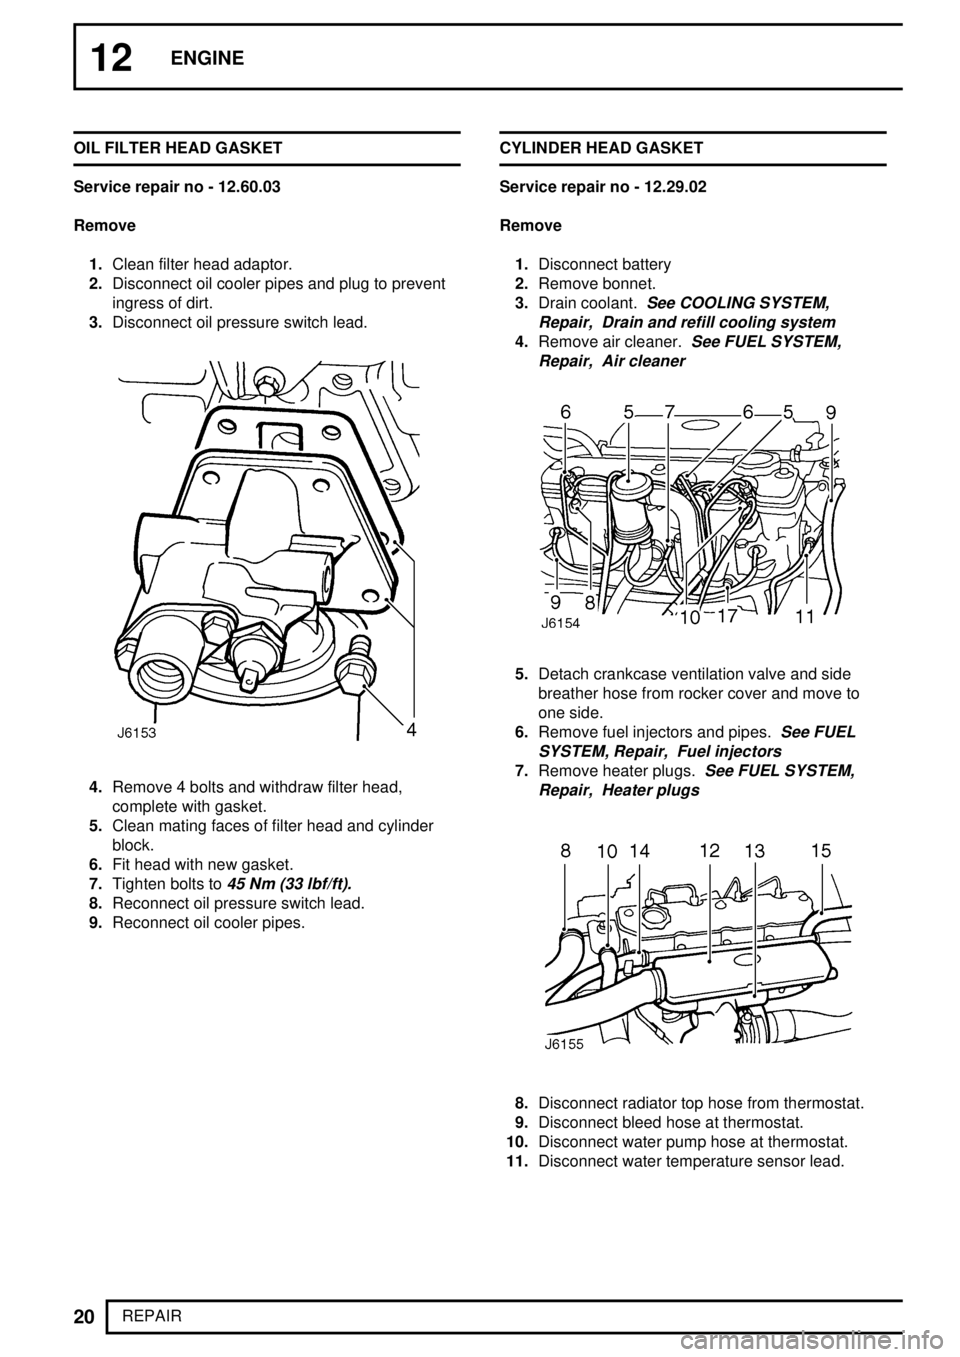
Remove
1.Clean adaptor housing.
2.Disconnect oil cooler feed pipe from thermostat
extension housing and plug to prevent ingress of
dirt.
3.Remove 2 bolts and carefully withdraw
thermostat extension housing (1) complete with
'O' ring seal (2), thermostat (3), 2 washers (4)
and spring (5).
4.Inspect all parts and renew as necessary.
Refit
5.Fit thermostat to extension housing ensuring pin
locates in hole.
6.Fit two washers and spring to thermostat.
7.Fit a new 'O' ring to extension housing.
8.Insert spring into adaptor and secure extension
housing to adaptor. Tighten bolts to
9Nm(7
lbf/ft).
Page 79 of 455

12ENGINE
20
REPAIR OIL FILTER HEAD GASKET
Service repair no - 12.60.03
Remove
1.Clean filter head adaptor.
2.Disconnect oil cooler pipes and plug to prevent
ingress of dirt.
3.Disconnect oil pressure switch lead.
4.Remove 4 bolts and withdraw filter head,
complete with gasket.
5.Clean mating faces of filter head and cylinder
block.
6.Fit head with new gasket.
7.Tighten bolts to
45 Nm (33 lbf/ft).
8.Reconnect oil pressure switch lead.
9.Reconnect oil cooler pipes.CYLINDER HEAD GASKET
Service repair no - 12.29.02
Remove
1.Disconnect battery
2.Remove bonnet.
3.Drain coolant.
See COOLING SYSTEM,
Repair, Drain and refill cooling system
4.Remove air cleaner.See FUEL SYSTEM,
Repair, Air cleaner
5.Detach crankcase ventilation valve and side
breather hose from rocker cover and move to
one side.
6.Remove fuel injectors and pipes.
See FUEL
SYSTEM, Repair, Fuel injectors
7.Remove heater plugs.See FUEL SYSTEM,
Repair, Heater plugs
8.Disconnect radiator top hose from thermostat.
9.Disconnect bleed hose at thermostat.
10.Disconnect water pump hose at thermostat.
11.Disconnect water temperature sensor lead.
Page 82 of 455

ENGINE
23
REPAIR
43.Check and adjust valve clearances.
See Adjustment, Valve clearances - check
and adjust
44.Fit rocker cover, ensuring oil seal is satisfactory
for continued use, and renew if necessary.
45.Secure rocker cover with special seal washers
and nuts. Tighten to
10 Nm (7 lbf/ft).
46.Fit rear engine lifting bracket, securing breather
pipe and multi-plug retaining clips. Tighten fixing
bolts to
25 Nm (18 lbf/ft).
47.Fit engine harness bracket to cylinder head.
48.Secure air cleaner mounting bracket to support
strut.
49.Connect heater hose to rear of cylinder head.
50.Position heater rail and connect hose from water
pump.
51.Fit exhaust manifold and turbocharger assembly.
See MANIFOLD AND EXHAUST SYSTEM,
Repair, Exhaust manifold
52.Fit induction manifold.See MANIFOLD AND
EXHAUST SYSTEM, Repair, Induction
manifold
53.Connect water temperature sensor lead.
54.Connect water pump hose at thermostat.
55.Fit bleed hose at thermostat.
56.Connect radiator top hose at thermostat.
57.Fit heater plugs.
See FUEL SYSTEM, Repair,
Heater plugs
58.Fit fuel injectors.See FUEL SYSTEM, Repair,
Fuel injectors
59.Fit crankcase ventilation valve and side breather
hose.
60.Fit air cleaner.
See FUEL SYSTEM, Repair,
Air cleaner
61.Refill cooling system.See COOLING SYSTEM,
Repair, Drain and refill cooling system
62.Fit bonnet.
63.Reconnect battery.OIL PUMP
Service repair no - 12.60.26
Remove
1.Remove engine front cover.
See Front cover
gasket
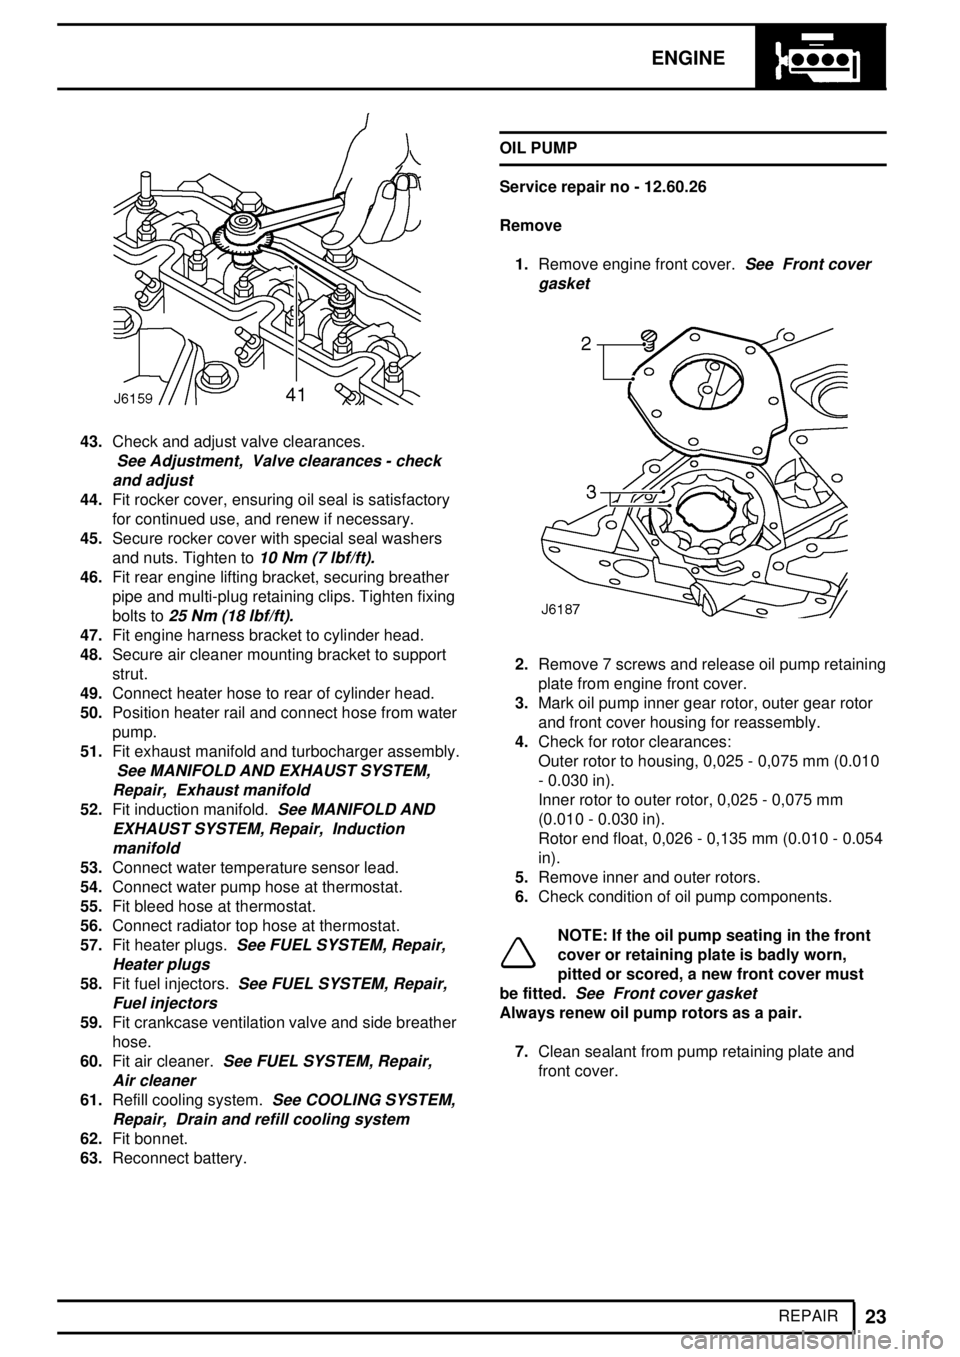
2.Remove 7 screws and release oil pump retaining
plate from engine front cover.
3.Mark oil pump inner gear rotor, outer gear rotor
and front cover housing for reassembly.
4.Check for rotor clearances:
Outer rotor to housing, 0,025 - 0,075 mm (0.010
- 0.030 in).
Inner rotor to outer rotor, 0,025 - 0,075 mm
(0.010 - 0.030 in).
Rotor end float, 0,026 - 0,135 mm (0.010 - 0.054
in).
5.Remove inner and outer rotors.
6.Check condition of oil pump components.
NOTE: If the oil pump seating in the front
cover or retaining plate is badly worn,
pitted or scored, a new front cover must
be fitted.
See Front cover gasket
Always renew oil pump rotors as a pair.
7.Clean sealant from pump retaining plate and
front cover.