1996 CHRYSLER VOYAGER wheel alignment
[x] Cancel search: wheel alignmentPage 199 of 1938

CLUTCH
CONTENTS
page page
GENERAL INFORMATION
CLUTCH COMPONENTS.................. 1
CLUTCH DISC AND COVER APPLICATION . . . 3
CLUTCH REPLACEMENT................. 3
DESCRIPTION AND OPERATION
CLUTCH PEDAL POSITION SWITCH........ 4
CLUTCH RELEASE SYSTEM.............. 4
DIAGNOSIS AND TESTING
CLASH±INTO±REVERSE
COMPLAINTS........................ 8
CLUTCH CHATTER COMPLAINTS.......... 8
CLUTCH COVER AND DISC RUNOUT....... 8
CLUTCH DIAGNOSIS.................... 6
CLUTCH PEDAL POSITION SWITCH........ 4
DRIVE PLATE MISALIGNMENT............ 7
REMOVAL AND INSTALLATION
CLUTCH ASSEMBLY (2.5L DIESEL)....... 13
CLUTCH CABLE SYSTEM Ð LHD.......... 8
CLUTCH PEDAL POSITION SWITCH....... 10CLUTCH RELEASE BEARING AND FORK . . . 14
HYDRAULIC CLUTCH LINKAGE SYSTEM Ð
RHD ............................... 11
MASTER CYLINDER SYSTEM
Ð RHD ............................ 12
MODULAR CLUTCH ASSEMBLY (2.0L AND
2.4L GASOLINE)..................... 13
QUICK CONNECT COUPLING
Ð RHD ............................ 12
SLAVE CYLINDER ASSEMBLY
Ð RHD ............................ 12
CLEANING AND INSPECTION
CLEANING PRECAUTIONS............... 15
CLUTCH CONTAMINATION.............. 15
ADJUSTMENTS
CLUTCH CABLE Ð LHD................ 16
CLUTCH PEDAL POSITION SWITCH....... 16
SPECIFICATIONS
CLUTCH TIGHTENING REFERENCE........ 16
GENERAL INFORMATION
CLUTCH COMPONENTS
The clutch used in the 2.0 liter and 2.4 liter gaso-
line engine is a single, dry-disc modular clutch
assembly. The modular clutch assembly combines the
pressure plate cover, pressure plate, disc, and fly-
wheel into one unit. The unit rides on the input shaft
of the transmission and is bolted to the drive plate
mounted on the rear of the crankshaft. The clutch
used in the 2.5 liter diesel engine is a conventional
clutch and pressure plate arrangement.
CLUTCH CABLE AND PEDAL Ð LHD
The clutch cable has a unique self-adjuster mecha-
nism built into the cable which compensates for
clutch disc wear. The cable requires no maintenance
or lubrication. There are no serviceable components
on the cable assembly.The clutch pedal is connected to the cable through
a plastic spacer (Fig. 1). The upper end of the clutch
pedal pivots in the pedal bracket on two nylon bush-
ings and a shaft (Fig. 2). These bushings are greased
during assembly and do not require periodic lubrica-
tion.
Fig. 1 Upstop/Spacer and Cable Ð LHD
NS/GSCLUTCH 6 - 1
Page 204 of 1938

CLUTCH DIAGNOSIS
Problem diagnosis will generally require a road
test to determine the type of fault. Component
inspection will then determine the problem after road
testing.
Drive the vehicle at normal speeds during road
test. Shift the transaxle through all gear ranges andobserve clutch action. If chatter, grab, slip, or
improper release is experienced, remove and inspect
the clutch components. If the problem is noise or
hard shifting, further diagnosis may be needed. The
transaxle or other driveline components may actually
be at fault.
SERVICE DIAGNOSIS±CLUTCH GRAB/CHATTER
CONDITION POSSIBLE CAUSES CORRECTION
CLUTCH DISC FACING
COVERED WITH OIL OR
GREASEOil leak at engine rear main or transaxle
input shaft sealCorrect leak and replace clutch assembly
NO FAULT FOUND WITH
CLUTCH
COMPONENTSProblem actually related to suspension
or driveline componentFurther diagnosis required. Check
engine/transmission mounts, suspension
attaching parts and other driveline
components as needed.
Engine related problems Check EFI and ignition systems
PARTIAL ENGAGEMENT
OF CLUTCH DISCClutch cover, spring, or release fingers
bent, distorted (rough handling, improper
assembly)Replace clutch assembly
Clutch disc damaged or distorted Replace clutch assembly
Clutch misalignment Check alignment and runout of flywheel,
disc, or cover. Check clutch housing to
engine dowels and dowel holes for
damage. Correct as necessary.
SERVICE DIAGNOSIS±CLUTCH SLIPS
CONDITION POSSIBLE CAUSES CORRECTION
DISC FACING WORN
OUTNormal wear. Replace clutch assembly.
Driver frequently rides (slips) clutch,
results in rapid wear overheating.Replace clutch assembly
Insufficient clutch cover diaphragm
spring tensionReplace clutch assembly
CLUTCH DISC FACING
CONTAMINATED WITH
OIL OR GREASELeak at rear main oil seal or transaxle
input shaft sealReplace leaking seals. Replace clutch
assembly.
Road splash, water entering housing Seal housing. Inspect clutch assembly.
CLUTCH IS RUNNING
PARTIALLY
DISENGAGEDRelease bearing sticking or binding,
does not return to normal running
position.Verify that bearing is actually binding.
Then, replace bearing and transmission
front bearing retainer if sleeve surface is
damaged.
Cable self-adjuster mechanism sticking
or binding causing high preload (LHD
Applications only)Verify that self-adjuster is free to move
(LHD Applications only)
CLUTCH DISC FACINGS
HAVE FRACTURED INTO
SMALL PIECESDriver performs a 5-1 downshift at
vehicle speed in excess of 60 miles per
hourAlert driver to problem cause. Replace
clutch assembly.
Excessive heat from slippage Replace clutch assembly
6 - 6 CLUTCHNS/GS
DIAGNOSIS AND TESTING (Continued)
Page 205 of 1938

SERVICE DIAGNOSIS±IMPROPER CLUTCH RELEASE
CONDITION POSSIBLE CAUSES CORRECTION
CLUTCH DISC BINDS ON
INPUT SHAFT SPLINESClutch disc hub splines damaged during
installationClean, smooth, and lubricate disc and
shaft splines. Replace clutch assembly
and/or input shaft if splines are severely
damaged.
Input shaft splines rough, damaged. Clean input shaft splines. Then lube.
Corrosion or rust formations on splines
of input shaft and discClean input shaft splines and disc
splines, then lube
CLUTCH DISC RUSTED
TO FLYWHEEL AND/OR
PRESSURE PLATEOccurs in vehicles stored or not driven
for extended period of time. Also occurs
after steam cleaning if vehicle is not
used for extended period.Replace clutch assembly
CLUTCH WILL NOT
DISENGAGE PROPERLYDisc bent, distorted during transaxle
installationReplace clutch assembly
Clutch cover diaphragm spring damaged
during transaxle installationReplace clutch assembly
Release fork and (or) bushings
damagedReplace fork and (or) bushings if worn or
damaged
Clutch cable binding or routed
incorrectlyCheck and correct cable routing
Self-adjuster in cable not functioning
properly, resulting in excess cable slackPull on cable conduit at transaxle (as if
disconnecting cable) to check adjuster
operation
Clutch pedal travel restricted Verify clutch pedal can travel all the way
to the downstop on the bracket
SERVICE DIAGNOSIS±CLUTCH PEDAL NOISE
CONDITION POSSIBLE CAUSES CORRECTION
CLUTCH PEDAL MAKES
REPEATED9POP9NOISE
IN THE FIRST INCH OF
TRAVELSelf-adjusting mechanism in cable
defective (LHD Applications)Replace clutch cable (LHD Applications)
CLUTCH PEDAL
SQUEAKS WHEN
DEPRESSED TO FLOORPedal bushings worn out or inadequate
lubricationReplace or lubricate bushings
Clutch pedal assist spring fittings worn
outReplace assist spring fittings
Clutch release shaft bushings in the
bellhousing are worn outReplace release shaft and bushings
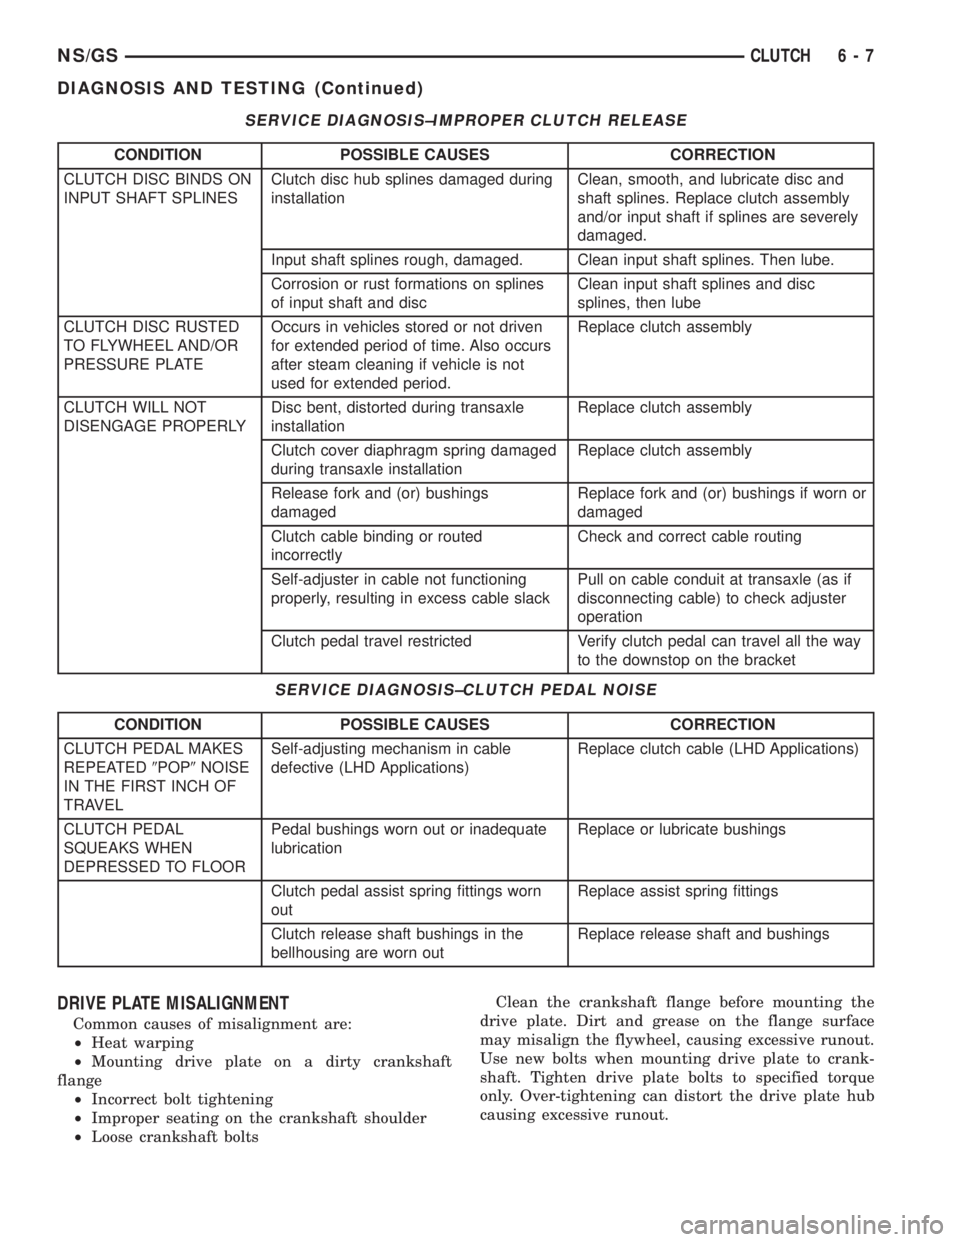
DRIVE PLATE MISALIGNMENT
Common causes of misalignment are:
²Heat warping
²Mounting drive plate on a dirty crankshaft
flange
²Incorrect bolt tightening
²Improper seating on the crankshaft shoulder
²Loose crankshaft boltsClean the crankshaft flange before mounting the
drive plate. Dirt and grease on the flange surface
may misalign the flywheel, causing excessive runout.
Use new bolts when mounting drive plate to crank-
shaft. Tighten drive plate bolts to specified torque
only. Over-tightening can distort the drive plate hub
causing excessive runout.
NS/GSCLUTCH 6 - 7
DIAGNOSIS AND TESTING (Continued)
Page 211 of 1938

INSTALLATION
1. Position the slave cylinder assembly to the tran-
saxle deck and secure with the nut and washer
assemblies (2) and tighten to specifications (Fig. 14).
2. Make sure the slave cylinder pushrod is prop-
erly seated in the cup end of the clutch release lever.
3. Connect the quick connect coupling. Refer to the
ªQuick Connect Couplingº removal and installation
procedure in this section.
MODULAR CLUTCH ASSEMBLY (2.0L AND 2.4L
GASOLINE)
The transaxle must be removed to service the mod-
ular clutch assembly and components (Fig. 17). Refer
to Group 21 for the ªA-558 Manual Transaxleº
removal procedure.
CLUTCH ASSEMBLY (2.5L DIESEL)
The transaxle must be removed to service the
clutch disc assembly and components.
REMOVAL
(1) Remove the transaxle, refer to Group 21, Tran-
saxle.
(2) Install universal clutch alignment tool into the
clutch assembly (this will prevent the clutch from
inadvertently being dropped).
(3) To avoid distortion of the pressure plate,
remove the clutch pressure plate bolts a few turns at
a time. Use a crisscross pattern until all bolts are
loosened.
(4) Carefully remove the clutch pressure plate and
disc (Fig. 18).To service the flywheel, refer to Group 9, Engine.
INSPECTION
Inspect for oil leakage through engine rear main
bearing oil seal and transaxle input shaft seal. If
leakage is noted, it should be corrected at this time.
The friction faces of the flywheel and pressure
plate should not have:
²Excessive discoloration
²Burned areas
²Small cracks
²Deep grooves
²Ridges
Replace parts as required.
CAUTION: Do not polish flywheel to a mirror like
surface. Clean the flywheel face with medium sand-
paper (80-160 grade), then wipe the surface with
mineral spirits. If the surface is severely scored,
heat checked, or warped, replace the flywheel.
CAUTION: Do not flat-machine the flywheel face.
The surface profile is slightly tapered and has a
0.30 mm step.
The disc assembly should be handled without
touching the facings. Replace disc if the facings show
evidence of grease or oil soakage, or wear to within
less than .38 mm (.015 inch) of the rivet heads. The
splines on the disc hub and transaxle input shaft
should be a snug fit without signs of excessive wear.
Metallic portions of disc assembly should be dry and
clean, and not been discolored from excessive heat.
Each of the arched springs between the facings
should not be broken and all rivets should be tight.
Wipe the friction surface of the pressure plate with
mineral spirits.
Using a straight edge, check clutch cover (pressure
plate) for flatness. The clutch cover (pressure plate)
Fig. 17 Modular Clutch Assembly Ð 2.0L and 2.4L
Fig. 18 Clutch Disc, Cover and Pressure Plate
NS/GSCLUTCH 6 - 13
REMOVAL AND INSTALLATION (Continued)
Page 212 of 1938

friction area should be slightly concave, with the
inner diameter 0.02 mm to 0.1 mm (.0008 in. to .0039
in.) below the outer diameter. It should also be free
from discoloration, burned areas, cracks, grooves, or
ridges.
Using a surface plate, test cover for flatness. All
sections around attaching bolt holes should be in con-
tact with surface plate within .015 inch.
The cover should be a snug fit on flywheel dowels.
If the clutch assembly does not meet these require-
ments, it should be replaced.
INSTALLATION
(1) Position the clutch and pressure plate onto the
flywheel.
(2) Insert the universal clutch alignment tool into
the clutch disc.
(3) To avoid distortion of the pressure plate, bolts
should be tightened a few turns at a time (Fig. 19).
Use a crisscross pattern until all bolts are seated.
Tighten pressure plate bolts to 27 N´m (20 ft. lbs.).
(4) Remove the universal clutch alignment tool.
(5) Install the transaxle, refer to Group 21, Tran-
saxle.
(6) Fill transaxle to the proper level with the spec-
ified lubricant.
(7) While the vehicle is elevated slightly, run the
transaxle through all the forward gears. Apply
brakes and shift into reverse. Run the transaxle
through reverse gear.
(8) Check the transaxle for leaks and recheck the
level of the transaxle lubricant.
CLUTCH RELEASE BEARING AND FORK
Remove the transaxle from the vehicle. See Group
21, for removal and installation procedures.
REMOVAL
(1) Remove clutch release shaft E-clip (Fig. 20).
(2) Remove the clutch release shaft and then slide
the fork and bearing assembly off the bearing pilot
(Fig. 21).
Fig. 19 2.5 Diesel Clutch Assembly
Fig. 20 E-clip at Clutch Release Lever Shaft
Fig. 21 Clutch Release Shaft
6 - 14 CLUTCHNS/GS
REMOVAL AND INSTALLATION (Continued)
Page 463 of 1938

(1) Connect wire connector into fog lamp wire har-
ness.
(2) Insert bulb into lamp so index notches on bulb
engage with bosses in lamp (Fig. 5).
(3) Hinge wire retainer clip over bulb base.
(4) Engage wire clip to hold bulb into lamp.
(5) Install rear cover on fog lamp.
(6) Install fog lamp on vehicle.
FOG LAMP BULB ± TOWN and COUNTRY
REMOVAL
(1) Reach behind fascia and remove bulb by rotat-
ing counterclockwise (Fig. 6).
(2) Rotate lamp bulb counterclockwise to disengage
bulb.
(3) Disconnect the wire connector from fog lamp
bulb base.
(4) Replace bulb.
INSTALLATION
CAUTION: Do not touch the glass of halogen bulbs
with fingers or other oily surfaces, reduced bulb life
will result.
(1) Connect wire connector into fog lamp bulb
base.
(2) Insert bulb into fog lamp housing.
(3) Rotate lamp bulb clockwise to engage bulb.
(4) Verify bulb operation.
(5) Verify fog lamp alignment.
FRONT SIDE MARKER LAMP BULB TOWN and
COUNTRY
REMOVAL
(1) Remove screw attaching side marker lamp to
fascia.(2) Remove housing by pulling rearward and away
from fascia (Fig. 7).
(3) Rotate lamp socket counterclockwise one quar-
ter turn.
(4) Pull bulb socket from the rear of lamp (Fig. 8).
(5) Pull bulb from socket.
INSTALLATION
(1) Insert bulb into socket.
(2) Insert bulb socket into rear of housing.
(3) Rotate park and turn signal socket clockwise
one quarter turn.
(4) Verify bulb operation.
(5) Install screw attaching side marker lamp.
PARKING AND TURN SIGNAL BULB
REMOVAL
(1) From under front wheelhouse, remove access
cover behind parking and turn signal lamp.
(2) Through access hole in wheelhouse, rotate
parking and turn signal socket counterclockwise one
quarter turn.
(3) Pull socket from back of lamp (Fig. 9).
(4) Pull bulb from socket.
INSTALLATION
(1) Align key on bulb base to groove in socket and
insert bulb into socket.
Fig. 6 Fog Lamp Bulb ± T&C
Fig. 7 Front Side Marker Lamp Bulb ± T&C
Fig. 8 Front Side Marker Lamp Sockets
NSLAMPS 8L - 11
REMOVAL AND INSTALLATION (Continued)
Page 1089 of 1938

CAUTION: If timing belt was damaged due to incor-
rect tracking (alignment), the belt tensioner assem-
bly must be replace. Refer to Timing Belt Tensioner
Assembly Removal and Installation procedure out-
lined in this section.
INSTALLATION
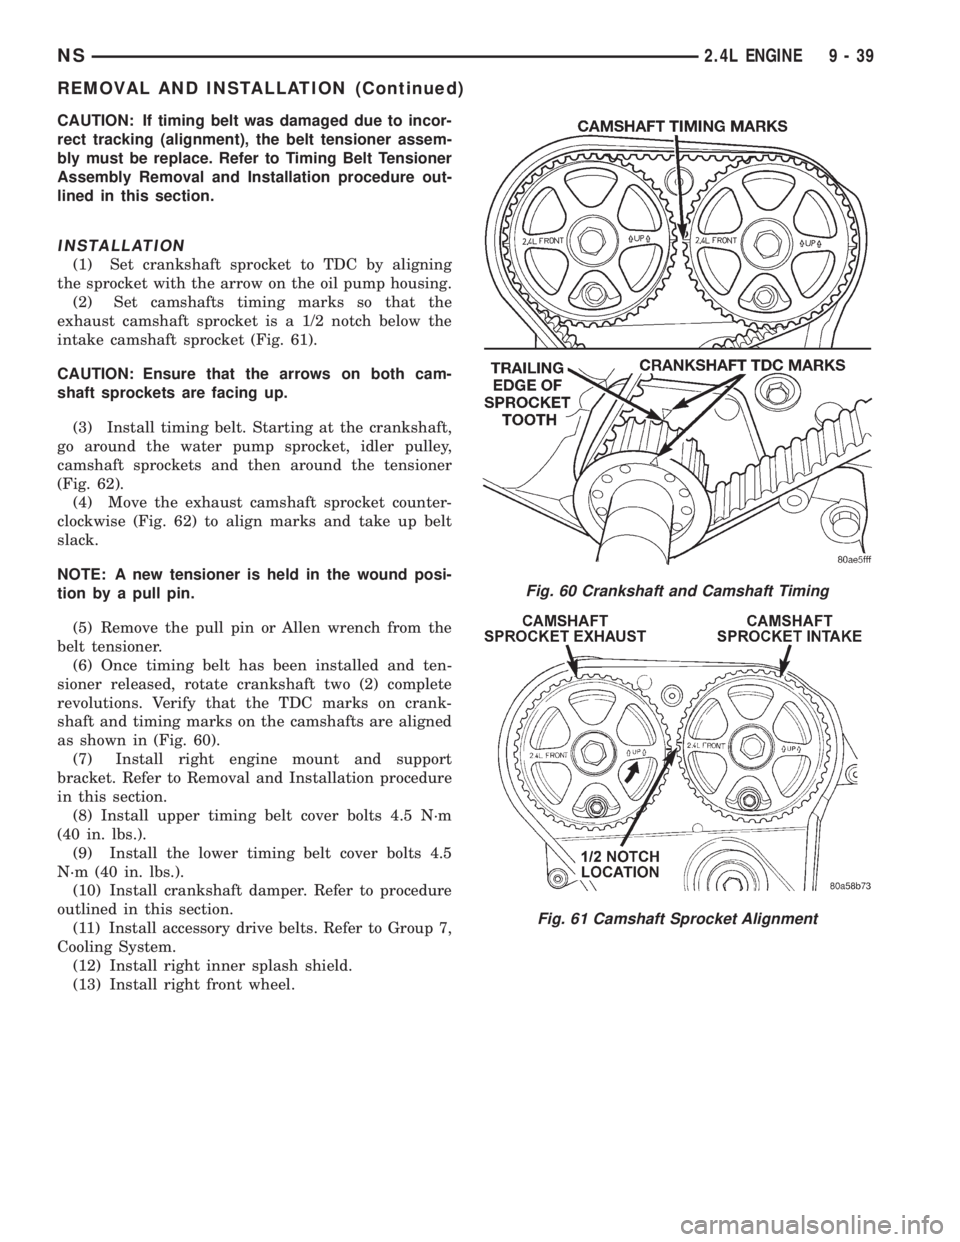
(1) Set crankshaft sprocket to TDC by aligning
the sprocket with the arrow on the oil pump housing.
(2) Set camshafts timing marks so that the
exhaust camshaft sprocket is a 1/2 notch below the
intake camshaft sprocket (Fig. 61).
CAUTION: Ensure that the arrows on both cam-
shaft sprockets are facing up.
(3) Install timing belt. Starting at the crankshaft,
go around the water pump sprocket, idler pulley,
camshaft sprockets and then around the tensioner
(Fig. 62).
(4) Move the exhaust camshaft sprocket counter-
clockwise (Fig. 62) to align marks and take up belt
slack.
NOTE: A new tensioner is held in the wound posi-
tion by a pull pin.
(5) Remove the pull pin or Allen wrench from the
belt tensioner.
(6) Once timing belt has been installed and ten-
sioner released, rotate crankshaft two (2) complete
revolutions. Verify that the TDC marks on crank-
shaft and timing marks on the camshafts are aligned
as shown in (Fig. 60).
(7) Install right engine mount and support
bracket. Refer to Removal and Installation procedure
in this section.
(8) Install upper timing belt cover bolts 4.5 N´m
(40 in. lbs.).
(9) Install the lower timing belt cover bolts 4.5
N´m (40 in. lbs.).
(10) Install crankshaft damper. Refer to procedure
outlined in this section.
(11) Install accessory drive belts. Refer to Group 7,
Cooling System.
(12) Install right inner splash shield.
(13) Install right front wheel.
Fig. 60 Crankshaft and Camshaft Timing
Fig. 61 Camshaft Sprocket Alignment
NS2.4L ENGINE 9 - 39
REMOVAL AND INSTALLATION (Continued)
Page 1167 of 1938

(3) Slowly rotate crankshaft clockwise, forcing out
upper half of bearing shell.
INSTALLATION
NOTE: Only one main bearing should be selec-
tively fitted while all other main bearing caps are
properly tightened.
When installing a new upper bearing shell, slightly
chamfer the sharp edges from the plain side.
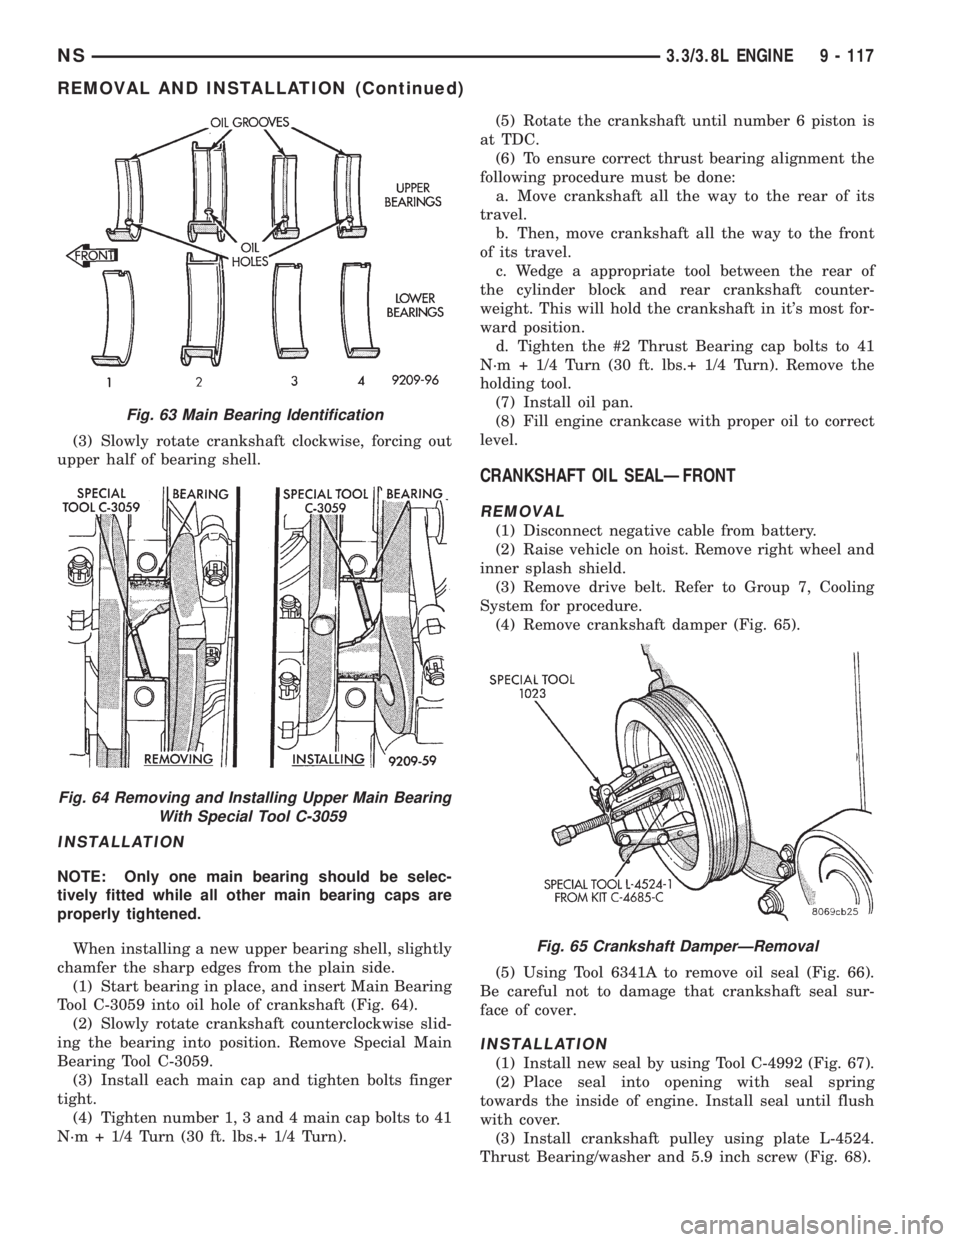
(1) Start bearing in place, and insert Main Bearing
Tool C-3059 into oil hole of crankshaft (Fig. 64).
(2) Slowly rotate crankshaft counterclockwise slid-
ing the bearing into position. Remove Special Main
Bearing Tool C-3059.
(3) Install each main cap and tighten bolts finger
tight.
(4) Tighten number 1, 3 and 4 main cap bolts to 41
N´m + 1/4 Turn (30 ft. lbs.+ 1/4 Turn).(5) Rotate the crankshaft until number 6 piston is
at TDC.
(6) To ensure correct thrust bearing alignment the
following procedure must be done:
a. Move crankshaft all the way to the rear of its
travel.
b. Then, move crankshaft all the way to the front
of its travel.
c. Wedge a appropriate tool between the rear of
the cylinder block and rear crankshaft counter-
weight. This will hold the crankshaft in it's most for-
ward position.
d. Tighten the #2 Thrust Bearing cap bolts to 41
N´m + 1/4 Turn (30 ft. lbs.+ 1/4 Turn). Remove the
holding tool.
(7) Install oil pan.
(8) Fill engine crankcase with proper oil to correct
level.
CRANKSHAFT OIL SEALÐFRONT
REMOVAL
(1) Disconnect negative cable from battery.
(2) Raise vehicle on hoist. Remove right wheel and
inner splash shield.
(3) Remove drive belt. Refer to Group 7, Cooling
System for procedure.
(4) Remove crankshaft damper (Fig. 65).
(5) Using Tool 6341A to remove oil seal (Fig. 66).
Be careful not to damage that crankshaft seal sur-
face of cover.
INSTALLATION
(1) Install new seal by using Tool C-4992 (Fig. 67).
(2) Place seal into opening with seal spring
towards the inside of engine. Install seal until flush
with cover.
(3) Install crankshaft pulley using plate L-4524.
Thrust Bearing/washer and 5.9 inch screw (Fig. 68).
Fig. 63 Main Bearing Identification
Fig. 64 Removing and Installing Upper Main Bearing
With Special Tool C-3059
Fig. 65 Crankshaft DamperÐRemoval
NS3.3/3.8L ENGINE 9 - 117
REMOVAL AND INSTALLATION (Continued)