Page 1547 of 1954

Headlights
Combinatio n Ligh t Switc h
Replacemen t
1. Remov e th e dashboar d lowe r cove r (se e sectio n 20 ).
2 . Remove the steering column covers (see
section 17 ).
3 . Disconnec t th e 14 P connecto r fro m th e combinatio n
ligh t switch , the n remov e th e tw o screw s an d th e
switch .
4 . Instal l th e combinatio n ligh t switc h i n th e revers e
orde r o f removal .
COMBINATIO N LIGH T SWITC H
14
P CONNECTO R
Replacemen t
CAUTION: Headlight s becom e ver y ho t i n use ; d o no t
touc h the m o r th e attachin g hardwar e immediatel y
afte r the y hav e bee n turne d off .
1 . Remov e th e fron t bumpe r an d fron t bumpe r uppe r
bea m (se e sectio n 20 ).
2 . Disconnec t th e connectors .
3 . Remov e th e fou r mountin g bolts , the n remov e th e
headligh t assembly .
HEADLIGH T
ASSEMBL Y
'9 6 - 9 8 models :
HEADLIGHT : 60/5 5 W
FRON T TUR N SIGNA L LIGHT : 2 1 W
FRON T PARKIN G LIGHT : 5 W x 2
FRON T FO G LIGHT : 5 5 W
SID E MARKE R LIGHT : 5 W
'9 9 - 0 1 models :
HEADLIGH T LO W BEAM : 3 5 W
HEADLIGH T HIG H BEAM : 5 5 W
FRON T TUR N SIGNAL/PARKIN G LIGHT : 27/ 8 W
SID E MARKE R LIGHT : 5 W
4. Instal l th e headligh t i n th e revers e orde r o f removal .
5 . Afte r replacement , adjus t th e headlight s t o loca l
requirements .
ProCarManuals.com
Page 1548 of 1954

Headlights
HID Bul b Remova l ('9 9 - 0 4 models )
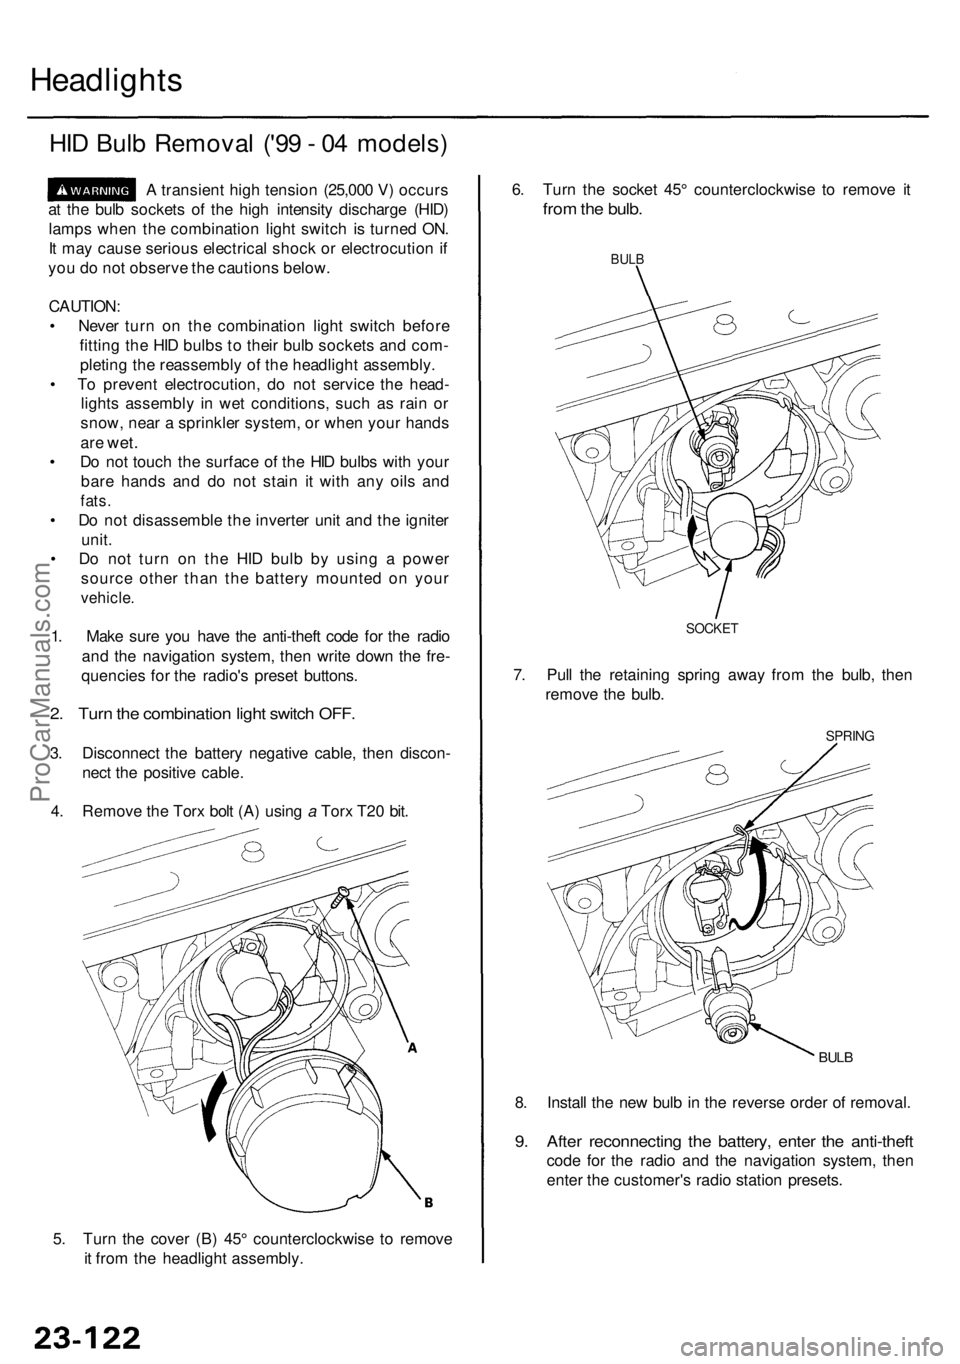
A transien t hig h tensio n (25,00 0 V ) occur s
a t th e bul b socket s o f th e hig h intensit y discharg e (HID )
lamp s whe n th e combinatio n ligh t switc h is turne d ON .
I t ma y caus e seriou s electrica l shoc k o r electrocutio n if
yo u d o no t observ e th e caution s below .
CAUTION :
• Neve r tur n o n th e combinatio n ligh t switc h befor e
fittin g th e HI D bulb s t o thei r bul b socket s an d com -
pletin g th e reassembl y o f th e headligh t assembly .
• T o preven t electrocution , d o no t servic e th e head -
light s assembl y i n we t conditions , suc h a s rai n o r
snow , nea r a sprinkle r system , o r whe n you r hand s
are wet .
• D o no t touc h th e surfac e o f th e HI D bulb s wit h you r
bar e hand s an d d o no t stai n i t wit h an y oil s an d
fats .
• D o no t disassembl e th e inverte r uni t an d th e ignite r
unit .
• D o no t tur n o n th e HI D bul b b y usin g a powe r
sourc e othe r tha n th e batter y mounte d o n you r
vehicle .
1. Mak e sur e yo u hav e th e anti-thef t cod e fo r th e radi o
an d th e navigatio n system , the n writ e dow n th e fre -
quencie s fo r th e radio' s prese t buttons .
2. Tur n th e combinatio n ligh t switc h OFF .
3. Disconnec t th e batter y negativ e cable , the n discon -
nec t th e positiv e cable .
4 . Remov e th e Tor x bol t (A ) usin g a Tor x T2 0 bit .
5 . Tur n th e cove r (B ) 45 ° counterclockwis e t o remov e
i t fro m th e headligh t assembly . 8
. Instal l th e ne w bul b in th e revers e orde r o f removal .
9. Afte r reconnectin g th e battery , ente r th e anti-thef t
code fo r th e radi o an d th e navigatio n system , the n
ente r th e customer' s radi o statio n presets .
BULB
SPRIN G
6. Tur n th e socke t 45 ° counterclockwis e t o remov e i t
fro m th e bulb .
BULB
7. Pul l th e retainin g sprin g awa y fro m th e bulb , the n
remov e th e bulb .
SOCKE T
ProCarManuals.com
Page 1549 of 1954

Adjustment ('9 6 - 9 8 models )
Before adjustin g th e headlights :
• Par k th e vehicl e o n leve l ground .
• Mak e sur e th e fue l tan k i s full .
• Th e drive r o r someon e who weigh s th e sam e shoul d
si t i n th e driver' s seat .
• Loa d th e trun k wit h th e item s yo u usuall y carry .
• Pus h dow n o n th e fron t an d rea r bumper s severa l
time s t o mak e sur e th e vehicl e i s sittin g normally .
CAUTION : Haloge n headlight s becom e ver y ho t i n use ;
d o no t touc h the m o r th e attachin g hardwar e immedi -
atel y afte r the y hav e bee n turne d off .
1 . Ope n th e hood .
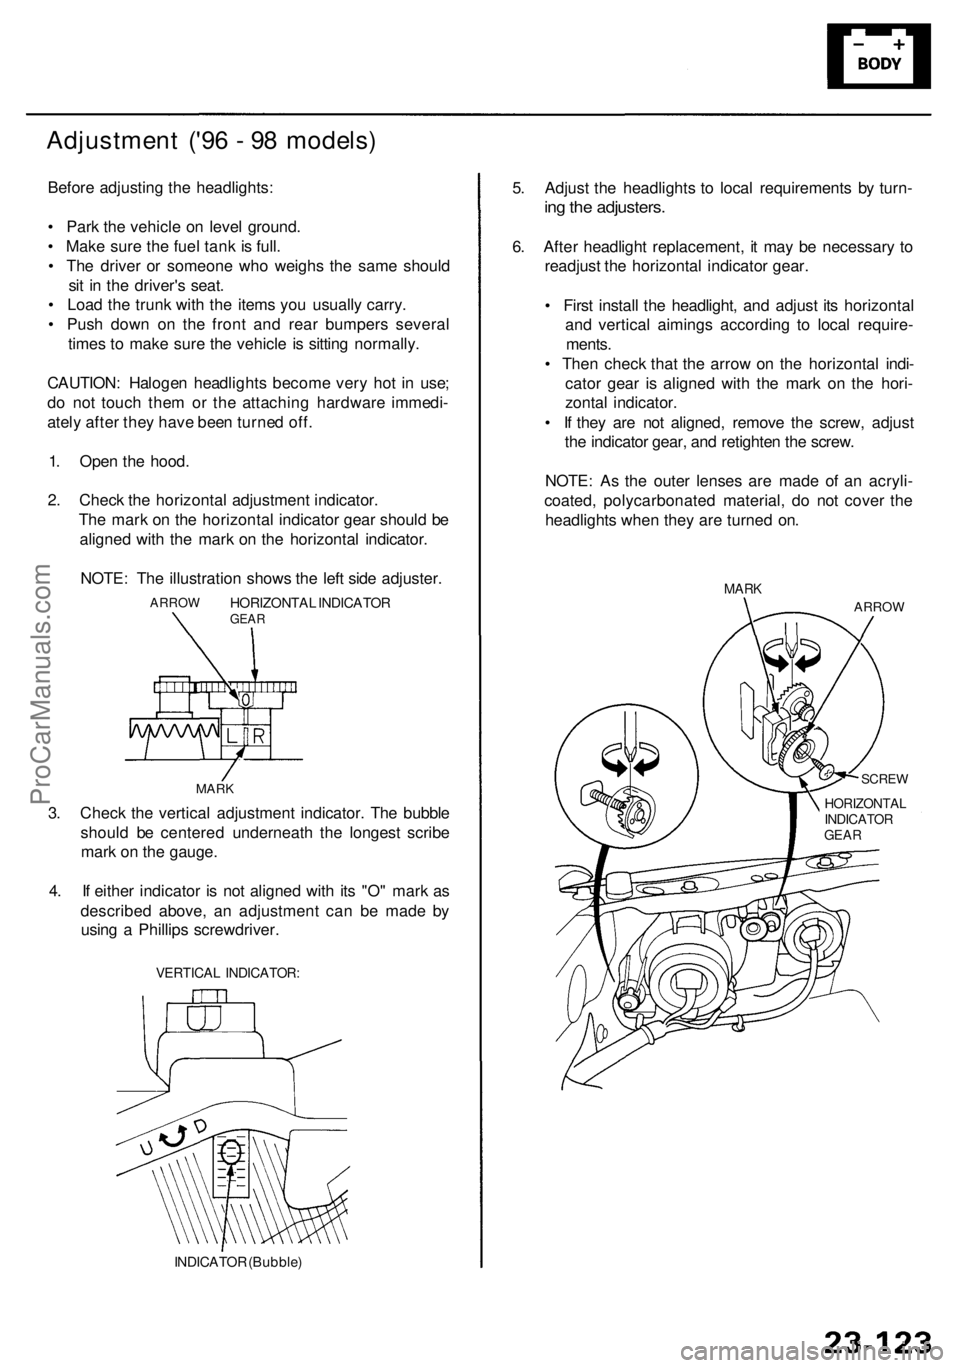
2 . Chec k th e horizonta l adjustmen t indicator .
Th e mar k o n th e horizonta l indicato r gea r shoul d b e
aligne d wit h th e mar k o n th e horizonta l indicator .
NOTE : Th e illustratio n show s th e lef t sid e adjuster .
HORIZONTA L INDICATO RGEARARRO W
MARK
3. Chec k th e vertica l adjustmen t indicator . Th e bubbl e
shoul d b e centere d underneat h th e longes t scrib e
mar k o n th e gauge .
4 . I f eithe r indicato r i s no t aligne d wit h it s "O " mar k a s
describe d above , a n adjustmen t ca n b e mad e b y
usin g a Phillip s screwdriver .
VERTICAL INDICATOR :
INDICATOR (Bubble )
5. Adjus t th e headlight s t o loca l requirement s b y turn -
ing th e adjusters .
6. Afte r headligh t replacement , i t ma y b e necessar y t o
readjus t th e horizonta l indicator gear.
• Firs t instal l th e headlight , an d adjus t it s horizonta l
an d vertica l aiming s accordin g t o loca l require -
ments .
• The n chec k tha t th e arro w o n th e horizonta l indi -
cato r gea r i s aligne d wit h th e mar k o n th e hori -
zonta l indicator .
• I f the y ar e no t aligned , remov e th e screw , adjus t
th e indicato r gear , an d retighte n th e screw .
NOTE : A s th e oute r lense s ar e mad e o f a n acryli -
coated , polycarbonate d material , d o no t cove r th e
headlight s whe n the y ar e turne d on .
MAR K
ARRO W
SCREW
HORIZONTA L
I NDICATO R
GEA R
ProCarManuals.com
Page 1550 of 1954

Headlights
Adjustmen t ('9 9 - 0 4 models )
CAUTION : Headlight s becom e ver y ho t i n use ; d o no t
touc h the m o r an y attachin g hardwar e immediatel y
afte r the y hav e bee n turne d off .
Befor e adjustin g th e headlights :
• Par k th e vehicl e o n a leve l surface .
• Mak e sur e th e tir e pressure s ar e correct .
• Th e drive r o r someon e who weigh s th e sam e shoul d
si t i n th e driver' s seat .
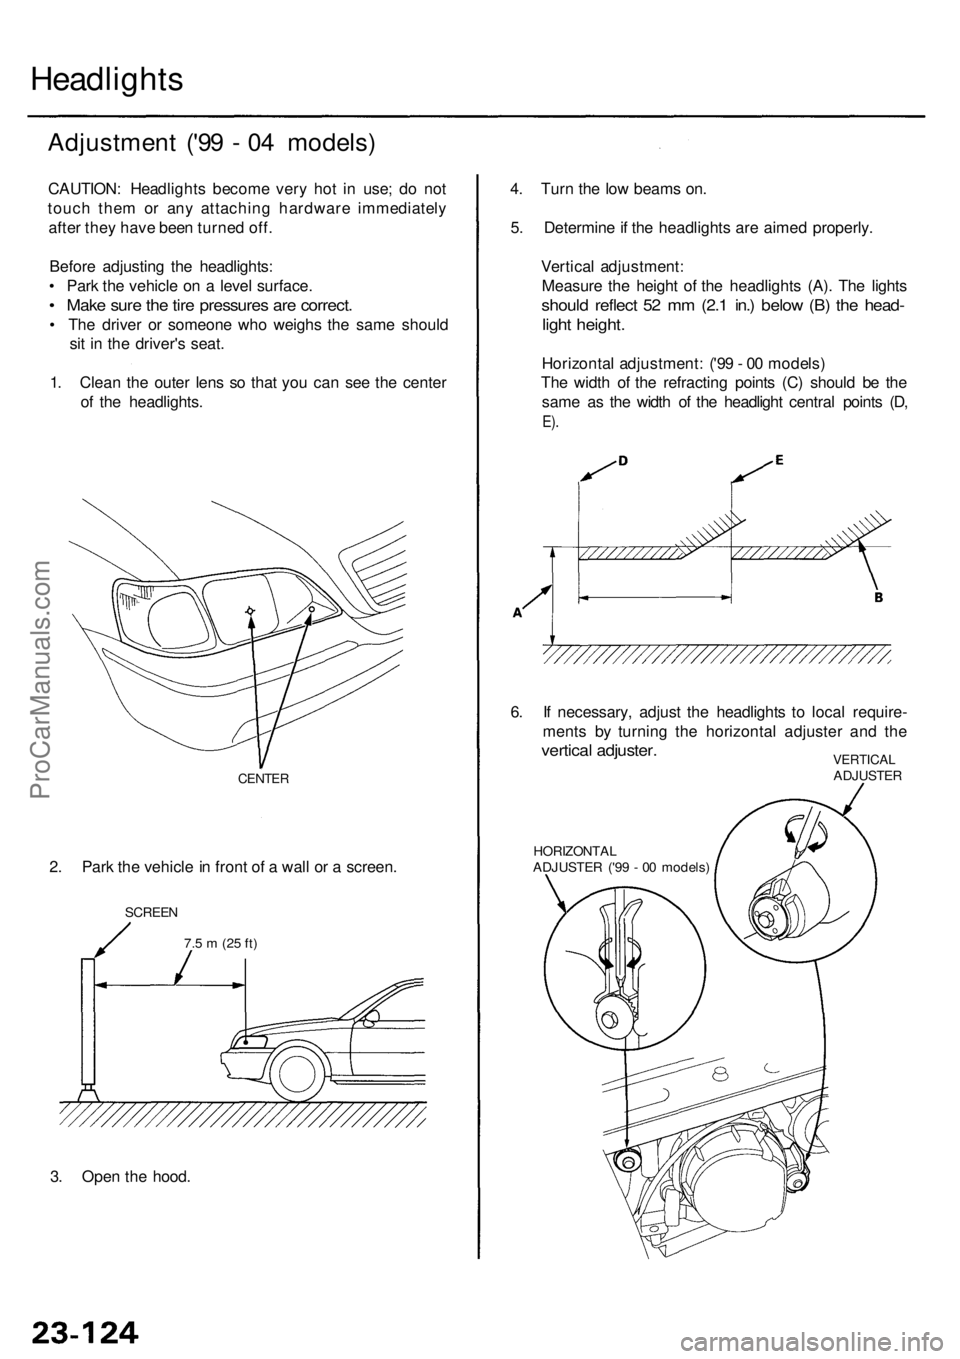
1 . Clea n th e oute r len s s o tha t yo u can see th e cente r
o f th e headlights . 4
. Tur n th e lo w beam s on .
5 . Determin e if th e headlight s ar e aime d properly .
Vertica l adjustment :
Measur e th e heigh t o f th e headlight s (A) . Th e light s
shoul d reflec t 5 2 m m (2. 1 in. ) belo w (B ) th e head -
light height .
Horizonta l adjustment : ('9 9 - 0 0 models )
Th e widt h o f th e refractin g point s (C ) shoul d b e th e
sam e a s th e widt h o f th e headligh t centra l point s (D ,
E).
2. Par k th e vehicl e in fron t o f a wal l o r a screen .
CENTER
SCREE N
3. Ope n th e hood .
7.5 m (2 5 ft )
6. I f necessary , adjus t th e headlight s t o loca l require -
ment s b y turnin g th e horizonta l adjuste r an d th e
vertica l adjuster .VERTICA LADJUSTE R
HORIZONTA L
ADJUSTE R ('9 9 - 0 0 models )
ProCarManuals.com
Page 1712 of 1954
![ACURA RL KA9 1996 Service Repair Manual From pag e 23-332
Indicato r flashe s
0.2 se c ON/2. 4 se c OF F(ARMED )
YES
Wan t th e syste m disarmed ?
• Trun k li d switc h O N
• Trun k ke y cylinde r switc h O N[UNLOCK ]
Trunk opene d wit ACURA RL KA9 1996 Service Repair Manual From pag e 23-332
Indicato r flashe s
0.2 se c ON/2. 4 se c OF F(ARMED )
YES
Wan t th e syste m disarmed ?
• Trun k li d switc h O N
• Trun k ke y cylinde r switc h O N[UNLOCK ]
Trunk opene d wit](/manual-img/32/56992/w960_56992-1711.png)
From pag e 23-332
Indicato r flashe s
0.2 se c ON/2. 4 se c OF F(ARMED )
YES
Wan t th e syste m disarmed ?
• Trun k li d switc h O N
• Trun k ke y cylinde r switc h O N[UNLOCK ]
Trunk opene d wit h key ?YES
NO
N O
Illega l activit y (An y o f th e following )
1. Doo r i s opene d forcibl y o r
2 . Trun k li d is opene d withou t usin g th e ke y o r
3 . Hoo d is opene d o r
4 . Batter y terminal(s ) ar e disconnecte d an d
reconnecte d o r5. Engin e starte r circui t an d batter y circui t ar e
bypasse d b y breakin g th e ignitio n switc h o r
6 . Hood/trun k li d opene r i n th e vehicl e is
operate d o r
7. Pani c butto n is pushe d
• Th e horns , headlights , sid e marke r lights , an d tail -
light s soun d an d flas h repeatedl y fo r tw o minutes .
• Engin e starte r circui t interrupte d
Abou t 2 minute s passed ?
YESNOWan t th e syste m disarmed ?
YES
Eithe r doo r unlocke d b y usin g
th e ke y o r transmitte r
• Eithe r doo r ke y cylinde r switc h
ON [UNLOCK ]
The securit y alar m syste m isdisarme d
Indicato r stop s flashin g
Rear m th e securit y alar m system ?
NOYE S
To pag e 23-332
ProCarManuals.com