Page 971 of 2248
![SUBARU LEGACY 1995 Service Repair Manual B5M0304
15. Roof Rack (Wagon only, if
equipped)
A: REMOVAL
1) Remove roof trim, rear quarter trim, pillar trim, etc.
<Ref. to 5-3 [W5A0].>
2) Remove flange bolts.
3) Remove flange nuts.
4) Remove roof SUBARU LEGACY 1995 Service Repair Manual B5M0304
15. Roof Rack (Wagon only, if
equipped)
A: REMOVAL
1) Remove roof trim, rear quarter trim, pillar trim, etc.
<Ref. to 5-3 [W5A0].>
2) Remove flange bolts.
3) Remove flange nuts.
4) Remove roof](/manual-img/17/57432/w960_57432-970.png)
B5M0304
15. Roof Rack (Wagon only, if
equipped)
A: REMOVAL
1) Remove roof trim, rear quarter trim, pillar trim, etc.
2) Remove flange bolts.
3) Remove flange nuts.
4) Remove roof rail.
B: INSTALLATION
Installation is in the reverse order of removal.
CAUTION:
To prevent deformation, be sure to install roof rail in
steps 4), 3), 2) and 1), in that order.
B5M0307A
16. Sunroof
A: REMOVAL
1. GLASS LID ASSEMBLY
1) Completely open sun shade. (Push it back far.)
2) Remove a clip and detach guide rail cover.
3) Remove six nuts from the left and right lid bracket.
4) Working inside, slightly raise glass lid assembly until it
is disengaged from lid bracket.
5) Hold both ends of glass lid assembly and remove it at
an angle.
B5M0308B
2. SUNROOF MOTOR AND RELAY
1) Remove center pillar trim upper.
2) Remove front pillar trim upper.
3) Remove assist grip on left side.
4) Remove sunvisor with hook.
5) Remove sunroof switch.
6) Remove rearview mirror.
7) While rolling up roof trim, disconnect harness clips and
connector.
8) While rolling up roof trim, remove spot lamp bracket and
sunroof motor.
51
5-1SERVICE PROCEDURE
15. Roof Rack (Wagon only, if equipped) - 16. Sunroof
Page 972 of 2248
![SUBARU LEGACY 1995 Service Repair Manual B5M0304
15. Roof Rack (Wagon only, if
equipped)
A: REMOVAL
1) Remove roof trim, rear quarter trim, pillar trim, etc.
<Ref. to 5-3 [W5A0].>
2) Remove flange bolts.
3) Remove flange nuts.
4) Remove roof SUBARU LEGACY 1995 Service Repair Manual B5M0304
15. Roof Rack (Wagon only, if
equipped)
A: REMOVAL
1) Remove roof trim, rear quarter trim, pillar trim, etc.
<Ref. to 5-3 [W5A0].>
2) Remove flange bolts.
3) Remove flange nuts.
4) Remove roof](/manual-img/17/57432/w960_57432-971.png)
B5M0304
15. Roof Rack (Wagon only, if
equipped)
A: REMOVAL
1) Remove roof trim, rear quarter trim, pillar trim, etc.
2) Remove flange bolts.
3) Remove flange nuts.
4) Remove roof rail.
B: INSTALLATION
Installation is in the reverse order of removal.
CAUTION:
To prevent deformation, be sure to install roof rail in
steps 4), 3), 2) and 1), in that order.
B5M0307A
16. Sunroof
A: REMOVAL
1. GLASS LID ASSEMBLY
1) Completely open sun shade. (Push it back far.)
2) Remove a clip and detach guide rail cover.
3) Remove six nuts from the left and right lid bracket.
4) Working inside, slightly raise glass lid assembly until it
is disengaged from lid bracket.
5) Hold both ends of glass lid assembly and remove it at
an angle.
B5M0308B
2. SUNROOF MOTOR AND RELAY
1) Remove center pillar trim upper.
2) Remove front pillar trim upper.
3) Remove assist grip on left side.
4) Remove sunvisor with hook.
5) Remove sunroof switch.
6) Remove rearview mirror.
7) While rolling up roof trim, disconnect harness clips and
connector.
8) While rolling up roof trim, remove spot lamp bracket and
sunroof motor.
51
5-1SERVICE PROCEDURE
15. Roof Rack (Wagon only, if equipped) - 16. Sunroof
Page 993 of 2248
B5M0068
8. OUTER HANDLE
1) Remove trim panel.
2) Remove sealing cover.
3) Detach door latch rod from outer handle and key lock.
4) Loosen nut securing outer handle and then remove
outer handle from outside.
CAUTION:
Be careful not to damage door.
Installation is in the reverse order of removal.
Tightening torque:
7.4±2.0 N⋅m (0.75±0.2 kg-m, 5.4±1.4 ft-lb)
B5M0069A
9. KEY LOCK
1) Remove trim panel.
2) Remove sealing cover.
3) Completely close door glass.
4) Remove outer handle.
5) Loosen spring�
1securing key lock.
6) Remove key lock from outer handle.
Installation is in the reverse order of removal.
NOTE:
Install so that key slot in key lock comes to center of hole
in outer handle.
B5M0070A
10. GUSSET
NOTE:
Be sure window is all the way down.
1) Remove trim panel.
2) Remove door rearview mirror.
3) Remove sealing cover.
4) Remove bolts and nuts which secure gusset.
5) Lift out gusset�
1.
To install, reverse the above removal procedures.
18
5-2SERVICE PROCEDURE
2. Door
Page 1015 of 2248

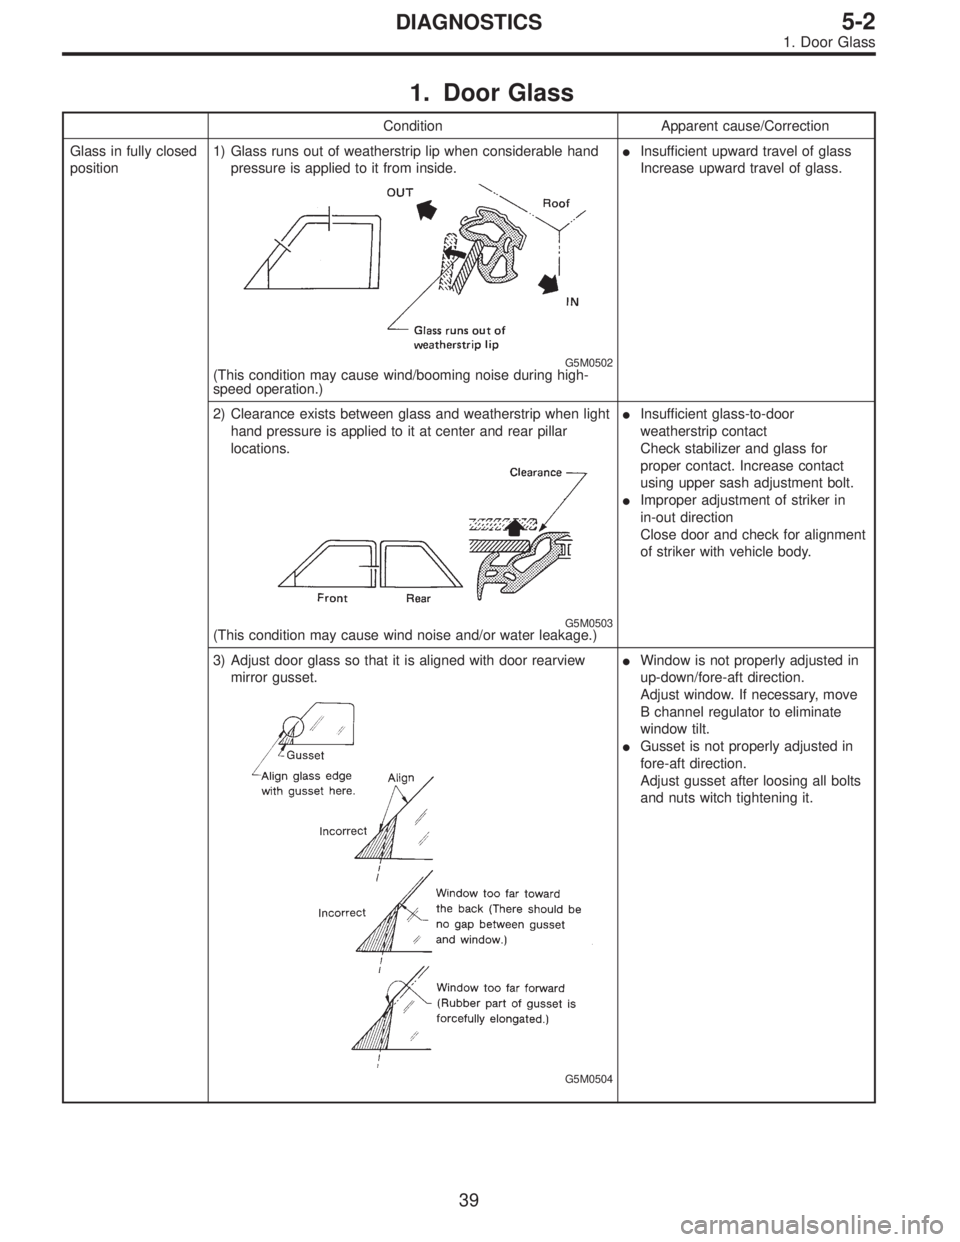
1. Door Glass
Condition Apparent cause/Correction
Glass in fully closed
position1) Glass runs out of weatherstrip lip when considerable hand
pressure is applied to it from inside.
G5M0502(This condition may cause wind/booming noise during high-
speed operation.)�Insufficient upward travel of glass
Increase upward travel of glass.
2) Clearance exists between glass and weatherstrip when light
hand pressure is applied to it at center and rear pillar
locations.
G5M0503(This condition may cause wind noise and/or water leakage.)�Insufficient glass-to-door
weatherstrip contact
Check stabilizer and glass for
proper contact. Increase contact
using upper sash adjustment bolt.
�Improper adjustment of striker in
in-out direction
Close door and check for alignment
of striker with vehicle body.
3) Adjust door glass so that it is aligned with door rearview
mirror gusset.
G5M0504
�Window is not properly adjusted in
up-down/fore-aft direction.
Adjust window. If necessary, move
B channel regulator to eliminate
window tilt.
�Gusset is not properly adjusted in
fore-aft direction.
Adjust gusset after loosing all bolts
and nuts witch tightening it.
39
5-2DIAGNOSTICS
1. Door Glass
Page 1144 of 2248
![SUBARU LEGACY 1995 Service Repair Manual B6M0133
B: INSPECTION
1. DOOR LOCK SWITCH (DRIVER’S DOOR)
1) Remove door trim panel. <Ref. to 5-2 [W2A2].>
2) Disconnect connector of door switch.
3) Set switch to each position and check continuity SUBARU LEGACY 1995 Service Repair Manual B6M0133
B: INSPECTION
1. DOOR LOCK SWITCH (DRIVER’S DOOR)
1) Remove door trim panel. <Ref. to 5-2 [W2A2].>
2) Disconnect connector of door switch.
3) Set switch to each position and check continuity](/manual-img/17/57432/w960_57432-1143.png)
B6M0133
B: INSPECTION
1. DOOR LOCK SWITCH (DRIVER’S DOOR)
1) Remove door trim panel.
2) Disconnect connector of door switch.
3) Set switch to each position and check continuity
between terminals as indicated in table below:
Terminal
Switch position12
UNLOCK��
LOCK
B6M0135
2. ACTUATOR
1) Remove door trim panel.
2) Disconnect connector of actuator.
3) Make sure that door link moves to LOCK or UNLOCK
position when battery voltage is applied between terminals
as described below:
�Connect battery positive (+) terminal to terminal No. 2,
and negative (�) terminal to terminal No. 4 at a moment.
�Connect battery positive (+) terminal to terminal No. 4,
and negative terminal (�) to terminal No. 2 at a moment.
B6M0352A
18. Remote Controlled Rearview Mirror
A: REMOVAL AND INSTALLATION
1. REMOTE CONTROLLED REARVIEW MIRROR
SWITCH
1) Remove rearview mirror switch from instrument panel
by using a small standard screwdriver.
CAUTION:
Do not pry rearview mirror switch forcefully as this
may scratch instrument panel.
2) Remove rearview mirror switch while disconnecting
connector.
42
6-2SERVICE PROCEDURE
17. Power Door Lock - 18. Remote Controlled Rearview Mirror
Page 1145 of 2248
![SUBARU LEGACY 1995 Service Repair Manual B6M0133
B: INSPECTION
1. DOOR LOCK SWITCH (DRIVER’S DOOR)
1) Remove door trim panel. <Ref. to 5-2 [W2A2].>
2) Disconnect connector of door switch.
3) Set switch to each position and check continuity SUBARU LEGACY 1995 Service Repair Manual B6M0133
B: INSPECTION
1. DOOR LOCK SWITCH (DRIVER’S DOOR)
1) Remove door trim panel. <Ref. to 5-2 [W2A2].>
2) Disconnect connector of door switch.
3) Set switch to each position and check continuity](/manual-img/17/57432/w960_57432-1144.png)
B6M0133
B: INSPECTION
1. DOOR LOCK SWITCH (DRIVER’S DOOR)
1) Remove door trim panel.
2) Disconnect connector of door switch.
3) Set switch to each position and check continuity
between terminals as indicated in table below:
Terminal
Switch position12
UNLOCK��
LOCK
B6M0135
2. ACTUATOR
1) Remove door trim panel.
2) Disconnect connector of actuator.
3) Make sure that door link moves to LOCK or UNLOCK
position when battery voltage is applied between terminals
as described below:
�Connect battery positive (+) terminal to terminal No. 2,
and negative (�) terminal to terminal No. 4 at a moment.
�Connect battery positive (+) terminal to terminal No. 4,
and negative terminal (�) to terminal No. 2 at a moment.
B6M0352A
18. Remote Controlled Rearview Mirror
A: REMOVAL AND INSTALLATION
1. REMOTE CONTROLLED REARVIEW MIRROR
SWITCH
1) Remove rearview mirror switch from instrument panel
by using a small standard screwdriver.
CAUTION:
Do not pry rearview mirror switch forcefully as this
may scratch instrument panel.
2) Remove rearview mirror switch while disconnecting
connector.
42
6-2SERVICE PROCEDURE
17. Power Door Lock - 18. Remote Controlled Rearview Mirror
Page 1146 of 2248
B6M0137
2. REARVIEW MIRROR
1) Remove door trim panel.
2) Disconnect connector of rearview mirror.
3) Remove screws which secure rearview mirror, and then
remove rearview mirror.
B6M0139A
B: INSPECTION
1. REARVIEW MIRROR SWITCH
Move rearview mirror switch to each position and check
continuity between terminals as indicated in table below:
Switch
position
TerminalMirror switch Left/Right changing switch
OFF Right Left Up Down Left N Right
7�
9�
6�
8�
2����
����
1�
���
��� �
4����
3
B6M0140
2. REARVIEW MIRROR
Check to ensure that rearview mirror moves properly when
battery voltage is applied to terminals as indicated in table
below:
OperationTerminal connection
(+) (�)
UP 3 1
DOWN 1 3
RIGHT 1 2
LEFT 2 1
43
6-2SERVICE PROCEDURE
18. Remote Controlled Rearview Mirror
Page 1185 of 2248

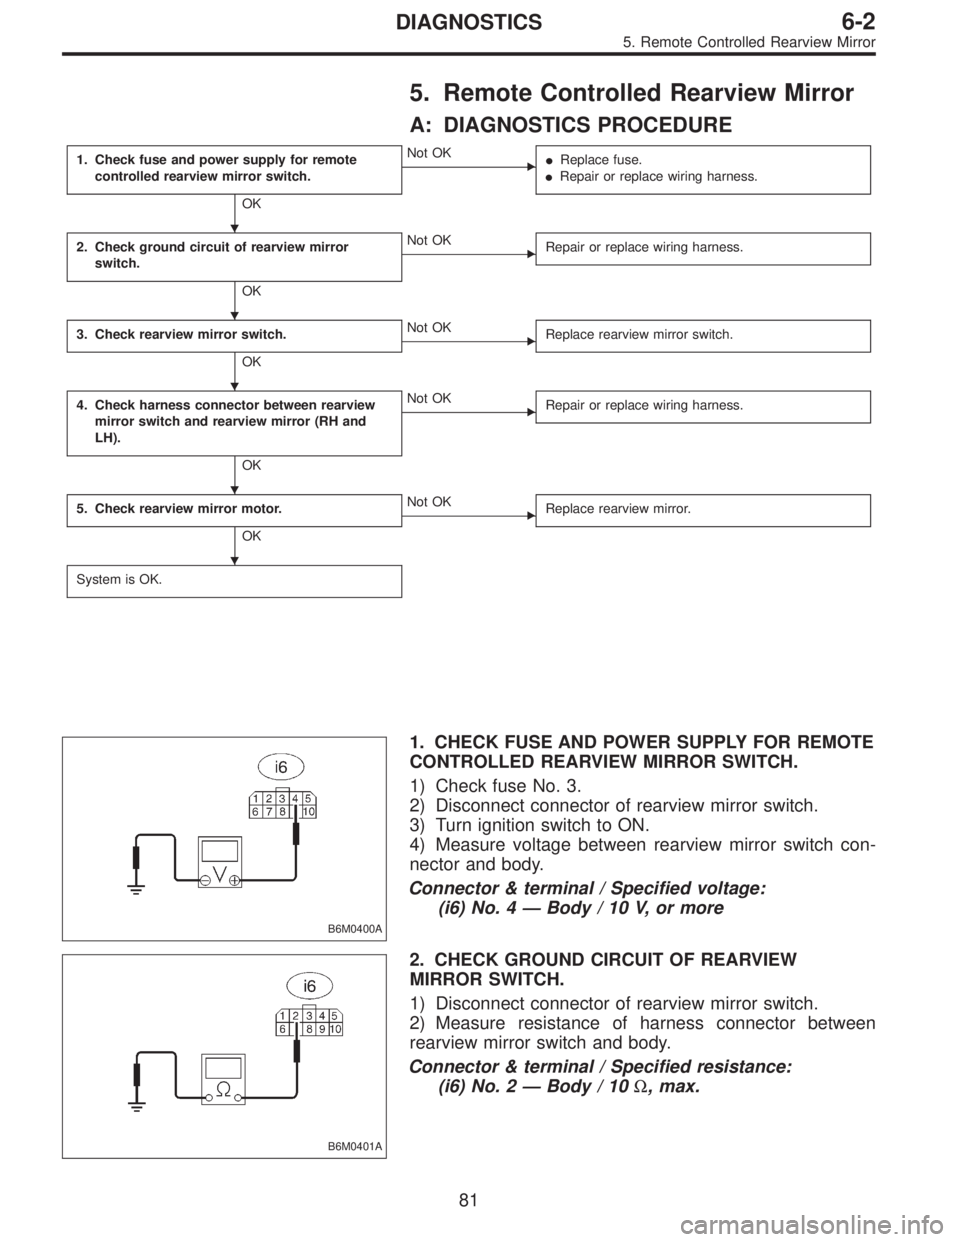
5. Remote Controlled Rearview Mirror
A: DIAGNOSTICS PROCEDURE
1. Check fuse and power supply for remote
controlled rearview mirror switch.
OK
�Not OK
�Replace fuse.
�Repair or replace wiring harness.
2. Check ground circuit of rearview mirror
switch.
OK
�Not OK
Repair or replace wiring harness.
3. Check rearview mirror switch.
OK
�Not OK
Replace rearview mirror switch.
4. Check harness connector between rearview
mirror switch and rearview mirror (RH and
LH).
OK
�Not OK
Repair or replace wiring harness.
5. Check rearview mirror motor.
OK
�Not OK
Replace rearview mirror.
System is OK.
B6M0400A
1. CHECK FUSE AND POWER SUPPLY FOR REMOTE
CONTROLLED REARVIEW MIRROR SWITCH.
1) Check fuse No. 3.
2) Disconnect connector of rearview mirror switch.
3) Turn ignition switch to ON.
4) Measure voltage between rearview mirror switch con-
nector and body.
Connector & terminal / Specified voltage:
(i6) No. 4—Body / 10 V, or more
B6M0401A
2. CHECK GROUND CIRCUIT OF REARVIEW
MIRROR SWITCH.
1) Disconnect connector of rearview mirror switch.
2) Measure resistance of harness connector between
rearview mirror switch and body.
Connector & terminal / Specified resistance:
(i6) No. 2—Body / 10Ω, max.
�
�
�
�
�
81
6-2DIAGNOSTICS
5. Remote Controlled Rearview Mirror