Page 1012 of 2248
2. WAGON MODEL
B5M0090A
1) Install rear gate trim.
2) Install glass in the same manner as in windshield.
3) About one hour after installation, test for water leakage.
Leave vehicle for 24 hours before using it.
4) Connect rear defogger connections.
5) Install high-mount stop light and rear wiper.
36
5-2SERVICE PROCEDURE
6. Rear Window Glass
Page 1013 of 2248
7. Rear Quarter Glass
A: REMOVAL
1. 4 DOOR MODEL
B5M0091A
1) Remove rear quarter molding.
2) Remove glass in the same manner as in windshield.
2. WAGON MODEL
B5M0092A
1) Remove rear quarter molding.
2) Remove glass in the same manner as in windshield.
G5M0497
B: INSTALLATION
1) Finish surface of adhesive layer on body.
Using a putty knife, etc., cut layer of adhesive stick firmly
to body and finish it into a smooth surface of about 2 mm
(0.08 in) in thickness.
CAUTION:
Be careful not to damage body finish.
37
5-2SERVICE PROCEDURE
7. Rear Quarter Glass
Page 1016 of 2248

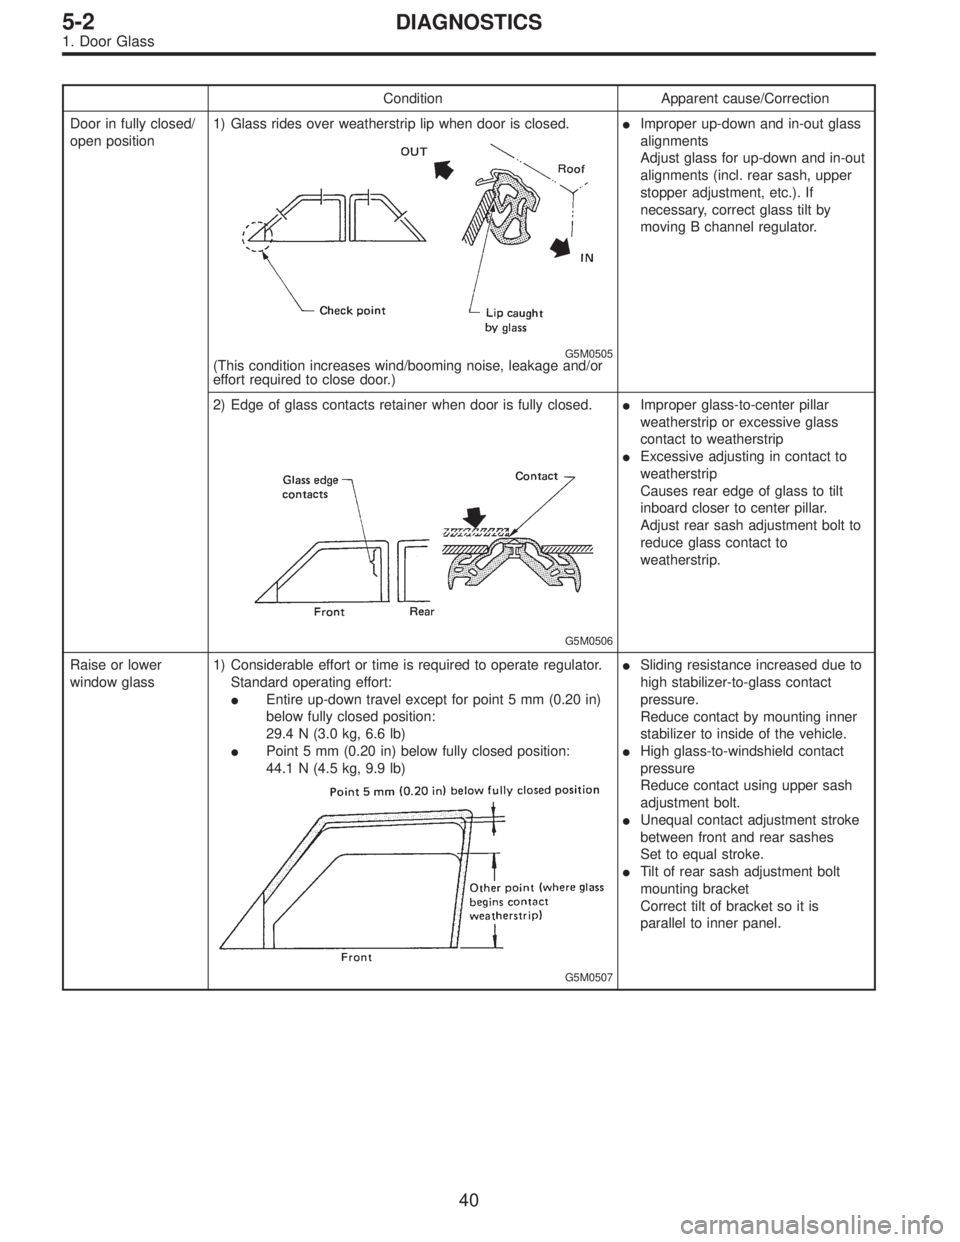
Condition Apparent cause/Correction
Door in fully closed/
open position1) Glass rides over weatherstrip lip when door is closed.
G5M0505(This condition increases wind/booming noise, leakage and/or
effort required to close door.)�Improper up-down and in-out glass
alignments
Adjust glass for up-down and in-out
alignments (incl. rear sash, upper
stopper adjustment, etc.). If
necessary, correct glass tilt by
moving B channel regulator.
2) Edge of glass contacts retainer when door is fully closed.
G5M0506
�Improper glass-to-center pillar
weatherstrip or excessive glass
contact to weatherstrip
�Excessive adjusting in contact to
weatherstrip
Causes rear edge of glass to tilt
inboard closer to center pillar.
Adjust rear sash adjustment bolt to
reduce glass contact to
weatherstrip.
Raise or lower
window glass1) Considerable effort or time is required to operate regulator.
Standard operating effort:
�Entire up-down travel except for point 5 mm (0.20 in)
below fully closed position:
29.4 N (3.0 kg, 6.6 lb)
�Point 5 mm (0.20 in) below fully closed position:
44.1 N (4.5 kg, 9.9 lb)
G5M0507
�Sliding resistance increased due to
high stabilizer-to-glass contact
pressure.
Reduce contact by mounting inner
stabilizer to inside of the vehicle.
�High glass-to-windshield contact
pressure
Reduce contact using upper sash
adjustment bolt.
�Unequal contact adjustment stroke
between front and rear sashes
Set to equal stroke.
�Tilt of rear sash adjustment bolt
mounting bracket
Correct tilt of bracket so it is
parallel to inner panel.
40
5-2DIAGNOSTICS
1. Door Glass
Page 1120 of 2248
B6M0346
9. Spot Light
A: REMOVAL AND INSTALLATION
1. SPOT LIGHT AND SWITCH
1) Pry spot light lens off using a screwdriver.
2) Remove screws which secure spot light body.
3) Remove spot light body while disconnecting connec-
tor(s).
B6M0347
B: INSPECTION
1. SPOT LIGHT SWITCH
Move switch and check continuity between terminal of spot
light switch connector and steel plate as shown.
Switch position Connector terminal Plate
Open (OFF)
Push in (ON)��
10. Front Wiper and Washer
A: ON-CAR SERVICES
1. ADJUSTMENT
1) Turn the wiper switch to OFF position.
2) Adjust blades in original position as shown in figure by
changing wiper arm installation.
G6M0115
Original position:
A: 25 — 30 mm (0.98 — 1.18 in)
B: 35 — 40 mm (1.38 — 1.57 in)
G6M0116
3) Stop the vehicle.
4) Adjust washer ejecting point on windshield glass as
shown in figure.
Ejecting point:
A: 375 mm (14.76 in)
B: 150 mm (5.91 in)
C: 380 mm (14.96 in)
22
6-2SERVICE PROCEDURE
9. Spot Light - 10. Front Wiper and Washer