1995 JEEP YJ turn signal
[x] Cancel search: turn signalPage 1155 of 2158
MALFUNCTION INDICATOR (CHECK ENGINE)
LAMP
The Powertrain Control Module (PCM) provides
ground for the malfunction indicator (Check Engine)
lamp on circuit G3. Circuit G3 connects to cavity 32
of the PCM. Circuit G5 connects to the instrument
cluster and supplies battery voltage for the malfunc-
tion indicator lamp. When illuminated, the malfunc-
tion indicator lamp displays the message CHECK
ENGINE.
For information regarding diagnostic trouble code
access using the malfunction indicator lamp, refer to
Group 14, Fuel Systems.
UP-SHIFT LAMP
On vehicles equipped with a manual transmission,
the Powertrain Control Module (PCM) provides
ground for the Up-Shift lamp on circuit K54. Circuit
G5 provides battery voltage for the lamp.
ABS WARNING LAMP
Circuit G5 provides power for the ABS warning
lamp at the instrument cluster. Ground for the ABS
warning lamp is provided by either the ABS control
module or by the ABS power relay when the relay is
not energized. The ABS control module illuminates
the lamp by providing ground on circuit G19.
Circuit G19 splices to connect to circuit B15
through a diode. When the ABS power relay is not
energized, it connects circuit B15 to circuit Z12. The
ground path for the warning lamp is provided
through the diode to circuit B15, through the ABS
power relay to ground on circuit Z12.
The diode between circuit G19 and B15 prevents
voltage from flowing to the ABS control module when
the ABS power relay switches to supply power on cir-
cuit B15.
BRAKE WARNING LAMP
Circuit G5 provides battery voltage for the brake
warning lamp. Circuit G11 can provide ground for
the lamp in 3 ways. The first ground path is through
the ignition switch when the key is in the START po-
sition.
The second ground path for the brake warning
lamp on circuit G11 is through the case grounded
brake warning switch. When the switch closes it pro-
vides a ground.
The third ground path on circuit G11 is through
the case grounded park brake switch. When the
switch closes it provides ground.
HIGH BEAM INDICATOR LAMP
Circuit G34 supplies power for the high-beam indi-
cator lamp when the operator either flashes the opti-
cal horn (high beams) or selects high beam operation.
Circuit Z1 provides the ground path for the lamp.
Circuit L3 from the headlamp switch powers the
high beam circuits of the headlamps. On vehicles not
equipped with Daytime Running Lamps (DRL), cir-
cuit G34 double crimps to circuit L3 at the bulkhead
connector.
On vehicles equipped with DRL, circuit L3 splices
to the DRL module. The DRL module powers circuit
G34.
TURN SIGNAL INDICATOR LAMPS
Circuit L61 supplies battery voltage to the left turn
signal indicator lamp. The right turn signal indicator
lamp receives battery voltage from circuit L60. The
turn signal/hazard flasher switch powers circuits L60
and L61. Circuit Z1 provides ground for the lamps.
HELPFUL INFORMATION
²If the warning lamps, gauges and indicator lamps
don't operate, check fuse 4 in the PDC and fuse 9 in
the fuse block.
²If the illumination lamps don't operate, check fuse
10 in the fuse block.
DIAGRAM INDEX
Component Page
4WD Switch............................8W-40-9
ABS Control Module......................8W-40-5
Brake Warning Switch.....................8W-40-5
Combination Buzzer.....................8W-40-7, 8
Daytime Running Lamp (DRL) Module.........8W-40-4, 6
Engine Coolant Temperature Sensor...........8W-40-7, 8
Engine Oil Pressure Sensor..................8W-40-9
Fuse 3 (PDC).......................8W-40-3, 7, 8
Fuse 4 (PDC).......................8W-40-4, 7, 8
Fuse 7 (PDC)...........................8W-40-6
Fuse 8 (Fuse Block)...................8W-40-3, 7, 8
Fuse 9 (Fuse Block).......................8W-40-8
Fuse 10 (Fuse Block).................8W-40-3, 7, 10
Gauge Package......................8W-40-7, 8, 9
Headlamp Switch...................8W-40-3, 6, 7, 8
Headlamp Dimmer Switch...................8W-40-6
Ignition Switch......................8W-40-4, 5, 8
Instrument Cluster...................8W-40-3 thru 9
Panel Lamp Dimmer Switch..............8W-40-3, 7, 8
Park Brake Switch........................8W-40-5
Powertrain Control Module.................8W-40-4, 5
8W - 40 - 2 8W-40 INSTRUMENT CLUSTERÐYJ VEHICLESJ
Page 1190 of 2158
FRONT LIGHTING
INDEX
page page
Daytime Running Lamp (DRL) ModuleÐCanadian
Vehicles Only........................... 2
Diagram Index............................ 2
Fog Lamps............................... 1Headlamps............................... 1
Parking Lamps............................ 1
HEADLAMPS
The headlamp switch has three positions: ON,
PARK (parking lamps) and OFF. Two circuits, L2 and
L20, connect the headlamp switch to the headlamp
dimmer/optical horn switch. The dimmer switch feeds
the low and high beams of the headlamps.
HEADLAMP SWITCH IN OFF OR PARKING
LAMP POSITION
Circuit A3 from fuse 7 in the Power Distribution
Center (PDC) supplies battery voltage to the head-
lamp switch. The headlamp switch has an internal
circuit breaker that connects circuit A3 to circuit
L20. The switch connects circuit A3 to circuit L2
when the headlamps are ON.
Circuit L20 connects to the dimmer switch. Circuit
L20 powers the high beams of the head lamps on cir-
cuit L3 when the operator flashes the headlamps
with the turn signal stalk.
HEADLAMP SWITCH IN ON POSITION
When the headlamp switch is in the ON position,
the A3 circuit from the PDC connects to circuit L2.
Circuit L2 connects to circuit L4 through the dimmer
switch. Circuit L4 powers the low beam of the head-
lamps.
When the operator selects high beam operation
with the turn signal stalk, the dimmer switch con-
nects circuit L20 to circuit L3. Circuit L3 supplies
battery voltage to the high beams.
HEADLAMP GROUND
Although circuit Z1 provides ground for both the
right and left headlamps, it has different termination
points for each. For the right headlamp, the Z1 cir-
cuit terminates at the radiator right support. For the
left headlamp, the Z1 circuit terminates at the left
radiator support.
HELPFUL INFORMATION
²Check fuse 7 in the PDC.
²The headlamp switch has an internal circuit
breaker.
²For the left front parking lamp, turn signal, side
marker lamp, headlamp, and fog lamp, circuit Z1 ter-
minates at the left radiator support.²For the right front parking lamp, turn signal, side
marker lamp, headlamp, and fog lamp, circuit Z1 ter-
minates at the right radiator support.
PARKING LAMPS
Circuit A6 from fuse 3 in the Power Distribution
Center (PDC) connects to the fuse block bus bar that
powers circuit F33. Fuse 8 in the fuse block protects
circuit F33. Circuit F33 connects to the headlamp
switch.
The headlamp switch has three positions: ON,
PARK (parking lamps) and OFF, plus a dimmer
switch. When the headlamp switch is in the PARK or
ON position, the switch connects circuit F33 to cir-
cuit L7. From the headlamp switch, circuit L7
branches to power the front parking lamps, rear tail
lamps, and side marker lamps. Circuit L7 also pow-
ers the park lamp relay, if equipped with fog lamps.
GROUND CIRCUIT
²For the left front parking lamp, turn signal, side
marker lamp, headlamp, and fog lamp, circuit Z1 ter-
minates at the left radiator support.
²For the right front parking lamp, turn signal, side
marker lamp, headlamp, and fog lamp, circuit Z1 ter-
minates at the right radiator support.
HELPFUL INFORMATION
²Check fuse 3 in the PDC.
²Check fuse 8 in the fuse block.
²Circuit L7 also feeds the radio, if equipped.
FOG LAMPS
The fog lamps are controlled by the fog lamp
switch and two relays. The fog lamps operate only
when the headlamp switch is in the ON position, and
the operator has selected low-beam operation. When
the headlamps are in high-beam operation, the fog
lamps will not operate.
When the headlamps or parking lamps are ON, cir-
cuit L7 from the headlamp switch supplies battery
voltage to the coil side of the park lamp relay. When
the operator presses the fog lamp switch, it provides
ground for the coil side of the park lamp relay. This
energizes the relay.
J8W-50 FRONT LIGHTINGÐYJ VEHICLES 8W - 50 - 1
Page 1191 of 2158
When the park lamp relay energizes, the relay con-
tacts close and connect circuit F81 from fuse 6 in the
fuse block to circuit L36. Circuit L36 connects to the
contact side of the high beam relay. The contacts in
the high beam relay are normally closed. Battery
voltage flows through high beam relay to the fog
lamps on circuit L39. Circuit L39 also splices to the
lamp in the fog lamp switch.
Circuit L3 from the dimmer switch provides power
for the high beams of the headlamps and connects to
Circuit G34. Circuit G34 powers the coil side of the
high beam relay. Circuit Z1 provides ground for the
coil. When the operator selects high beam operation
or flashes the optical horn, circuit G34 energizes the
high beam relay. When energized, the normally
closed contacts in the relay open, shutting off battery
voltage to the fog lamps on circuit L39.
HELPFUL INFORMATION
²Circuit A6 from fuse 3 in the PDC supplies voltage
to the fuse block for fuses in cavities 3 and 6. Fuse 6
in the fuse block protects circuit F81 which powers
the contact side of the park lamp relay.
²In the high beam position, the dimmer switch con-
nects circuit L20 from the headlamp switch to circuit
L3. The headlamp switch connects circuit A3 from
fuse 7 in the PDC with circuit L20. Circuits A3 and
L20 are HOT at all times.
DAYTIME RUNNING LAMP (DRL) MODULEÐ
CANADIAN VEHICLES ONLY
On Canadian vehicles, the low-beam headlamps op-
erate when the ignition switch is in the RUN position
and the headlamp switch is OFF.
When the ignition switch is in the START or RUN
positions, circuit A1 from fuse 4 in the Power Distri-
bution Center (PDC) connects to circuit A21. Circuit
A21 supplies voltage to circuit G5 through fuse 9 in
the fuse block. Circuit G5 splices to supply battery
voltage to the DRL module.
Circuit L20 from the headlamp switch connects to
the DRL module. Circuit L20 is HOT at all times.
The DRL module receives the vehicle speed sensor
input from circuit G7. Circuit G34 from the DRLmodule provides power for the high beam indicator
lamp in the instrument cluster.
Circuit L4 feeds the low beams of the headlamps.
When the headlamp switch is in the OFF position,
the DRL module powers the left and right headlamps
on circuit L4. When the headlamps are ON, the dim-
mer switch powers the low beams on circuit L4.
Circuit L3 feeds the high beams of the headlamps.
When the operator flashes the high beams with the
turn signal stalk, the DRL senses voltage on circuit
L3. When it senses voltage on circuit L3, the DRL
module stops supplying power to the low beams on
circuit L4.
Circuit Z1 provides ground for the DRL module.
Circuit Z1 terminates at the radiator left side sup-
port.
DIAGRAM INDEX
Component Page
Daytime Running Lamp (DRL) Module. . . .8W-50-3, 7, 9, 11
Fog Lamps.............................8W-50-9
Fog Lamp Switch........................8W-50-9
Fuse 3 (PDC)...........................8W-50-3
Fuse 4 (PDC)..........................8W-50-10
Fuse 6 (Fuse Block).......................8W-50-8
Fuse 7 (PDC)........................8W-50-3, 10
Fuse 8 (Fuse Block).......................8W-50-3
Fuse 9 (Fuse Block)......................8W-50-10
Headlamp Switch....................8W-50-3, 8, 10
Headlamp Dimmer Switch.................8W-50-3, 8
High Beam Relay.........................8W-50-9
Ignition Switch.........................8W-50-10
Instrument Cluster..................8W-50-3 thru 10
Left Headlamp.........................8W-50-4, 6
Left Park, Turn Signal Lamp...............8W-50-4, 6
Left Side Marker Lamp...................8W-50-4, 6
Park Lamp Relay.........................8W-50-8
Powertrain Control Module..................8W-50-11
Right Headlamp........................8W-50-5, 7
Right Park, Turn Signal Lamp..............8W-50-5, 7
Right Side Marker Lamp..................8W-50-5, 7
8W - 50 - 2 8W-50 FRONT LIGHTINGÐYJ VEHICLESJ
Page 1202 of 2158
REAR LIGHTING
TAIL LAMPS AND LICENSE PLATE LAMPS
Circuit A6 in the Power Distribution Center (PDC)
connects to a bus bar in the fuse block. The fuse
block bus bar powers circuit F33. Circuit F33 con-
nects to the headlamp switch. Fuse 3 in the PDC
protects circuit A3. Fuse 8 in the fuse block protects
circuit F33.
The headlamp switch has three positions: ON,
PARK (parking lamps) and OFF, plus a dimmer
switch. When the headlamp switch is in the PARK or
ON position, the switch connects circuit F33 to cir-
cuit L7. From the headlamp switch, circuit L7
branches to power the front parking lamps and rear
tail and license plate lamps. The lamps are case
grounded.
HELPFUL INFORMATION
²If the vehicle is equipped with factory installed fog
lamps, circuit L7 splices to feed the park lamp relay.
²Jumper harnesses connect the tail, stop, turn sig-
nal lamp to the body harness.
²Check fuse 3 in the PDC.
²Check fuse 8 in the fuse block.
²Circuit L7 also feeds the radio, if equipped.
STOP LAMPS AND CHMSL LAMPS
Circuit A6 from fuse 3 in the Power Distribution
Center (PDC) supplies voltage to the fuse block bus
bar. The bus bar powers circuit F32 through fuse 3 in
the fuse block. Circuit F32 connects to the stop lamp
switch.
When the operator depresses the brake pedal, the
stop lamp switch closes, and connects circuit F32 to
circuit L50. Circuit L50 connects to the CHMSL
lamps and turn signal/hazard flasher. Circuit Z1 pro-
vides ground for the CHMSL lamps. The turn signal/
hazard flasher supplies current to the L62 and L63
circuits. Circuit L62 powers the right stop lamp. Cir-
cuit L63 powers the left stop lamp. The stop lamps
are case grounded.
HELPFUL INFORMATION
²Circuits L50 and Z1 pass through contacts in the
rear door before reaching the CHMSL lamps.
²Check fuse 3 in the PDC.²Check fuse 3 in the fuse block.
²Check for continuity across the stop lamp switch
when it is closed.
²If the vehicle is equipped with anti-lock brakes,
circuit L50 connects to the ABS module.
BACK-UP LAMPS
In the START or RUN position, the ignition switch
connects circuit A1 from fuse 4 in the Power Distri-
bution Center (PDC) to circuit A21. Circuit A21 feeds
a bus bar in the fuse block that powers circuit G5
through fuse 9.
Circuit G5 splices to supply power to the back-up
lamp switch. On automatic transmission vehicles, the
back-up lamp switch is part of an assembly that in-
cludes the PARK/NEUTRAL position switch.
When the operator puts the transmission in Re-
verse, the back-up lamp switch connects circuit G5 to
circuit L1. Circuit L1 feeds the case grounded
back-up lamps.
HELPFUL INFORMATION
²Check fuse 4 in the PDC.
²Check fuse 9 in the fuse block.
²Check for continuity across the back-up lamp
switch when it is closed.
DIAGRAM INDEX
Component Page
ABS Control Module......................8W-51-3
Back-Up Lamps..........................8W-51-4
Back-Up Lamp Switch.....................8W-51-2
Center High Mounted Stop Lamps (CHMSL).......8W-51-3
Fuse 3 (Fuse Block).......................8W-51-2
Fuse 3 (PDC)...........................8W-51-2
Fuse 4 (PDC)...........................8W-51-2
Fuse 9 (Fuse Block).......................8W-51-2
Fuse 8 (Fuse Block).......................8W-51-2
Headlamp Switch.........................8W-51-2
Ignition Switch..........................8W-51-2
Powertrain Control Module..................8W-51-3
Stop Lamp Switch........................8W-51-3
Tail, Stop, and Turn Signal Lamps.............8W-51-4
J8W-51 REAR LIGHTINGÐYJ VEHICLES 8W - 51 - 1
Page 1206 of 2158
TURN SIGNALS
TURN SIGNALS
In the ACCESSORY or RUN position, the ignition
switch connects circuit A1 from fuse 4 in the Power
Distribution Center (PDC) to circuit A31. Circuit A31
feeds circuit L5 through fuse 4 in the fuse block.
Circuit L5 powers the turn signal flasher. Circuit
L6 from the flasher connects to the turn signal/haz-
ard flasher switch which supplies current to the turn
signals. The switch connects to the turn signal and
side marker lamps on circuits L60, L61, L62 and
L63.
RIGHT TURN SIGNAL
When the operator selects the right turn signal, the
turn signal/hazard flasher switch connects power
from circuit L6 to circuits L60 and L62. Circuit L62
feeds the right rear turn signal/hazard flasher/stop
lamp.
Circuit L60 feeds the right front turn signal/hazard
flasher lamp and side marker lamp. Circuit L60 also
splices to power the turn signal indicator lamp on the
instrument cluster.
LEFT TURN SIGNAL
When the operator selects the left turn signal, the
turn signal/hazard flasher switch connects power
from circuit L6 to circuits L61 and L63. Circuit L63
feeds the left rear turn signal/hazard flasher/stop
lamp.
Circuit L61 feeds the left front turn signal/hazard
flasher lamp and side marker lamp. Circuit L61 also
splices to power the turn signal indicator lamp on the
instrument cluster.
GROUND CIRCUIT
Circuit Z1 provides a ground for the left front park
and turn signal lamp, side marker lamp and head
lamp. The grounding point for circuit Z1 is the radi-
ator left support.
Circuit Z1 provides a ground for the right front
park and turn signal lamp, side marker lamp and
head lamp. The grounding point for circuit Z1 is the
radiator right support.
HELPFUL INFORMATION
²Check fuse 4 in the PDC.
²Check fuse 4 in the fuse block.
HAZARD FLASHERS
Circuit L9 from fuse 5 in the Power Distribution
Center (PDC) supplies power to the hazard flasher.
Circuit L19 from the flasher connects to the turn sig-
nal/hazard flasher switch.When the operator presses the hazard flasher but-
ton, the turn signal/hazard flasher switch connects
circuit L19 to circuits L60, L61, L62, and L63. Cir-
cuit L62 powers the right rear turn signal/stop/haz-
ard lamp. Circuit L63 powers the left rear turn
signal/stop/hazard lamp. Circuit L60 powers the right
front indicator lamp. Circuit L61 powers the left
front lamp.
Circuit L60 also splices to feed the instrument clus-
ter right indicator lamp. Circuit L61 splices to feed
the instrument cluster left indicator lamp.
GROUND CIRCUIT
The rear turn signal/stop/hazard lamps are case
grounded.
Circuit Z1 provides a ground for the left front park
and turn signal lamp, side marker lamp and head
lamp. The grounding point for circuit Z1 is the radi-
ator left support.
Circuit Z1 provides a ground for the right left park
and turn signal lamp, side marker lamp and head
lamp. The grounding point for circuit Z1 is the radi-
ator right support.
HELPFUL INFORMATION
Check fuse 5 in the PDC.
DIAGRAM INDEX
Component Page
ABS Control Module......................8W-52-2
Fuse 3 (Fuse Block).......................8W-52-2
Fuse 3 (PDC)...........................8W-52-2
Fuse 4 (Fuse Block).......................8W-52-2
Fuse 4 (PDC)...........................8W-52-2
Fuse 5 (PDC)...........................8W-52-2
Hazard Flasher..........................8W-52-2
Ignition Switch..........................8W-52-2
Instrument Cluster Turn Signal Lamps...........8W-52-3
Stop Lamp Switch........................8W-52-2
Turn Signal Flasher.......................8W-52-2
Turn Signal/Hazard Flasher Switch..............8W-52-3
J8W-52 TURN SIGNALSÐYJ VEHICLES 8W - 52 - 1
Page 1421 of 2158
MULTI-PORT FUEL INJECTION (MFI)ÐCOMPONENT DESCRIPTION/SYSTEM
OPERATION
INDEX
page page
Air Cleaner.............................. 29
Air Conditioning (A/C) Clutch RelayÐPCM Output . 26
Air Conditioning (A/C) ControlsÐPCM Input...... 21
Auto Shutdown (ASD) RelayÐPCM Output...... 26
Automatic Shutdown (ASD) SenseÐPCM Input . . . 21
Battery VoltageÐPCM Input................. 21
Brake SwitchÐPCM Input................... 22
Camshaft Position SensorÐPCM Input......... 22
Crankshaft Position SensorÐPCM Input........ 22
Data Link ConnectorÐPCM Input............. 22
Data Link ConnectorÐPCM Output............ 27
EMR LampÐPCM Output................... 27
Engine Coolant Temperature SensorÐPCM Input . 23
Extended Idle SwitchÐPCM Input............. 23
Fuel InjectorsÐPCM Output................. 27
Fuel Pressure Regulator.................... 33
Fuel Pump RelayÐPCM Output.............. 27
Fuel Rail................................ 33
General Information....................... 19
Generator FieldÐPCM Output................ 27
Generator LampÐPCM Output............... 27
Idle Air Control (IAC) MotorÐPCM Output....... 27
Ignition Circuit SenseÐPCM Input............. 23
Ignition CoilÐPCM Output................... 28Intake Manifold Air Temperature SensorÐ
PCM Input............................. 22
Malfunction Indicator LampÐPCM Output....... 28
Manifold Absolute Pressure (MAP) SensorÐPCM
Input................................. 23
Open Loop/Closed Loop Modes of Operation..... 30
Oxygen (O2S) SensorÐPCM Input............ 24
Park/Neutral SwitchÐPCM Input.............. 24
Power Ground........................... 24
Power Steering Pressure SwitchÐPCM Input.... 24
Powertrain Control Module (PCM)............. 20
Radiator Fan RelayÐPCM Output............. 28
SCI ReceiveÐPCM Input................... 24
SCI TransmitÐPCM Output.................. 29
Sensor ReturnÐPCM Input.................. 25
Shift IndicatorÐPCM Output................. 29
Speed ControlÐPCM Input.................. 25
Speed ControlÐPCM Output................. 29
TachometerÐPCM Output................... 29
Throttle Body............................ 33
Throttle Position Sensor (TPS)ÐPCM Input...... 25
Torque Converter Clutch RelayÐPCM Output.... 29
Vehicle Speed SensorÐPCM Input............ 25
GENERAL INFORMATION
All 2.5L 4-cylinder and 4.0L 6-cylinder engines are
equipped with sequential Multi-Port Fuel Injection
(MFI). The MFI system provides precise air/fuel ra-
tios for all driving conditions.
The Powertrain Control Module (PCM) operates
the fuel system. The PCM was formerly referred to
as the SBEC or engine controller. The PCM is a pre-
programmed, dual microprocessor digital computer. It
regulates ignition timing, air-fuel ratio, emission con-
trol devices, charging system, speed control, air con-
ditioning compressor clutch engagement and idle
speed. The PCM can adapt its programming to meet
changing operating conditions.
Powertrain Control Module (PCM) Inputsrep-
resent the instantaneous engine operating conditions.
Air-fuel mixture and ignition timing calibrations for
various driving and atmospheric conditions are pre-
programmed into the PCM. The PCM monitors and
analyzes various inputs. It then computes engine fuel
and ignition timing requirements based on these in-
puts. Fuel delivery control and ignition timing will
then be adjusted accordingly.
Other inputs to the PCM are provided by the brake
light switch, air conditioning select switch and the
speed control switches. All inputs to the PCM are
converted into signals.
Electrically operated fuel injectors spray fuel inprecise metered amounts into the intake port directly
above the intake valve. The injectors are fired in a
specific sequence by the PCM. The PCM maintains
an air/fuel ratio of 14.7 to 1 by constantly adjusting
injector pulse width. Injector pulse width is the
length of time that the injector opens and sprays fuel
into the chamber. The PCM adjusts injector pulse
width by opening and closing the ground path to the
injector.
Manifold absolute pressure (air density) and engine
rpm (speed) are the primary inputs that determine
fuel injector pulse width. The PCM also monitors
other inputs when adjusting air-fuel ratio.
Inputs That Effect Fuel Injector Pulse Width:
²Exhaust gas oxygen content
²Engine coolant temperature
²Manifold absolute pressure (MAP)
²Engine speed
²Throttle position
²Battery voltage
²Air conditioning selection
²Transmission gear selection (automatic transmis-
sions only)
²Speed control
The powertrain control module (PCM) adjusts igni-
tion timing by controlling ignition coil operation. The
ignition coil receives battery voltage when the igni-
tion key is in the run or starter position. The PCM
JFUEL SYSTEM COMPONENT DESCRIPTION/SYSTEM OPERATION 14 - 19
Page 1422 of 2158
provides a ground for the ignition coil. The coil dis-
charges when the PCM supplies a ground. By switch-
ing the ground path on and off, the PCM regulates
ignition timing.
The sensors and switches that provide inputs to
the powertrain control module (PCM) comprise the
Engine Control System. It is also comprised of the
PCM Outputs (engine control devices that the are op-
erated by the PCM).
SYSTEM DIAGNOSIS
The powertrain control module (PCM) tests many
of its own input and output circuits. If a Diagnostic
Trouble Code (DTC) is found in a major system, this
information is stored in the PCM memory. Refer to
On-Board Diagnostics in the MFI SystemÐGeneral
Diagnosis section of this group for DTC information.
POWERTRAIN CONTROL MODULE (PCM)
The PCM operates the fuel system. The PCM was
formerly referred to as the SBEC or engine control-
ler. The PCM is a pre-programmed, dual microproces-
sor digital computer. It regulates ignition timing, air-
fuel ratio, emission control devices, charging system,
speed control, air conditioning compressor clutch en-
gagement and idle speed. The PCM can adapt its
programming to meet changing operating conditions.
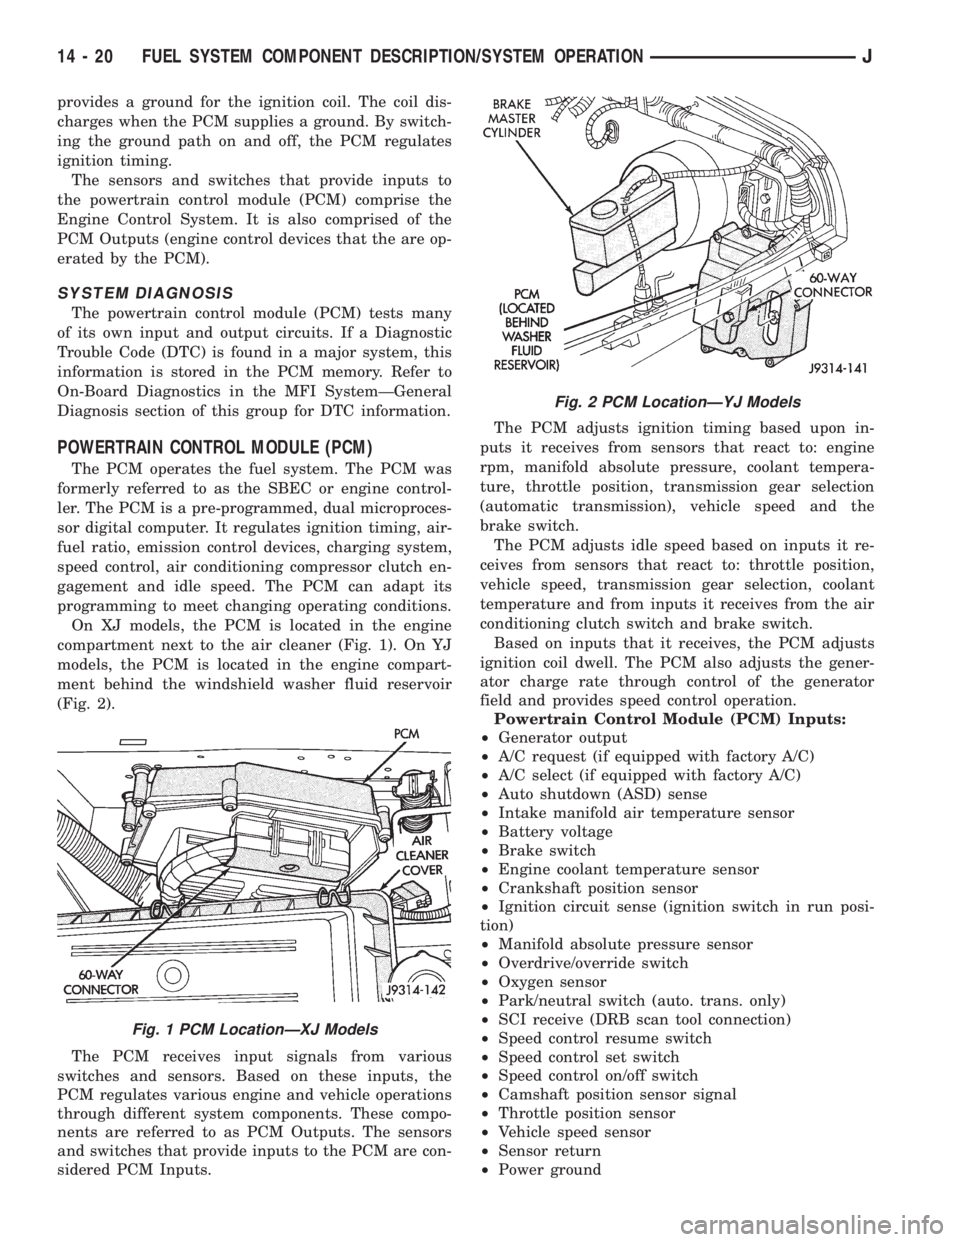
On XJ models, the PCM is located in the engine
compartment next to the air cleaner (Fig. 1). On YJ
models, the PCM is located in the engine compart-
ment behind the windshield washer fluid reservoir
(Fig. 2).
The PCM receives input signals from various
switches and sensors. Based on these inputs, the
PCM regulates various engine and vehicle operations
through different system components. These compo-
nents are referred to as PCM Outputs. The sensors
and switches that provide inputs to the PCM are con-
sidered PCM Inputs.The PCM adjusts ignition timing based upon in-
puts it receives from sensors that react to: engine
rpm, manifold absolute pressure, coolant tempera-
ture, throttle position, transmission gear selection
(automatic transmission), vehicle speed and the
brake switch.
The PCM adjusts idle speed based on inputs it re-
ceives from sensors that react to: throttle position,
vehicle speed, transmission gear selection, coolant
temperature and from inputs it receives from the air
conditioning clutch switch and brake switch.
Based on inputs that it receives, the PCM adjusts
ignition coil dwell. The PCM also adjusts the gener-
ator charge rate through control of the generator
field and provides speed control operation.
Powertrain Control Module (PCM) Inputs:
²Generator output
²A/C request (if equipped with factory A/C)
²A/C select (if equipped with factory A/C)
²Auto shutdown (ASD) sense
²Intake manifold air temperature sensor
²Battery voltage
²Brake switch
²Engine coolant temperature sensor
²Crankshaft position sensor
²Ignition circuit sense (ignition switch in run posi-
tion)
²Manifold absolute pressure sensor
²Overdrive/override switch
²Oxygen sensor
²Park/neutral switch (auto. trans. only)
²SCI receive (DRB scan tool connection)
²Speed control resume switch
²Speed control set switch
²Speed control on/off switch
²Camshaft position sensor signal
²Throttle position sensor
²Vehicle speed sensor
²Sensor return
²Power ground
Fig. 1 PCM LocationÐXJ Models
Fig. 2 PCM LocationÐYJ Models
14 - 20 FUEL SYSTEM COMPONENT DESCRIPTION/SYSTEM OPERATIONJ
Page 1427 of 2158
SPEED CONTROLÐPCM INPUT
The speed control system provides three separate
inputs to the powertrain control module (PCM); On/
Off, Set and Resume. The On/Off input informs the
PCM that the speed control system has been acti-
vated. The Set input informs the PCM that a fixed
vehicle speed has been selected. The Resume input
indicates to the PCM that the previous fixed speed is
requested.
The speed control operating range is from 50 km/h
to 142 km/h (35 to 85 mph). Inputs that effect speed
control operation are:
²Brake switch position
²Park/neutral switch
²Vehicle speed sensor
²Throttle position sensor
Refer to Group 8H for further speed control infor-
mation.
SENSOR RETURNÐPCM INPUT
Sensor Return provides a low noise ground refer-
ence for all system sensors.
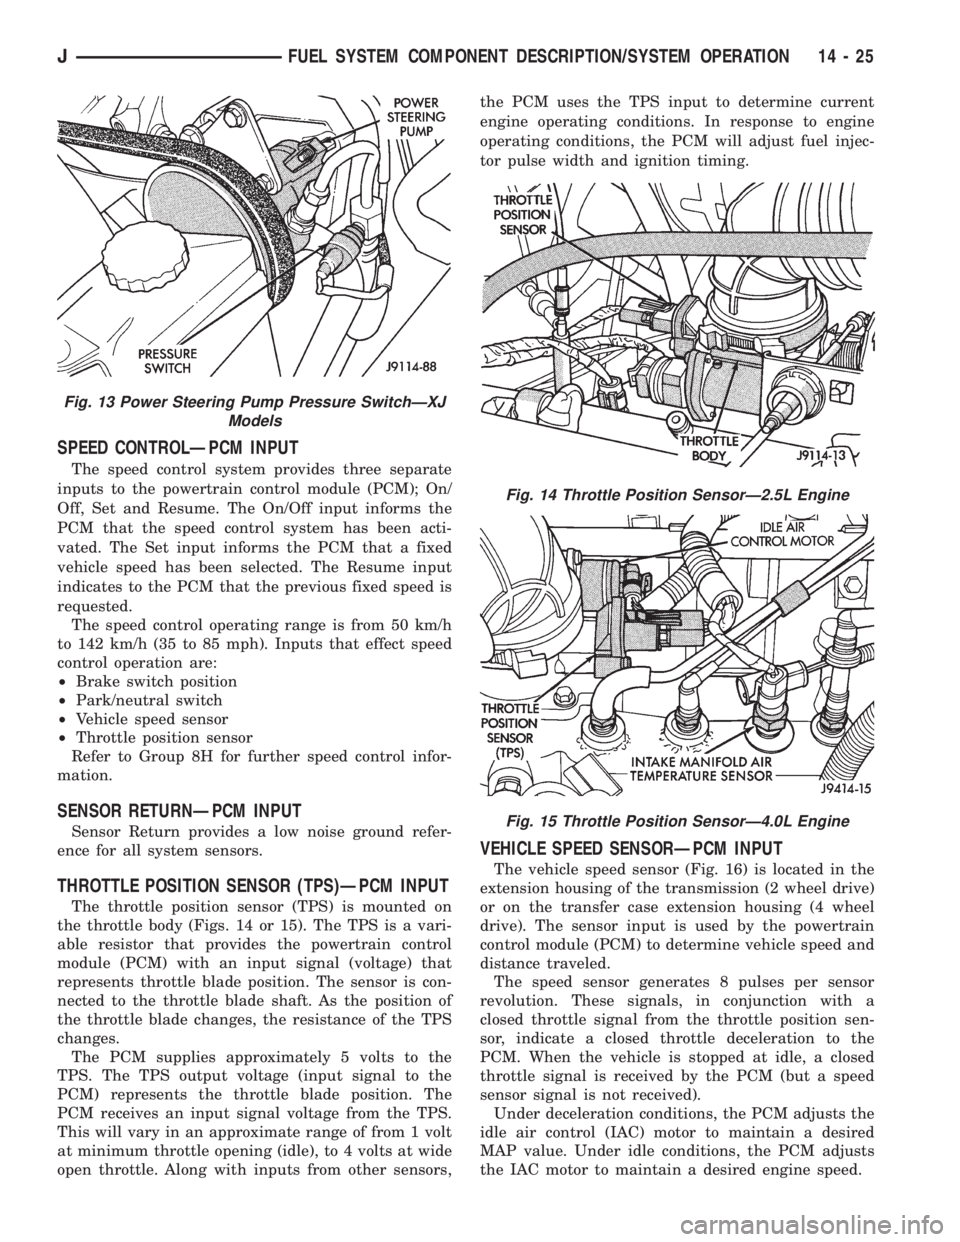
THROTTLE POSITION SENSOR (TPS)ÐPCM INPUT
The throttle position sensor (TPS) is mounted on
the throttle body (Figs. 14 or 15). The TPS is a vari-
able resistor that provides the powertrain control
module (PCM) with an input signal (voltage) that
represents throttle blade position. The sensor is con-
nected to the throttle blade shaft. As the position of
the throttle blade changes, the resistance of the TPS
changes.
The PCM supplies approximately 5 volts to the
TPS. The TPS output voltage (input signal to the
PCM) represents the throttle blade position. The
PCM receives an input signal voltage from the TPS.
This will vary in an approximate range of from 1 volt
at minimum throttle opening (idle), to 4 volts at wide
open throttle. Along with inputs from other sensors,the PCM uses the TPS input to determine current
engine operating conditions. In response to engine
operating conditions, the PCM will adjust fuel injec-
tor pulse width and ignition timing.
VEHICLE SPEED SENSORÐPCM INPUT
The vehicle speed sensor (Fig. 16) is located in the
extension housing of the transmission (2 wheel drive)
or on the transfer case extension housing (4 wheel
drive). The sensor input is used by the powertrain
control module (PCM) to determine vehicle speed and
distance traveled.
The speed sensor generates 8 pulses per sensor
revolution. These signals, in conjunction with a
closed throttle signal from the throttle position sen-
sor, indicate a closed throttle deceleration to the
PCM. When the vehicle is stopped at idle, a closed
throttle signal is received by the PCM (but a speed
sensor signal is not received).
Under deceleration conditions, the PCM adjusts the
idle air control (IAC) motor to maintain a desired
MAP value. Under idle conditions, the PCM adjusts
the IAC motor to maintain a desired engine speed.
Fig. 13 Power Steering Pump Pressure SwitchÐXJ
Models
Fig. 14 Throttle Position SensorÐ2.5L Engine
Fig. 15 Throttle Position SensorÐ4.0L Engine
JFUEL SYSTEM COMPONENT DESCRIPTION/SYSTEM OPERATION 14 - 25