Page 1775 of 2198

FRONT DOOR WINDOW GLASS REGULATORÐXJ
REMOVAL
(1) Remove the door trim panel and waterdam.
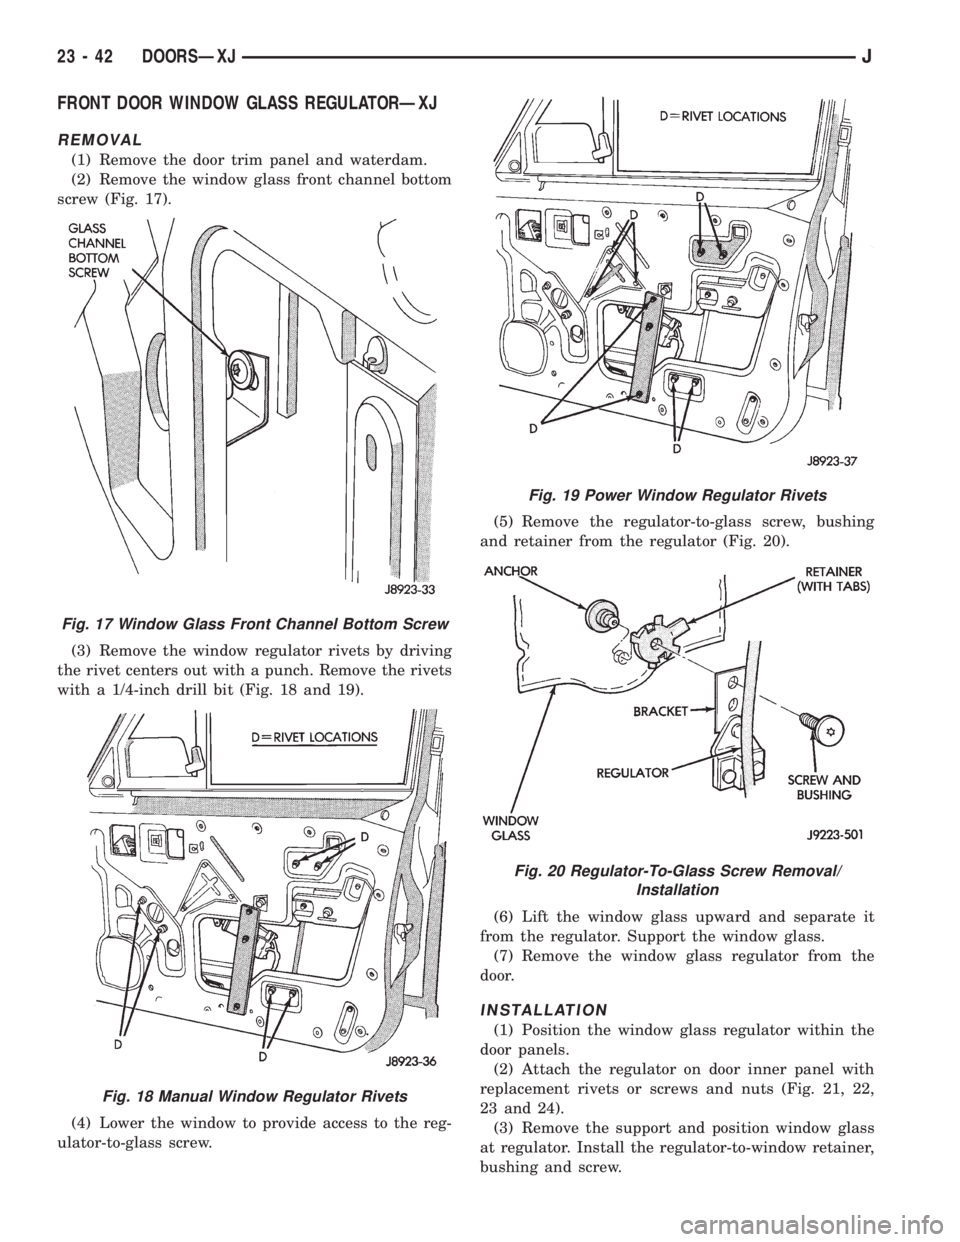
(2) Remove the window glass front channel bottom
screw (Fig. 17).
(3) Remove the window regulator rivets by driving
the rivet centers out with a punch. Remove the rivets
with a 1/4-inch drill bit (Fig. 18 and 19).
(4) Lower the window to provide access to the reg-
ulator-to-glass screw.(5) Remove the regulator-to-glass screw, bushing
and retainer from the regulator (Fig. 20).
(6) Lift the window glass upward and separate it
from the regulator. Support the window glass.
(7) Remove the window glass regulator from the
door.
INSTALLATION
(1) Position the window glass regulator within the
door panels.
(2) Attach the regulator on door inner panel with
replacement rivets or screws and nuts (Fig. 21, 22,
23 and 24).
(3) Remove the support and position window glass
at regulator. Install the regulator-to-window retainer,
bushing and screw.
Fig. 17 Window Glass Front Channel Bottom Screw
Fig. 18 Manual Window Regulator Rivets
Fig. 19 Power Window Regulator Rivets
Fig. 20 Regulator-To-Glass Screw Removal/
Installation
23 - 42 DOORSÐXJJ
Page 1776 of 2198
(4) Tighten the regulator-to-glass screw to 4 Nzm
(36 in-lbs) torque.
(5) Install the glass channel bottom screw (Fig.
17). Tighten screw to 9 Nzm (7 ft-lbs) torque.(6) Attach the door waterdam to the door inner
panel with sealant.
(7) Install the trim panel.
FRONT DOOR WINDOW GLASSÐXJ
REMOVAL
(1) Remove the door trim panel and waterdam.
(2) Remove the window glass channel hardware,
beltline molding and weatherstrip seals (Fig. 25 and
26).
(3) Remove the glass channel bottom screw.
(4) Remove the regulator-to-window glass screw,
bushing and retainer (Fig. 20).
(5) Lift the glass upward and out of the door.
Fig. 21 Manual Regulator InstallationÐUpper Rivets
Fig. 22 Manual Regulator InstallationÐLower Rivets
and Glass Retaining Screw
Fig. 23 Power Regulator InstallationÐUpper Rivets
Fig. 24 Power Regulator InstallationÐLower Rivets
Fig. 25 Front Door Beltline Molding and
Weatherstrip Seals
JDOORSÐXJ 23 - 43
Page 1777 of 2198

INSTALLATION
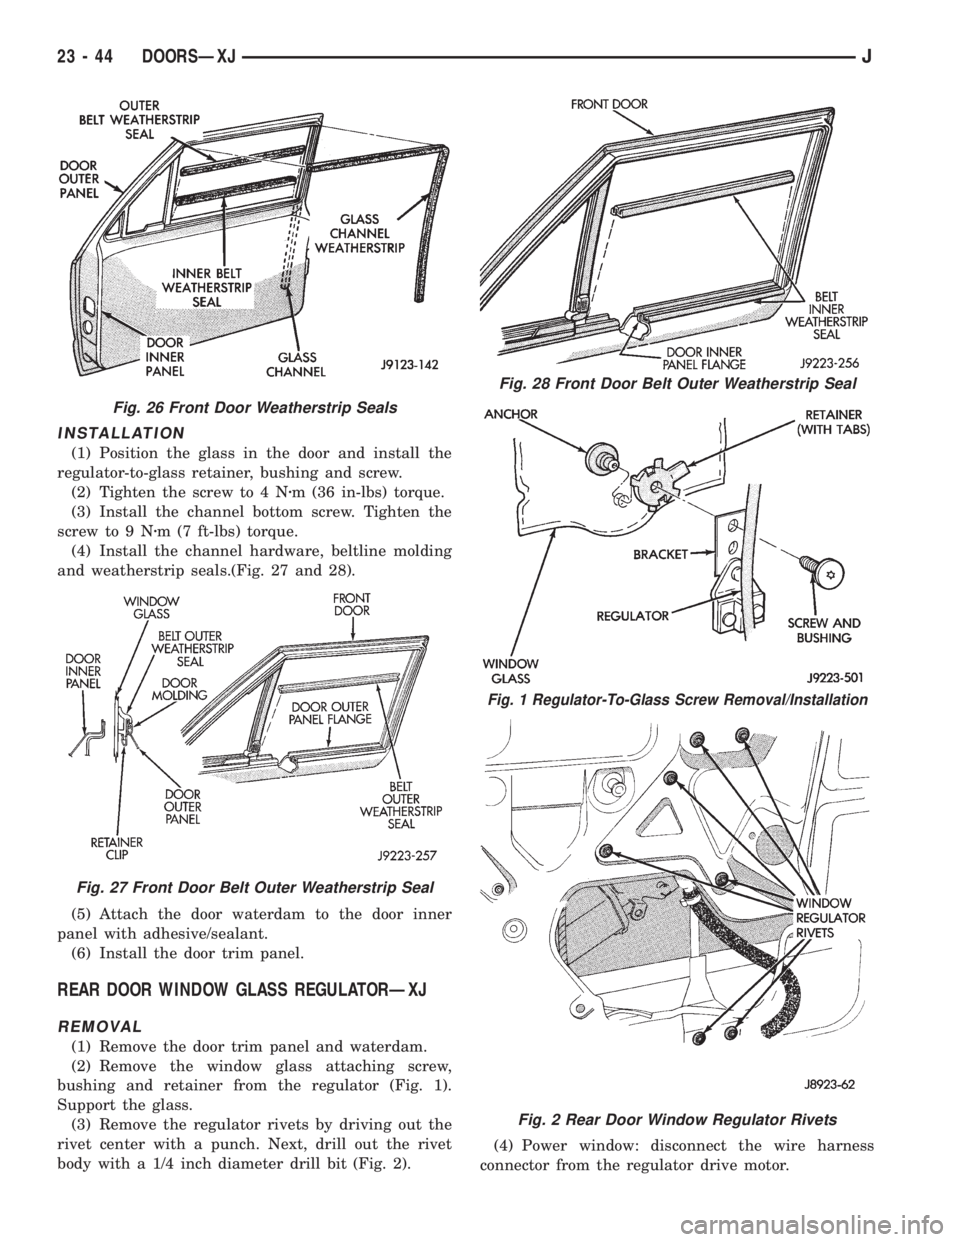
(1) Position the glass in the door and install the
regulator-to-glass retainer, bushing and screw.
(2) Tighten the screw to 4 Nzm (36 in-lbs) torque.
(3) Install the channel bottom screw. Tighten the
screw to 9 Nzm (7 ft-lbs) torque.
(4) Install the channel hardware, beltline molding
and weatherstrip seals.(Fig. 27 and 28).
(5) Attach the door waterdam to the door inner
panel with adhesive/sealant.
(6) Install the door trim panel.
REAR DOOR WINDOW GLASS REGULATORÐXJ
REMOVAL
(1) Remove the door trim panel and waterdam.
(2) Remove the window glass attaching screw,
bushing and retainer from the regulator (Fig. 1).
Support the glass.
(3) Remove the regulator rivets by driving out the
rivet center with a punch. Next, drill out the rivet
body with a 1/4 inch diameter drill bit (Fig. 2).(4) Power window: disconnect the wire harness
connector from the regulator drive motor.
Fig. 26 Front Door Weatherstrip Seals
Fig. 27 Front Door Belt Outer Weatherstrip Seal
Fig. 28 Front Door Belt Outer Weatherstrip Seal
Fig. 1 Regulator-To-Glass Screw Removal/Installation
Fig. 2 Rear Door Window Regulator Rivets
23 - 44 DOORSÐXJJ
Page 1778 of 2198

(5) Remove the regulator and drive motor, if
equipped.
INSTALLATION
(1) Position window regulator and, if equipped,
drive motor within the door panels.
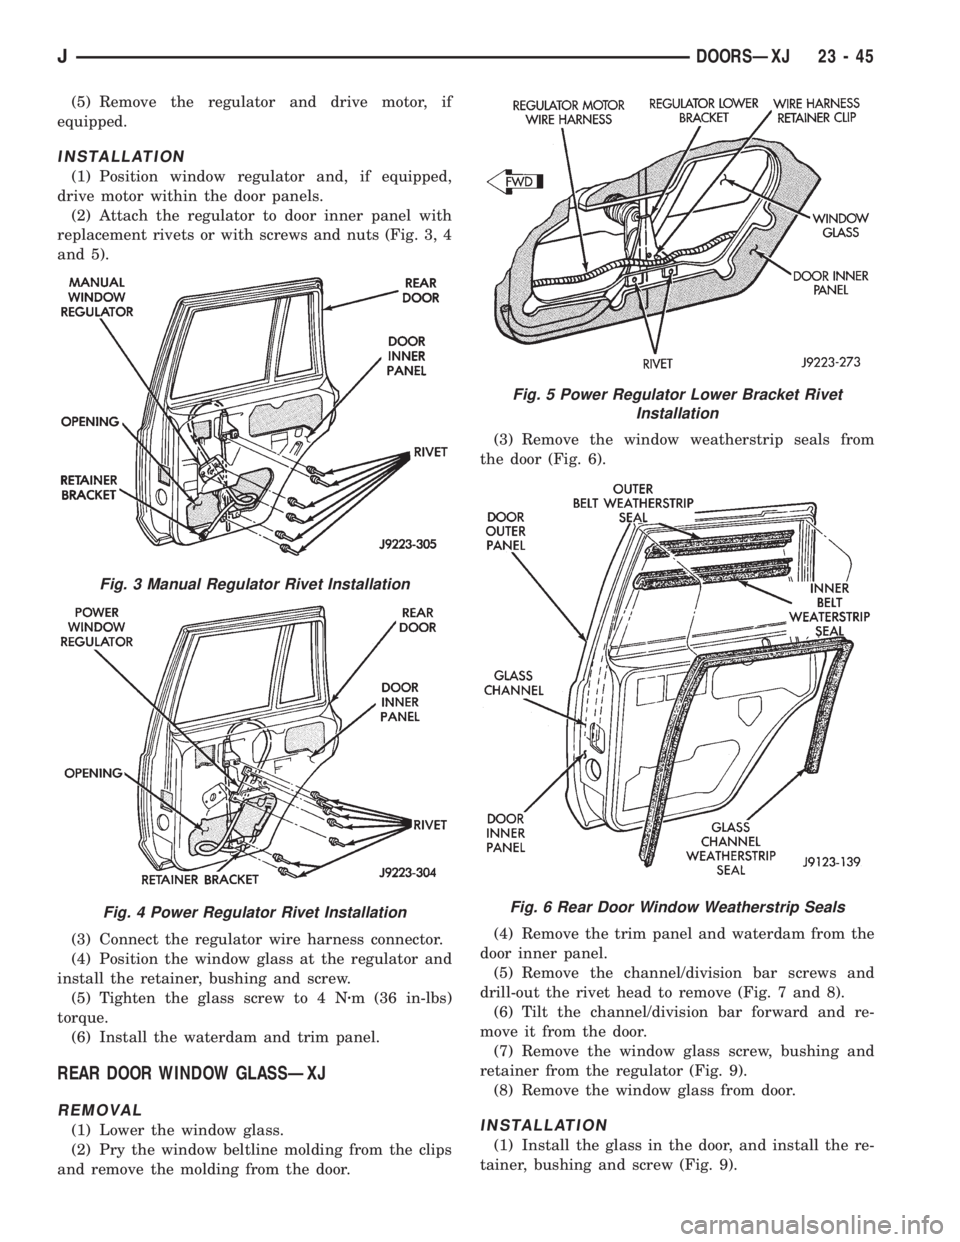
(2) Attach the regulator to door inner panel with
replacement rivets or with screws and nuts (Fig. 3, 4
and 5).
(3) Connect the regulator wire harness connector.
(4) Position the window glass at the regulator and
install the retainer, bushing and screw.
(5) Tighten the glass screw to 4 Nzm (36 in-lbs)
torque.
(6) Install the waterdam and trim panel.
REAR DOOR WINDOW GLASSÐXJ
REMOVAL
(1) Lower the window glass.
(2) Pry the window beltline molding from the clips
and remove the molding from the door.(3) Remove the window weatherstrip seals from
the door (Fig. 6).
(4) Remove the trim panel and waterdam from the
door inner panel.
(5) Remove the channel/division bar screws and
drill-out the rivet head to remove (Fig. 7 and 8).
(6) Tilt the channel/division bar forward and re-
move it from the door.
(7) Remove the window glass screw, bushing and
retainer from the regulator (Fig. 9).
(8) Remove the window glass from door.INSTALLATION
(1) Install the glass in the door, and install the re-
tainer, bushing and screw (Fig. 9).
Fig. 3 Manual Regulator Rivet Installation
Fig. 4 Power Regulator Rivet Installation
Fig. 5 Power Regulator Lower Bracket Rivet
Installation
Fig. 6 Rear Door Window Weatherstrip Seals
JDOORSÐXJ 23 - 45
Page 1779 of 2198
(2) Tighten the glass attaching screw 6 Nzm (53 in-
lbs) torque.(3) Install the window glass channel/division bar in
the door.
(4) Install the window glass channel/division bar
screws and rivet. Tighten the screws to 6 Nzm(5ft-
lbs) torque.
(5) Install the window glass channel and belt
weatherstrip seals (Fig. 10 and 11).
(6) Install the window beltline molding.
(7) Install the door waterdam and trim panel.
REAR DOOR STATIONARY WINDOW GLASSÐXJ
REMOVAL
(1) Lower the window glass.
(2) Pry the window beltline molding away from the
clips and remove the molding from the door.
Fig. 7 Window Channel/Division Bar Screws and
Rivet
Fig. 8 Window Channel/Division Bar Rivet
Fig. 9 Regulator-To-Glass Screw Removal/
Installation
Fig. 10 Glass Channel Weatherstrip Seal
Fig. 11 Belt Weatherstrip Seals
23 - 46 DOORSÐXJJ
Page 1780 of 2198

(3) Remove the window weatherstrip seals from
the door.
(4) Remove the trim panel and waterdam from
door inner panel.
(5) Remove the channel/division bar screws. Drill
out the rivet head to remove it from the inner panel.
(6) Tilt the channel/division bar forward and re-
move it from the door.
(7) Remove the fixed glass support bracket bolts
from the door inner panel reinforcement bracket (Fig.
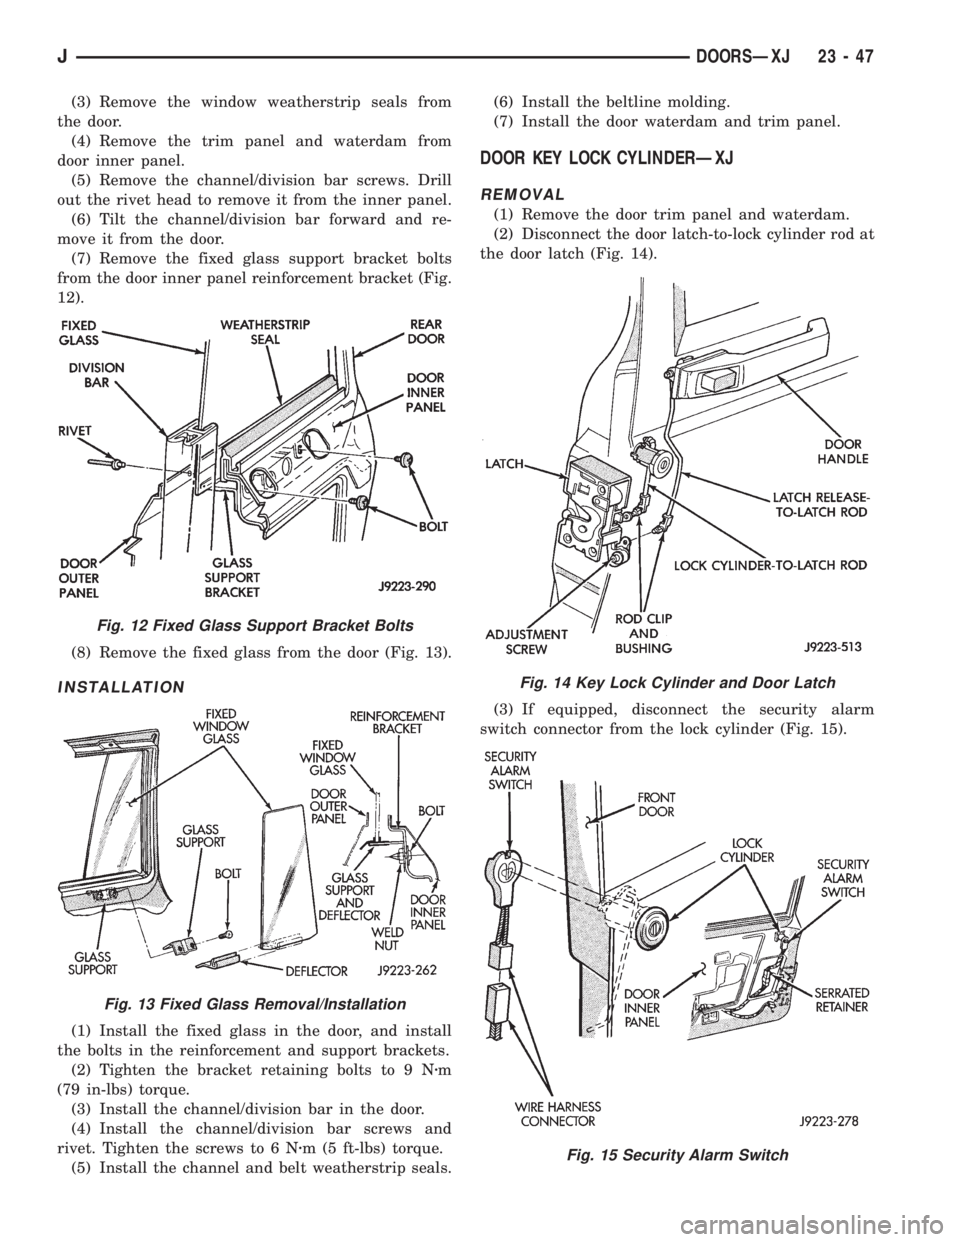
12).
(8) Remove the fixed glass from the door (Fig. 13).
INSTALLATION
(1) Install the fixed glass in the door, and install
the bolts in the reinforcement and support brackets.
(2) Tighten the bracket retaining bolts to 9 Nzm
(79 in-lbs) torque.
(3) Install the channel/division bar in the door.
(4) Install the channel/division bar screws and
rivet. Tighten the screws to 6 Nzm (5 ft-lbs) torque.
(5) Install the channel and belt weatherstrip seals.(6) Install the beltline molding.
(7) Install the door waterdam and trim panel.
DOOR KEY LOCK CYLINDERÐXJ
REMOVAL
(1) Remove the door trim panel and waterdam.
(2) Disconnect the door latch-to-lock cylinder rod at
the door latch (Fig. 14).
(3) If equipped, disconnect the security alarm
switch connector from the lock cylinder (Fig. 15).
Fig. 12 Fixed Glass Support Bracket Bolts
Fig. 13 Fixed Glass Removal/Installation
Fig. 14 Key Lock Cylinder and Door Latch
Fig. 15 Security Alarm Switch
JDOORSÐXJ 23 - 47
Page 1784 of 2198
(2) Move the door release handle outward and dis-
connect the handle-to-latch rods (Fig. 3). For vehicles
equipped with power door locks/windows, also discon-
nect the wire harness connector (Fig. 4).
(4) Drill-out the rivet heads and remove the rod
guide bracket rivets from the door inner panel (Fig. 5
and 6).
(5) Remove the rod guide brackets and rods from
the door.
INSTALLATION
(1) Position the rod guide brackets and rods in the
door.
(2) Install rod the guide bracket rivets in the door
inner panel (Fig. 7).
(3) Install the door trim panel and waterdam.
(4) Adjust the door latch as described in DOOR
LATCH ADJUSTMENT.
Fig. 3 Door Inside Latch Release Rods
Fig. 4 Power Switch Wire Harness Connector 16
(3) Remove the door trim panel and waterdam.
Fig. 5 Front Door Rod Guide Bracket and Rods
Fig. 6 Rear Door Rod Guide Bracket and Rods
Fig. 7 Rod Guide Bracket Installation
JDOORSÐXJ 23 - 51
Page 1786 of 2198
14). Be careful not to bend the hinge when driving
the hinge pin, support may be required under the
hinge.
(8) Adjust/align latch striker and latch as neces-
sary.(9) Install the door restraint (check) retaining pin
with a punch.
FRONT DOOR SPACER BLOCKSÐTWO-DOOR
VEHICLES
REMOVAL
(1) Upper spacer block: drill-out the rivet heads
and remove them from the reinforcement plate (Fig.
1).
(2) Lower spacer block: remove the screws from the
door face (Fig. 2).
(3) As applicable, remove the spacer block from the
door window frame or door face.
INSTALLATION
(1) As applicable, position the spacer block on the
door window frame or door face.
(2) Upper spacer block: Install the replacement riv-
ets in the spacer block and reinforcement plate.
Fig 11 Install Bushing In Hinge
Fig. 12 Begin To Roll Bushing Material Outward
Fig. 13 Forming A Head On The Bushing
Fig. 14 Installing The Hinge Pin
Fig. 1 Front Door Upper Spacer BlockÐTwo-Door
Vehicles
JDOORSÐXJ 23 - 53