1995 HONDA ODYSSEY display
[x] Cancel search: displayPage 95 of 240
Audio System
Once that station's frequency is
stored, simply press and release the
proper preset button to tune to it. If
you want to change any preset button's selection, store another fre-
quency as described. The frequen-
cies you preset will be lost if your
car's battery goes dead or is discon-
nected.
The AUTO SELECT function allows
you to find stations easily when youare in an unfamiliar area. Press the
AUTO SELECT button. The system automatically scans both bands to
find six strong stations on AM and twelve on FM, and stores their
frequencies in the Preset buttons.
You can then use the Preset buttons in the normal manner to select thosestations. "A SEL" stays displayed
next to the frequency as a reminder.
If you are in a remote area, AUTO
SELECT may not find enough stations to fill all the available
presets. If this is the case, you will see a "0" displayed when you press
any Preset button that does not have
a station stored. You cannot manually store radio
station frequencies in the Preset
buttons when AUTO SELECT is ON. If you do not like the stations found
by AUTO SELECT, you can still use
the TUNE or SEEK function to findother stations.
AUTO SELECT does not erase the stations you have manually preset.
When you return to your normal reception area, turn off AUTO
SELECT by pressing the buttonagain. The light goes out and the
Preset buttons can then select thestations you originally set.
Comfort and Convenience FeaturesProCarManuals.comMain Menu Table of Contents s t
Page 99 of 240
Audio System
Cassette Search Functions Once a cassette is playing, you can
use the FF, REW, RPT, or SKIP
function to look for desired songs or
passages.
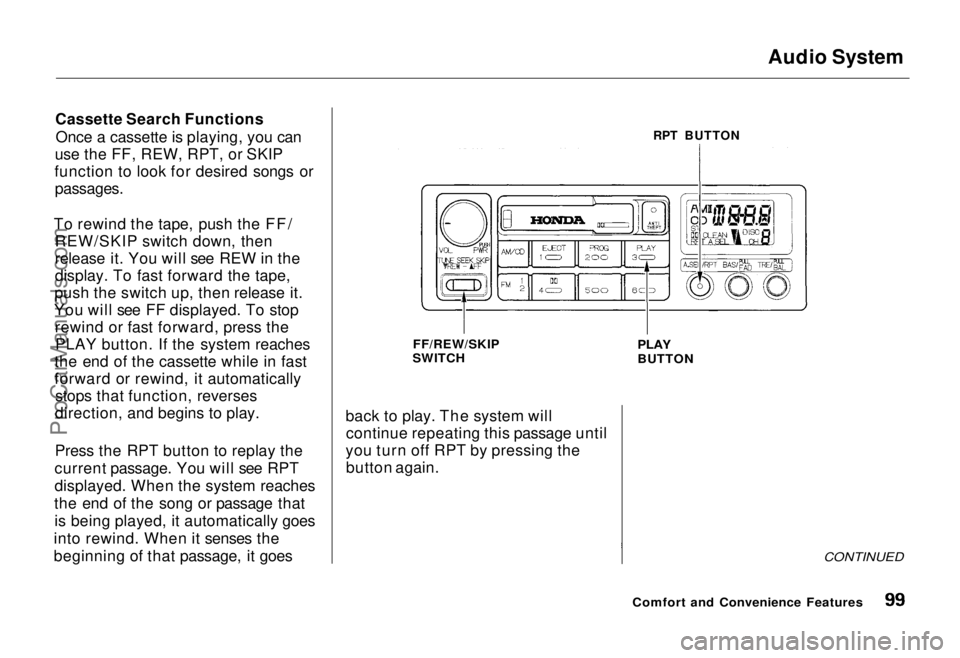
To rewind the tape, push the FF/ REW/SKIP switch down, then
release it. You will see REW in the
display. To fast forward the tape,
push the switch up, then release it.
You will see FF displayed. To stop rewind or fast forward, press thePLAY button. If the system reaches
the end of the cassette while in fast
forward or rewind, it automatically stops that function, reverses
direction, and begins to play.
Press the RPT button to replay the
current passage. You will see RPT
displayed. When the system reaches
the end of the song or passage that is being played, it automatically goes
into rewind. When it senses the
beginning of that passage, it goes back to play. The system will
continue repeating this passage until
you turn off RPT by pressing the button again.
CONTINUED
Comfort and Convenience Features
RPT BUTTON
FF/REW/SKIP
SWITCH
PLAY
BUTTONProCarManuals.comMain Menu Table of Contents s t
Page 100 of 240
Audio System
The SKIP function lets you skip to
the beginning of a song or other
passage. The tape skips forward or
backward, depending on which direction you push the FF/REW/
SKIP switch.
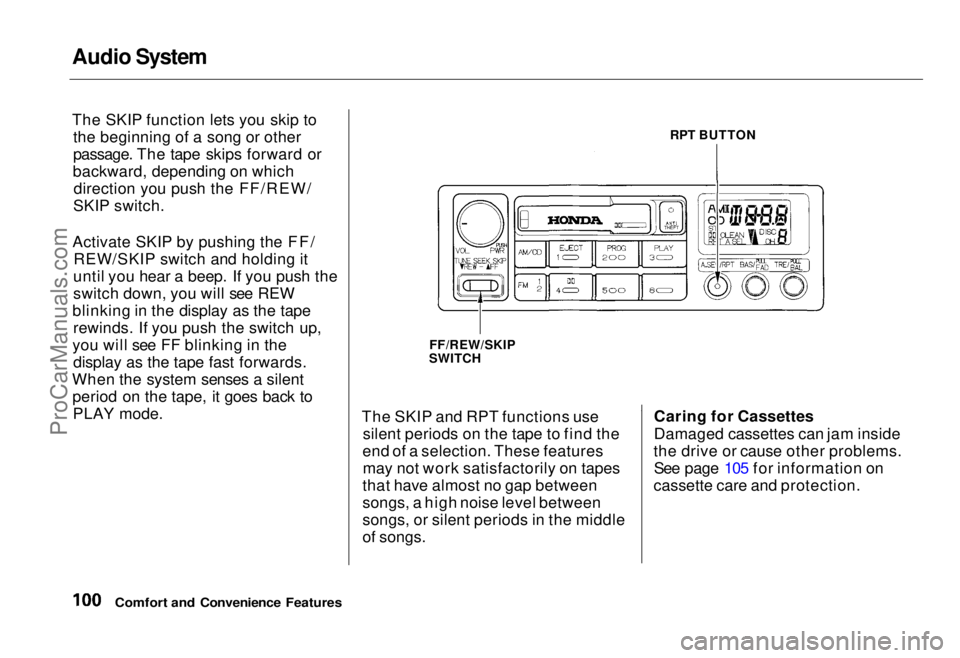
Activate SKIP by pushing the FF/ REW/SKIP switch and holding it
until you hear a beep. If you push the
switch down, you will see REW
blinking in the display as the tape rewinds. If you push the switch up,
you will see FF blinking in the display as the tape fast forwards.
When the system senses a silent period on the tape, it goes back toPLAY mode. The SKIP and RPT functions use
silent periods on the tape to find the
end of a selection. These features may not work satisfactorily on tapes
that have almost no gap between
songs, a high noise level between
songs, or silent periods in the middle
of songs. Caring for Cassettes
Damaged cassettes can jam inside
the drive or cause other problems. See page 105 for information on
cassette care and protection.
Comfort and Convenience Features
RPT BUTTON
FF/REW/SKIP
SWITCHProCarManuals.comMain Menu Table of Contents s t
Page 101 of 240
Audio System
Operating the CD Player
(Optional)
A Compact Disc changer is available for your car. It holds up to six discs,
providing several hours of continu-ous programming. You operate the
CD changer with the same controls
used for the radio and cassette
player.
Load the desired CD's in the
magazine and load the magazine in
the changer according to the
instructions that came with the unit.
Your dealer has Genuine Honda accessory in-dash CD players
available that are operated by the
radio controls. If you have one of
these units, use the directions in this section (except for multi-disc
selection) to operate it. To operate the CD changer, the
ignition key must be in ACCESSORY (I) or ON (II). If you are listening to
a cassette tape, eject it before
playing a CD.
Press the CD button until "CD" appears on the display. Once in the
CD mode, the system will start to
play the first track of the first disc in the magazine.
When that disc ends, the next disc in the magazine is loaded and played.
After disc 6 has completed, the system will return to disc 1. To make
your own disc selection, push one of the six preset buttons. Your selection
will appear in the display and start
playing.
U.S. EX model
You can use the TUNE/SEEK switch while a disc is playing to
select passages and change tracks.
To move rapidly forward within a track, push up and hold the TUNE/SEEK switch. Push down and hold
the switch to move rapidly backward
within a track. You will hear a beep a
half second after you push the switch up or down. Keep pushing the
switch until you think the track has
advanced or returned to the desired
position. The disc will start playing
when you release the switch.
If you push the TUNE/SEEK switch
up and release it before you hear a
beep, the system will skip forward to the beginning of the next track on
that CD.
It will skip backward to the begin-
ning of the current track if you push
the switch down and release it.
Comfort and Convenience Features
CONTINUEDProCarManuals.comMain Menu Table of Contents s t
Page 103 of 240
Audio System
U.S. LX and Canadian EX models
You can use the TUNE/SEEK buttons while a disc is playing to select passages and change tracks.
To move rapidly forward within a track, push and hold the button.
Push and hold the button to
move rapidly backward within a
track. You will hear a beep a half second after you push the button.
Keep pushing the button until you
think the track has advanced or
returned to the desired position. The disc will start playing when you
release the button. If you push the button and
release it before you hear a beep, the system will skip forward to the
beginning of the next track on that
CD.
It will skip backward to the begin-
ning of the current track if you push the button and release it. If you push the RPT button on the
U.S. LX and Canadian EX models or
the A. SELECT/RPT button on the
U.S. EX model, the system will
continuously play the track you are
listening to. You will see RPT in the display. Push the switch again to
turn off the RPT (REPEAT) mode.
On U.S. EX model
You can get the CD player to randomly select tracks by pressing
A. SELECT/RPT until you see "A. SEL" in the display.
With this active, the system selects and plays the tracks randomly,
rather than sequentially, on each disc. When the system has played all
the tracks on that disc, it loads the
next disc and starts to play randomly.
The system continues to select and play tracks randomly on each of thesix discs until you press the
A. SELECT/RPT button again. To turn on random play mode while
the system is in the REPEAT mode,
turn off REPEAT mode first by
pressing the A. SELECT/RPT
button. Then, press the button againas explained above.
If you change modes to radio or
tape while a CD is playing, thenchange back to CD mode, thesame disc and track will play.
If you turn off the system while a CD is playing, either with the
PWR/VOL knob or by turning off
the ignition, the system will begin at the same disc and track when
you turn it back on.
If you try to select an empty slot in
the magazine, the system willselect and play the first track of
the next disc in the magazine.
To return to the radio function, press the CD button.
Comfort and Convenience FeaturesProCarManuals.comMain Menu Table of Contents s t
Page 104 of 240
Audio System
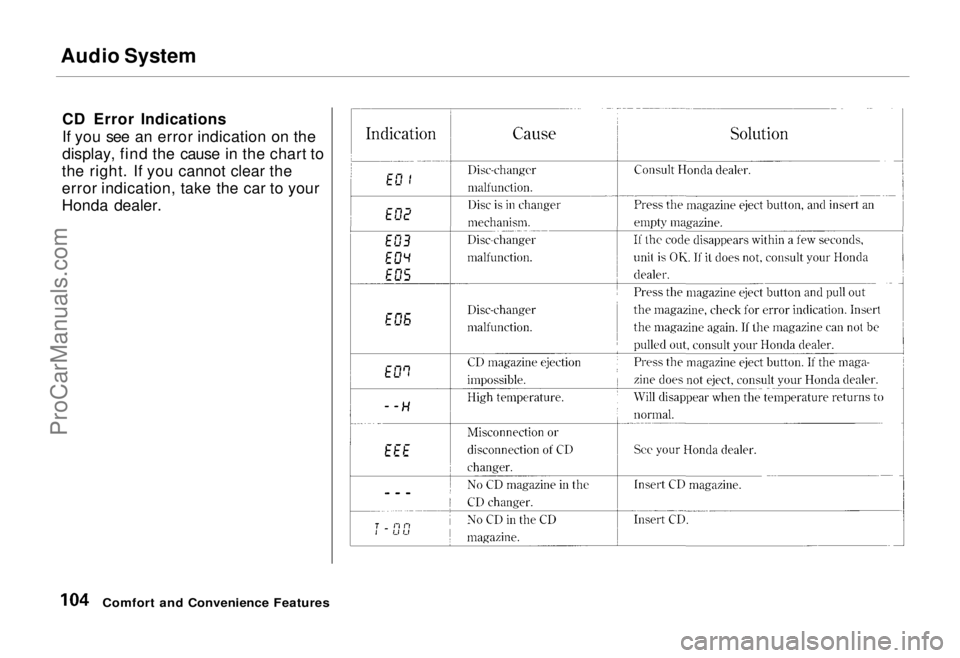
CD Error Indications
If you see an error indication on the
display, find the cause in the chart to
the right. If you cannot clear the
error indication, take the car to your
Honda dealer.
Comfort and Convenience FeaturesProCarManuals.comMain Menu Table of Contents s t
Page 105 of 240
Caring for the Cassette Player
The cassette drive picks up dirt and oxides whenever you play a tape.
This builds up over time and causes the sound quality to degrade. To
prevent this, you should clean the
cassette drive after every 30 hours of
use. Your dealer has a cleaning kit available for this purpose.
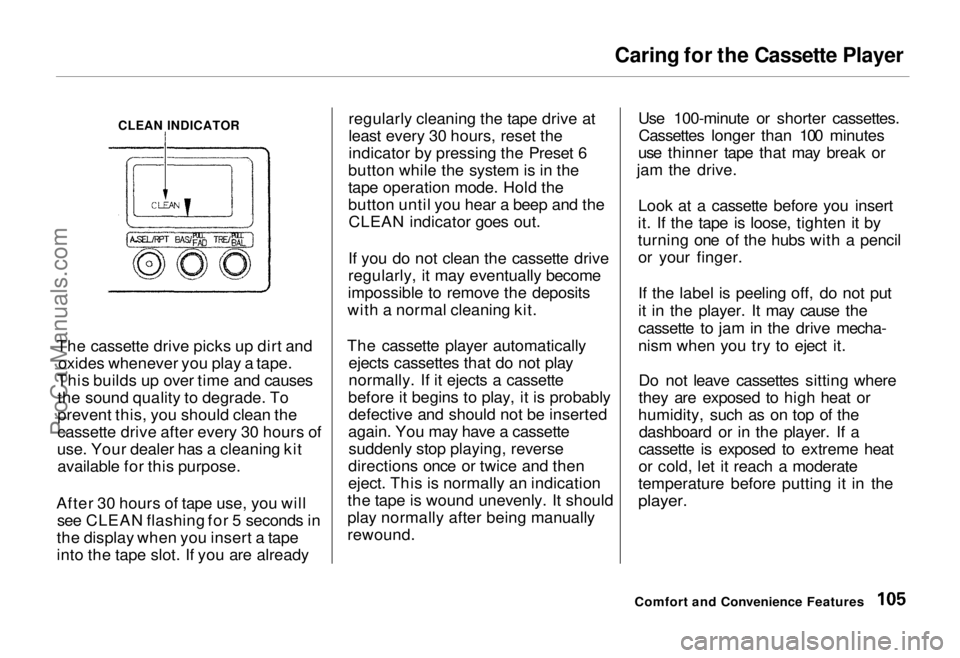
After 30 hours of tape use, you will see CLEAN flashing for 5 seconds in
the display when you insert a tape
into the tape slot. If you are already regularly cleaning the tape drive at
least every 30 hours, reset the
indicator by pressing the Preset 6
button while the system is in the
tape operation mode. Hold the
button until you hear a beep and the CLEAN indicator goes out.
If you do not clean the cassette drive
regularly, it may eventually become
impossible to remove the deposits
with a normal cleaning kit.
The cassette player automatically ejects cassettes that do not play
normally. If it ejects a cassette
before it begins to play, it is probably defective and should not be inserted
again. You may have a cassette suddenly stop playing, reverse
directions once or twice and then
eject. This is normally an indication
the tape is wound unevenly. It should
play normally after being manually
rewound. Use 100-minute or shorter cassettes.
Cassettes longer than 100 minutes
use thinner tape that may break or
jam the drive.
Look at a cassette before you insert
it. If the tape is loose, tighten it by
turning one of the hubs with a pencil or your finger.
If the label is peeling off, do not put
it in the player. It may cause the
cassette to jam in the drive mecha-
nism when you try to eject it.
Do not leave cassettes sitting where
they are exposed to high heat or
humidity, such as on top of the dashboard or in the player. If a
cassette is exposed to extreme heat
or cold, let it reach a moderate
temperature before putting it in the
player.
Comfort and Convenience Features
CLEAN INDICATORProCarManuals.comMain Menu Table of Contents s t
Page 106 of 240
Theft Protection
On U.S. EX model Your car's audio system will disableitself if it is disconnected from
electrical power for any reason. Tomake it work again, the user must
enter a specific five-digit code in the
Preset buttons. Because there are
hundreds of number combinations
possible from five digits, making the system work without knowing the
exact code is nearly impossible.
You should have received a card that lists your audio system's code
number and serial number. It is best
to store this card in a safe place at
home, or to keep it in your wallet or
purse. In addition, you should write
the audio system's serial number in
this Owner's Manual. If you should
happen to lose the card, you must obtain the code number from your
Honda dealer. To do this, you will
need the system's serial number. If your car's battery is disconnected
or goes dead, the audio system will
disable itself. If this happens, you
will see "Code" in the frequency display the next time you turn on the
system. Use the Preset buttons to
enter the five-digit code. If it is
entered correctly, the radio will start
playing.
If you make a mistake entering the
code, do not start over or try to
correct your mistake. Complete the
five-digit sequence, then enter the correct code. You have three tries to
enter the correct code. If you are
unsuccessful in three attempts, you must then leave the system on for
one hour before trying again. You will have to store your favorite
stations in the Preset buttons after
the system begins working. Your original settings were lost when
power was disconnected.
Comfort and Convenience FeaturesProCarManuals.comMain Menu Table of Contents s t