Page 32 of 240
Safety Labels
These labels are in the locations shown. They warn you of potential
hazards that could cause serious
injury. Read these labels carefully
and don't remove them.
If a label comes off or becomes hard
to read, contact your Honda dealer
for a replacement. RADIATOR CAP
Driver and Passenger Safety
BATTERYProCarManuals.comMain Menu Table of Contents s t
Page 113 of 240
Service Station Procedures
4. Remove it again and check the level. It should be between the
upper and lower marks.
If it is near or below the lower mark,
see page 146 for information on the
proper oil and how to add it. Look at the coolant level in the
radiator reserve tank. Make sure it is
between the MAX and MIN lines. If
it is below the MIN line, see Adding
Engine Coolant on page 151 for
information on adding the proper
coolant.Refer to Periodic Checks on page
144 for information on checking
other items in your Honda.
Before Driving
UPPER MARK
Engine Coolant Check
RESERVE TANK
MAX MIN
LOWER MARKProCarManuals.comMain Menu Table of Contents s t
Page 143 of 240

Periodic Checks
You should check the following items at the specified intervals. If
you are unsure of how to perform any check, turn to the page given. Engine oil level — Check every
time you fill the fuel tank. See
page 112.
Engine coolant level — Check the
radiator reserve tank every time
you fill the fuel tank. See page 113.
Windshield washer fluid — Check the level in the reservoir monthly.If weather conditions cause you to
use the washers frequently, check
the reservoir each time you stop
for fuel. See page 154. Automatic transmission — Check
the fluid level monthly. See page
155.
Brakes and power steering —
Check the fluid level monthly. See
page 156.
Tires — Check the tire pressure
monthly. Examine the tread for
wear and foreign objects. See page
169.
Battery — Check its condition and
the terminals for corrosion monthly. See page 162. Air conditioning — Check its
operation weekly. See page 168. Lights — Check the operation of
the headlights, parking lights,
taillights, high-mount brake light,
turn signals, brake lights, and
license plate lights monthly. See
page 175.
Maintenance
ProCarManuals.comMain Menu Table of Contents s t
Page 149 of 240

Engine Oil, Cooling System
If you change Your own oil, please
dispose of the used oil properly. Put it
in a sealed container and take it to a
recycling center. Do not discard it in a
trash bin or dump it on the ground.
The oil and filter should be changed every 6 months or 12,000 km (7,500
miles), whichever comes first. Under severe driving conditions, they
should be changed every 3 months
or 6,000 km (3,750 miles). See page 137 for a description of severe
driving conditions. Checking the Engine Coolant
Level
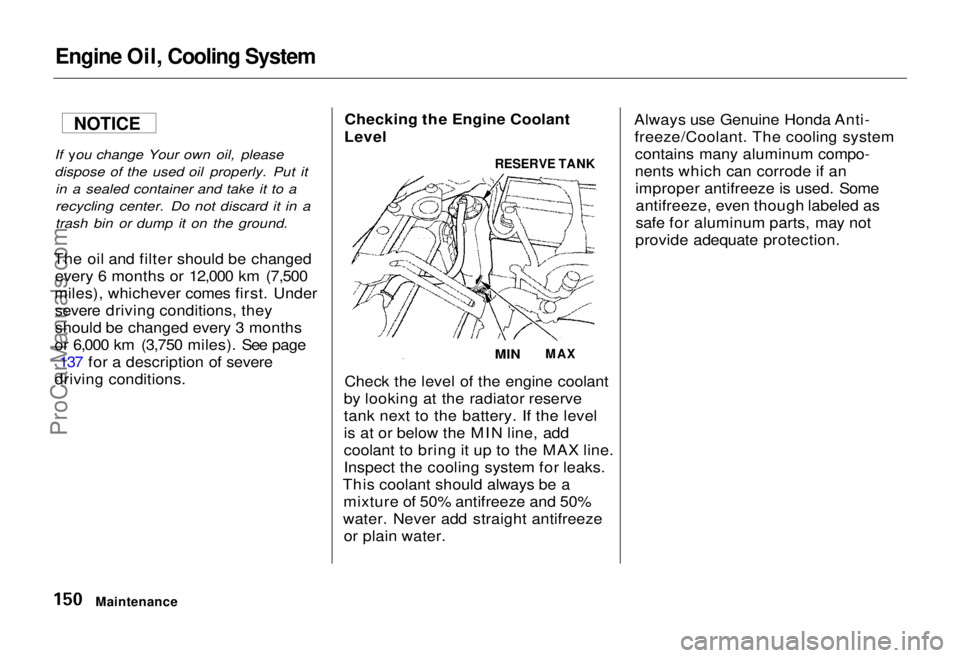
Check the level of the engine coolant
by looking at the radiator reserve
tank next to the battery. If the level
is at or below the MIN line, add
coolant to bring it up to the MAX line.
Inspect the cooling system for leaks.
This coolant should always be a mixture of 50% antifreeze and 50%
water. Never add straight antifreeze or plain water. Always use Genuine Honda Anti-
freeze/Coolant. The cooling systemcontains many aluminum compo-
nents which can corrode if animproper antifreeze is used. Someantifreeze, even though labeled as
safe for aluminum parts, may not
provide adequate protection.
Maintenance
NOTICE
RESERVE TANK
MIN
MAX
ProCarManuals.comMain Menu Table of Contents s t
Page 150 of 240
Cooling System
Adding Engine Coolant If the reserve tank is completelyempty, you should also check the
coolant level in the radiator.
1. Make sure the engine and radiator
are cool.
RADIATOR CAP
2. Turn the radiator cap counter- clockwise, without pressing down
on it, until it stops. This relieves
any pressure remaining in the
cooling system.
3. Remove the radiator cap by pushing down and turningcounterclockwise.
4. The coolant level should be up to
the base of the filler neck. Addcoolant if it is low.
5. Put the radiator cap back on. Tighten it fully.
6. Pour coolant into the reserve tank. Fill it to halfway between the MAX
and MIN marks. Put the cap backon the reserve tank.
Maintenance
RESERVE TANK
Removing the radiator cap
while the engine is hot can
cause the coolant to spray out,
seriously scalding you.
Always let the engine and radiator cool down before
removing the radiator cap.
CONTINUEDProCarManuals.comMain Menu Table of Contents s t
Page 151 of 240
Cooling System
Do not add any rust inhibitors or other additives to your car's cooling
system. They may not be compatible
with the coolant or engine compo- nents.
Replacing Engine Coolant
The cooling system should be completely drained and refilled with
new coolant according to the time
and distance recommendations in
the maintenance schedule. Only use
recommended antifreeze.
Draining the coolant requires access
to the underside of the car. Unless
you have the tools and knowledge,
you should have this maintenance done by a skilled mechanic. 1. Start the engine. Turn the heater
temperature control dial to
maximum heat and turn off theengine. Open the hood. Make sure
the engine and radiator are cool to
the touch.
2. Remove the radiator cap. DRAIN BOLT
3. Loosen the drain plug on the bottom of the radiator. Thecoolant will drain through thesplash guard. Remove the drain
bolt from the engine block.
Maintenance DRAIN PLUGProCarManuals.comMain Menu Table of Contents s t
Page 152 of 240

Cooling System
RESERVE TANK RESERVE
TANK CAP
HOLDER
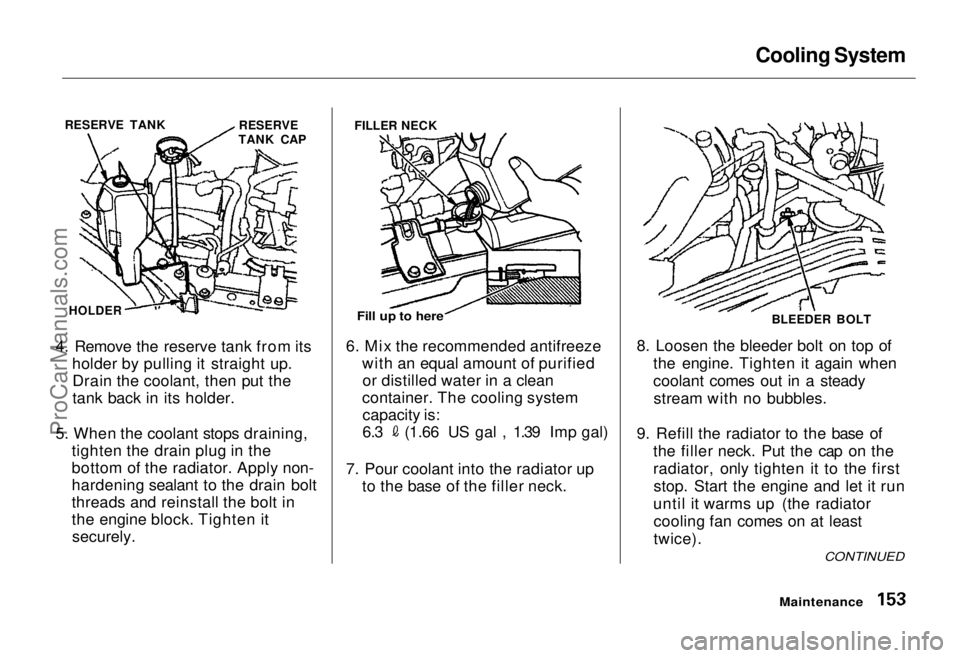
4. Remove the reserve tank from its holder by pulling it straight up.Drain the coolant, then put the
tank back in its holder.
5. When the coolant stops draining, tighten the drain plug in the
bottom of the radiator. Apply non-
hardening sealant to the drain bolt
threads and reinstall the bolt in
the engine block. Tighten it
securely.
FILLER NECK
Fill up to here
6. Mix the recommended antifreeze with an equal amount of purifiedor distilled water in a clean
container. The cooling system capacity is: 6.3
(1.66 US gal , 1.39 Imp gal)
7. Pour coolant into the radiator up to the base of the filler neck. 8. Loosen the bleeder bolt on top of
the engine. Tighten it again when
coolant comes out in a steadystream with no bubbles.
9. Refill the radiator to the base of the filler neck. Put the cap on the
radiator, only tighten it to the firststop. Start the engine and let it run
until it warms up (the radiator cooling fan comes on at least
twice).
Maintenance
BLEEDER BOLT
CONTINUEDProCarManuals.comMain Menu Table of Contents s t
Page 153 of 240

Cooling System, Windshield Washers
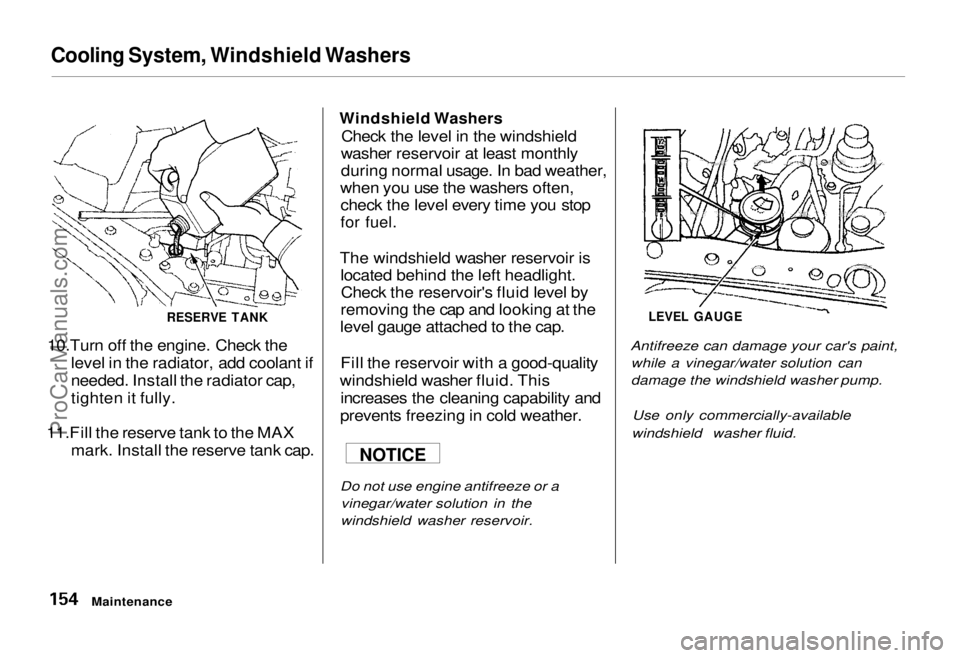
10.Turn off the engine. Check the level in the radiator, add coolant if needed. Install the radiator cap,
tighten it fully.
11.Fill the reserve tank to the MAX mark. Install the reserve tank cap.
Windshield Washers
Check the level in the windshield
washer reservoir at least monthly
during normal usage. In bad weather,
when you use the washers often, check the level every time you stop
for fuel.
The windshield washer reservoir is located behind the left headlight.Check the reservoir's fluid level by
removing the cap and looking at the
level gauge attached to the cap.
Fill the reservoir with a good-quality
windshield washer fluid. This increases the cleaning capability and
prevents freezing in cold weather.
Do not use engine antifreeze or a vinegar/water solution in the
windshield washer reservoir.
LEVEL GAUGE
Antifreeze can damage your car's paint, while a vinegar/water solution can
damage the windshield washer pump.
Use only commercially-available
windshield washer fluid.
Maintenance
RESERVE TANK
NOTICEProCarManuals.comMain Menu Table of Contents s t