1995 CHEVROLET CORVETTE tow
[x] Cancel search: towPage 13 of 386
Downloaded from www.Manualslib.com manuals search engine Power Seat (Option)
4b
SEAT
i
Sport Seat (Option)
RIDE CONTROL
SPORT
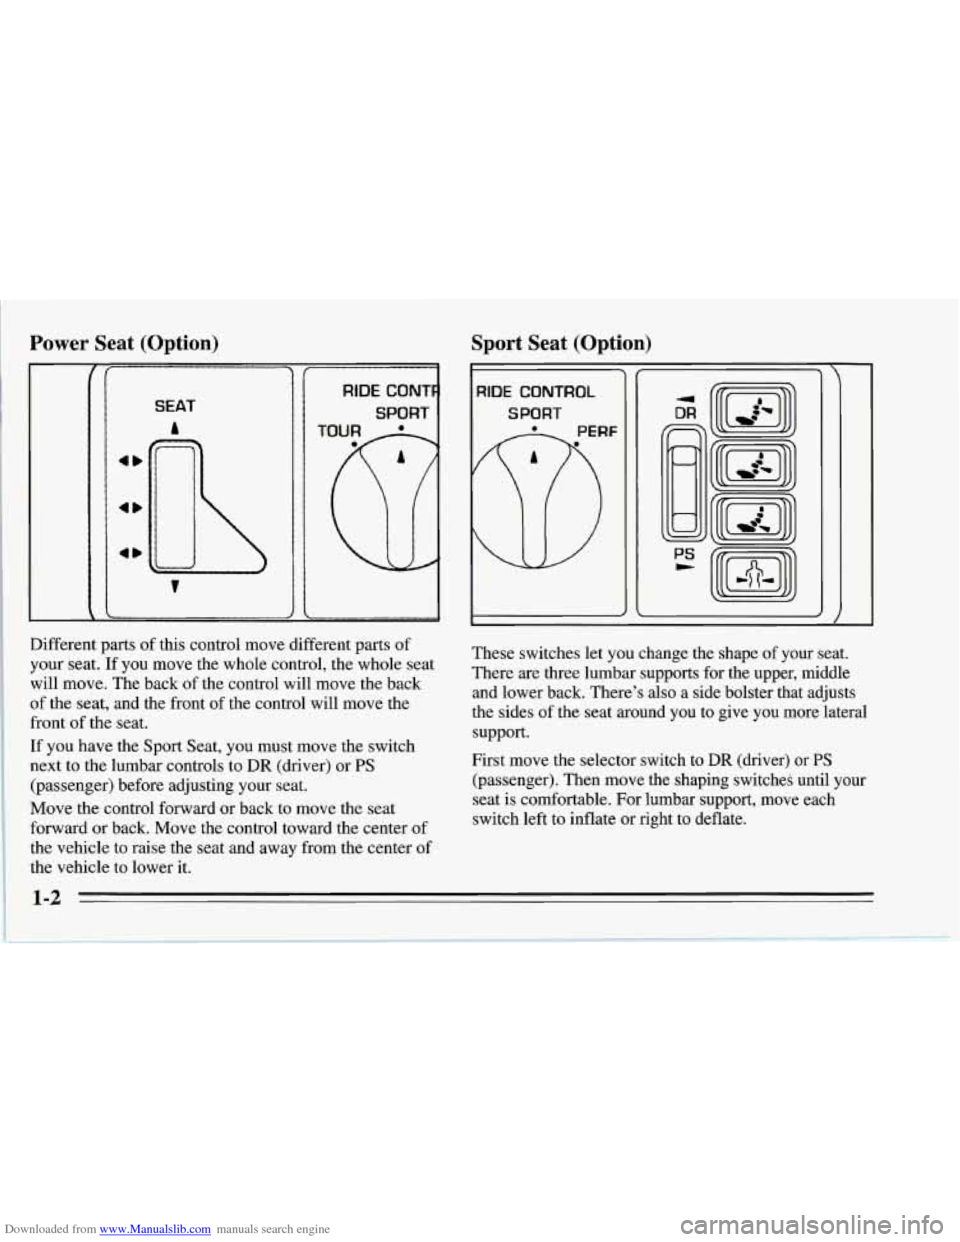
Different parts of this control move different parts of
your seat. If you move the whole control, the whole seat
will move. The back of the control will move the back
of the seat, and the front of the control will move the
front
of the seat.
If you have the Sport Seat, you must move the switch
next to the lumbar controls to
DR (driver) or PS
(passenger) before adjusting your seat.
Move the control forward or back to move the seat
forward or back. Move the control toward the center of
the vehicle to raise the seat and away from the center of
the vehicle to lower
it.
These switches let you change the shape of your seat.
There are three lumbar supports for the upper, middle
and lower back. There’s also a side bolster that adjusts
the sides of the seat around you to give you more lateral
support.
First move the selector switch
to DR (driver) or PS
(passenger). Then move the shaping switches until your
seat is comfortable. For lumbar support, move each
switch left to inflate or right to deflate.
1-2
Page 31 of 386
Downloaded from www.Manualslib.com manuals search engine When should an air bag inflate?
The air bag is designed to inflate in moderate to severe
frontal or near-frontal crashes. The air bag will inflate
only
if the impact speed is above the system’s designed
“threshold level.” If your vehicle goes straight into a
wall that doesn’t move or deform, the threshold level is
about
9 to 15 mph (14 to 24 km/h). The threshold level
can vary, however, with specific vehicle design,
so that
it can be somewhat above or below
this range. If your
vehicle strikes something that will move or deform, such
as a parked car, the threshold level will be higher. The
air bag is not designed to inflate in rollovers, side
impacts, or rear impacts, because inflation would not
help the occupant.
It is possible that in a crash only one of the two air bags
in your Corvette will deploy.
This is rare, but can
happen in a crash just severe enough to make an air bag
inflate.
In any particular crash, no one can say whether an air
bag should have inflated simply because of the damage
to a vehicle or because of what the repair costs were.
Inflation is determined by the angle of the impact and
the vehicle’s deceleration. Vehicle damage is only one
indication of this.
What makes an air bag inflate?
In a frontal or near-frontal impact of sufficient severity,
the air bag sensing system detects that the vehicle is
suddenly stopping as a result
of a crash. The sensing
system triggers a chemical reaction of the sodium azide
sealed in the inflator. The reaction produces nitrogen
gas, which inflates the air bag. The inflator, air bag, and
related hardware are all part of the air bag modules
packed inside the steering wheel and in the instrument
panel in front of the passenger.
How does an air bag restrain?
In moderate to severe frontal or near-frontal collisions,
even belted occupants can contact the steering wheel or
the instrument panel. The air bag supplements the
protection provided by safety belts. Air bags distribute
the force of the impact more evenly over the occupant’s
upper body, stopping the occupant more gradually. But
air bags would not help you in many types of collisions,
including rollovers and rear and side impacts, primarily
because an occupant’s motion
is not toward the air bag.
Air bags should never be regarded
as anything more
than a supplement to safety belts, and then only in
moderate to severe frontal or near-frontal collisions.
1-20
Page 40 of 386
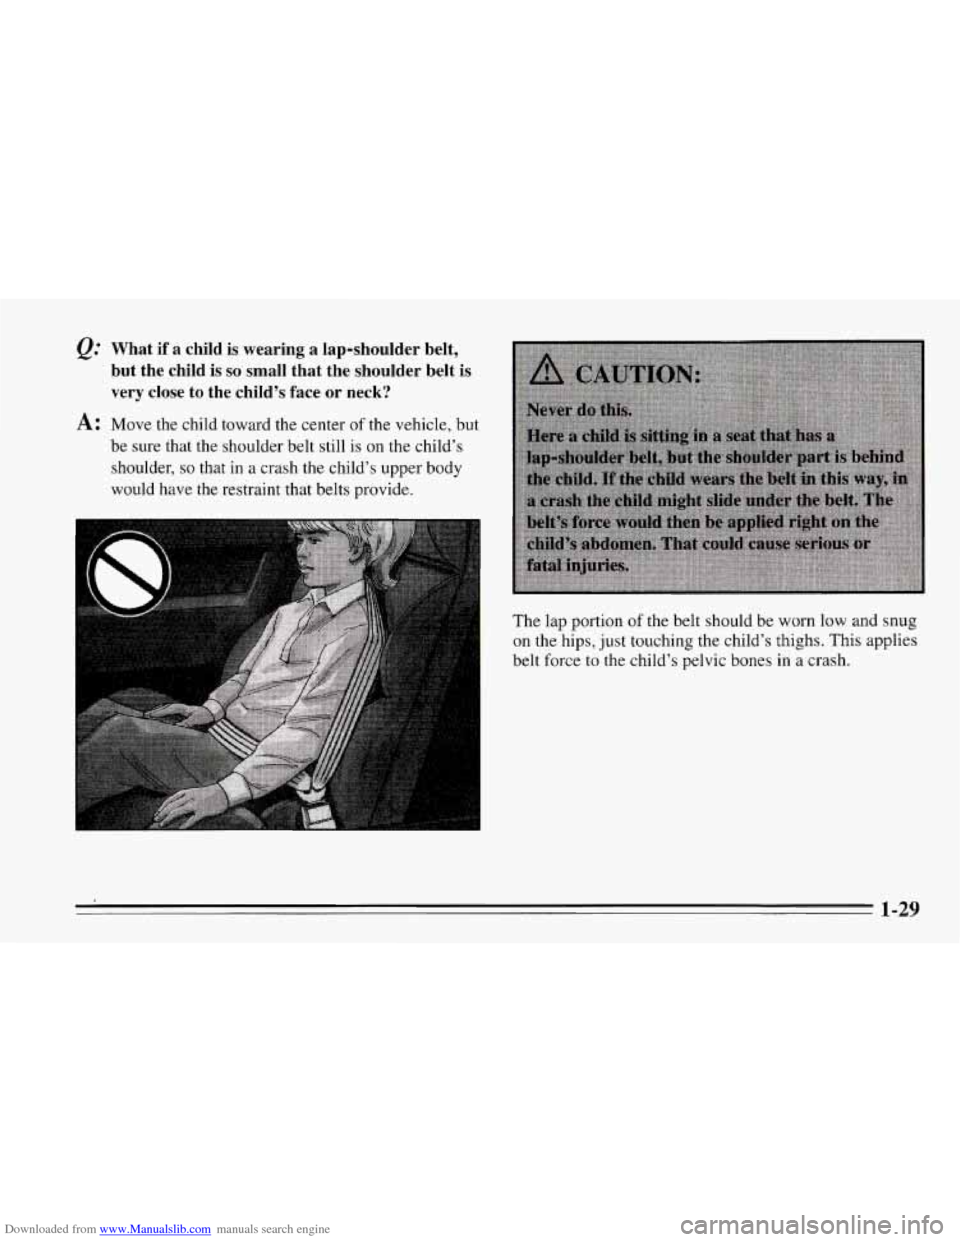
Downloaded from www.Manualslib.com manuals search engine Q: What if a child is wearing a lap-shoulder belt,
but the child
is so small that the shoulder belt is
very close to the child’s face or neck?
A: Move the child toward the center of the vehicle, but
be sure that the shoulder belt still is on the child’s
shoulder,
so that in a crash the child’s upper body
would have the restraint that belts provide.
The lap portion
of the belt should be worn low and snug
on the hips, just touching the child’s thighs. This applies
belt force to the child’s pelvic bones in
a crash.
1-29
Page 48 of 386
Downloaded from www.Manualslib.com manuals search engine Your Passive Keyless Entry system operates on a radio
frequency subject to Federal Communications
Commission (FCC) Rules.
This device complies with Part
15 of the FCC Rules.
Operation is subject to the following two conditions:
(1) This device may not cause harmful interference, and
(2) This device must accept any interference received,
including interference that may cause undesired
operation.
Should interference to this system occur, try this:
0
0
a
0
Check to determine if battery replacement is
necessary. See the instructions
on battery
replacement.
Check the distance. You may be too far from your
vehicle. This product has a maximum range.
Check the location. Other vehicles or objects may be
blocking the signal.
See your Chevrolet dealer or a qualified technician
for service.
Changes or modifications to this system by other than an
authorized service facility could void authorization to
use this equipment.
Operation
You don’t have to do anything for PKE to work when
the passive feature is on. Just walk toward your vehicle
with the
PKE transmitter, and the system will
automatically disarm your theft-deterrent system and
unlock the doors.
If it’s dark enough outside, your
interior lamps will come on.
If you move out of range, the PKE system will:
1. Lock the doors after five seconds.
2. Arm the theft-deterrent system.
3. Sound the horn to let you know the doors are locked.
4. Turn off the interior lamps.
You can also use the buttons on the transmitter. Press
DOOR to open the passenger’s door or HATCH to open
the hatch. The HATCH button will only work when the
ignition is off.
The system has a feature that makes it difficult for you
to lock your keys in your vehicle. If you leave your keys
in the ignition and lock the doors, the system will unlock
the doors as soon as they are closed. If you leave the
keys in the ignition and move away with the transmitter,
the doors still will not lock. You should notice that the
horn doesn’t sound and return to get your keys.
Page 59 of 386
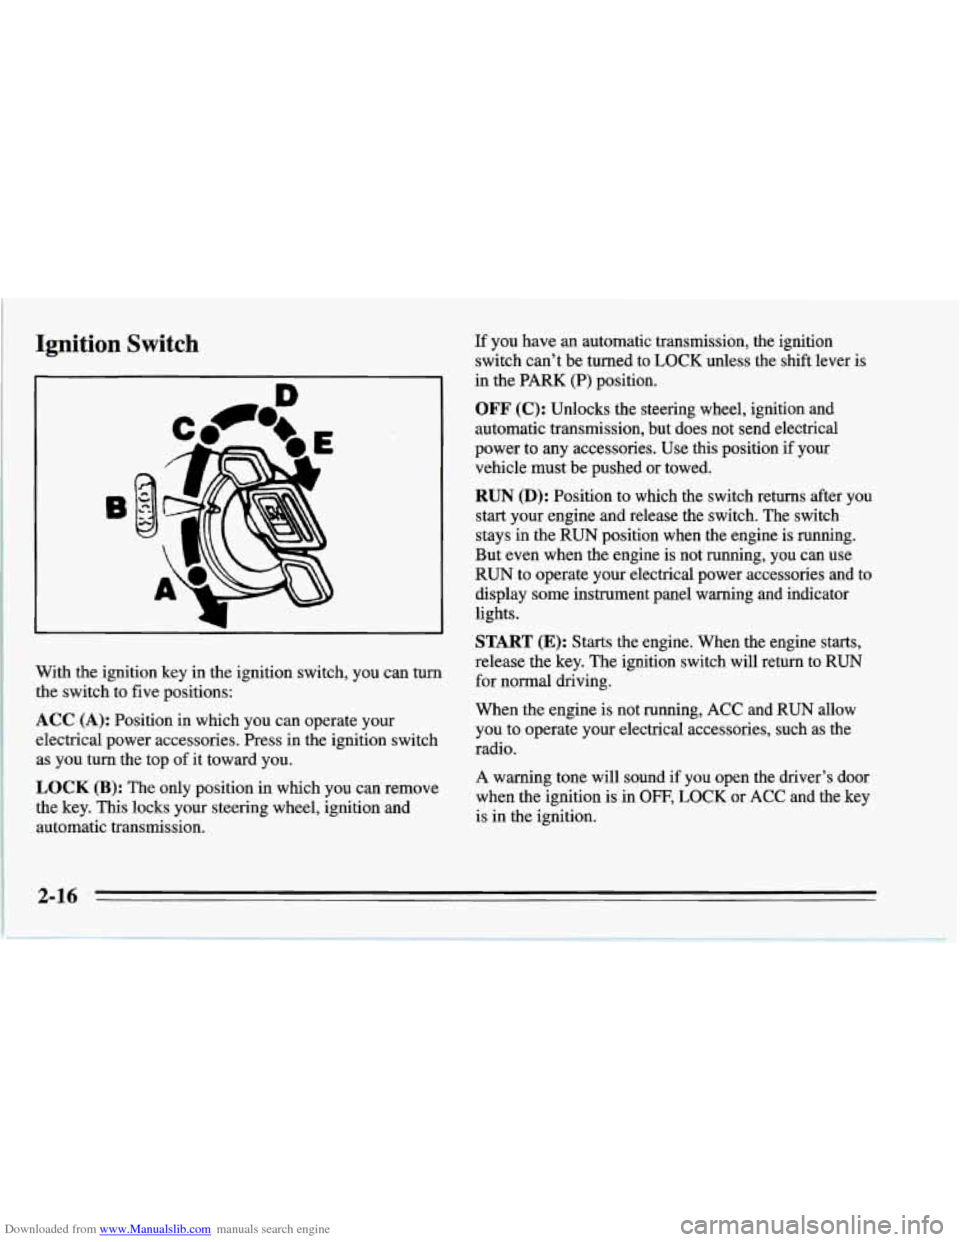
Downloaded from www.Manualslib.com manuals search engine Ignition Switch
With the ignition key in the ignition switch, you can turn
the switch to five positions:
ACC (A): Position in which you can operate your
electrical power accessories. Press in the ignition switch as you turn the top of it toward you.
LOCK (B): The only position in which you can remove
the key.
This locks your steering wheel, ignition and
automatic transmission. If
you have an automatic transmission, the ignition
switch can’t be turned to LOCK unless the shift lever is
in the PARK (P) position.
OFF (C): Unlocks the steering wheel, ignition and
automatic transmission, but does not send electrical
power to any accessories. Use this position
if your
vehicle. must be pushed or towed.
RUN (D): Position to which the switch returns after you
start your engine and release the switch. The switch
stays in the
RUN position when the engine is running.
But even when the engine is not running, you can use
RUN to operate your electrical power accessories and to
display some instrument panel warning and indicator
lights.
START (E): Starts the engine. When the engine starts,
release
the key. The ignition switch will return to RUN
for normal driving.
When
the engine is not running, ACC and RUN allow
you to operate your electrical accessories, such as the
radio.
A warning tone will sound if you open the driver’s door
when the ignition
is in OFF, LOCK or ACC and the key
is in the ignition.
Page 62 of 386

Downloaded from www.Manualslib.com manuals search engine NOTICE:
Holding your key in START for longer than
15 seconds at a time will cause your battery to be
drained much sooner. And the excessive heat can
damage your starter motor.
2. If it doesn’t start within 3 seconds, push the
accelerator pedal about one-third of the way down,
while you hold the ignition key in START. When the
engine starts, let go
of the key and let up on the
accelerator pedal. Wait about
15 seconds between
each try to help avoid draining your battery.
When starting your engine in very cold weather (below
0°F or -18”C), do this:
1. With your foot off the accelerator pedal, turn the
ignition key to START and hold it there. After two
seconds, push the accelerator pedal down just a little.
When the engine starts, let go
of the key. Use the
accelerator pedal to maintain engine speed,
if you
have to, until your engine has run for a while.
2. If your engine still won’t start (or starts but then
stops), it could be flooded with too much gasoline.
Try pushing your accelerator pedal all the way to the
floor and holding it there as you hold the key
in
START for about three seconds. If the vehicle starts
briefly but then stops again, do the same thing, but
this time keep the pedal down for five or six seconds.
This clears the extra gasoline from the engine.
NOTICE:
Your engine is designed to work with the
electronics in your vehicle.
If you add electrical
parts or accessories, you could change the
way
the fuel injection system operates. Before adding
electrical equipment, check with your dealer.
If
you don’t, your engine might not perform
properly.
If you ever have to have your vehicle towed, see
the part of this manual that tells how to do
it
without damaging your vehicle. See “Towing
Your Vehicle” in the Index.
2-19
Page 63 of 386

Downloaded from www.Manualslib.com manuals search engine To start your 5.7 Liter LTl engine:
1. Without pushing the accelerator pedal, turn the
ignition key to START. When the engine starts, let
go of the key. The idle speed will go down as your
engine gets warm.
I 1
I NOTICE:
Holding your key in START for longer than
15 seconds at a time will cause your battery to be
drained much sooner. And the excessive heat can
damage your starter motor.
2.
If it doesn’t start within 10 seconds, push the
accelerator pedal all the way to the floor, while you
hold the ignition key in START. When the engine
starts, let go of the key and let up on the accelerator
pedal. Wait about
15 seconds between each try to
help avoid draining your battery.
When starting your engine
in very cold weather (below
0°F or -18”C), do this:
1. With your foot off the accelerator pedal, turn the
ignition key to START and hold it there. When the
engine starts, let go of the key. Use the accelerator pedal
to maintain engine speed, if you have to, until
your engine has run for a while.
stops), it could be flooded with too much gasoline.
Try pushing your accelerator pedal all the
way to the
floor and holding it there as you hold the key in
START for about three seconds. If the vehicle starts
briefly but then stops again, do the same thing, but
this time keep the pedal down for five or six seconds.
This clears the extra gasoline from the engine.
2. If your engine still won’t start (or starts but then
I NOTICE:
Your engine is designed to work with the
electronics in your vehicle.
If you add electrical
parts
or accessories, you could change the way
the fuel injection system operates. Before adding
electrical equipment, check with your dealer.
If
you don’t, your engine might not perform
properly.
If you ever have to have your vehicle towed, see
the part of this manual that tells how to
do it
without damaging your vehicle. See “Towing
Your Vehicle” in the Index.
2-20
Page 69 of 386
Downloaded from www.Manualslib.com manuals search engine NEUTRAL (N): In this position, your engine doesn’t
connect with the wheels.
To restart when you’re
already moving, use
NEUTRAL (N) only. Also, use
NEUTRAL (N) when your vehicle is being towed.
I NOTICE:
I
Damage to your transmission caused by shifting
out of
PARK (P) or NEUTRAL (N) with the
engine racing isn’t covered
by your warranty.
AUTOMATIC OVERDRIVE (0): This position is for
normal driving. If you need more power for passing, and
you’re:
Going less than about 35 mph (56 km/h), push your
accelerator pedal about halfway down.
Going about 35 mph (56 km/h) or more, push the
accelerator all
the way down.
You’ll shift down to the next gear and have more power.
DRIVE 0): This is like AUTOMATIC OVERDRIVE (@),
but you never go into overdrive.
Here
are some times you might choose DFUVE (D)
instead of AUTOMATIC OVERDRIVE
(0):
0 When driving on hilly, winding roads
0 When going down a steep hill
2-26