1995 CHEVROLET CORVETTE clock setting
[x] Cancel search: clock settingPage 90 of 386

Downloaded from www.Manualslib.com manuals search engine Headlamp Doors
The headlamp doors are designed to open when you
turn the headlamps on and close when you turn the
headlamps and parking lamps off. If you turn the
headlamps on, then turn the headlamp switch back to
the parking lamps setting, the headlamp doors will stay
open. You
can open the doors manually using the knob next to
the headlamp assembly. Turn the knob counterclockwise
until the doors are open.
The headlamp doors should be open when driving in icy
or snowy conditions to prevent the doors from freezing
closed and when washing the vehicle to help clean the
headlamps.
Daytime Running Lamps (Canada Only)
Daytime Running Lamps (DRL) can make it easier for
others to see the front of your vehicle during the day.
DRL can be helpful in many different driving
conditions, but they can be especially helpful in the
short periods after dawn and before sunset.
A light sensor on top of the instrument panel makes the
DRL work,
so be sure it isn’t covered.
The DRL system will make your front turn signal lamps
come on when:
The ignition is on,
The headlamp switch is off, and
0 The parking brake is released.
2-47
Page 153 of 386

Downloaded from www.Manualslib.com manuals search engine Flow-Through Ventilation System
Your Corvette's flow-through ventilation system
supplies outside air into the vehicle when it is moving.
Outside air will also enter the vehicle when the heater or
the air conditioning fan is running.
Ventilation Tips
Keep the hood and front air inlet free of ice, snow or
any other obstruction (such as leaves). The heater
and defroster will work far better, reducing the
chance of fogging the inside of your windows.
When you enter a vehicle in cold weather, adjust the
fan to the highest speed for a few moments before
driving off. This helps clear the intake ducts
of snow
and moisture, and reduces the chance of fogging the
inside
of your windows.
Audio Systems
Your Delco@ audio system has been designed to operate
easily and give years
of listening pleasure. But you will
get the most enjoyment out of it
if you acquaint yourself
with
it first. Find out what your Delco system can do
and how to operate all its controls, to be sure you're
getting the most out of the advanced engineering that
went into it.
Setting the Clock
Press SET. Within five seconds, press and hold TUNE
until the correct hour appears. Press and hold TUNE
A
until the correct minute appears.
Noise Reduction
Your audio system has automatic Dolby@ B Noise
Reduction.
Dolby and the
00' are trademarks of Dolby
Laboratories Licensing Corporation.
Noise reduction system manufactured under license
from Dolby Laboratories Licensing Corporation.
3-10
Page 154 of 386

Downloaded from www.Manualslib.com manuals search engine AM/FM Stereo with Cassette Tape Player
L/F R/I
0 II 0 0 0
0 OII 0 0 0
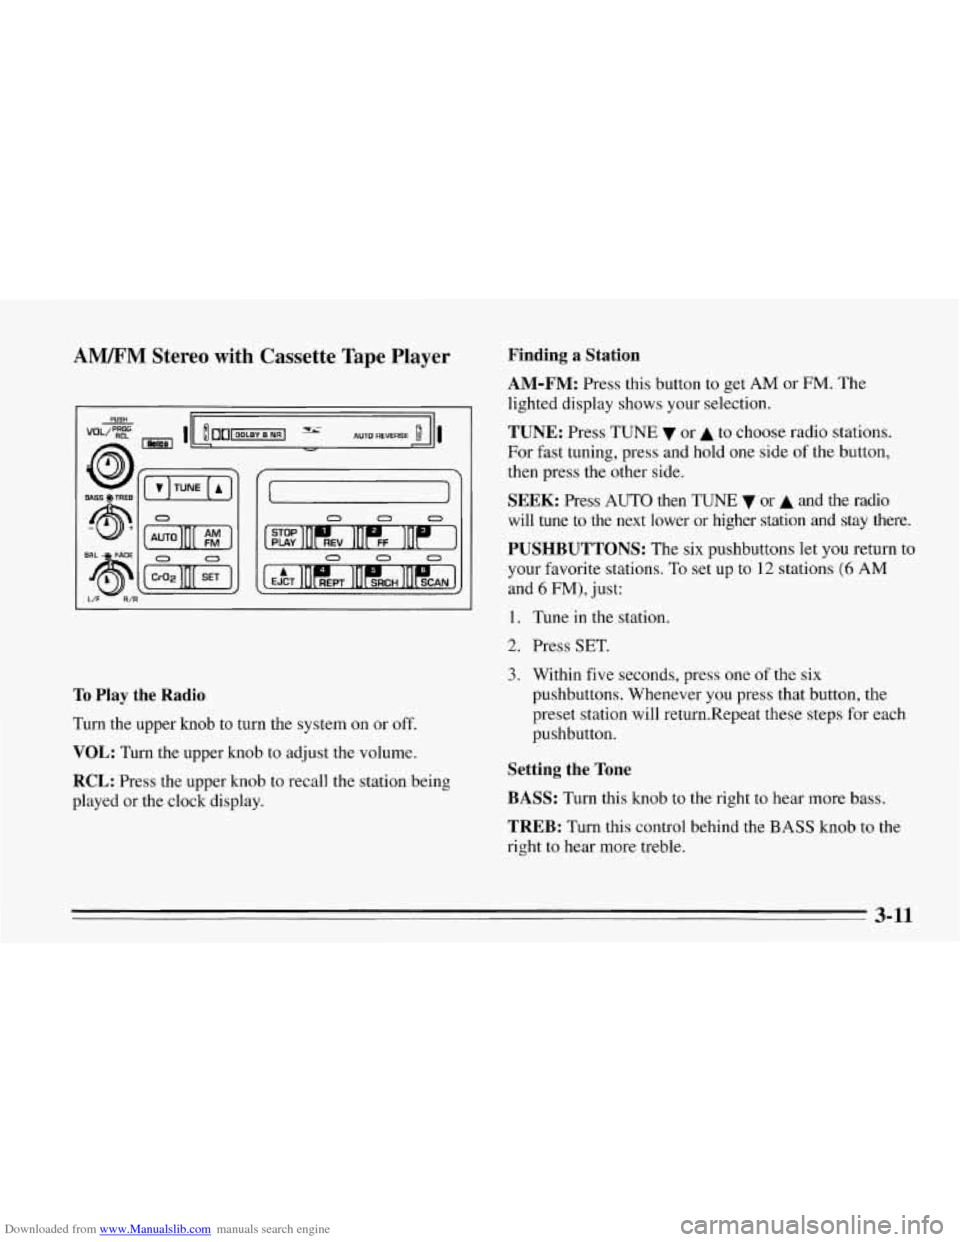
To Play the Radio
Turn the upper knob to turn the system on or off.
VOL: Turn the upper knob to adjust the volume.
RCL: Press the upper knob to recall the station being
played or the clock display.
Finding a Station
AM-FM:
Press this button to get AM or FM. The
lighted display shows your selection.
TUNE: Press TUNE or A to choose radio stations.
For fast tuning, press and hold one side
of the button,
then press the other side.
SEEK: Press AUTO then TUNE 7 or A and the radio
will tune to the next lower or higher station
and stay there.
PUSHBUTTONS: The six pushbuttons let you return to
your favorite stations. To set up to
12 stations (6 AM
and 6 FM), just:
1. Tune in the station.
2. Press SET.
3. Within five seconds, press one of the six
pushbuttons. Whenever you press that button, the
preset station will return.Repeat these steps for each
pushbutton.
Setting the Tone
BASS:
Turn this knob to the right to hear more bass.
TREB: Turn this control behind the BASS knob to the
right to hear more treble.
3-11
Page 157 of 386

Downloaded from www.Manualslib.com manuals search engine H has a higher maximum volume and gets louder faster
than L. Use H when you are driving with the roof panel
off, the convertible top down or the windows open. If
you don’t want to use SCV, turn the control to OFF.
RCL: Press the upper knob to recall the station being
played
or the clock display.
Finding a Station
AM-FM:
Press this button to get AM or FM. The
lighted display shows your selection.
TUNE: Press TUNE v or A to choose radio stations.
For fast tuning, press and hold one side of the button,
then press the other side.
SEEK: Press AUTO then TUNE v or A and the radio
will tune to the next lower or higher station and stay
there.
PUSHBUTTONS: The six pushbuttons let you return to
your favorite stations. To set up to 12 stations (6 AM
and
6 FM), tune in the station and press SET. Within
five seconds, press one of the six pushbuttons.
Whenever you press that button, the preset station will
return. Repeat these steps for each pushbutton.
Setting the Tone
BASS:
Turn this knob to the right to hear more bass.
TREB: Turn this control behind the BASS knob to the
right to hear more treble.
Adjusting the Speakers
BAL: With the DelcoBose system, your speakers are
electronically balanced.
FADE: Turn this knob to move the sound between the
front and rear speakers. Note that
if you turn the knob
all the way to
F or R, you may still get some sound from
the opposite speakers.
3-14
Page 376 of 386

Downloaded from www.Manualslib.com manuals search engine Check Gauges Light ............................. 2-85
Checking Your Restraint Systems
.................. 1-30
Checking Automatic Transmission Fluid
.................. 6-21
BrakeFluid
................................. 6-33
Engine Coolant
.............................. 6-28
Manual Transmission Fluid
.................... 6-23
Power Steering Fluid
......................... 6-30
Restraint Systems
............................ 1-30
Things Under the
Hood ........................ 6-8
Checking and Adding Hydraulic Clutch Fluid
........ 6-25
Chemical Paint Spotting
.......................... 6-64
Child Restraints
................................ 1-25
Securing in the Passenger Seat Position
........... 1-26
TopStrap
................................... 1-25
WheretoPut
................................ 1-25
Cigarette Lighter
............................... 2-6 1
Cinch Feature. Lap Belt
.......................... 1- 12
Cleaner. Air
................................... 6-17
Cleaning Aluminum Wheels
........................... 6-63
Dulso-Coated Moldings ....................... 6-58
Engine
..................................... 6-63
Fabric
..................................... 6-56
Glass
...................................... 6-59
Leather
.................................... 6-58
Outside
of the Windshield and Wiper Blades ....... 6-60
Removable Roof Panel
........................ 6-60
Soft-Touch Surfaces
.......................... 6-58
Speakercovers
.............................. 6-59
Special Problems
............................ 6-57
EngineOil
.................................. 6-13
Stains
...................................... 6-57
The Inside
of Your Corvette .................... 6-56
The Outside of Your Corvette
................... 6-61
Tires
...................................... 6-63
Top
of the Instrument Panel .................... 6-59
Your Convertible Top
......................... 6-62
Cleaning and Storage. Hardtop
.................... 6-63
Climate Control. Automatic Electronic
............... 3-4
Clock. Setting the
............................... 3-10
Clutch. Hydraulic
............................... 6-24
Comfort Controls
................................ 3-1
Compact Discs. Care of Your
...................... 3-19
Compact Spare Tire
............................. 5-40
Compartment. Door Storage ...................... 2-59
Console. Center
................................ 2-57
Control
of a Vehicle .............................. 4-5
Control. Loss of ................................ 4-14
Convertible Hardtop
............................. 2-95
Convertible Hardtop.
To Install .................... 2-99
Convertible Hardtop. To Remove
.................. 2-96
ConvertibleTop
................................ 2-90
ToLower
................................... 2-90
ToRaise
................................... 2-93
Convex Outside Mirror
.......................... 2-50
Coolant ....................................... 6-27
Coolant Heater. Engine
..................... 2-23. 6- 16
Coolant High Fill Reservoir
(LT1 Engine) ........... 5-23
Coolant. How to Add to the High Fill Reservoir
Vinyl
...................................... 6-58
Compartment.
Rear Storage ....................... 2-58
Coolant Recovery Tank
.......................... 5-17
(LTl Engine)
................................. 5-23