1995 CADILLAC ELDORADO start stop button
[x] Cancel search: start stop buttonPage 95 of 395

Downloaded from www.Manualslib.com manuals search engine Ensure the shift lever is fully in PARK (P) range before starting the
engine. Your Cadillac has
a brake-transaxle shift interlock. You have to
fully apply your regular brakes befure you can shift from PARK (P) when
when the ignition key is
in the RUN position. If you cannot shift out of
PARK (P), ease pressure on the shift lever -- push the shift lever all the
way into PARK (P) and release the shift lever button
on the floor shift
console models as you maintain brake application. Then move the shift
lever into the gear you wish. (Press the shift lever button before moving
the shift lever
on floor shift console models.) See “Shifting Out of
PARK (P)” in this section.
REVERSE (R): Use this gear to back up.
NOTICE:
Shifting to REVERSE (R) while your vehicle is moving forward
could damage
your transaxle. Shift to REVERSE (R) only after
your vehicle
has stopped.
Also use this gear to rock your vehicle back and forth to get out of snow,
ice or sand without damaging your transaxle. See “If You’re Stuck in
Sand,
Mud, Ice or Snow” in the Index for additional information.
NEUTRAL, (N): In this position, your engine doesn’t connect with the
wheels.
To restart when you’re already moving, use NEUTRAL (N) only.
Also, use NEUTRAL (N) when your vehicle is being towed.
2-24
1
1
a
Page 137 of 395

Downloaded from www.Manualslib.com manuals search engine 3. Decide which one of the three channels you want to program. Using
both hands, press the hand-held transmitter button and the desired
button on the HomeLink
TM Transmitter. Continue to hold both
buttons through Step
4.
4.
Hold down both buttons until you see the red light on the HomeLink
Transmitter flash rapidly. The rapid flashing, which could take
up to
90 seconds, indicates that the HomeLink TM Transmitter has been
programmed.
Release both buttons once the light starts to flash rapidly.
If you have trouble programming the HomeLink
TM Transmitter, make
sure that
you have followed the directions exactly as described and that the
batteries in the hand-held transmitter are not dead. If you still cannot
program
it, rotate your hand-held transmitter end over end and try again.
The HomeLink TM Transmitter may not work with older garage door
openers that do not meet current Federal Consumer Safety Standards. If
you cannot program the transmitter after repeated attempts, consult your
Cadillac dealer or call
1-800-355-35 15.
Be sure to keep your original hand-held transmitter in case you need to
erase and reprogram the HomeLink TM transmitter.
Note to Canadian Owners: During programming, your hand-held transmitter
may stop transmitting after one or two seconds. If you are programming
from one
of these transmitters, the HorneLink TM indicator light may prompt
you to re-activate your hand-held transmitter
with a series of double blinks.
After you reactivate your hand-held transmitter, the HolneLink
TM light
should flash rapidly. If
it flashes slowly, continue to periodically rc-activate
your hand-held transmitter
until the light flashes rapidly.
Operating the Transmitter
Press the appropriate button on the HomcLink TM Universal Transmitter.
The red light comes on while the signal is being transmitted.
Note that the effective transmission range
of the HomeLink" Transmitter
may differ from your hand-held transmitter and from one channel to another.
Erasing Channels
To erase all three programmed channels, hold down the two outside
buttons until the red light begins
to flash. Individual channels cannot be
erased,
but can be reprogrammed using the procedure for programming
the transmitter explained earlier.
2-66
Page 155 of 395

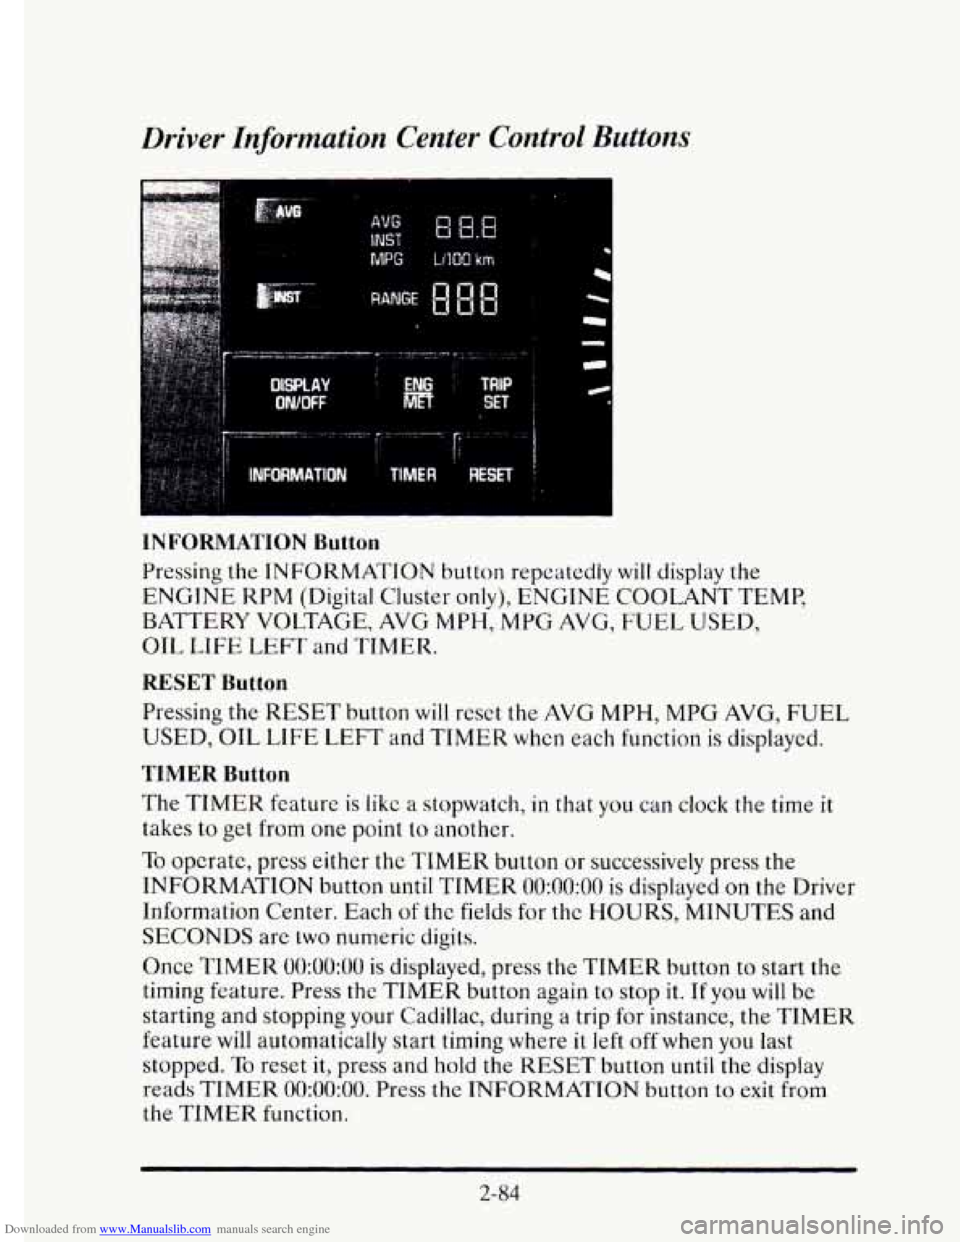
Downloaded from www.Manualslib.com manuals search engine Driver Information Center Control Buttons
MPG LlIQO km
INFORMATION Button
Pressing the INFORMATION button repeatedly will display the
ENGINE KPM (Digital Cluster only), ENGINE COOLANT TEMP,
BATTERY VOLTAGE, AVG
MPH, MPG AVG, FUEL USED,
OIL
LIFE LEFT and TIMER.
RESET Button
Pressing the RESET button will reset the AVG MPH, MPG AVG, FUEL
USED, OIL LIFE LEFT and TIMER when each function is displayed.
TIMER Button
The TIMER feature is like a stopwatch, in that you can clock the time it
takes to get from one point to another.
To opcrate, press either the TIMER button or successively press the
INFORMATION button
until TIMER 0O:OO:OO is displayed on the Driver
Information Center. Each
of the fields for the HOURS, MINUTES and
SECONDS are two numeric digits.
Once
TIMER 0O:OO:OO is displayed, press the TIMER button to start the
timing feature. Press the TIMER button again to stop
it. If you will be
starting and stopping your Cadillac, during a trip for instance, the
TIMER
feature will automatically start timing where it left off when you last
stopped.
To reset it, press and hold the RESET button until the display
reads
TIMER 0O:OO:OO. Press the INFORMATION button to exit from
the TIMER function.
2-84
Page 179 of 395

Downloaded from www.Manualslib.com manuals search engine FWD: Press this button to go forward rapidly to another part of the tape.
The radio
will play during fast forward. To stop the tape, press the same
button and the tape
will start to play.
REV: Press this button to reverse the tape. To stop the tape, press the
same button lightly or
any of the other buttons. The radio will play during
this reverse function.
PREV: Press this button to go back to the beginning of the last selection.
If the player has played less than 10 seconds into the current selection,
pressing the
PREV button will cause the player to find the beginning of
the previous selection and resume play from that point. If the player is
more than
10 seconds into the current selection, pressing the PREV
button will cause the player to find the beginning of the current selection
and resume play from that point.
If PREV is pressed while the first
selection
on the tape is being played, the player will return to the
beginning
of that side of the tape.
NEXT: Press this button to advance to the next selection. If the selection
is at the end
of the tape, the tape will reverse directions and begin playing
at a normal speed.
ST/PL Press this button to switch back to the radio without ejecting the
tape. Press it a second time
to start playing the tape again.
EJCT: Press this button to remove the tape.
3-14
Page 182 of 395

Downloaded from www.Manualslib.com manuals search engine To Play a Cassette Tape
1. Turn the radio on.
2. Insert the cassette through the tape door. (The TAPE indicator in the
If you hear nothing or hear just a garbled sound, the cassette may
not be
in squarely. Press the EJCT button to remove the tape and start over. The
tape equalization is automatically sensed and set. Inserting the cassette
also activates
DOLBY @ noise reduction.
display
will light.)
DNR@ is the Dynamic Noise Reduction. It helps remove background hiss
noise from
the radio.
*DNR@ is a registered trademark of National Semiconductor
Corporation.
3. Once the tape is playing, use the upper and lower knobs to adjust the
volume and balance, just as you do for the radio. Press the upper knob
to change tape direction. The arrow in the display shows which
direction the tape is being played.
FWD: Press this button to go forward rapidly to another part of the tape.
The radio will play during fast forward. To stop the tape press the same
button and the tape
will start to play.
REK Press this button to reverse the tape. To stop the tape press the same
button lightly or any
of the other buttons. The radio will play during this
reverse function.
PREV Press this button to go back to the beginning of the last selection.
If the player has played less than
10 seconds into the current selection,
pressing the PREV button
will cause the player to find the beginning of
the previous selection and resume play from that point. If the player is
more than 10 seconds into the current selection, pressing the PREV
button will cause the player to
find the beginning of the current selection
and resume play from that point. If
PREV is pressed while the first
selection on the tape
is being played, the player will return to the
beginning of that side of the tape.
NEXT: Press this button to advance to the next selection. If the selection
is at the end of the tape, the tape will reverse directions and begin playing
at a normal speed.
3-17
Page 184 of 395

Downloaded from www.Manualslib.com manuals search engine 3
ST/PL Press this button and the tape or CD will stop without ejecting and
the radio
will start to play. Press it again and the tape or CD will start to
play again.
EJCR Press this button to remove the tape or CD. If you have both a CD
and a tape in the player, then the other playback media will start to play.
Press it again and the other media
will eject.
COMP: Pressing this button makes soft and loud passages more equal in
volume. For example, classical or jazz music has very quiet and very loud
passages in the same tune. The
COMP display will light as long as COMP
is on.
Tips about Your Audio System
Be aware that hearing damage from loud noise is almost undetectable
until it is too late. Your hearing can adapt to higher volumes
of sound.
Sound that seems normal can
be loud and harmful to your hearing. Take
precautions
by adjusting the volume control on your radio to a safe sound
level before your hearing adapts
to it.
To help avoid hearing loss or damage:
0 Adjust the volume control to the lowest setting.
Increase volume slowly until you hear comfortably and clearly.
NOTICE:
Before you add any sound equipment to your vehicle -- like a
tape player,
CB radio, mobile telephone or two-way radio -- be
sure you can add what you want.
If you can, it’s very important
to do
it properly. Added sound equipment may interfere with the
operation
of your vehicle’s engine, Delco@ radio or other
systems, and even damage them.
And, your vehicle’s systems
may interfere with the operation
of sound equipment that has
been added improperly.
So, before adding sound equipment, check with your dealer and
be sure
to check Federal rules covering mobile radio and
telephone units.
3-19