1994 OLDSMOBILE SILHOUETTE tow
[x] Cancel search: towPage 195 of 276
As shown in the chart, SAE 5W-30 is
best for your vehicle. However, you can
use SAE 1OW-30 if it’s going
to be 0°F
(-18°C) or above. These numbers on an
oil container show
its viscosity, or
thickness.
Do not use other viscosity oils,
such as SAE 1OW-40 or SAE 20W-50.
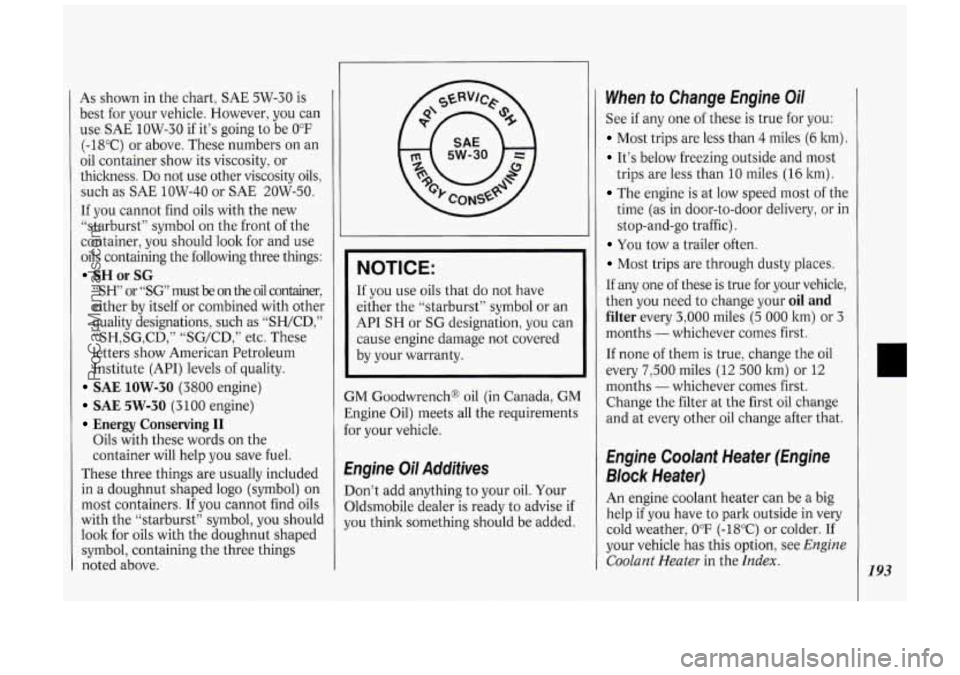
If you cannot find oils with the new
“starburst” symbol on the front of the
container, you should look for and use
oils containing the following three things:
SH or SG
“SH’ or “SG’ must be on the oil container,
either by itself or combined with other
quality designations, such as “SHKD,”
“SH,SG,CD,” “SG/CD,” etc. These
letters show American Petroleum
Institute (API) levels of quality.
SAE 1OW-30 (3800 engine)
SAE 5W-30 (3100 engine)
Energy Conserving I1
Oils with these words on the
container will help you save fuel.
These three things are usually included
in a doughnut shaped logo (symbol) on
most containers.
If you cannot find oils
with the “starburst” symbol,
you should
look for oils with the doughnut shaped
symbol, containing the three things
noted above. If
you use oils that do not have
either the “starburst” symbol or an
API SH or
SG designation, you can
cause engine damage not covered
by your warranty.
GM Goodwrench@ oil (in Canada, GM
Engine Oil) meets all the requirements
for your vehicle.
Engine Oil Additives
Don’t add anything to your oil. Your
Oldsmobile dealer is ready to advise if
you think something should be added.
When to Change Engine Oil
See if any one of these is true for you:
Most trips are less than 4 miles (6 ltm).
It’s below freezing outside and most
trips are less than
10 miles (16 ltm).
The engine is at low speed most of the
time
(as in door-to-door delivery, or in
stop-and-go traffic).
You tow a trailer often.
Most trips are through dusty places.
If any one of these is true for your vehicle,
then you need to change your
oil and
filter every 3,000 miles (5 000 ltm) or 3
months - whichever comes first.
If none
of them is true, change the oil
every
7,500 miles (12 500 ltm) or 12
months -whichever comes first.
Change the filter at the first oil change
and at every other oil change after that.
Engine Coolant Heater (Engine
Block Heater)
An engine coolant heater can be a big
help if you have to park outside in very
cold weather,
0°F (-18°C) or colder. If
your vehicle has this option, see
Engine
Coolant Heater in the Index. 193
ProCarManuals.com
Page 197 of 276
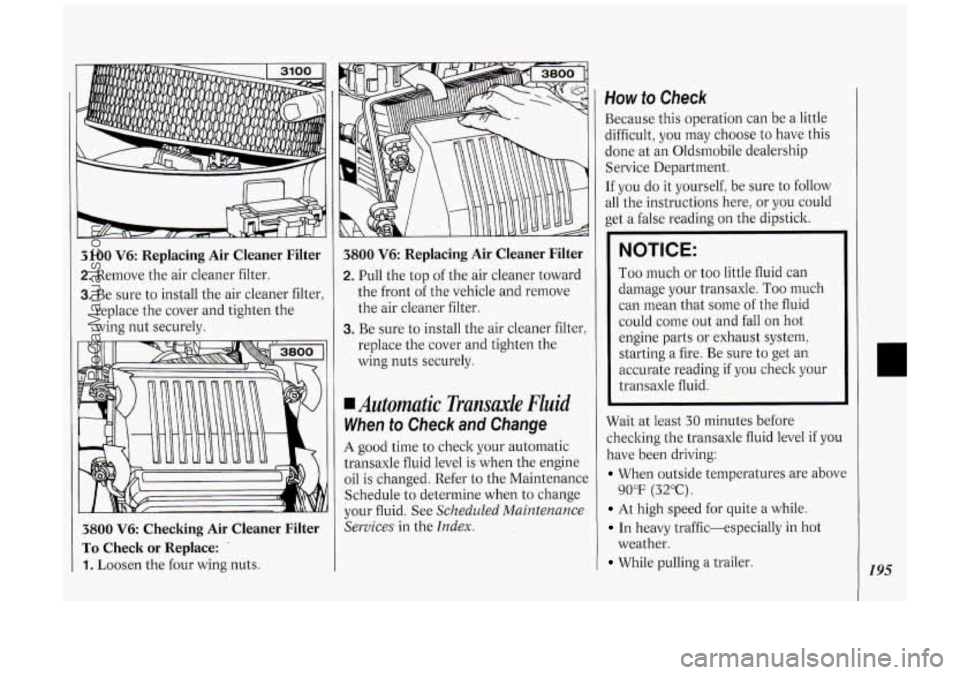
3100 V6: Replacing Air Cleaner Filter
2. Remove the air cleaner filter.
3. Be sure to install the air cleaner filter,
replace the cover and tighten the
wing nut securely.
3800 V6 Checking Air Cleaner Filter
To Check or Replace: .
1. Loosen the four wing nuts.
3800 V6: Replacing Air Cleaner Filter
2. Pull the top of the air cleaner toward
the front of the vehicle and remove
the air cleaner filter.
3. Be sure to install the air cleaner filter,
replace the cover and tighten the
wing nuts securely.
Automatic Transaxle Fluid
When to Check and Change
A good time to check your automatic
transaxle fluid level is when the engine
oil is changed. Refer
to the Maintenance
Schedule to determine when to change
your fluid. See
Scheduled Maintenance
Services
in the Index.
How to Check
Because this operation can be a little
difficult, you may choose to have this
done at an Oldsmobile dealership
Service Department.
If you do it yourself, be sure to follow
all the instructions here, or you could
get a false reading on the dipstick.
NOTICE:
Too much or too little fluid can
damage your transaxle.
Too much
can mean that some of the fluid
could come out and fall on hot
engine parts or exhaust system,
starting a fire. Be sure to get an
accurate reading if you check your
transaxle fluid.
Wait at least
30 minutes before
checking the transaxle fluid level
if you
have been driving:
When outside temperatures are above
At high speed for quite a while.
In heavy traffic-especially in hot
While pulling a trailer.
90°F (32°C).
weather.
195
ProCarManuals.com
Page 198 of 276
Service &Appearance Care
196
To get the right reading, the fluid
should be at normal operating
temperature, which is
180°F to 200°F
(82°C to 93°C).
Get the vehicle warmed up by driving
about
15 miles (24 ltm) when outside
temperatures are above
50°F (10°C). If
it's colder than 50°F ( 10°C), you may
have to drive longer.
To Check the Fluid Level
Park your vehicle on a level place.
With the parking brake applied, place
With your foot on the brake pedal,
the
shift lever in
P (Park).
move the shift lever through each gear
range, pausing for about three
seconds in each range. Then, position
the shift lever in
P (Park).
Let the engine run at idle for three to
five minutes.
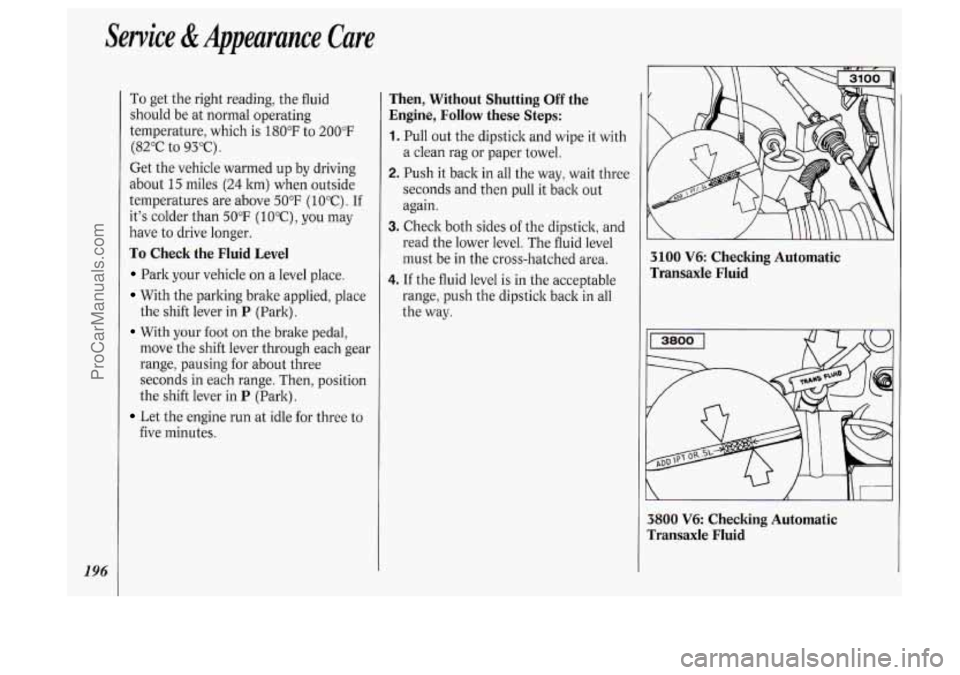
Then, Without Shutting Off the
Engine, Follow these Steps:
1. Pull out the dipstick and wipe it with
a clean rag or paper towel.
2. Push it back in all the way, wait three
seconds and then pull it back out
again.
3. Check both sides of the dipstick, and
read the lower level. The fluid level
must be in the cross-hatched area.
4. If the fluid level is in the acceptable
range, push the dipstick back in all
the way.
3100 V6: Checking Automatic
rransaxle Fluid
3800 V6: Checking Automatic
rransaxle Fluid
ProCarManuals.com
Page 215 of 276
Using Foam-Type Cleaner on
Fabric
Vacuum and brush the area to remove
Always clean a whole trim panel or
any
loose dirt.
section. Mask surrounding trim along
stitch or welt lines.
Mix Multi-Purpose Powdered Cleaner
following the directions on the
container label.
Use suds only and apply with a clean
Don’t saturate the material.
Don’t rub it roughly.
As soon as you’ve cleaned the section,
use a sponge to remove the suds.
Rinse the section with a clean, wet
sponge.
Wipe off what’s left with a slightly
damp paper towel or cloth.
Then dry it immediately with a blow
sponge.
dryer or a heat lamp.
NOTICE:
Be careful with a hair dryer or heat
lamp. You could scorch the fabric.
Wipe with a clean cloth.
Using Solvent-Type Cleaner on
Fabric
First, see if you have to use solvent-type
cleaner at all. Some spots and stains
will clean off better with just water and
mild soap.
If you need to use a solvent:
Gently scrape excess soil from the
trim material with a clean, dull knife
or scraper. Use very little cleaner,
light pressure and clean cloths
(preferably cheesecloth). Cleaning
should start
at the outside of the
stain, “feathering” toward the center.
Keep changing to a clean section of
the cloth.
When you clean a stain from fabric,
immediately dry the area with an air
hose, hair dryer, or heat lamp to help prevent
a cleaning ring. (See the
previous NOTICE.)
Special Cleaning Problems
Greasy or Oily Stains
Such as grease, oil, butter, margarine,
shoe polish, coffee with cream, chewing
gum, cosmetic creams, vegetable oils,
wax crayon, tar and asphalt.
Carefully scrape off excess stain.
Follow the solvent-type instructions
Shoe polish, wax crayon, tar and
described earlier.
asphalt will stain
if left on a vehicle
seat fabric. They should be removed
as soon as possible. Be careful,
because the cleaner will dissolve them
and may cause them to spread.
Non-Greasy Stains
Such as catsup, coffee (black), egg,
fruit, fruit juice, milk, soft drinks, wine,
vomit, urine and blood.
Carefully scrape off excess stain, then
sponge the soiled area with cool
water.
213
ProCarManuals.com
Page 217 of 276
1 I Glass
’ Glass should be cleaned often. GM
~ Glass Cleaner (GM Part No. 1050427)
or a liquid household glass cleaner will
remove normal tobacco smoke and dust
films.
Don’t use abrasive cleaners on glass,
’ because thejr may cause scratches.
Avoid placing decals on the inside rear
window, since they may have to be
scraped off later.
If abrasive cleaners are
used on the inside of the rear window,
~ an electric defogger element may be
~ damaged. Any temporary license should
not be attached across the defogger
grid.
Cleaning the Outside of the
Windshield, Backglass and Wiper Blades
If the windshield is not clear after using
the windshield washer, or if the wiper
blade chatters when running, wax or
other material may be
on the blade or
windshield. Clean
the outside
of the windshield
with GM Windshield Cleaner, Bon-Ami
Powder@
(GM Part No. l050011). The
windshield is clean
if beads do not form
when you rinse it with water.
Clean the blade by wiping vigorously
with a cloth soaked in
full strength
windshield washer solvent. Then rinse
the blade with water.
Wiper blades should be checked on a
regular basis and replaced when worn.
I Cleaning the Outside of Your
Oldsmobile
The paint finish on your vehicle
provides beauty, depth of color, gloss
retention and durability.
Washing Your Vehicle
The best way to preserve your vehicle‘s
finish is to keep it clean by washing it
often with lukewarm or cold water.
Don’t wash your vehicle in the direct
rays of the sun. Don’t use strong soaps
or chemical detergents. Use liquid hand,
dish
or car washing (mild detergent)
soaps. Don’t use cleaning agents that
contain acid or abrasives. All cleaning
agents should be flushed promptly and
not allowed to dry on the surface, or
they could stain. Dry the finish with a
soft, clean chamois or a
100*/0 cotton
towel to avoid surface scratches and
water spotting.
High pressure vehicle washes may
cause water to enter your vehicle.
215
ProCarManuals.com
Page 235 of 276
inspections that your Oldsmobile
dealer’s service department or another
qualified service center should perform.
Section
D: Recommended Fluids and
Lubricants lists some products
GM
recommends to help keep your vehicle
properly maintained. These products, or
their equivalents, should be used
whether you do the work yourself or
have
it done.
Section
E: Maintenance Record
provides
a place for you to record the
maintenance performed on your vehicle.
Whenever any maintenance is
performed, be sure to write
it down in
this section. This will help you
determine when your next maintenance
should be done. In addition, it is
a good
idea to keep your maintenance receipts.
They may be needed to qualify your
vehicle for warranty repairs.
Section A: Scheduled
Maintenance Services
Using Your Maintenance
Schedule
This section tells you the maintenance
services you should have done and
when you should schedule them. Your
Oldsmobile dealer knows your vehicle
best and wants you to be happy with it.
If
you go to your dealer for your service
needs, you’ll know that GM-trained and
supported service people will perform
the work using genuine
GM parts.
These schedules are for vehicles that:
carry passengers and cargo within
recommended limits.
You will find
these limits on your vehicle’s
CertificatiodTire label. See
Loading
Your Vehicle in the Index.
are driven on reasonable road
surfaces within legal driving limits.
use the recommended unleaded fuel.
See
Fuel in the Index.
Selecting the Right Schedule
First you’ll need to decide which of the
two schedules is right for your vehicle.
Here’s how to decide which schedule to
follow:
Schedule I
Is any one of these true for your
vehicle?
Most trips are less than 4 miles
Most trips are less than 10 miles
(6 ltm) .
(16 ltm) when outside temperatures
are below freezing.
The engine is at low speed most of the
time (as in door-to-door delivery, or in
stop-and-go traffic).
areas.
You operate your vehicle in dusty
You tow a trailer.
If any one (or more) of these is true for
your driving, follow Schedule
I.
Schedule I1
Follow Schedule I1 only if none of the
above conditions is true.
233
ProCarManuals.com
Page 236 of 276
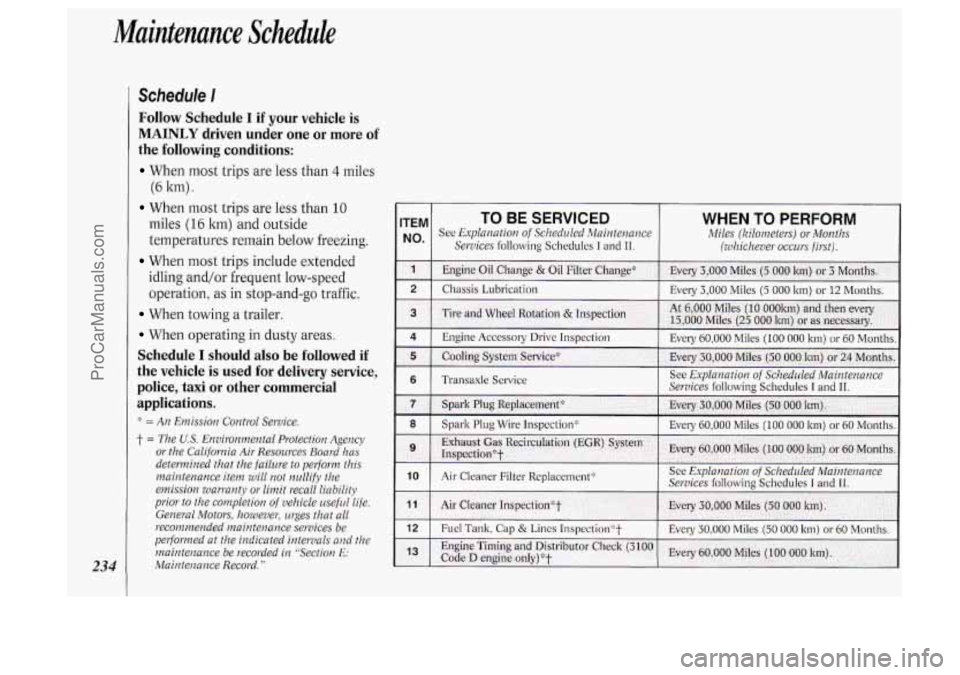
Muintenunce Schedule
234
Schedule I
Follow Schedule I if your vehicle is
MAINLY driven under one or more of
the following conditions:
When most trips are less than 4 miles
When most trips are less than 10
(6
ltm)
.
miles (16 ltrn) and outside
temperatures remain below freezing.
When most trips include extended
idling and/or frequent low-speed
operation, as in stop-and-go traffic.
When towing a trailer.
When operating in dusty areas.
Schedule I should also be followed if
the vehicle is used for delivery service,
police, taxi
or other commercial
applications.
::: = An Emission Control Service.
j- = The U.S. Emiyonmental Protection Agency
or the California Air Resources Board has
determined that the failure
to pelform this
maintenance item will
not nullify the
emission warranty or limit recall liability
prior
to the completion of vehicle useful life.
General Motors, however, urges that all
recommended maintenance services be
pelformed at the indicated intervals and the
maintenance be recorded in “Section
E:
Maintenance Record.”
ITEM TO BE SERVICED WHEN TO PERFORM
No* See Explanation of Scheduled Maintenance Miles (Kilometers) or Months
Services
following Schedules I and 11. (whichever occurs firsl).
1 Engine Oil Change & Oil Filter Change* Every 3,000 Miles (5 000 km) or 3 Montl~s..
2 Chassis Lubrication Every 3,000 Miles (5 000 lm) or 12 Months.
ProCarManuals.com
Page 241 of 276

6. Transaxle Service - Change both
the fluid and filter every
15,000 miles
(25 000 ltm) if the vehicle is mainly
driven under one or more of these
conditions:
In heavy city traffic where the
outside temperature regularly
reaches
90°F (32°C) or higher.
In hilly or mountainous terrain.
When doing frequent trailer towing.
Uses such as found in taxi, police
car or delivery service.
If you do not use your vehicle under
any of these conditions, change both
the
fluid and filter every 100,000 miles
(166 000 ltm) .
7. Spark Plug Replacement::' -
Replace spark plugs with the proper
type. See
Replacement Parts in the
Index.
8. Spark Plug Wire Inspection''-
Inspect for burns, cracks or other
damage. Check the boot fit at the
distributor or coils and at the spark
plugs. Replace wires
as needed.
9. Exhaust Gas Recirculation (EGR)
System 1nspection':t
- Conduct
the
EGR system service as described
in the service manual.
To purchase a
service manual, see
Service
Publications
in the Index.
IO. Air Cleaner Filter Replacement+-
Replace every 30,000 miles
(50 000 ltm) or more often under
dusty conditions.
Ask your dealer
for the proper replacement intervals
for your driving conditions.
11. Air Cleaner Inspection''? - Inspect
all hoses and ducts for proper
hookup. Make sure the valve works
properly.
1nspection';:t - Inspect fuel tank,
cap and lines for damage
or leaks.
Inspect fuel cap gasket for an even
filler neck imprint or any damage.
Replace parts as needed. Periodic
replacement of the fuel filter
is not
required.
12. Fuel Tank, Cap and Lines
13. Engine Timing and Distributor
Check
(3100 Code D engine
only)'xt
- Adjust the timing to the
underhood label specifications.
Inspect the inside and outside
of the
distributor cap and rotor for cracks,
carbon tracking and corrosion.
Clean or replace as needed.
NOTE: To determine your engine's
displacement and code, see
Engine
Identification
in the Index.
': = An Enzission Control Service.
t = The U.S. Environmental Protection Agency
or the California Air Resources Boa1.d has
determined that the failure
to pelform this
maintenance item will
not nullify the
emission warranty
or limit recall liability
prior
to fhe completion of ~~ehicle useful life.
General
Motors: however, urges that all
recornmended maintenance services be
performed at the indicated intervals and the
maintenance be recorded
in "Section E:
Maintenance Record."
239
ProCarManuals.com