1994 JEEP CHEROKEE radiator
[x] Cancel search: radiatorPage 1596 of 1784
FENDERS
SERVICE INFORMATION
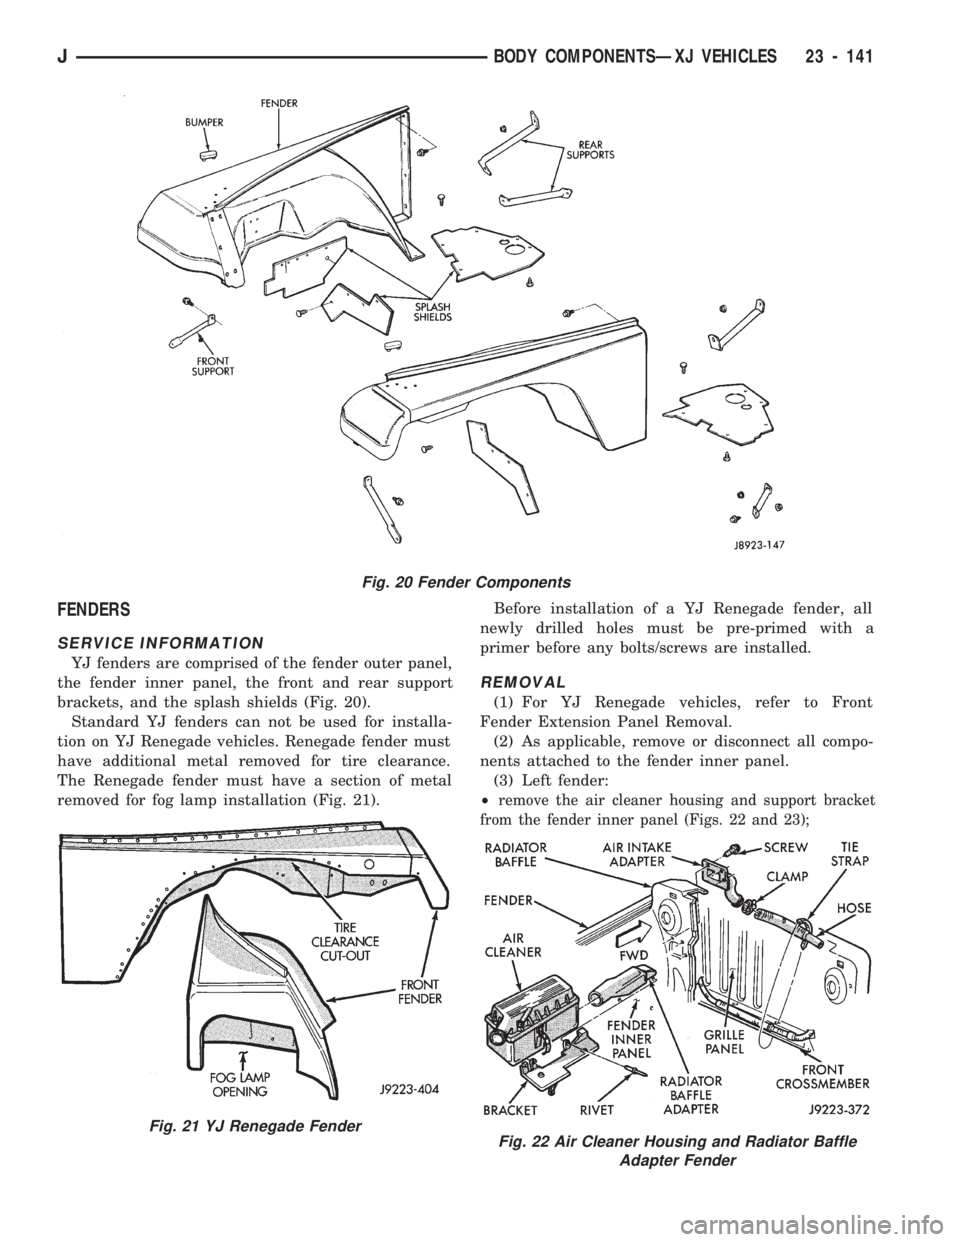
YJ fenders are comprised of the fender outer panel,
the fender inner panel, the front and rear support
brackets, and the splash shields (Fig. 20).
Standard YJ fenders can not be used for installa-
tion on YJ Renegade vehicles. Renegade fender must
have additional metal removed for tire clearance.
The Renegade fender must have a section of metal
removed for fog lamp installation (Fig. 21).Before installation of a YJ Renegade fender, all
newly drilled holes must be pre-primed with a
primer before any bolts/screws are installed.
REMOVAL
(1) For YJ Renegade vehicles, refer to Front
Fender Extension Panel Removal.
(2) As applicable, remove or disconnect all compo-
nents attached to the fender inner panel.
(3) Left fender:
²
remove the air cleaner housing and support bracket
from the fender inner panel (Figs. 22 and 23);
Fig. 20 Fender Components
Fig. 21 YJ Renegade FenderFig. 22 Air Cleaner Housing and Radiator Baffle
Adapter Fender
JBODY COMPONENTSÐXJ VEHICLES 23 - 141
Page 1657 of 1784
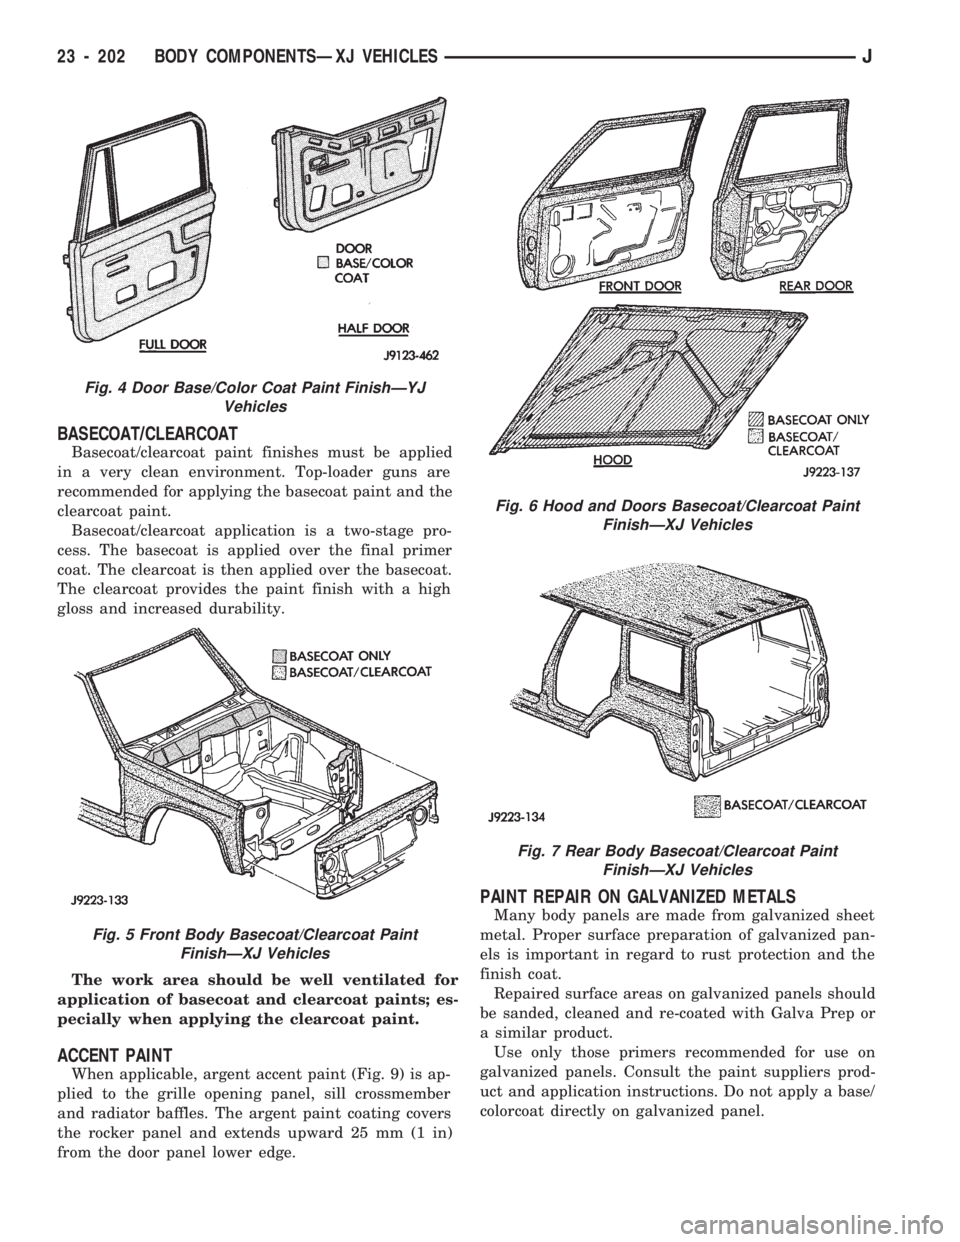
BASECOAT/CLEARCOAT
Basecoat/clearcoat paint finishes must be applied
in a very clean environment. Top-loader guns are
recommended for applying the basecoat paint and the
clearcoat paint.
Basecoat/clearcoat application is a two-stage pro-
cess. The basecoat is applied over the final primer
coat. The clearcoat is then applied over the basecoat.
The clearcoat provides the paint finish with a high
gloss and increased durability.
The work area should be well ventilated for
application of basecoat and clearcoat paints; es-
pecially when applying the clearcoat paint.
ACCENT PAINT
When applicable, argent accent paint (Fig. 9) is ap-
plied to the grille opening panel, sill crossmember
and radiator baffles. The argent paint coating covers
the rocker panel and extends upward 25 mm (1 in)
from the door panel lower edge.
PAINT REPAIR ON GALVANIZED METALS
Many body panels are made from galvanized sheet
metal. Proper surface preparation of galvanized pan-
els is important in regard to rust protection and the
finish coat.
Repaired surface areas on galvanized panels should
be sanded, cleaned and re-coated with Galva Prep or
a similar product.
Use only those primers recommended for use on
galvanized panels. Consult the paint suppliers prod-
uct and application instructions. Do not apply a base/
colorcoat directly on galvanized panel.
Fig. 4 Door Base/Color Coat Paint FinishÐYJ
Vehicles
Fig. 5 Front Body Basecoat/Clearcoat Paint
FinishÐXJ Vehicles
Fig. 6 Hood and Doors Basecoat/Clearcoat Paint
FinishÐXJ Vehicles
Fig. 7 Rear Body Basecoat/Clearcoat Paint
FinishÐXJ Vehicles
23 - 202 BODY COMPONENTSÐXJ VEHICLESJ
Page 1671 of 1784
SERVICE DIAGNOSISÐMECHANICAL
GENERAL
The reason for a decrease in cooling or heating ef-
ficiency must be understood before attempting repair
or replacement of parts. Determined if the condition
is the air conditioner, the heating system, its compo-
nents or the in the air flow system.
The air conditioning system generally operates at
peak efficiency at normal highway speeds. However,
a slight reduction in A/C performance may be expe-
rienced in congested city driving conditions; espe-
cially when ambient temperatures are high.
When diagnosing a gradual decrease in A/C perfor-
mance, remember to check condition of the condenser
and radiator fins. Air flow blockage of either compo-
nent, caused by dirt, foreign material or insects, will
affect the air conditioning and engine cooling sys-
tems. Vehicles equipped with a protective screen, can
restrict air flow to the radiator and condenser.
During high outside operating temperatures, a
slight increase in engine coolant temperature will oc-
cur when the air conditioner is operating.
A/C PERFORMANCE TEST
The pressure developed on the high side and low
side of the compressor indicates whether the system
is operating properly.
WARNING: USE EXTREME CAUTION WHEN THE
ENGINE IS OPERATING. DO NOT STAND IN A DI-
RECT LINE WITH THE FAN. DO NOT PUT YOUR
HANDS NEAR THE PULLEYS, BELTS OR FAN. DO
NOT WEAR LOOSE CLOTHING.
WARNING: WEAR SAFETY GOGGLES WHEN SER-
VICING THE REFRIGERATION SYSTEM
(1) Attach an engine tachometer and refrigerant
Pressure Gauge and Manifold Assembly Tool
C-4740-A.
(2) Close both hand valves on the gauge and man-
ifold assembly.
(3) Set both service hand valve stems to the mid-
position.
(4) Engine should be warmed up with doors, win-
dows and hood closed.
(5) Operate air conditioning system with the en-
gine running at 1,000 RPM. Set the controls for max-
imum A/C, temperature control on full cool and
blower switch on high.
(6) Insert a thermometer into center discharge air
outlet and observe the air temperature. The temper-
ature should be approximately 7ÉC (45ÉF) at 27ÉC
(80ÉF) ambient temperature after 5 minutes of oper-
ation.(7) Observe the high and low side pressures. The
evaporator suction pressure should be 207-241 kPag
(30-35 psig). The compressor discharge pressure
should be 1103-1633 kPag (160-235 psig). It should
be noted that high ambient temperature and humid-
ity conditions will cause higher pressures and tem-
perature conditions. If the clutch cycles, take
readings before clutch disengages.
(8) If pressures are abnormal, refer to the Pressure
and Performance Diagnosis Charts.
The following charts have been developed for quick
reference. If the step by step method used is not com-
pletely understood, refer to the correct section of the
Service Manual for more detailed information.
COMPRESSOR VALVE PLATEÐLEAK TESTS
This test can be preformed with the compressor in-
stalled in the vehicle.
Discharge or Suction Valve BreakageÐWhen
compressor is operating at idle speed, compressor
makes a ``clacking'' sound. Preform the Pressure Bal-
ancing Test.
Head Gasket BreakageÐAt idle speed, discharge
pressure does not increase to normal condition and
suction pressure is high. Preform the Pressure Bal-
ancing Test.
Pressure Balancing Test:
(1) Connect manifold gauge set to suction and dis-
charge ports.
(2) Run compressor for 5 minutes at idle speed and
stop.
(3) Measure elapsed time that discharge pressure
is balanced to suction pressure. If less than 2 min-
utes, it is determined that discharge valve or head
gasket is broken.
REFRIGERANT LEAK TEST
External leaks in the system can be located using
an electronic detector.
The electronic leak detector is recommended be-
cause it is light, accurate and most important, does
not expose the user to toxic gas fumes. An electronic
leak detector will locate R-12 leaks as small as 15 ml
(0.5 fluid oz.) per year.
WARNING: DO NOT USE A HALIDE TORCH. THE
HALIDE TORCH REQUIRES AN OPEN FLAME FOR
LEAK DETECTION. WHEN R-12 IS EXPOSED TO AN
OPEN FLAME, IT TURNS INTO PHOSGENE GAS
WHICH IS POISONOUS.
(1) Calibrate the detector as outlined in the manu-
facturer's instructions.
(2) Remove the flexible detector probe from the
case.
(3) Turn the detector control switch ON.
24 - 8 HEATING AND AIR CONDITIONINGJ
Page 1691 of 1784
HEATER CORE
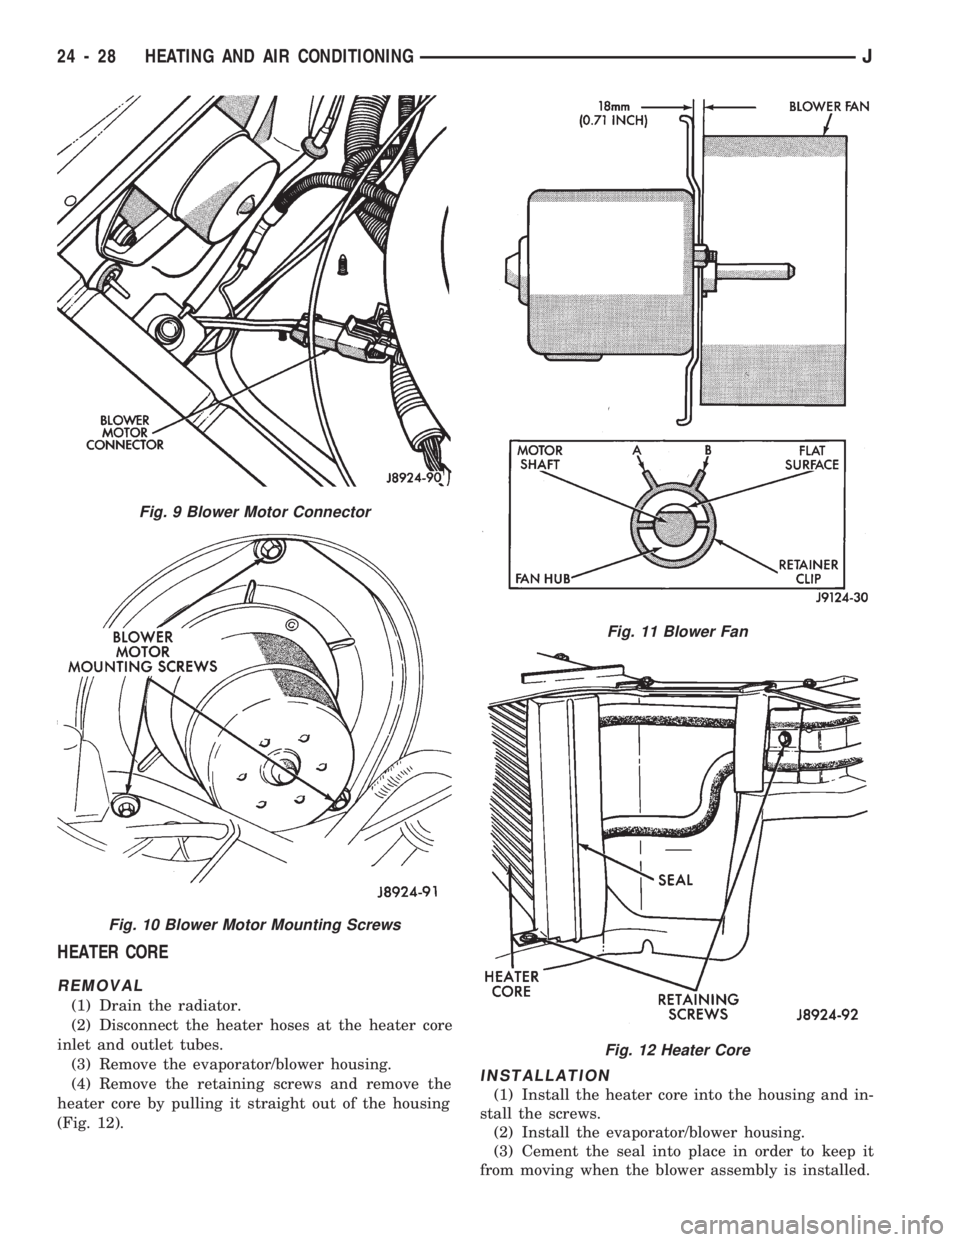
REMOVAL
(1) Drain the radiator.
(2) Disconnect the heater hoses at the heater core
inlet and outlet tubes.
(3) Remove the evaporator/blower housing.
(4) Remove the retaining screws and remove the
heater core by pulling it straight out of the housing
(Fig. 12).
INSTALLATION
(1) Install the heater core into the housing and in-
stall the screws.
(2) Install the evaporator/blower housing.
(3) Cement the seal into place in order to keep it
from moving when the blower assembly is installed.
Fig. 9 Blower Motor Connector
Fig. 10 Blower Motor Mounting Screws
Fig. 11 Blower Fan
Fig. 12 Heater Core
24 - 28 HEATING AND AIR CONDITIONINGJ
Page 1694 of 1784
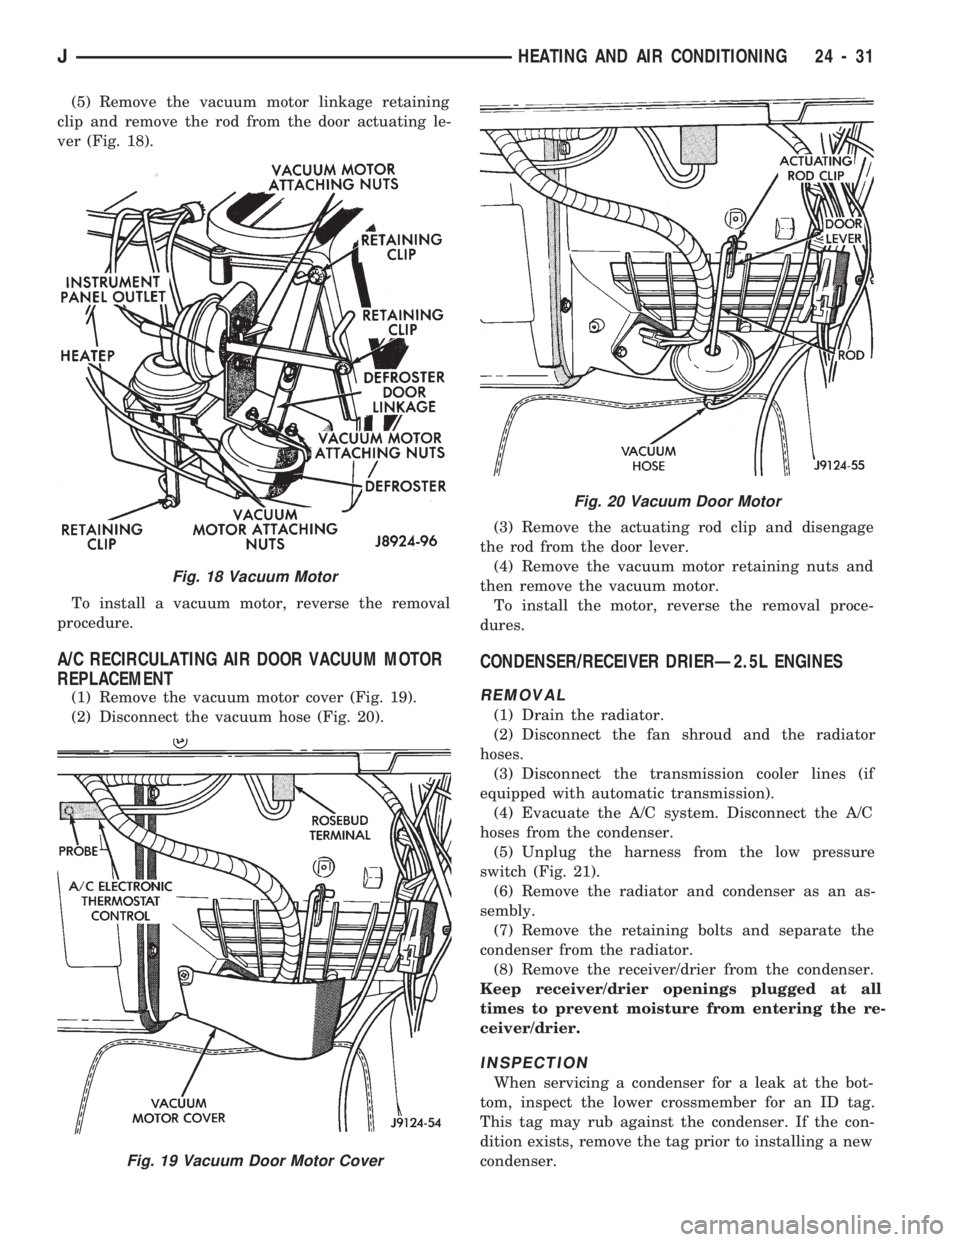
(5) Remove the vacuum motor linkage retaining
clip and remove the rod from the door actuating le-
ver (Fig. 18).
To install a vacuum motor, reverse the removal
procedure.
A/C RECIRCULATING AIR DOOR VACUUM MOTOR
REPLACEMENT
(1) Remove the vacuum motor cover (Fig. 19).
(2) Disconnect the vacuum hose (Fig. 20).(3) Remove the actuating rod clip and disengage
the rod from the door lever.
(4) Remove the vacuum motor retaining nuts and
then remove the vacuum motor.
To install the motor, reverse the removal proce-
dures.
CONDENSER/RECEIVER DRIERÐ2.5L ENGINES
REMOVAL
(1) Drain the radiator.
(2) Disconnect the fan shroud and the radiator
hoses.
(3) Disconnect the transmission cooler lines (if
equipped with automatic transmission).
(4) Evacuate the A/C system. Disconnect the A/C
hoses from the condenser.
(5) Unplug the harness from the low pressure
switch (Fig. 21).
(6) Remove the radiator and condenser as an as-
sembly.
(7) Remove the retaining bolts and separate the
condenser from the radiator.
(8) Remove the receiver/drier from the condenser.
Keep receiver/drier openings plugged at all
times to prevent moisture from entering the re-
ceiver/drier.
INSPECTION
When servicing a condenser for a leak at the bot-
tom, inspect the lower crossmember for an ID tag.
This tag may rub against the condenser. If the con-
dition exists, remove the tag prior to installing a new
condenser.
Fig. 18 Vacuum Motor
Fig. 19 Vacuum Door Motor Cover
Fig. 20 Vacuum Door Motor
JHEATING AND AIR CONDITIONING 24 - 31
Page 1695 of 1784
INSTALLATION
(1) Remove the plugs from the receiver/drier open-
ings. Install receiver/drier into the condenser.
(2) Install the condenser to the radiator. Tighten
the retaining bolts.
(3) Install the radiator and condenser as an assem-
bly (refer to Group 7, Cooling System for the proper
procedure).
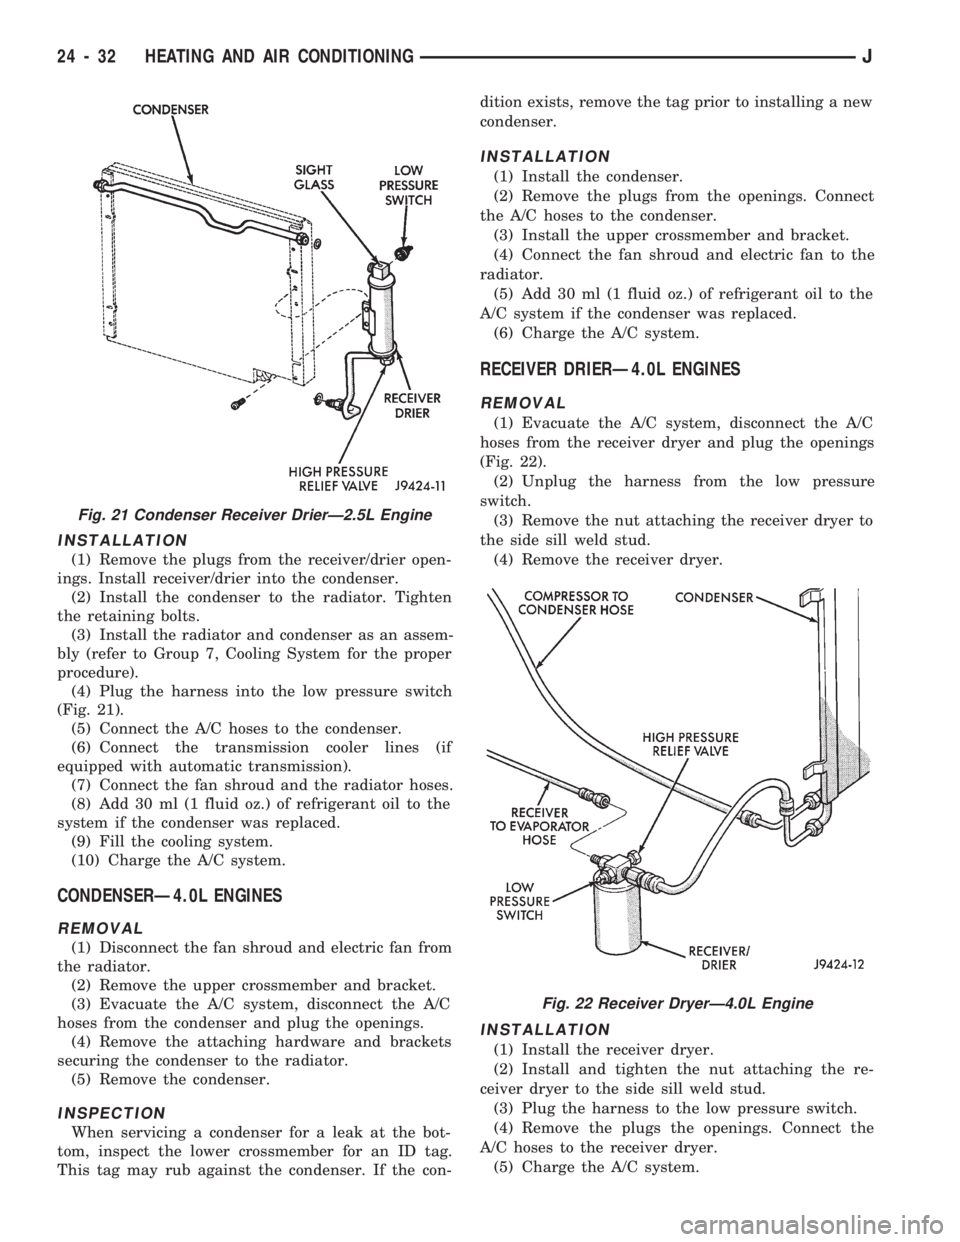
(4) Plug the harness into the low pressure switch
(Fig. 21).
(5) Connect the A/C hoses to the condenser.
(6) Connect the transmission cooler lines (if
equipped with automatic transmission).
(7) Connect the fan shroud and the radiator hoses.
(8) Add 30 ml (1 fluid oz.) of refrigerant oil to the
system if the condenser was replaced.
(9) Fill the cooling system.
(10) Charge the A/C system.
CONDENSERÐ4.0L ENGINES
REMOVAL
(1) Disconnect the fan shroud and electric fan from
the radiator.
(2) Remove the upper crossmember and bracket.
(3) Evacuate the A/C system, disconnect the A/C
hoses from the condenser and plug the openings.
(4) Remove the attaching hardware and brackets
securing the condenser to the radiator.
(5) Remove the condenser.
INSPECTION
When servicing a condenser for a leak at the bot-
tom, inspect the lower crossmember for an ID tag.
This tag may rub against the condenser. If the con-dition exists, remove the tag prior to installing a new
condenser.
INSTALLATION
(1) Install the condenser.
(2) Remove the plugs from the openings. Connect
the A/C hoses to the condenser.
(3) Install the upper crossmember and bracket.
(4) Connect the fan shroud and electric fan to the
radiator.
(5) Add 30 ml (1 fluid oz.) of refrigerant oil to the
A/C system if the condenser was replaced.
(6) Charge the A/C system.
RECEIVER DRIERÐ4.0L ENGINES
REMOVAL
(1) Evacuate the A/C system, disconnect the A/C
hoses from the receiver dryer and plug the openings
(Fig. 22).
(2) Unplug the harness from the low pressure
switch.
(3) Remove the nut attaching the receiver dryer to
the side sill weld stud.
(4) Remove the receiver dryer.
INSTALLATION
(1) Install the receiver dryer.
(2) Install and tighten the nut attaching the re-
ceiver dryer to the side sill weld stud.
(3) Plug the harness to the low pressure switch.
(4) Remove the plugs the openings. Connect the
A/C hoses to the receiver dryer.
(5) Charge the A/C system.
Fig. 21 Condenser Receiver DrierÐ2.5L Engine
Fig. 22 Receiver DryerÐ4.0L Engine
24 - 32 HEATING AND AIR CONDITIONINGJ
Page 1703 of 1784
HEATER CORE AND HOUSING
REMOVAL
WARNING: HOT ENGINE COOLANT CAN CAUSE
SEVERE BURNS. DO NOT OPEN THE RADIATOR
DRAIN COCK WHEN THE COOLING SYSTEM IS
HOT AND PRESSURIZED. ALLOW THE COOLANT
TO DECREASE TO ROOM TEMPERATURE BEFORE
STARTING REPAIR OPERATIONS.
(1) Drain approximately 1.9 liters (2 qts) of coolant
from the radiator. Drain the coolant into a clean con-
tainer.
(2) Disconnect the heater hoses.
(3) Disconnect the vent door cables.
(4) Disconnect the blower motor wire.
(5) Disconnect the defroster duct.
(6) Remove the nuts that attach the heater hous-
ing studs to the engine compartment side of the dash
panel.
(7) Remove the heater housing assembly by tilting
it downward, to disengage it from the defroster duct.
Pull it rearward and out from under the instrument
panel.
(8) Remove the heater hosing cover from the hous-
ing.
(9) Remove the heater core from the housing.
INSTALLATION
(1) Install the heater core in the housing and in-
stall the cover on the housing.
(2) Position the heater housing on the dash panel.
Be sure the housing studs all extend through the
dash panel.
(3) Install the seals on the heater core outlet and
inlet tubes and over the blower motor housing.
(4) Install the attaching nuts on the housing studs.
CAUTION: DO NOT over tighten the attaching nuts.
The housing could become distorted causing air
leaks and improper heater door operation. Tighten
the nuts alternately and evenly until 2 stud threads
are visible beyond each nut.
(5) Connect the defroster duct to the housing.
(6) Connect the blower motor wire.
(7) Connect the vent door control cables.
(8) Connect the heater hoses.
(9) Fill and bleed the cooling system.
(10) Check system operation.
BLOWER MOTOR (HEATING)
REMOVAL
(1) Remove the heater housing.
(2) Remove the blower motor-to-heater housing at-
taching screws/nuts.
(3) Remove the blower motor from the housing.
INSTALLATION
(1) Position the blower motor into the housing.
(2) Install and tighten the blower motor-to-heater
housing attaching screws/nuts.
(3) Install the heater housing.
(4) Check blower motor and heater operation.
DEFROSTER NOZZLE AND DUCT
REMOVAL
WARNING: HOT ENGINE COOLANT CAN CAUSE
SEVERE BURNS. DO NOT OPEN THE RADIATOR
DRAIN COCK WHEN THE COOLING SYSTEM IS
HOT AND PRESSURIZED. ALLOW THE COOLANT
TO DECREASE TO ROOM TEMPERATURE BEFORE
STARTING REPAIR OPERATIONS.
(1) Drain approximately 1.9 liters (2 qts) of coolant
from the radiator. Drain the coolant into a clean con-
tainer.
(2) Disconnect the heater hoses.
(3) Remove the nuts attaching the heater housing
studs to the engine compartment side of the dash
panel.
(4) Disconnect the speedometer cable.
(5) Remove the glove box.
(6) Tilt the heater housing back and pull it rear-
ward and out from under the instrument panel.
(7) Disconnect the vent control cables.
(8) Remove the fresh air intake grille from the
cowl.
(9) Remove the fresh air intake duct.
(10) Lower the windshield.
(11) Remove the defroster nozzle attaching screws
and remove the nozzle and duct.
INSTALLATION
(1) Install the defroster nozzle and duct.
(2) Raise and secure the windshield.
(3) Install the fresh air intake duct.
(4) Install the fresh air intake grille on the cowl.
(5) Install the vent cables.
(6) Position the heater housing on the dash panel.
Be sure all the housing studs extend through the
dash panel.
(7) Install the seals on the blower motor and the
heater core inlet and outlet tubes.
(8) Install the attaching nuts on the housing studs.
CAUTION: DO NOT over tighten the attaching nuts.
The housing could become distorted causing air
leaks and improper heater door operation. Tighten
the nuts alternately and evenly until 2 stud threads
are visible beyond each nut.
(9) Install the glove box.
(10) Connect the speedometer cable.
(11) Connect the heater hoses.
24 - 40 HEATING AND AIR CONDITIONINGJ
Page 1704 of 1784
(12) Fill and bleed the cooling system.
FRESH AIR DOOR VACUUM MOTOR
REMOVAL
(1) Remove the glove box and assist handle.
(2) Disconnect the vacuum hose from the motor.
(3) Remove the motor lever retaining clip.
(4) Remove the motor attaching nuts and remove
the motor from the fresh air duct.
INSTALLATION
(1) Position the motor on the fresh air duct and in-
stall the motor attaching nuts.
(2) Align the motor lever with the air door lever
and install the lever retaining clip.
(3) Connect the vacuum hose to the motor.
(4) Install the glove box and assist handle.
FRESH AIR INTAKE DUCT
REMOVAL
WARNING: HOT ENGINE COOLANT CAN CAUSE
SEVERE BURNS. DO NOT OPEN THE RADIATOR
DRAIN COCK WHEN THE COOLING SYSTEM IS
HOT AND PRESSURIZED. ALLOW THE COOLANT
TO DECREASE TO ROOM TEMPERATURE BEFORE
STARTING REPAIR OPERATIONS.
(1) Drain approximately 1.9 liters (2 qts) of coolant
from the radiator. Drain the coolant into a clean con-
tainer.
(2) Disconnect the heater hoses.
(3) Remove the nuts attaching the heater housing
studs to the dash panel from inside the engine com-
partment.
(4) Disconnect the speedometer cable.
(5) Remove the glove box and assist handle.
(6) Tilt the heater housing back and pull it rear-
ward and out from under the instrument panel.
(7) Disconnect the vent cables.
(8) Remove the fresh air intake grille from the
cowl.
(9) Remove the fresh air intake duct.
INSTALLATION
(1) Install the fresh air intake duct.
(2) Install the defroster nozzle and duct.
(3) Raise and secure the windshield.
(4) Install the fresh air grille on the cowl.
(5) Install the vent cables.
(6) Position the heater housing on the dash panel.
Be sure all the housing studs extend through the
dash panel.
(7) Install the seals on the blower motor and
heater core inlet and outlet tubes.
(8) Install the attaching nuts on the heater hous-
ing studs.CAUTION: DO NOT over tighten the attaching nuts.
The housing could become distorted causing air
leaks and improper heater door operation. Tighten
the nuts alternately and evenly until 2 stud threads
are visible beyond each nut.
(9) Install the glove box and assist handle.
(10) Connect the speedometer cable.
(11) Connect the heater hoses.
(12) Fill and bleed the cooling system.
DESCRIPTION (AIR CONDITIONING)
The evaporator, blower fan and motor, thermostat,
expansion valve, capillary tube, air outlets and sys-
tem controls are located in the evaporator housing.
The evaporator housing is mounted under the instru-
ment panel. The compressor, condenser, receiver-
dryer and refrigerant lines are located in the engine
compartment.
A rotary-type compressor with magnetic clutch op-
erated drive pulley is used for all vehicles equipped
with air conditioning.
SIGHT GLASS
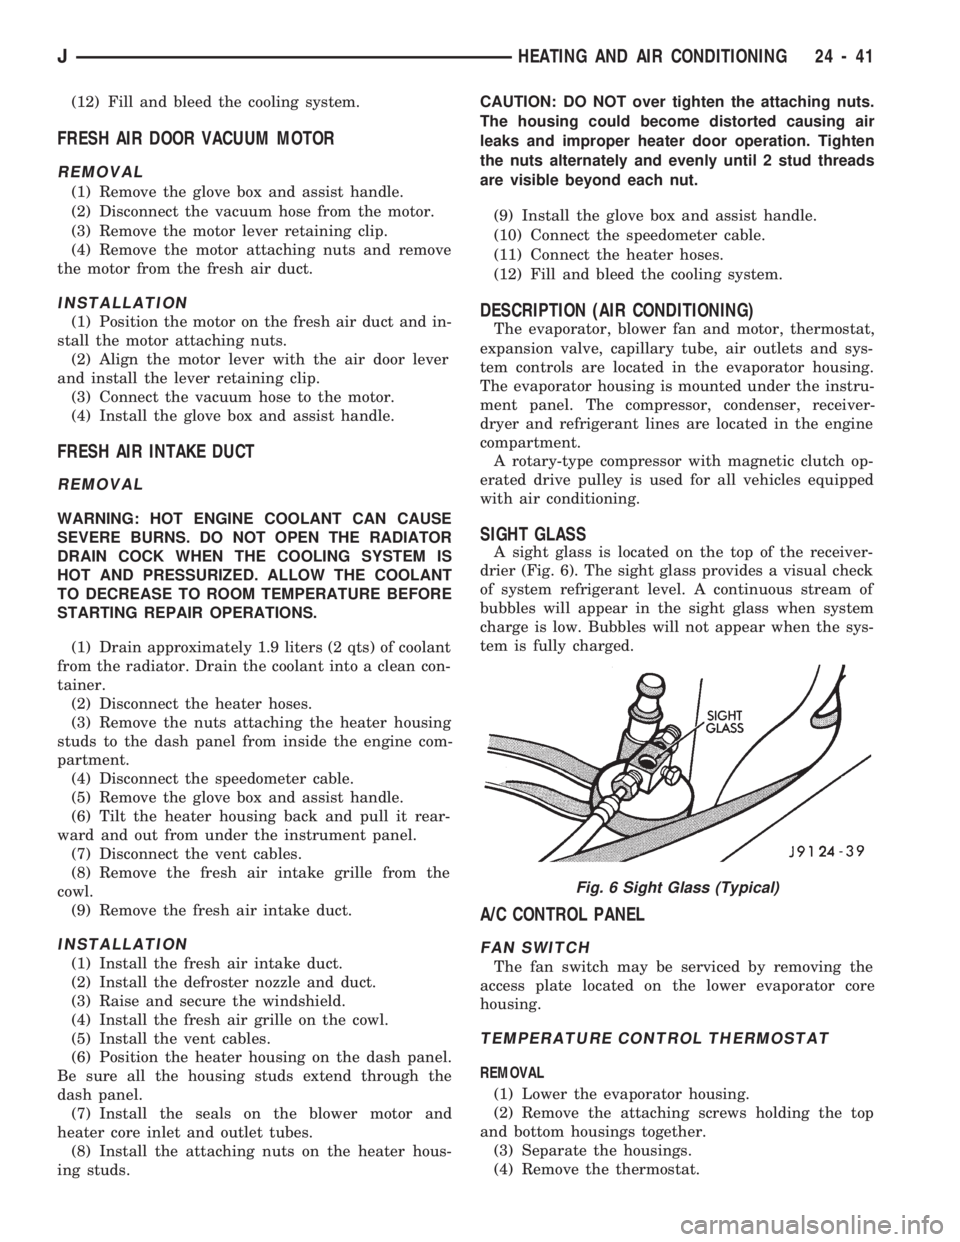
A sight glass is located on the top of the receiver-
drier (Fig. 6). The sight glass provides a visual check
of system refrigerant level. A continuous stream of
bubbles will appear in the sight glass when system
charge is low. Bubbles will not appear when the sys-
tem is fully charged.
A/C CONTROL PANEL
FAN SWITCH
The fan switch may be serviced by removing the
access plate located on the lower evaporator core
housing.
TEMPERATURE CONTROL THERMOSTAT
REMOVAL
(1) Lower the evaporator housing.
(2) Remove the attaching screws holding the top
and bottom housings together.
(3) Separate the housings.
(4) Remove the thermostat.
Fig. 6 Sight Glass (Typical)
JHEATING AND AIR CONDITIONING 24 - 41