Page 1277 of 1413

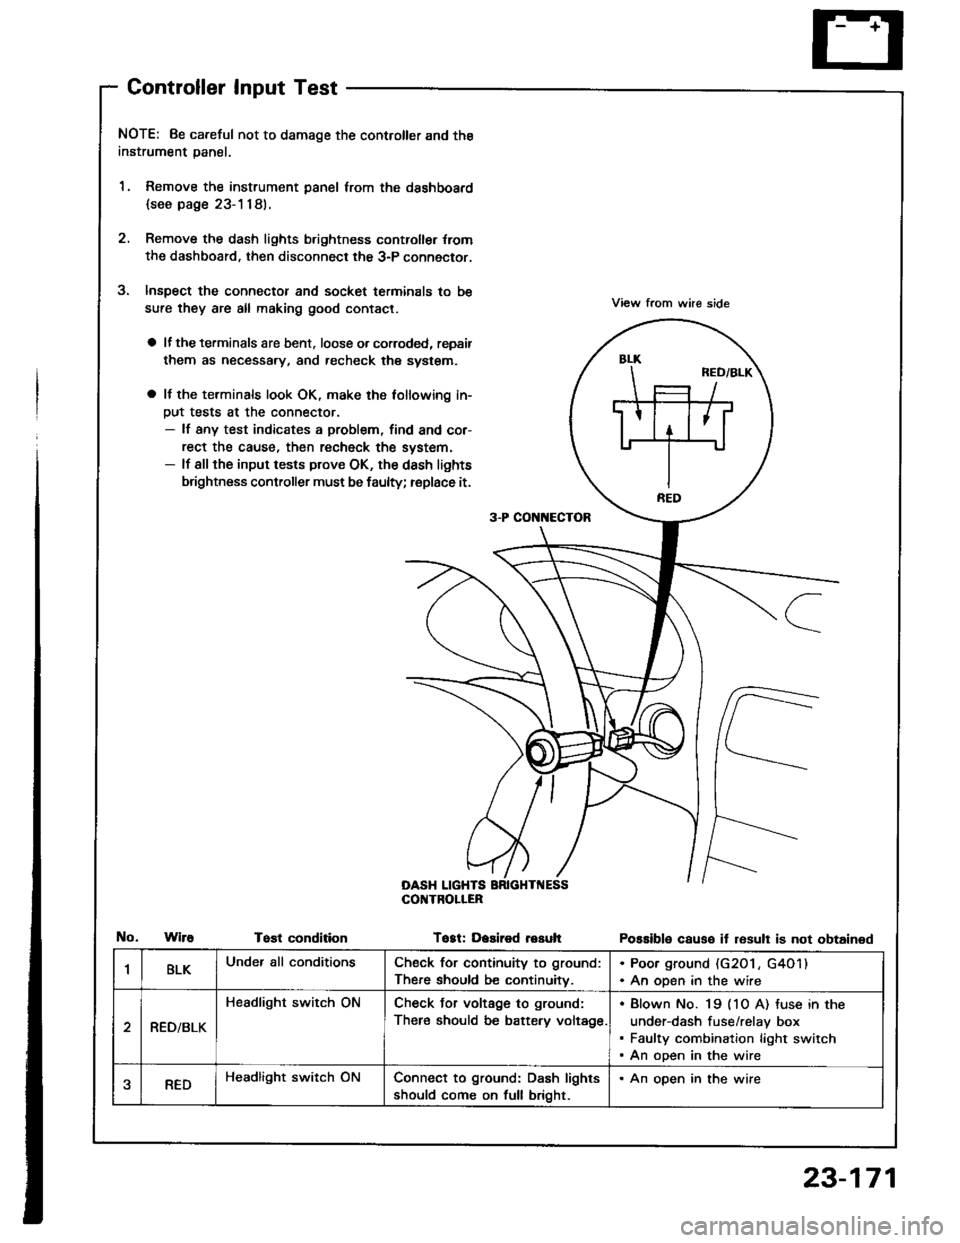
Controller Input Test
NOTE: 8e careful not to damage the controller and the
instrument panal.
1. Remove the instrument panel lrom the dsshboard
{see page 23-1181.
2. Remove the dash lights b.ightness controller {rom
the dashboard. then disconnect the 3-P connector.
Inspect the connector and socket terminals to be
sure they are all making good contact.
a lf the terminals are bent. loose o. corroded, repsir
them as necessary, and recheck the system.
a It the terminals look OK, make the tollowing in-
Dut tests at the connector.- lf any test indicates a problem, find and cor-
rect the cause, then recheck the system.- lf all the input tests prove OK, the dash lights
brightness controller must be faulty; replace it.
View from whe side
Possible causo it resull is not obtained
3-P CON[{ECTOR
OASH LIGHTSCOI{TROLIER
WireTost conditionTogt: Dasired resuh
1BLKUnder all conditionsCheck for continuity to ground:
There should be continuitv.
. Poor ground (G20 l , G4O1). An open in the wire
RED/BLK
Headlight switch ONCheck Jor voltage to ground:
There should be battery voltage.
Blown No. 19 (1O A) tuse in the
under-dash fuse/relay box
Faulty combination light switch
An open in the wire
aREDHeadlight switch ONConnect to ground: Dash lights
should come on full bright.
. An open in the wire
23-171
Page 1279 of 1413
FROiTTPASSEiIGEB'SDOOf,SWTCH
GRr{/Bt U t-t
I
q*",,.,
I DOOR
I swncH
I
I:
U DEN-DASHFUSE/RELAY 8OX
LT
II{IEGRATED 1cotlrnor II,NIT I
GRI{
I
l**,-0,,nI rNorcAToRI UGHT
IY
i'GRN
d_
f-:
J
23-173
lS.d.nl
TBUi{KUGHTt3.4Wl
Circuit Diagram
Hltcnb&n-------1
CARGOASEAUGHTt3.4Wl
UNOER - HOOD FUSE/RELAY 8OX
Page 1281 of 1413
Ceiling Light Test/Replacement
With moonrool:
1. Turn the light switch OFF.
2. Pry otJ the lens.
3. Remove the two mounting nuts, then pull out thehousing.
4. Disconnect the 3-P connector f.om the housing.
3-P CONNECTOR
re.mrnal
Position \A8or8'cD
OFFo-za--o\7
DOORo---o\7
ONG-/1--o\:.,/
5. Check for continuity between the terminals in €schswatch position according to the table.
F om o.3l7.5Al FUSE(ln th. snd.. - dr.h fu!./r€by boxl
23-175
Page 1282 of 1413
Geiling/Trunk/Cargo Area Lights' Spotlights
Geiling Light Test/Replacement
Without moonroot:
1. Turn the light switch OFF.
2. Pry ofJ the lens.
3. Remove the sctew, then pull out the housing'
4. Disconnect the 3-P connector from the housing.
3-PCONNECTOR
23-176
T6ninsl
P"riti"" \
ABor B'D
OFFo-/:\--o\:.,/
DOORo-A--o
ONLF/A--o
5. Check for continuity between the terminals in each
switch position according to the table.
F om o.3l7.5Al FUSEtln thr uid.r - ddr h|. /,.LY borlA
Page 1283 of 1413
Trunk/Cargo Area Light Test/Replacement
Pry the trunk/cargo afea light lens out of its housing.
Pry out the light assembly.
Disconnect the 2-P connector trom the housing.
Hatchback:
2.P CONNECTOR
BULE 13.4 Wl
A {+}B {-)
HOUSING
BULB {3.4 W)
2.P CONNECTOR
4. Make sure that the bulb is in good condition. Checkfor continuity between the A (+) and B (-ltermi-
nals. There should be continuitv (Hachback: theswitch must be Dushed).
Hatchback:
Sedan:
Froh o.3 (7.5A1FUSE
{ln th. undor - d!.hfur./r.hy box)
To HATCHLATCHswtTcH
F om o.3 (7.5A1FUSE
{ln th. und.i- da.htur€/r.hy box)
To TRU KLATCHswtTcH
23-177
Page 1285 of 1413
Back-up Lights
Circuit Diagram
wHT/Bt( +WHT
A/T GEARPosrnotr swrTcHf 8ek - up lioht 'l
--------_JL---------
UI{DER_ IIOOO FUSEiBEIAY BOX
23-179
Page 1286 of 1413

Back-up Lights
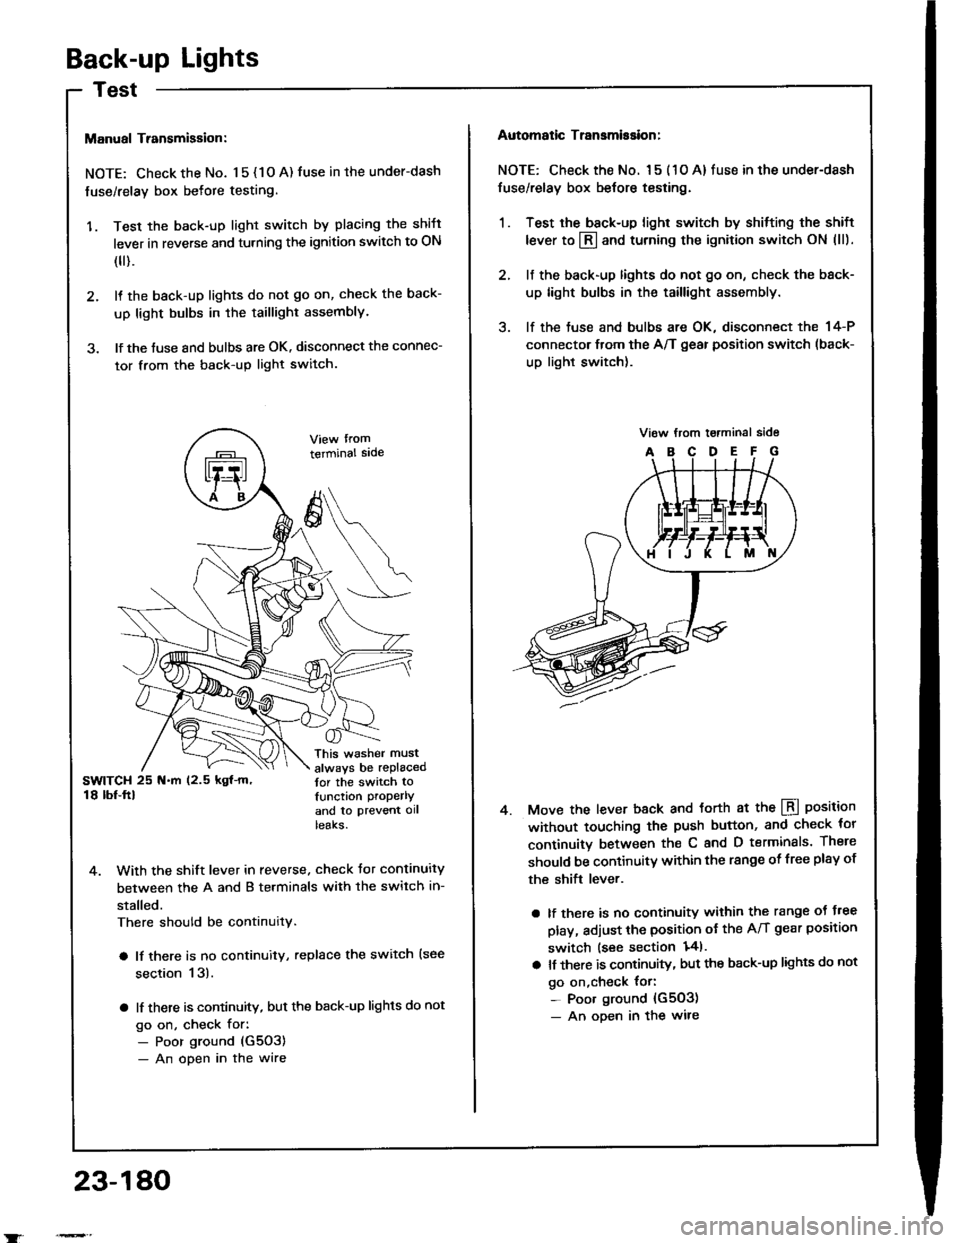
Manual Transmigsion:
NOTE: Check the No. 1 5 { 1 O A) fuse in the under-dash
fuse/relay box befote testing.
'1. Test the back-up light switch by placing the shift
lever in reverse and turning the ignition switch to ON
(
).
2. It the back-up lights do not go on, check the back-
up light bulbs in the taillight assembly.
3. lf the tuse and bulbs are OK. disconnect the connec-
tor from the back-up light switch.
terminal sade
This washer must
always be replacedtor the switch tolunction properlY
and to ptevent ollteaKs.
4. With the shift lever in reverse. check Jor continuity
between the A and B terminals with the switch in-
stalled.
There should be continuity.
a lf there is no continuity, replace the switch {see
section 13).
a lf there is continuity, but the back-up lights do not
go on, check for:- Poor ground (G5O3)
- An open in the wire
23-180
Automatic Transmission:
NOTE: Check the No. l 5 ( 1 O A) fuse in the under-dash
fuse/relay box belore testing.
1. Test the back-up light switch by shitting the shift
lever to l3l and turning the ignition switch ON (ll).
2. lf the back-up lights do not go on, check the back-
up light bulbs in the taillight assembly.
3. lf the tuse and bulbs are OK, disconnect the 14-P
connector from the A/T gear position switch (back-
up light switch).
Move the lever back and torth at the LBI position
without touching the push button, and check tor
continuitv between th€ C and D terminals. There
should be continuitY within the range of free plsy of
the shift lever.
a lf there is no continuity within the range oJ J.ee
play, adjust the position ot the A/T gear position
switch lsee section 141.
a lt there is continuity, but the back-up lights do not
go on,check {or:- Poor ground {G503)- An oDen in the wire
4.
Page 1287 of 1413
Circuit Diagram
Brake Lights
UNDEE-HOOOFUSE/NELAY BOX
. HORi{. IMTERI.OCK SYSTEM
{.BLK
*H-i
{.{u8tK
23-181