Page 1225 of 1413
Disassembly
NOTE: Handle the terminals and printed circuit boards caretully to avoid damaging them.
ENGINE COOLA]TTTEiIPERATURE {ECT}GAUGEMOUNTING SCREW (x 3)
TAGHOMETER MOUI{TING SCREW (x 3l
SPEEDOMETER MOUNTTNG SCREW tx 4l
. SPEEDOMETER
k)T
-
n
FUEL GAUTest, psgeGE UNIT23-123
Specilication, pa96 23-1 14Troubfeshooting. page 23-1 20. ODOMETERTroubleshooting, page 23-1 20. TRIP METERTroubfeshooting, page 23-1 20
23-119
Page 1229 of 1413

Fuel Gauge
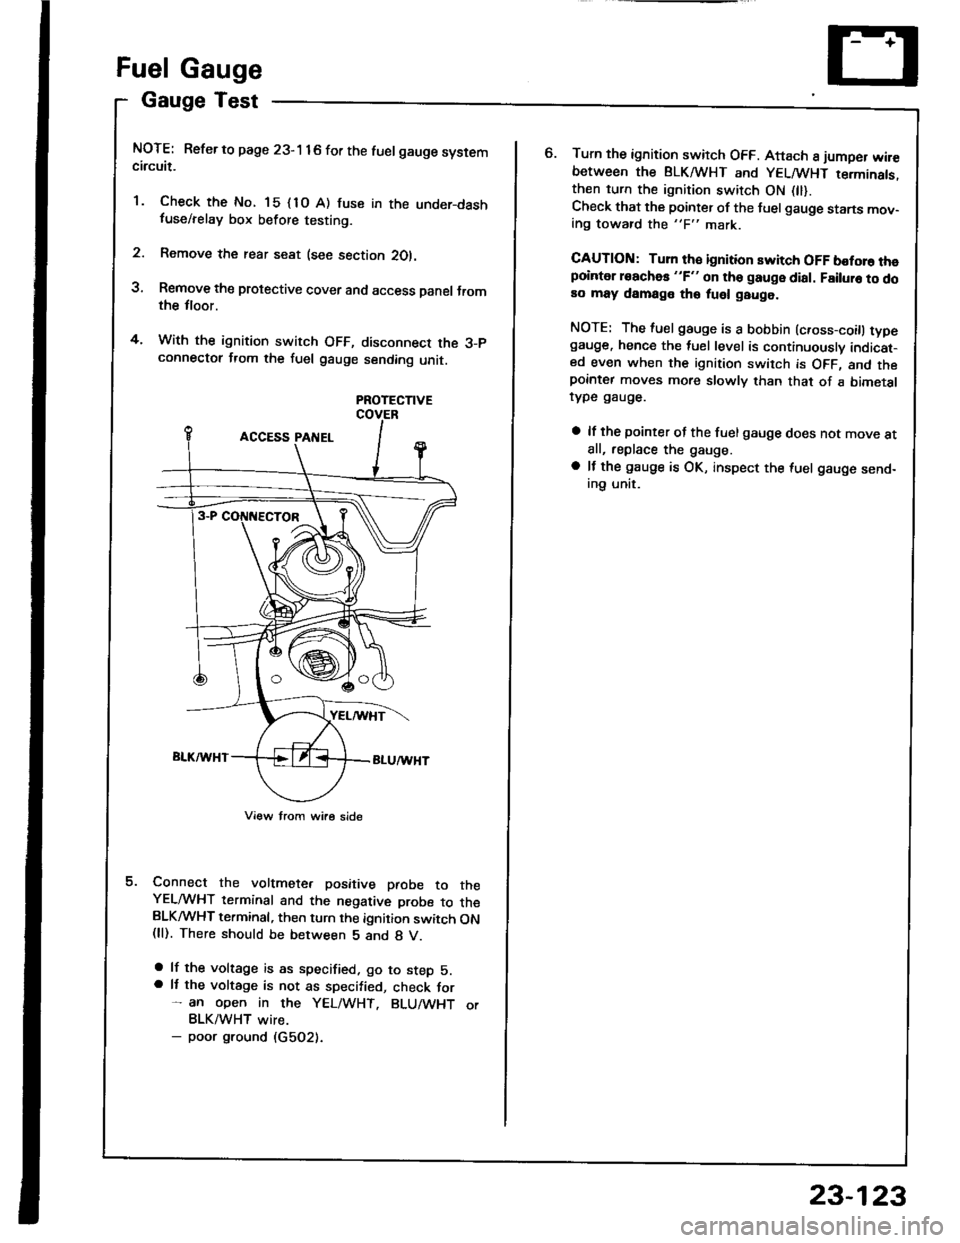
Gauge Test
NOTE: Refer to page 23-1 16 for the luelgauge systemcircuit.
'1. Check the No. 15 {1O A) fuse in the under-dashfuse/relay box before testing.
2. Remove the rear seat (see section 2Ol.
3, Remove the protective cover and access Danel Jromthe tloor.
4. With the ignition switch OFF, disconnect the 3-pconnectot from the fuel gauge sending unit.
PROTECTIVE
Connect the voltmete. positive paobe to theYELMHT terminal and the negative probe to theBLKMHT terminal, then turn the ignition switch ON(ll). There should be between 5 and 8 V.
a lf the voltage is as specified. go to step 5.a It the voltage is not as specified, check for- an open in the YEL/WHT. BLU/WHT orBLK/WHT wire.- poor ground (G5O2).
o.Turn the ignition switch OFF. Attach 8 jumper wir€between the BLKA HT and YELMHT terminats.then turn the ignition switch ON 0l).Check that the pointer of the fuel gauge starts mov-ing toward the "F" mark.
CAUTION: Turn th€ ignition switch OFF boforo thepointer roachas "F" on tho gauge dial. Failuro to doao may damage tho fuel gauge.
NOTE: The fuel gauge is a bobbin (c.oss-coitl typegauge. hence the tuel level is continuously indicat-ed even when the ignition switch is OFF, and thepornter moves more slowly than that of a bimetalrype gauge.
a lf the pointer of the fuel gauge does not move atall, replace the gauge.
a lf the gauge is OK, inspect the {uel gauge send-ing unit.
23-123
Page 1230 of 1413
Fuel Gauge
Sending Unit Test/Replacement
@ oo not lmoke while working on tho fuol
system. Kaop open flamos away from your wotk aroa.
1. Remove the rear seat (see section 2O).
2. Remove the protective cover and access panel lrom
the floor.
3. With the ignition switch OFF, disconnect the 3-P
connector from the fuel gauge sending unit.
4. Remove the tuel gauge s€nding unit.
5. Measure the resistance between the A and B termi-
nals at E (empty), 1/2 (half full) and F (full) by mov-
ing the tloat.
6. Check the change in resistance by moving the float
uo and down.
(
lf unable to obtain the above readings or it resistance
do€s not change, replace the fuelgauge sending unit.
Float PositionE
Resistance lO)105-11025.5-39.52-5
o
23-124
Page 1231 of 1413

Low FuelIndicator
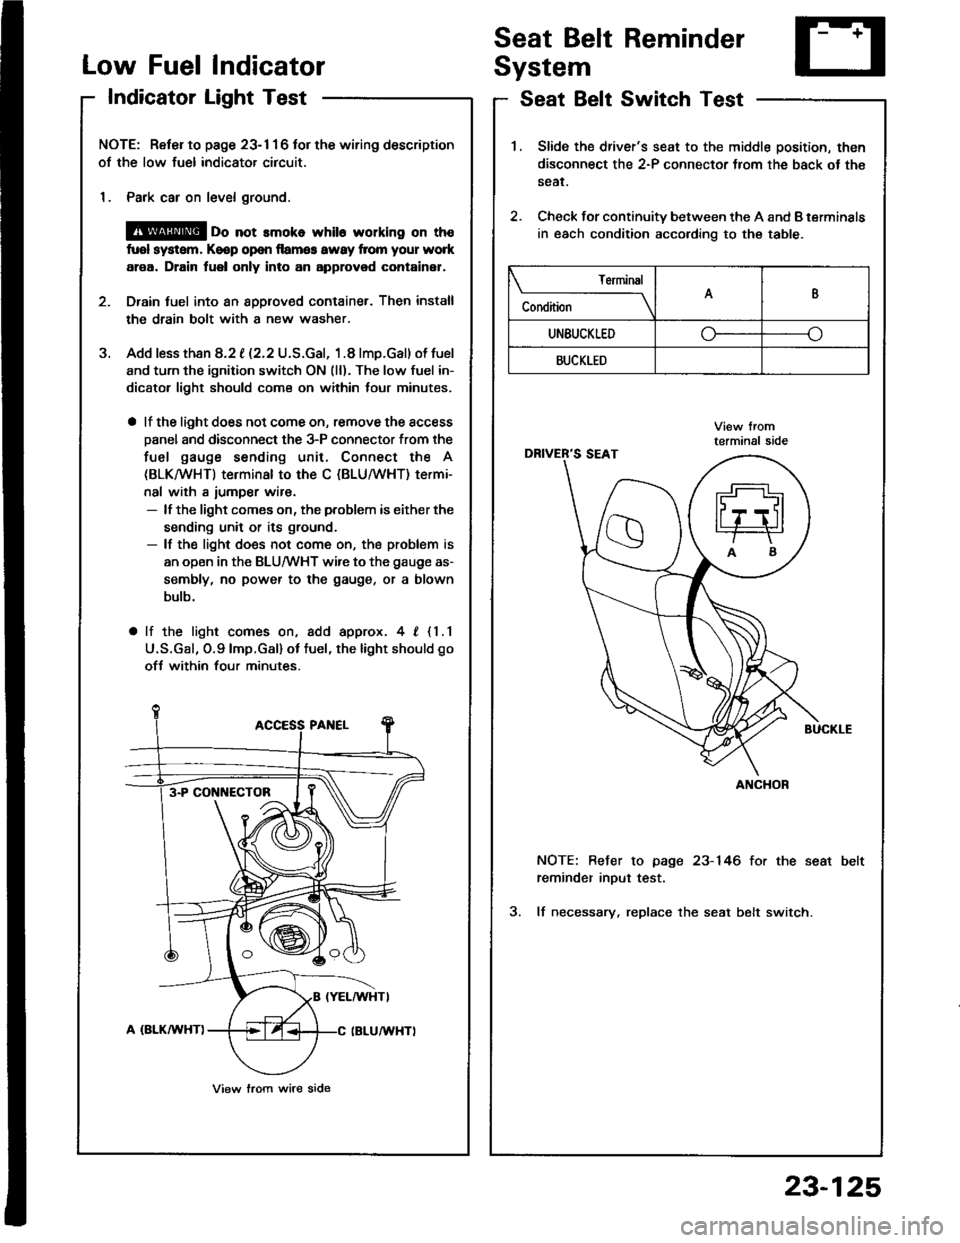
IndicatorLight Test
Seat Belt Reminder
System
Seat Belt Switch Test
J.
NOTE: Reter to page 23- 1 1 6 tor the wiring description
of the low fuel indicator circuit.
1. Park car on level ground.
@ oo not rmoko whil6 working on th€
fuol system, Keop op€n llamg3 awsy from your work
area. Drain fuel only into an approvod container,
Drain tuel into an 8pplov€d container. Then install
the drain bolt with a new washer.
Add less than 8.2 t (2.2 U.S.Gal, 1.8 lmp.Gal) of fuel
and turn the ignition switch ON (ll). The low fuel in-
dicator light should com€ on within lour minutes,
a lf the light does not come on, remove the access
Danel and disconnect the 3-P connector from the
fuel gauge sending unit, Connect the A
(BLKMHT) terminal to the C (BLU/WHT) termi-
nal with a iumper wir€.- lf the light comes on, the problem is either the
sending unit or its ground.- lf the light does not come on, the problem is
an open in the BLU/WHT wire to the gauge as-
sembly, no power to the gauge, or a blown
bulb.
a lf the light comes on, add approx. 4, {1.1
U.S.Gal, O.9lmp.Gal) ot tuel, the light should go
ofJ within four minutes.
3-P CONI{ECTOB
View lrom wire side
1.Slide the driver's seat to the middle position, then
disconnect the 2-P connector Jrom the back ot th€
sear.
Check for continuity between the A and B terminals
in each condition according to the table.
2.
NOTE: Befer to page 23-146 for the seat
reminder inout test.
3. lf necessary. replace the seat belt switch.
Terminal
C"** \AB
UNEUCKLEDo--o
BUCKLED
ANCHOR
23-125