1994 CHEVROLET CORVETTE fog light
[x] Cancel search: fog lightPage 109 of 274
Downloaded from www.Manualslib.com manuals search engine Comfort Controls and Audio Systems
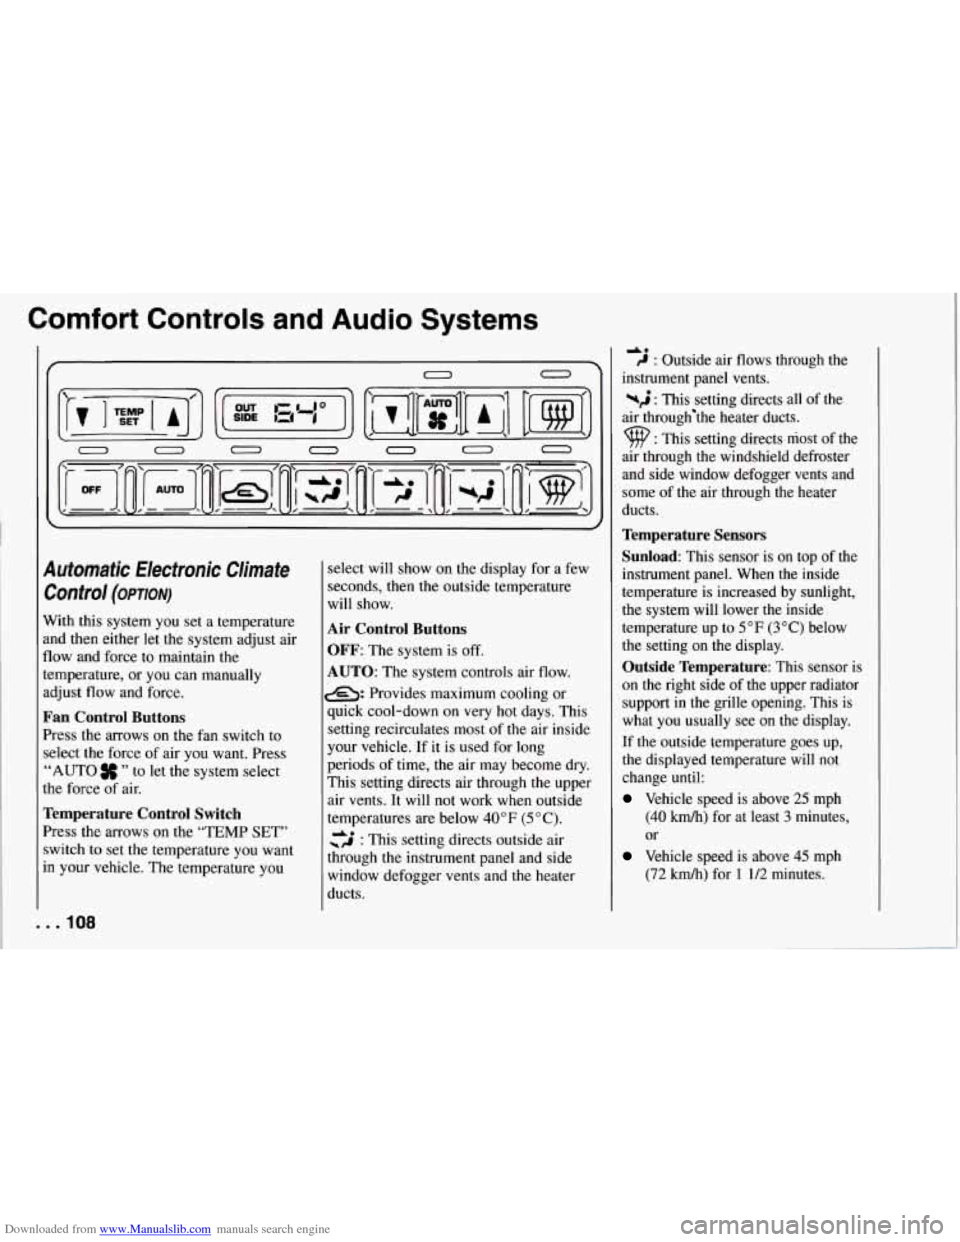
Automatic Electronic Climate Control
(OP~ON)
With this system you set a temperature
and then either let the system adjust air
flow and force to maintain
the
temperature, or you can manually
adjust flow and force.
Fan Control Buttons
Press the arrows on the fan switch to
select the force of air you want. Press
“AUTO
” to let the system select
the force of air.
Temperature Control Switch
Press the arrows on the “TEMP SET’’
switch to set the temperature you want
in your vehicle. The temperature you
. . .IO8
select will show on the display for a few
seconds, then the outside temperature
will show.
Air Control Buttons
OFF:
The system is off.
AUTO: The system controls air flow.
e: Provides maximum cooling or
quick cool-down on
very hot days. This
setting recirculates most of the air inside
your vehicle. If it is used for long
periods of time, the air may become dry.
This setting directs air through the upper
air vents. It will not work when outside
temperatures are below
40°F (5 “C).
cs : This setting directs outside air
through the instrument panel and side
window defogger vents and the heater
ducts.
40 C : Outside air flows through the
instrument panel vents.
%$ : This setting directs all of the
air through‘the heater ducts.
9 : This setting directs most of the
air through
the windshield defroster
and side window defogger vents and
some of the air through the heater
ducts.
Temperature Sensors
Sunload:
This sensor is on top of the
instrument panel. When the inside
temperature is increased by sunlight,
the system will lower the inside
temperature up to
5°F (3°C) below
the setting on the display.
Outside Temperature: This sensor is
on the right side of the upper radiator
support in the grille opening. This is
what you usually see on the display.
If the outside temperature goes up,
the displayed temperature will not
change until:
Vehicle speed is above 25 mph
(40 kmh) for at least 3 minutes,
or
Vehicle speed is above 45 mph
(72
km/h) for 1 1/2 minutes.
Page 111 of 274
Downloaded from www.Manualslib.com manuals search engine Comfort Controls and Audio Systems
except ‘j and-; and at all
temperatures above freezing.
3. Press the arrows on the fan speed
switch if you don’t like the automatic
setting. In
“AUTO # ” on hot days,
the fan speed will be low at fist to
help get rid of the hot inside air..
When the air conditioner is on,
you may
notice slight changes
in your vehicle’s
engine speed and power. This is normal
because the system is designed to cycle
the compressor on and off to keep the
desired temperature and help fuel
economy.
Defogging and Defrosting
Windows
Your vehicle has several settings for
clearing your windows. The air
conditioner compressor will run to help
remove moisture from the air.
To defrost the windshield quickly:
1. Press the arrows on the “TEMP SET”
switch to set
a comfortable
temperature.
2. Press .
3. The fan will go to high speed. After
the windows are clear, you can lower
. . .I10
the speed using 7 or
“AUTO .”
To warm passengers while keeping the
windshield clear:
1. Press the arrows on the “TEMP SET”
switch
to set a comfortable
temperature.
2. Press -2 and at the same time.
3. Press the arrows on the fan speed
switch if you don’t like the automatic
setting.
To defrost
the side windows quickly:
1. Press the arrows on the “TEMP SET”
switch to set a‘comfortable
temperature.
2. Press c2 .
3. Press the arrows on the fan speed
switch if you don’t like the automatic
setting.
System Problems
If ,the light above a button flashes when
you turn on the ignition, your system may
have an electrical problem. The flashing
will continue for one minute, then stop.
The flashing light could also mean the
refrigerant level
is too low in your
system. The light will continue to flash, even
if refrigerant
is added, until the
system is reset. Have your system
checked and serviced
if needed.
To reset yoilr system:
1. Turn your ignition key to “Off’ or
2. Remove the courtesy lights and radio
fuses from the main fuse panel and
wait one minute. See “Fuses and
Circuit Breakers” in the Index.
3. Put the fuses back in and start your
The light shouldn’t come on and your
system should be working properly. If
you still have a problem, see your dealer.
“LOCK.”
vehicle.
Page 112 of 274
Downloaded from www.Manualslib.com manuals search engine I- - 1-0
I I I
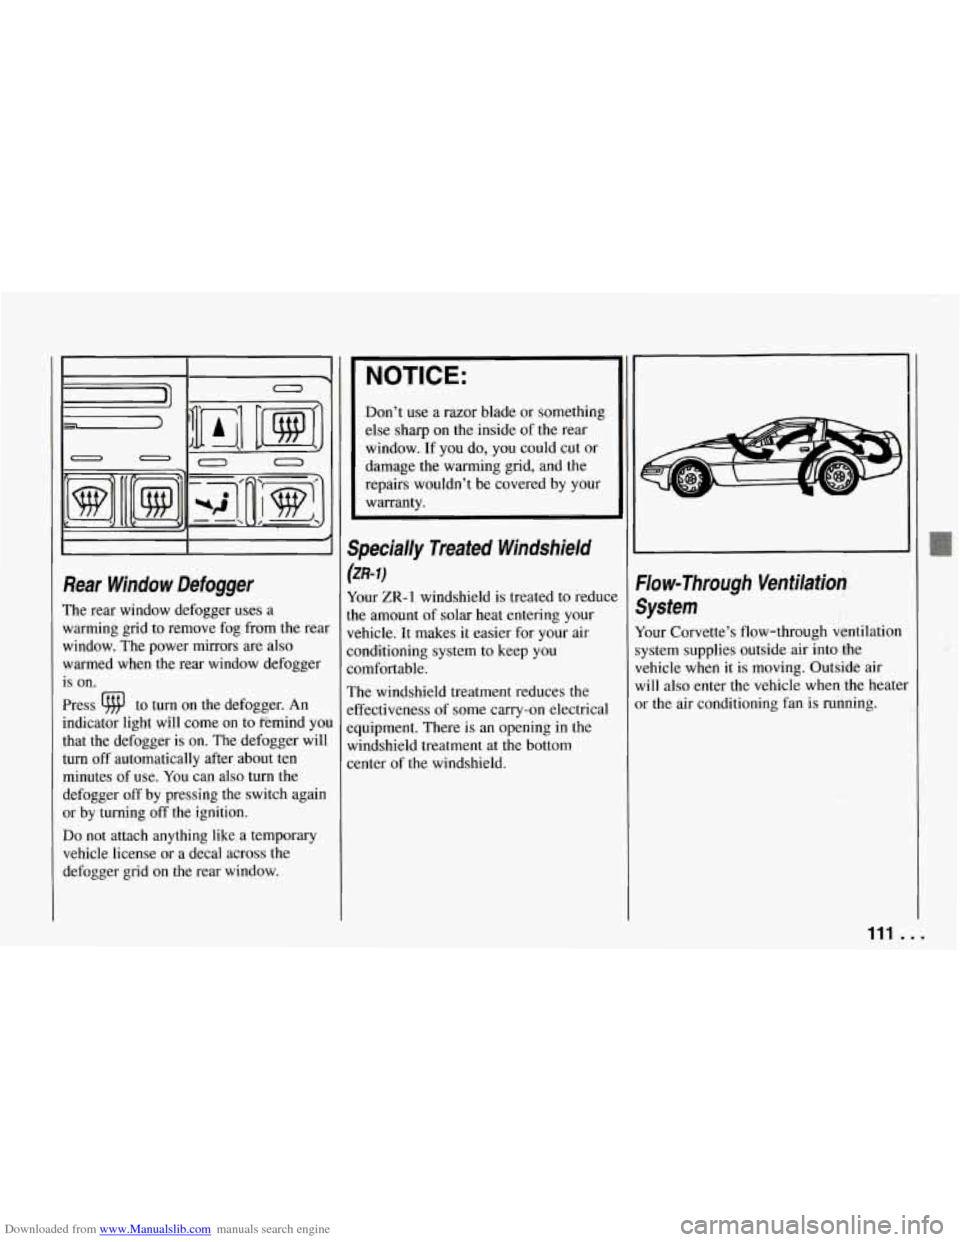
Rear Window Defogger
The rear window defogger uses a
warming grid to remove fog from the rear
window. The power mirrors are also
warmed when the rear window defogger
is on.
Press
9 to turn on the defogger. An
indicator light will come on to fiemind you
that the defogger is on. The defogger will
turn off automatically after about ten
minutes
of use. You can also turn the
defogger
off by pressing the switch again
or by turning
off the ignition.
Do not attach anything like a temporary
vehicle license or a decal across the
defogger grid on the rear window.
NOTICE:
Don’t use a razor blade or something
else sharp on the inside of the rear
window. If
you do, you could cut or
damage the warming grid, and the
repairs wouldn’t be covered by your
warranty.
Specially Treated Windshield
(ZR-I)
Your ZR-1 windshield is treated to reduct
the amount of solar heat entering your
vehicle. It makes it easier for your air
conditioning system to keep you
comfortable.
The windshield treatment reduces the
effectiveness of some carry-on electrical
equipment. There is an opening in the
windshield treatment at the bottom
center of the windshield.
Vow-Through Ventilation
System
four Corvette’s flow-through ventilation
lystem supplies outside air into .the
Iehicle when it is moving. Outside air
vi11 also enter the vehicle when the heater
)r the air conditioning fan
is running.
111 . .
Page 197 of 274
Downloaded from www.Manualslib.com manuals search engine Service and Appearance Care
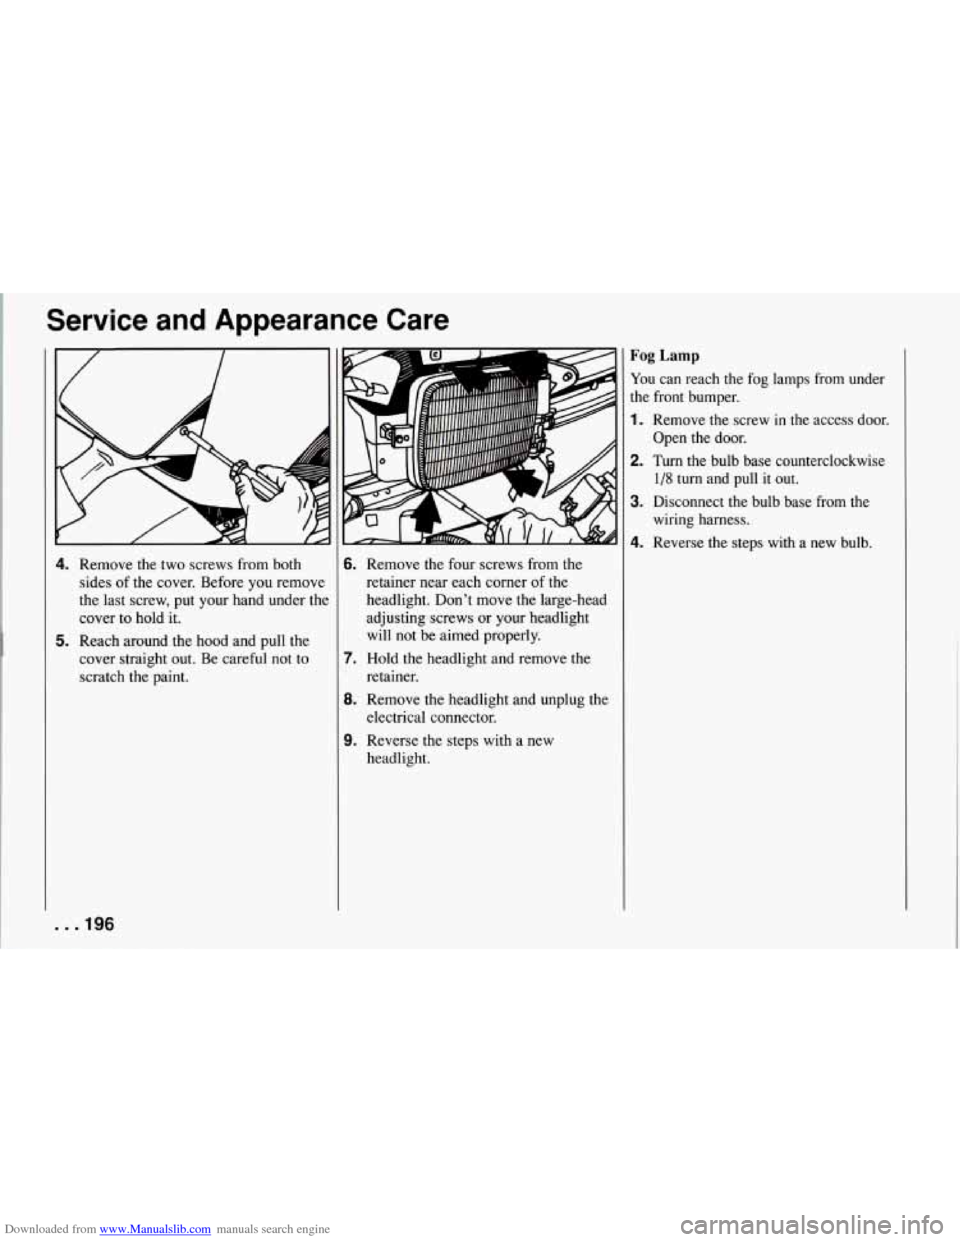
4. Remove the two screws from both
sides of the cover. Before you remove
the last screw, put your hand under the
cover to hold it.
5. Reach around the hood and pull the
cover straight out. Be careful not to
scratch the paint.
6.
7.
8.
9.
Remove the four screws from the
retainer near each corner of the
headlight. Don’t move the large-head
adjusting screws or your headlight
will not be aimed properly.
Hold the headlight and remove the
retainer.
Remove the headlight and unplug the
electrical connector.
Reverse the steps with a new
headlight.
Fog Lamp
You can reach the fog lamps from under
the front bumper.
1. Remove the screw in the access door.
Open the door.
1/8 turn and pull it out.
wiring harness.
2. Turn the bulb base counterclockwise
3. Disconnect the bulb base from the
4. Reverse the steps with a new bulb.
. . ,196
Page 214 of 274
Downloaded from www.Manualslib.com manuals search engine Glass
Glass should be cleaned often. GM Glass
Cleaner (GM Part
No. 1050427) or a
liquid household glass cleaner will
remove normal tobacco smoke and dust
films.
Don’t use abrasive cleaners on glass,
because they may cause scratches. Avoid
placing decals on the inside rear window,
since they may have to be scraped
off
later. If abrasive cleaners are used on the
inside of the rear window, an electric
defogger element may be damaged. Any
temporary license should not be attached
across the defogger grid.
Cleaning Dulso-Coated Moldings
These moldings are around the hatch
opening in your Corvette’s rear area.
When lightly soiled, wipe with a
sponge or
soft lint-free cloth
dampened with water.
water.
When heavily soiled, use warm soapy
You can remove scratches from a
Dulso-coated molding by wiping briskly
with the solvent-type cleaner described
earlier. If a ring forms, repeat the procedure
over a larger area, feathering
toward the center of the ring. If the ring
still remains, wipe the whole molding.
Cleaning the Outside of the Windshield
and Wiper Blades
If the windshield is not clear after using
the windshield washer, or if the wiper
blade chatters when running, wax or other
material may be on the blade or
windshield.
Clean the outside of the windshield with
GM Windshield Cleaner, Bon-Ami
Powder@
(GM Part No. 1050011). The
windshield is clean
if beads do not form
when you rinse it with water.
If you use a glass treatment or conditioner
containing ethyl alcohol or ethyl sulfate
on your glass, be sure to remove the
acrylic roof panel, if
so equipped. These
products may damage the panel.
Clean the blade by wiping vigorously
with a cloth soaked in full strength
windshield washer solvent. Then rinse the
blade with water.
Wiper blades should be checked on a
regular basis and replaced when worn.
Cleaning a Removable Roof Panel
Special care is necessary when cleaning,
removing and/or storing the roof panel.
Flush with water to remove dust and
dirt, then dry the panel.
Cleaner (GM Part
No. 1050427) or
a liquid household glass cleaner.
Leave the cleaner on the panel for
one minute, then wipe the panel with
a
soft, lint-free cloth.
Clean the panel with GM Glass
Don’t use abrasive cleaning materials.
If water drops are frequently allowed to
dry on the roof panel, impurities in the
water will adhere to the top, These
impurities may destroy the finish. When
the panel gets wet, you should dry it
off.
Do not use a glass treatment or
conditioner containing ethyl alcohol
or ethyl sulfate on the roof panel.
These products may damage the
panel.
213..
Page 221 of 274

Downloaded from www.Manualslib.com manuals search engine Service and Appearance Care
I EoA7 I
POWER WINDOW
lu
D
.
Instrument Panel Fuse Block
1 - A/C Module (5 Amp)
2 - Blank
3 - Windshield WiperNVasher Switch
4 - Radio Receiver Box (Ignition)
5 - Heated Mirrors (5 Amp.)
6 - Taillight, Daytime Running Lights
Module (15 Amp.)
Assembly
(30 Amp.)
(5 Amp.)
7 - Horn Relay
(15 Amp.)
*Export Horn
(20 Amp.)
8 - Hazard Flashers; Brake Switch
(20 Amp.)
9 - Crank-Air Bag (5 Amp.)
10 - Crank-Parmeutral Shitch
(Automatic); Clutch (Manual)
(5 Amp.)
11 - RH Illumination (5 Amp.)
12 - LH Illumination (5 Amp.)
13 - Console Illumination (5 Amp.)
14 - Fuel Pump 1 (10 Amp.)
15 - Fuel Pump 2 (LT5) (IO Amp.)
16 - Central Control Module; Daytime
Running Lights Module
(5 Amp.)
17 - Generator; Vacuum Pump (LT5);
Valet Mode (LT5); EGR Circuit
(LT5); Oxygen Sensors (LT5)
(10 Amp.)
and A/C Control Head; Heater and
A/C Programmer; Rear Defog
Relay
(10 Amp.)
19 - Utility Plug (15 Amp.)
20 - Heated Oxygen Sensors (LT1)
(15 Amp.)
21 - Fuel Pump Relay Coil #2 (LT5);
Selective Ride Control Module;
ABS Module; Transmission Clutch
Control Switch (Automatic);
Air Pump Relay; Diverter Valve;
Secondary Bypass Valve (LT5)
(10 Amp.)
22 - Injectors #1,4,6,7 (LT1); Primary
Injectors #1-8 (LT5); Ignition Coil
Module (LT5); Ignition Coil Plate
Connector (LT5) (10 Amp.)
18 - A/C Compressor Clutch; Heater
. . .220
Page 223 of 274
Downloaded from www.Manualslib.com manuals search engine Service and Appearance Care
. . .222
1 I INTERIOR LIGHTING
20A I
I RH HDLP 30A I I I
h 3 5 I SECONDARY COOLING FAN
40A I
6 I EXTERIOR LIGHTING
60A
I
7 piiiFiAAccsy
I
AIR PUMP
20A I
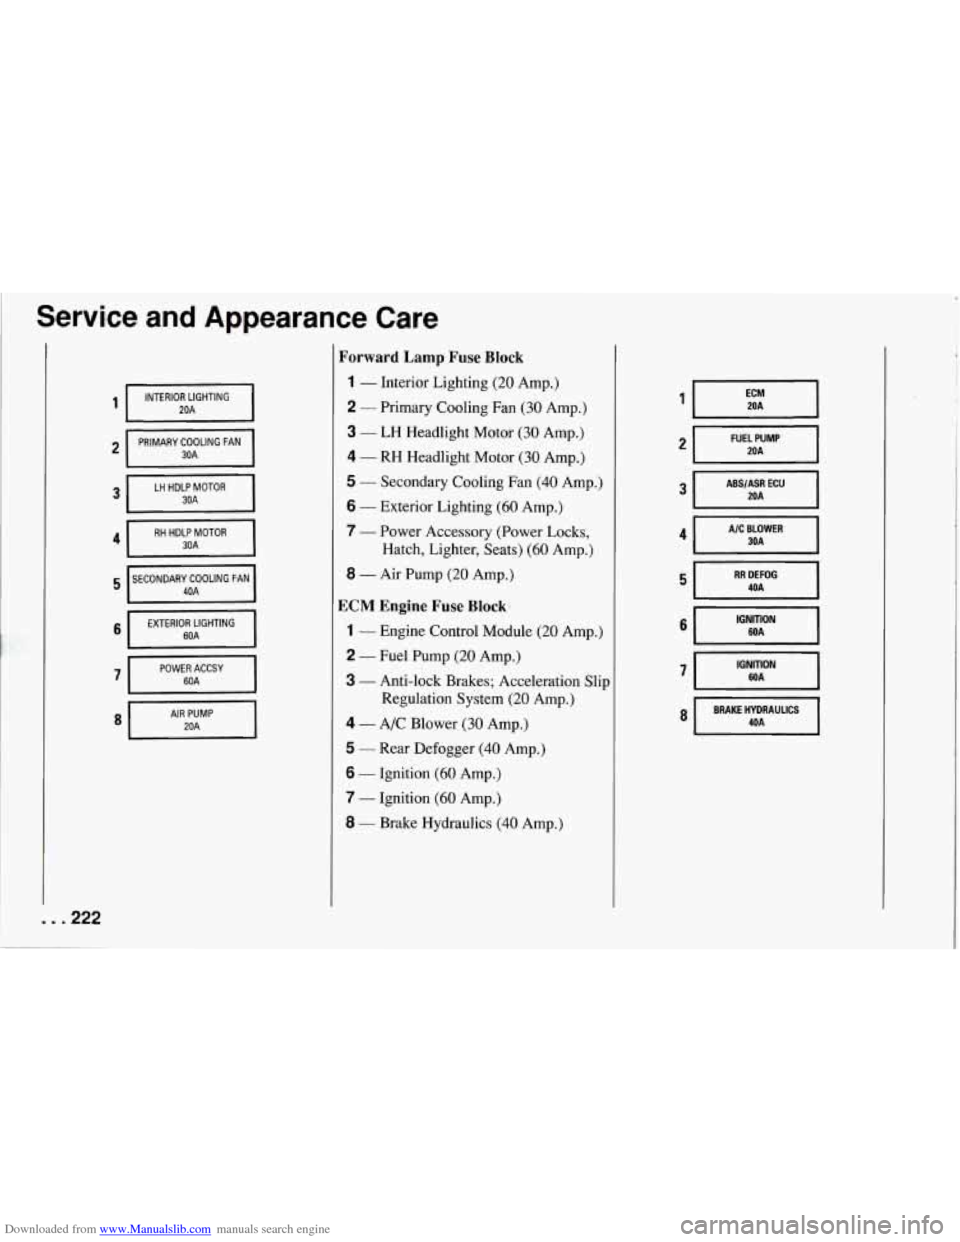
Forward Lamp Fuse Block
1 - Interior Lighting (20 Amp.)
2 - Primary Cooling Fan (30 Amp.)
3 - LH Headlight Motor (30 Amp.)
4 - RH Headlight Motor (30 Amp.)
5 - Secondary Cooling Fan (40 Amp.)
6 - Exterior Lighting (60 Amp.)
7
- Power Accessory (Power Locks, Hatch, Lighter, Seats)
(60 Amp.)
8 - Air Pump (20 Amp.)
ECM Engine Fuse Block.
1 - Engine Control Module (20 Amp.)
2 - Fuel Pump (20 Amp.)
3 - Anti-lock Brakes; Acceleration Slip
Regulation System
(20 Amp.)
4 - A/C Blower (30 Amp.)
5 - Rear Defogger (40 Amp.)
6 - Ignition (60 Amp.)
7 - Ignition (60 Amp.)
8 - Brake Hydraulics (40 Amp.)
FUEL PUMP
ABS/ASR ECU
A/C BLOWER
IGNITION WA I
8 I BRAKE HYDRAULICS 4OA I
Page 224 of 274

Downloaded from www.Manualslib.com manuals search engine Replacement Bulbs
Air Conditioningmeater Control ....................................... 37
Automatic Transmission Indicator
.................................. 194NA
Backup
......................................................... 1 156
Center High-Mounted Stoplight (except ZR-1)
.......................... 1156
Center High-Mounted Stoplight (ZR-
1) ................................. 891
Console
......................................................... 564
Cornering
....................................................... 1156
DoorCourtesy
.................................................. 212-2
Door Flood
........................................................ 73
Driver Information Center
Floorcourtesy
.................................................... 562
Fog
.............................................................. 896
* .............................................
Front Parking/Turn Signal ....................................... 2057NA
Headlight
..................................................... HP6054
Instrument Cluster
License
........................................................... 24
MirrorFlood
....................................................... 74
MirrorReading
.................................................... 168
Radio
* ...................................................
* .............................................................
Rear Courtesy (Convertible) ......................................... 562
Rear Courtesy (except Convertible)
.................................... 906
Sidemarker
........................................................ 24
Tail/Stop/Turn
................................................... 2057
Underhood
..................................................... 212-2
Visor Vanity Mirror
................................................. 74
"These bulbs are not owner.serviceab1e . See your dealer .
. h . .
223 ...