1994 CHEVROLET CORVETTE fog light
[x] Cancel search: fog lightPage 10 of 274

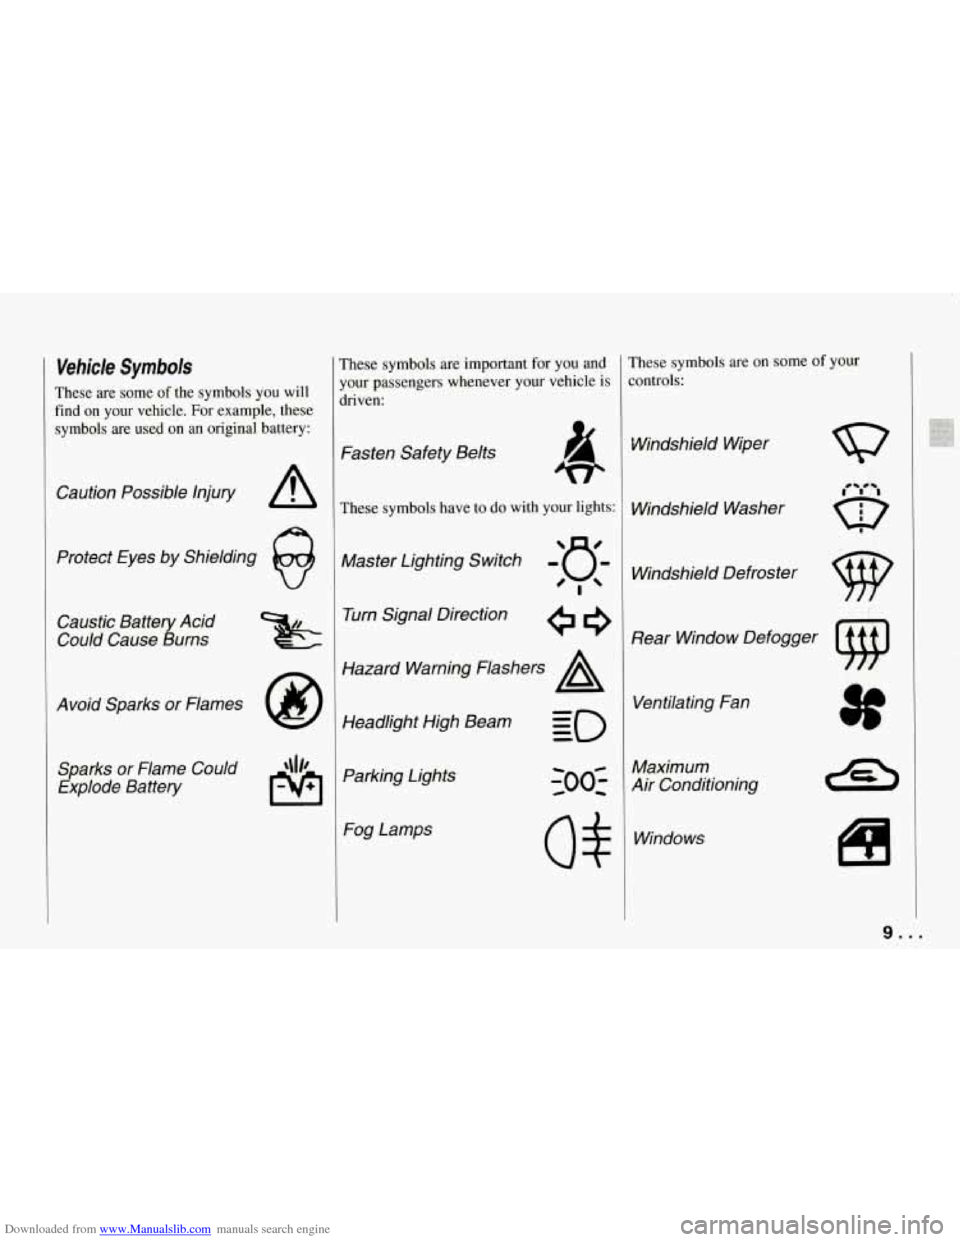
Downloaded from www.Manualslib.com manuals search engine Vehicle Symbols
These are some of the symbols you will
find on your vehicle. For example, these
symbols are used on an original battery:
Caution Possible Injury A
Protect Eyes by Shielding
Caustic Battery Acid
Could Cause Burns
Avoid Sparks
or Flames
Sparks
or Flame Could
Explode Battery
These symbols are important for you and
your passengers whenever your vehicle is
driven:
Fasten Safety Belts
These symbols have to do with your lights:
Master Lighting Switch -'a-
'!
Turn Signal Direction
Hazard Warning Flashers
A
Headlight High Beam Parking Lights Fog Lamps
rhese symbols are on some of your
:ontrols:
Windshield Wiper
Windshield Washer Windshield Defroster
Rear Window Defogger Ventilating Fan
Maximum
Air Conditioning
Windows
I
i
9...
Page 44 of 274

Downloaded from www.Manualslib.com manuals search engine NOTICE:
If you put things in the hatchback
area, be sure they won’t break the
glass when
you close it.
Never slam the hatch down. You
could break the glass or damage the
defogger grid.
When you close the hatch, make sure
you pull down from the center, not
the sides. If you pull the hatch down
1 from the side too often, the weather-
1 strip can be damaged.
Theft
Vehicle theft is big business, especially in
;ome cities. Although your Corvette has a
lumber of theft-deterrent features, we
mow that nothing we put on
it can make
It impossible to steal. However, there are
ways you can help.
Key in the Ignition
[f you walk away from your vehicle with
the keys inside, it’s an easy target for joy
riders or professional thieves
- so don’t
do it.
When you park your Corvette and open
the driver’s door, you’ll hear a tone
reminding you to remove your key from
the ignition and take it with you. Always
do this. Your steering wheel will be
locked, and
so will your ignition. If you
have an automatic transmission, taking
your key out also locks your transmission.
And remember to lock the doors.
Parking at Night
Park in a lighted spot, close all windows
and lock your vehicle. Remember to keep
your valuables out of sight. Put them in a
storage area, or take them with you.
Parking Lots
If you park in a lot where someone will be
watching your vehicle, it’s best to lock it
up and take your keys. But what if you
have to leave your ignition key? What
if
you have to leave something valuable in
your vehicle?
0 Put your valuables in a storage area,
0 Lock the storage area.
Lock all the doors except the driver’s.
0 Then take the door key with you.
like the rear area or center console.
43 ...
Page 67 of 274

Downloaded from www.Manualslib.com manuals search engine Features and Controls
Passing Another Vehicle While Using
Cruise Control
Use the accelerator pedal to increase your
speed. When you take your foot off the
pedal, your vehicle will slow down to the
Cruise Control speed you set earlier.
Using Cruise Control on Hills
How well your Cruise Control will work
on hills depends upon your speed, load,
and the steepness of the hills. When going
up steep hills, you may have to step on
the accelerator pedal to maintain your
speed. When going downhill, you may
have to brake or shift to a lower gear to
keep your speed down. Of course,
applying the brake takes you out of
Cruise Control. Many drivers find this to
be too much trouble and don’t use Cruise
Control on steep hills.
... 66
:o Get Out of Cruise Control
’here are several ways to turn off the
bise Control:
. Step lightly on the brake pedal or push
the clutch pedal, if you have a manual
transmission;
OR
!. Move the Cruise switch to “OFF.”
ro Erase Speed Memory
Nhen you turn off the Cruise Control or
he ignition, your Cruise Control set speed
nemory is erased.
Operation of Lights
4lthough your vehicle’s lighting system
:headlights, parking lights, fog lamps,
sidemarker lights and taillights) meets all
applicable federal lighting requirements,
2ertain states and provinces may apply
their own lighting regulations that may
require special attention before you
operate these lights.
For example, some jurisdictions may
require that you operate your fog lamps
only when your lower beam headlights
are also on, or that headlights be turned
on whenever you must use your
windshield wipers. In addition, most
jurisdictions prohibit driving solely with
parking lights, especially at dawn or dusk.
It is recommended that you check with
your own state or provincial highway
authority for applicable lighting
regulations.
Page 69 of 274

Downloaded from www.Manualslib.com manuals search engine Features and Controls
Daytime Running Lights (Canada)
The Canadian Federal Government has
decided that “Daytime Running Lights”
(DE) are a useful feature, in that DIU
can make your vehicle more visible to
pedestrians and other drivers during
daylight hours. DIU are required on new
vehicles sold
in Canada.
Your
DRL, work with a light sensor on top
of the instrument panel. Don’t cover it up.
The front turn signal lights will come on
in daylight when:
0 The ignition is on
0 The headlight switch is off, and
0 The parking brake is released.
At dusk, the exterior lights will come on
automatically and the front turn signal
lights will go out. At dawn, the exterior
lights will go out and the front turn signal
lights will come on (if the headlight
switch is
off).
Of course, you may still turn on the
headlights any time
you need to.
To idle your vehicle with the DRL off, set
the parking brake while the ignition is
in
the “Off” or “LOCK” position. Then start
the vehicle. The DRL will stay
off until
you release the parking brake.
... 68
$.
Fog Lights
Use your fog lights for better vision in
Foggy or misty conditions. Your parking
lights or low beam headlights must be
on
or your fog lights won’t work.
To turn the fog lights on, push the button.
Push the button again to turn the fog
lights
off. A light above the button will
come on when the fog lights are on.
Interior Lights
Courtesy Lights
When any door is opened, the interior
lights will go on (unless it’s bright
outside). The lights will stay on for about
30 seconds or until you turn on the
ignition.
Front Map Lights
Your inside rearview mirror includes two
map lights. The lights will go on when a
door is opened. When the doors are
closed and the ignition is on, press the
switch to turn on the lights.
Page 80 of 274

Downloaded from www.Manualslib.com manuals search engine Instrument Panel
1. Acceleration Slip Regulation Switch
2. Side Window Defogger Vent
3. Side Air Vent
4. Turn Signaweadlight Beam Lever
5. Tilt Lever
6. Instrument Cluster
7. Ignition Switch
8. Trip Monitor Controls
9. Solar Sensor
IO. Center Air Vent
11. Driver Information Center
12. Comfort Controls
13. Fuse Panel
14. Audio System
15. Ashtray/Lighter/Cupholder
16. Selective Ride Control (if equipped)
17. Power Seat Control (if equipped)
18. Shift Lever
19. Horn
20. Main Light Control
21. Fog Lamp Switch
79 ...
Page 103 of 274

Downloaded from www.Manualslib.com manuals search engine Features and Controls
I
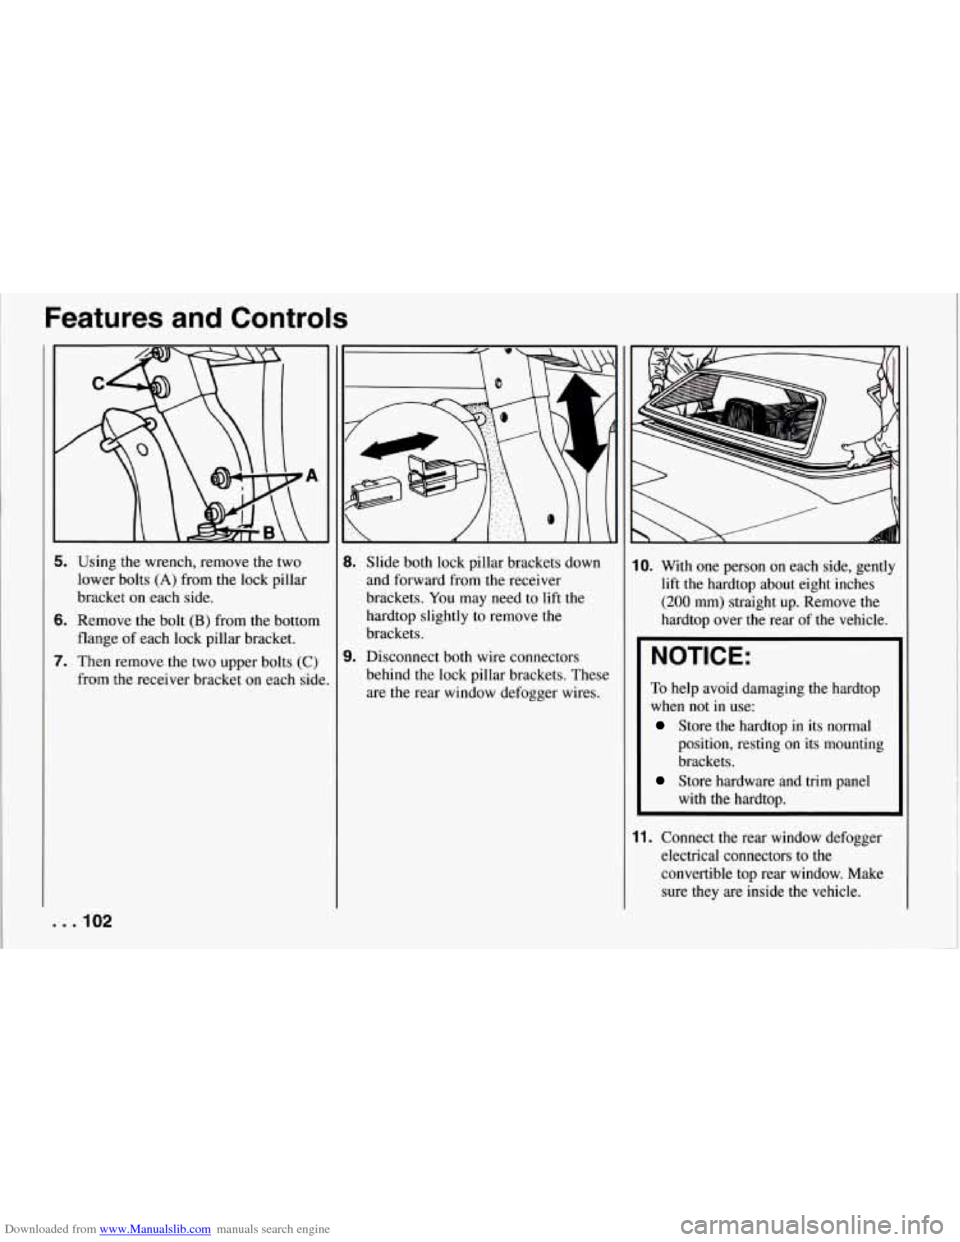
5. Using the wrench, remove the two
lower bolts (A) from the lock pillar
bracket on each side.
6. Remove the bolt (B) from the bottom
flange of each lock pillar bracket.
7. Then remove the two upper bolts (C)
from the receiver bracket on each side
. .I02
Slide both lock pillar brackets down
and forward from the receiver
brackets.
You may need to lift the
hardtop slightly to remove
the
brackets.
Disconnect both wire connectors
behind the lock pillar brackets. These
are the rear window defogger wires.
10. With one person on each side, gently
lift the hardtop about eight inches
(200 mm) straight up. Remove the
hardtop over the rear of the vehicle.
NOTICE:
To help avoid damaging the hardtop
when not
in use:
Store the hardtop in its normal
position, resting
on its mounting
brackets.
with the hardtop.
Store hardware and trim panel
11. Connect the rear window defogger
electrical connectors to the
convertible top rear window. Make
sure they are inside the vehicle.
Page 104 of 274

Downloaded from www.Manualslib.com manuals search engine TO Install Your Convertible Hardtop
1. Park on a level surface, set the parkinl
brake firmly and shift an automatic
transmission into
“F’” (Park). Shift
a manual transmission into
“R’
(Reverse). Lower both windows and
sunshades.
Turn off the radio to lower
the power antenna and turn the
ignition key to
“LOCK.”
electrical connectors behind the lock
pillar.
3. Lower the convertible top. Refer to
“Convertible Top” in the Index.
4. With one person on each side,
carefully position the hardtop over
the vehicle. Lower the hardtop slowly. aligning the rear bolt spacers onto the
bezels, and front conical nuts into the
2. Disconnect both rear window defogger
tapered receivers. Realign the hardtop
if necessary.
NOTICE:
To help avoid damage, don’t force
the rear of the hardtop down. The
hardtop may rest slightly above the
$forage compartment lid until the
release lever
is pulled. See step 8 in
this procedure.
\Q
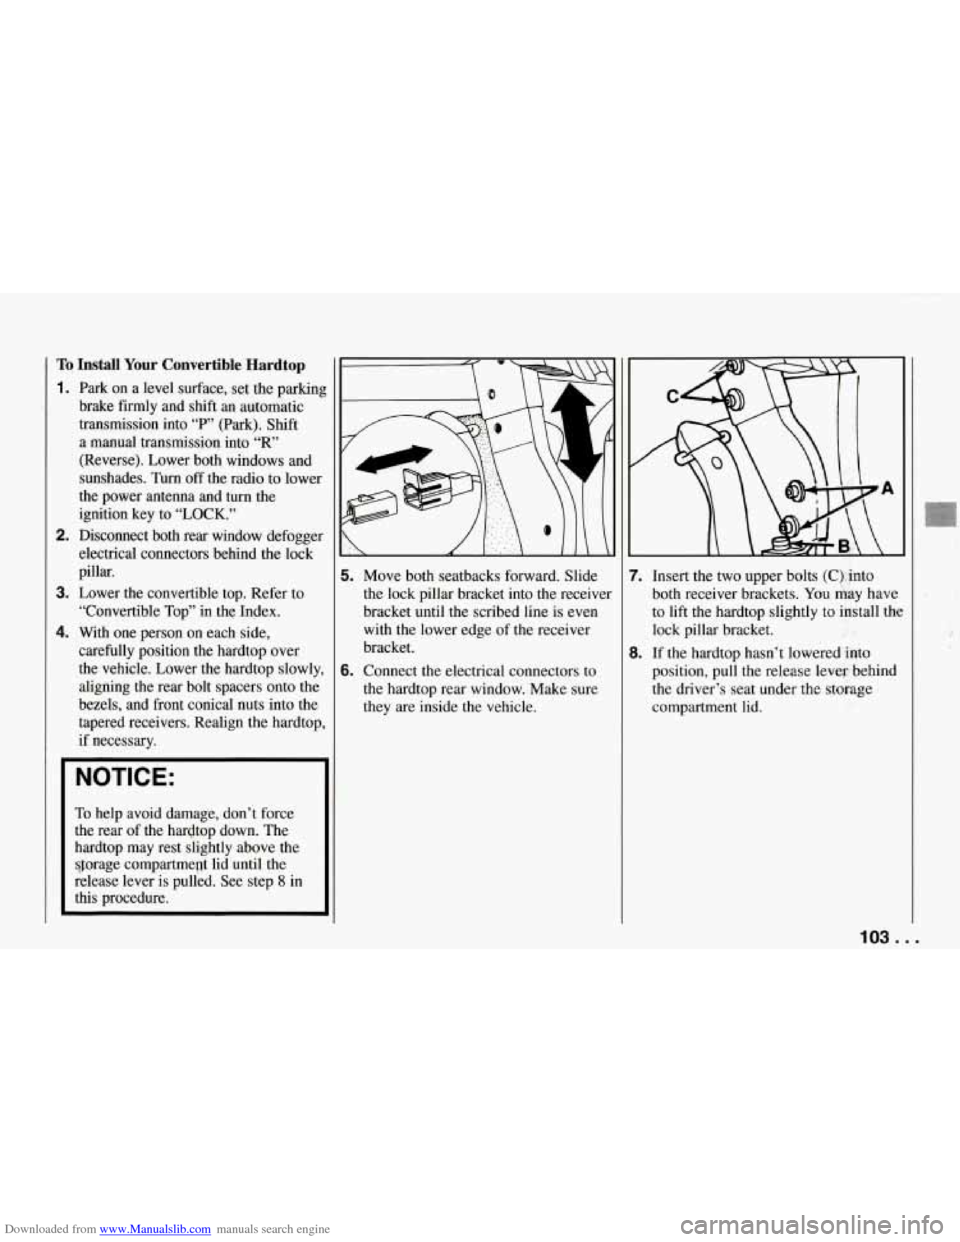
i. Move both seatbacks forward. Slide
the lock pillar bracket into the receiver
bracket until
the scribed line is even
with the lower edge of the receiver
bracket.
i. Connect the electrical connectors to
the hardtop rear window. Make sure
they are inside the vehicle. 7.
Insert the two upper bolts
(C), into
both receiver brackets. You kay have
to lift the hardtop slightly to install the
lock pillar bracket.
8. If the hardtop hasn’t lowered into
position, pull the release lever- behind
the driver’s seat under the storage
compartment lid.
103 ...
Page 107 of 274

Downloaded from www.Manualslib.com manuals search engine Comfort Controls and Audio Systems
0 00
0 0 0 0 0 0 0 a
Comfort Controls
With these systems, you can control the
heating, cooling and ventilation in your
Corvette.
Your vehicle also has
the flow-through
ventilation system described later in this
section.
Air Conditioner Controls
Fan Control Buttons
Press the arrows on the fan switch to
select the force of air you want.
Temperature Control Lever
Move the lever to change the temperature
of the air flowing from
the system. Move
it to the right for warmer air and to the
left for cooler air.
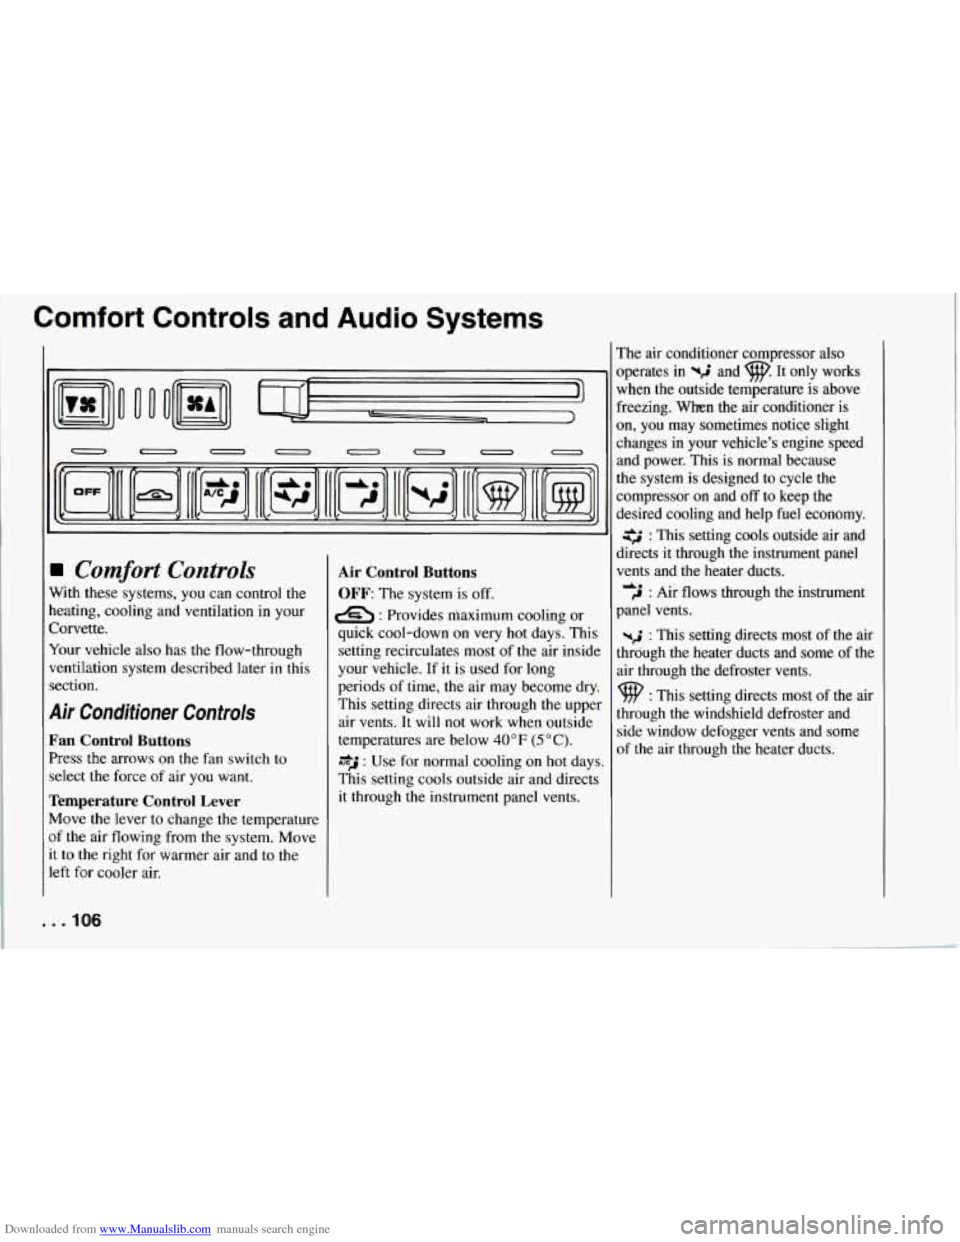
Air Control Buttons
OFF: The system is off.
e : Provides maximum cooling or
quick cool-down on very hot days. This
setting recirculates most of the air inside
your vehicle. If it is used for long
periods of time,
the air may become dry.
This setting directs air through the upper
air vents. It will not work when outside
temperatures are below
40 OF (5 O C).
*J : Use for normal cooling on hot days.
This setting cools outside air and directs
it through the instrument panel vents. The air conditioner compressor also
operates in
%$ and w. It only works
when the outside temperature is above
freezing. When the air conditioner is
on, you may sometimes notice slight
changes
in your vehicle’s engine speed
and power. This is normal because
the system is designed to cycle the
compressor on and
off to keep the
desired cooling and help fuel economy.
: This setting cools outside air and
directs it through the instrument panel
vents and the heater ducts.
,J : Air flows through the instrument
panel vents.
-2 : This setting directs most of the air
through the heater ducts and some of the
air through the defroster vents.
9 : This setting directs most of the air
through the windshield defroster and
side window defogger vents and some
of the air through the heater ducts.
de
. . .IO6