1994 CHEVROLET BLAZER buttons
[x] Cancel search: buttonsPage 112 of 348
Downloaded from www.Manualslib.com manuals search engine Storage Compartments
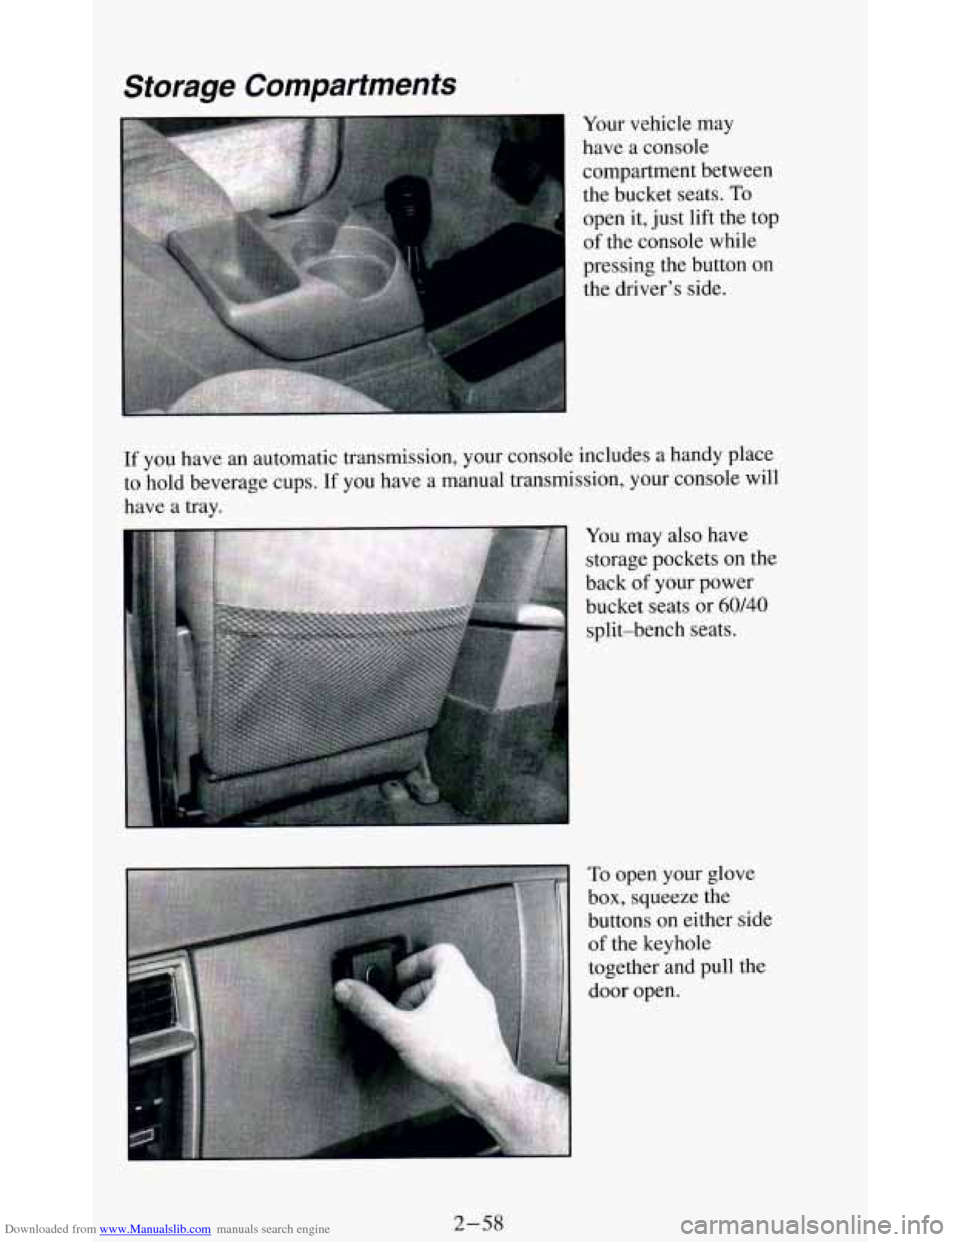
Your vehicle may
have a console
compartment between
the bucket seats.
To
open it, just lift the top
of the console while
pressing the button
on
the driver’s side.
If you have an automatic transmission, your console includes a handy place
to hold beverage cups.
If you have a manual transmission, your console will
have a tray.
You may also have
storage pockets on the
back
of your power
bucket seats or
60140
split-bench seats.
To open your glove
box, squeeze the
buttons
on either side
of the keyhole
together and pull the
door open.
2-58
Page 143 of 348
Downloaded from www.Manualslib.com manuals search engine PWR (Power)
The PWR button turns your system on and off.
Pushbuttons
The four pushbuttons let you return to favorite stations. To set the
pushbuttons, just:
0 Tune in the station.
Push SET. (SET appears in the VF display for a few seconds.)
0 Within 5 seconds, push one of the four pushbuttons. Whenever you
push that button, the preset station
will return.
NOTE: Up to three additional stations may be preset by pressing two adjoining
buttons at the same time.
Tune in the station.
0 Push SET. (SET appears in the VF display for a few seconds.)
Within 5 seconds, push any two adjoining buttons at the same time.
(The station will return when the same two buttons are pressed again.)
Clock
To set the clock, just:
Push SET.
0 Within 5 seconds, push and hold HRS (time will be displayed) until the
0 Push and hold MINS until the correct minute appears.
correct
hour appears.
To display the clock with the ignition off, push the upper knob. The time
will be displayed for a few seconds.
3-9
Page 145 of 348
Downloaded from www.Manualslib.com manuals search engine Pushbuttons
The four pushbuttons let you return to favorite stations.
You
can set the pushbuttons for up to eight favorite stations (4 AM and 4
FM). Just:
Tune in the station.
0 Push SET. (SET appears in the VF display for a few seconds.)
Within 5 seconds, push one of the four pushbuttons to store the station.
Whenever you push
that button, the preset station will return.
Repeat these steps for each pushbutton.
NOTE:
You can preset 3 more stations on each band by pushing a pair of buttons
next to each other at the same time. Just:
Tune in the station.
0 Push SET. (SET appears in the VF display for a few seconds.)
0 Within 5 seconds, push two buttons next to each other at the same time.
Whenever you push that pair of buttons, the preset station
will return.
Repeat these steps for each pair of buttons.
Scan Button
When you push this, the radio will go to the next station and stay there a
few seconds. Then it
will go to the next station and pause, and keep doing
that. Press
SCAN again to stop scanning.
Seek Button
This chooses station also, but it doesn’t keep moving as SCAN does. When
you push
SEEK the radio goes to the next station and stays there.
Clock
To set the clock, just:
Push SET.
Within 5 seconds, push and hold SCAN until the correct hour appears.
Press and hold SEEK until the correct minute appears.
To display the clock
with the ignition off, push the upper knob. The time
will be displayed for a few seconds.
3-1 1
Page 147 of 348
Downloaded from www.Manualslib.com manuals search engine TREBLE -Slide this lever up to increase the treble response.
Adjust these levers to give
a pleasing sound. If a station is weak and noisy,
move
TREBLE down to reduce the noise.
PWR (Power)
The PWR button turns your system on and off.
DNR @
This is the Dynamic Noise Reduction button. It helps remove background
hiss noise from the radio or tape player. You may want
to leave it pushed in
all the time.
DNR@ is
a registered trademark of National Semiconductor Corporation.
Pushbuttons
The four pushbuttons let you return to favorite stations.
You
can set the pushbuttons for up to eight favorite stations (4 AM and 4
FM). Just:
Tune in the station.
Push SET. (SET appears in the VF display for a few seconds.)
Within 5 seconds, push one of the four pushbuttons. Whenever you
push that button, the preset station will return.
Repeat these steps for each pushbutton.
NOTE: You can preset
3 more stations on each band by pushing a pair of buttons
next to each other at the same time.
Just:
Tune in the station.
Push SET. (SET appears in the VF display for a few seconds.)
Within 5 seconds, push two buttons next to each other at the same time.
Whenever
you push that pair of buttons, the preset station will return.
Repeat these steps for each pair of buttons.
Scan Button
When you push this, the radio will go to the next station and stay there a
few seconds. Then it will go to the next station and pause, and keep doing
that. Press
SCAN again to stop scanning.
Seek Button
This chooses station also, but it doesn’t keep moving as SCAN does. When
you push
SEEK the radio goes to the next station and stays there.
3-13
Page 150 of 348
Downloaded from www.Manualslib.com manuals search engine PWR (Power)
The PWR button turns your system on and off.
AM-ST Button
Push this button if you want AM stereo. (“STEREO” will be displayed
when
you are receiving an AM stereo station.)
Cr02 Button
The Cr02 button lets you set the system for the type of cassette being used.
If you are using chrome
or metal tapes, push the Cr02 button in. If you are
using standard iron tapes, make sure the button
is out.
Your audio system has automatic Dynamic Noise Reduction. It helps
remove background hiss
noise from the radio or tape player.
DNR@
DNR@ is a registered trademark of the National Semiconductor
Corporation.
Pushbuttons
The four pushbuttons let you return to favorite stations.
You can set the pushbuttons for up to eight favorite stations
(4 AM and
4 FM). Just:
Tune in the station.
Push SET. (SET appears in the VF display for a few seconds.)
Within 5 seconds, push one of the four pushbuttons. Whenever you
push that button, the preset station will return.
Repeat these steps for each pushbutton.
NOTE: You can preset
3 more stations on each band by pushing a pair of
buttons next to each other at the same time. Just:
Tune in the station.
Push SET. (SET appears in the VF display for a few seconds.)
Within 5 seconds, push two buttons next to each other at the same time.
Whenever
you push that pair of buttons, the preset station will return.
Repeat these steps for each pair of buttons.
SCAN Button
When you push this, the radio will go to the next station and stay there a
few seconds. Then
it will go to the next station and pause, and keep doing
that. Press
SCAN again to stop scanning.
SEEK Button
This chooses stations also, but it doesn’t keep moving as SCAN does. When
you push SEEK, the radio goes to the next station and stays there.
3-16
Page 154 of 348
Downloaded from www.Manualslib.com manuals search engine SEEK
Pressing the SEEK button will cause the receiver to seek the next higher
station and stop.
Pressing the
4 SEEK button will cause the receiver to seek the next lower
station and stop.
SCAN
When you press SCAN, the radio will go to the next station and pause, and
will keep scanning until you press SCAN again. SC will be displayed when
using this control.
Pushbuttons
The five pushbuttons let you return to favorite stations. They are also used
when
you play a disc. (See “To Play A Compact Disc”.)
To set the pushbuttons for
up to ten favorite stations (5 AM and 5 FM):
Tune in the desired station.
Push the SET button. (SET is displayed briefly.)
Within 5 seconds, push one of the five pushbuttons to store the station.
Whenever you press that button, the preset station
will return.
Clock
To set the clock, just:
Press the SET button. The radio may be on or off.
Within 5 seconds, press and hold either SEEK to increase the
minutes or
4 SEEK to decrease the minutes until the correct minute
appears on the display.
Press and hold SCAN until the correct hour appears on the display.
RCL
Press the RCL button to alternate between time and radio station on the
display.
RCL may be pressed when the ignition is off to see the time.
BASS
Press the BASS A to increase the bass tones and BASS to decrease bass
tones. Press the center of the control for a preset
BASS position. The bass
level will be displayed briefly when using this control.
TREBLE
Press the TREB A to increase the treble tones and TREB to decrease
the treble tones. Press the center of the control for a preset
TREB position.
The treble level
will be displayed briefly when using this control.
3-20
Page 156 of 348
Downloaded from www.Manualslib.com manuals search engine SCAN
Press SCAN to sample each track for approximately 10 seconds. Scanning
will continue until the
RDM, SCAN or any other motion button is pressed
again.
PREV
If you hold the PREV (4 .SEEK ) button, or press it more than once, the
disc will return
to previous tracks.
NEXT
Press NEXT (SEEK ) to hear the next track now instead of waiting until
the present track is finished. If you hold this button or press it more than
once, the disc will advance further.
ST-PL
Press ST-PL (Stop-Play) to make the disc stop and the radio play. Press
ST-PL again to restart the disc at the point where it stopped.
Press
PWR or turn the ignition key off to stop the disc player. The disc
stays
in the player and will resume playing at the point where it stopped.
Press
EJCT to eject the disc and make the radio play. The disc will start at
track
1 when you reinsert it.
Anti-Theft Feature
Delco LOC II@ is an Anti-Theft feature for the compact disc player. It can
be used or ignored. If ignored, the system plays normally. If
it is used, your
player won’t be usable
if it is ever stolen, because it won’t turn on.
The instructions below tell you how to enter a secret code into the system. If
your car loses battery power for any reason,
you must unlock the system
with the secret code before the radio will turn
on.
To Lock The System:
1.
2.
3.
4.
5.
6.
7.
Write down any 6 digit number and keep it in a safe place.
Turn the ignition
to the ACC (Accessory) or RUN position.
Press
the PWR button to turn the radio off.
Press the
1 and 4 buttons together. Hold them down until “- - -” shows
on the display.
You are now ready
to enter your secret code. Don’t wait more than
15 seconds between steps.
Press SET and 000 will appear on the display.
Press the
SEEK or 4 button to make the first number appear.
Press
SCAN to make the last two numbers agree with your code.
3-22