1993 VOLKSWAGEN GOLF low oil pressure
[x] Cancel search: low oil pressurePage 48 of 156
Downloaded from www.Manualslib.com manuals search engine CONTROLS AND EQUIPMENT
Warning lamps
Attention • Be careful when opening the coolant expansion tank! When the engine is hot the cooling system is under pressure -Danger of scalding! Let engine cool down therefore before unscrewing the cap_
• Do not touch the fan. The fan can switch on suddenly -even when ignition is switched off.
For furthe r details see pages 98 and 98.
1 -Coolant temperaturel _~_ If the coolant le vel is in orde r the trouble Coolant level') may be due to failure of the radiato r fan.
Check radiator fan fuse and renew is
T he wa rni ng lamp lights up for a few sec
necessary -see page 119.onds as a functional check when ign ition IS coo lant level .
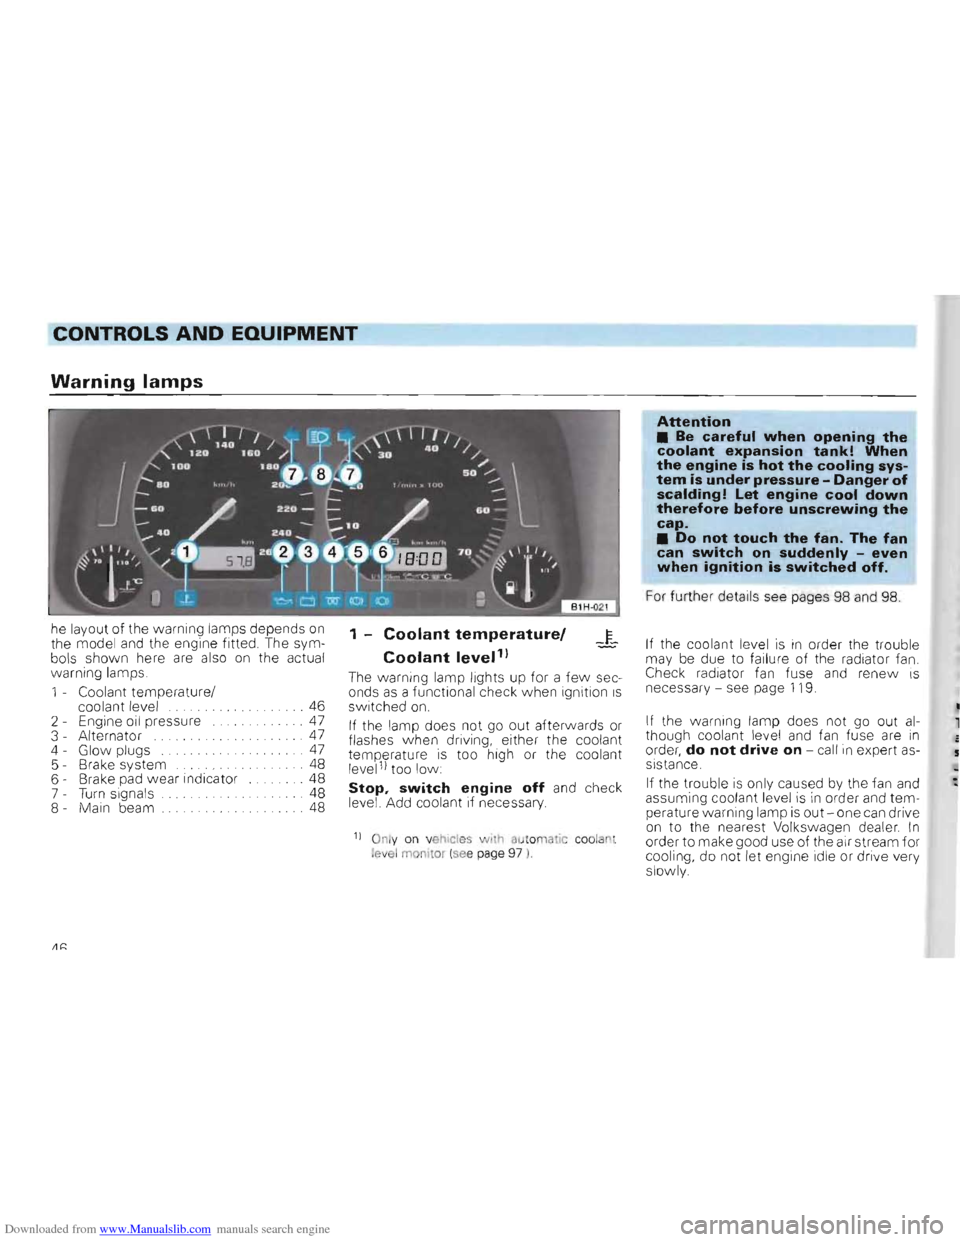
. 46 switched on.
2 - Engine oil pressure ... .. 47 If the warning lamp does not go out al
If the lamp does not go out afterwards or 3 -Alternator . 47 though coolant level and fan fuse are inflashes when driving, either the coolant 4 -Glow plugs ... 47 orde r, do not drive on -call in expe rt astempe ratur e is too high or the coolant 5 -Brake system .. 48 sistance
.
level1 l too low: 6 -Brake pad wear indicator .48 If the trouble is only caused by the fan andStop, switch engine off and check7 -Turn signals 48
assuming coolant level is in order and temlevel . Add coolant if necessary . 8 -Main beam .
48
perature warning lamp is out -one can drive on to the nearest Volkswagen dealer. In 11 Only 011 vehicl es wi h a t omatic coolant order to make good use of the air stream for level lllonit or (see page 97 l. cooling , do not let engine idle or drive very
slowly .
he
layout
of the warning lamps depends on the model and the engine fitted. The sym
bols shown here are also on the actual
warn ing lamps.
1 -Coolant temperature /
Page 49 of 156
Downloaded from www.Manualslib.com manuals search engine CONTROLS AND EQUIPMENT
2 -Engine oil pressure ~
e wa rning lamp flashes when ignition is :ched on. the lamp must go out when ,=~g ne has started.
, 'Il e warning lamp does not go out or
ash es when driving -a buzzer also sounds
-' e!,gine spe,eds above 2000 rpm -stop, switch engine off, check oil level and if ecessary, add oil -see page 94.
- - he lamp comes
on although the oil level 5 n order, do not drive on. Do not even "'., t he engine at idling speed -call in expert ~slstance.
-du ring the Journe y the engine is operated
a : a speed less than idling speed, it ca n ~ appen that the oil warning lamp lights up. "crease engine speed by accelerating or :'langing down .
Note Th e oil pressure warning lamp is not an oil level indicator. The oil level shou.'d therefore be checked at reg, ular Intervals, preferably every time the fuel tank is filled.J
3 -Alternator
The warning lamp comes on w hen the igni
tion IS sWitched on and must go out when
the engine is started .
The alternator
is driven by a long-life ribbed
belt.
If the warning lamp lights during the
Journey ,
stop, switch off engine and
check ribbed belt.
If
t~e ribbed belt is loose or broken, do not
drive on -the coolant pump is no longer
being driven. The ribbed belt must be
checked/renewed by the next Volkswagen
dealer.
If the ribbed belt
is not loose or broken, one
can normally drive on to the next Vo lks
wag en dea ler. However as the battery is
then discharging co ntinuously , all electrical
consumers which are not absolutely essen
tial should be switched off.
4 -Glow plugs
(Diesel engines only)
When the engine
is cold the w arning lamp
come s on when key IS turned to Drive posi
tion (ignition on)
If the warning lamp does not come on, there IS a defectln the glow plug system -call in expert assistance.
When the lamp goes out, start the engine
Immediately -see page 37.
As the 55 kWDiesel engine glow period be
gins automatically after closing the drivers'
door,
It can happen that after switching to
the driving position (Ignition on) with a cold
engine, that the glow plug warning lamp
does not light up . The engine
can be started
straight away
When the engine
is warm the glow plug
lamp does not come on -the engine ca n be started straight away
Note
If while driving a fault occurs in the engine
management system of the 66 kW Diesel
engine, this
is indicated by a flashing warnIng lamp The engine must be checked by a
Volkswagen dealer as soon as possible.
47
Page 75 of 156
Downloaded from www.Manualslib.com manuals search engine DRIVING TIPS
The technical prerequisites
for a low fuel consumpt ion and efficienc y "" ere " built in" at the factory. Particular Im
p ortance was placed on the lowes t possible
d is turban ce to the enviro nme nt. To retain and make the best possible use of these characteristics attent ion should be paid to the fo llow ing points
~Even those vehicles which do W not have a catalytic converter should be driven on unleaded petrol for the sake of the environment.
~The prescribed maintenance W operations should be carried out exactly as specified in the Service Schedule.
Having your vehicle regularly serviced by a Volkswagen dealer not only ensures that it is always operationally fit, but it also ensures economy, lowest possible burden on the environment and a long service life.
~Check the tyre pressures every 4 W weeks.
Low tyre pressures increase the rolling resistance. This not only increases the fuel consumption and tyre wear, but the handling is also impaired.
~Do not carry unnecessary ballast W in the luggage boot
Particularly in town traffic when one has to accelerate often, weight has a great influence on the fuel consumption. As a
rule ofthumb: For every 100 kg ofweight the consumption increases by approximately litre per 100 km.
~Remove roof rack immediately Wafter use
Particularly at high speeds the increased air resistance makes itself felt considerably.
~Electrical consumers should W only be switched on when they are actually required
Heated rear windows, additional driving lights and heater blower consume a considerable amount of current. The higher alternator load also increases the fuel consumption. For instance, overa period of 10 hours, the heated rear window will increase the fuel consumption by approximately 1 litre.
~Check the fuel consumption regW ularly
The fuel consumption should be checked each time the tank is filled up. By doing this inconsistencies on the vehicle which lead to an increased fuel consumption can be discovered sooner.
• Check the engine oil level each time the tank is filled up The oil consumption depends to a g reat ex
tent on the engine load and speed. Depend
ing on the style of driving the consumption
can be as much as 1 .0 litr es/1 000 km .
It
IS no rmal fo r the oil consumption of a ne w
engine to reach its lowest level after a cer
tain mileage has be en covered . The con
sumption cannot be properly assessed until
the vehicle has run appro x. 5000 km.
This also applies to the fuel consumption
and the engine output.
73
Page 93 of 156
Downloaded from www.Manualslib.com manuals search engine GENERAL MAINTE NA NCE
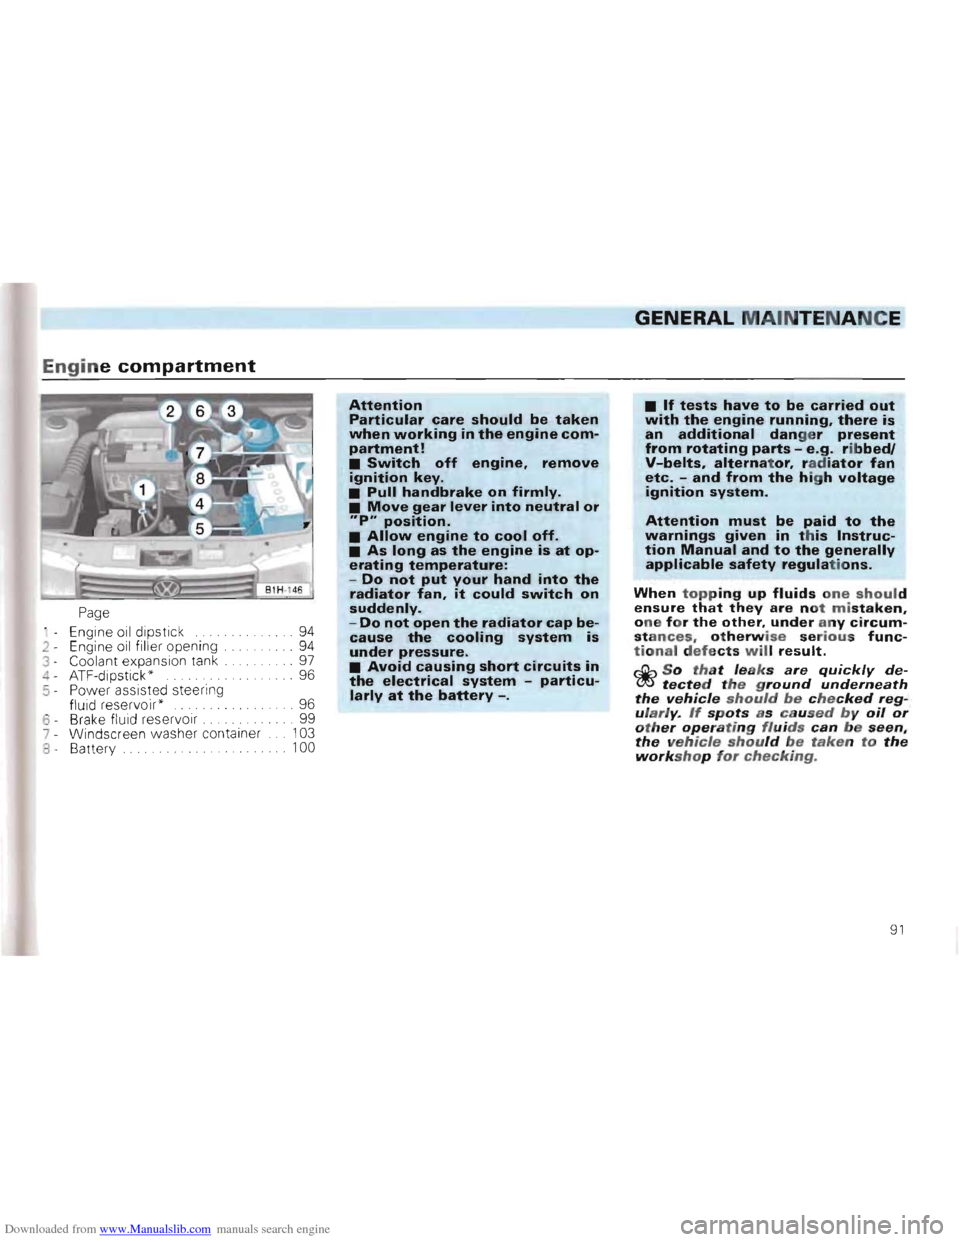
Engine c ompartmen t
Page
Engine oil dip sti ck . . 94
2 - Eng ine o
il filler openi ng ... ...... . 94
3 - Coolant exp ansion ta nk .. 97
4 -ATF-dip sti ck " . . . . . . . . . . . .. . 96
5 - Power assist ed steering flu id r eservoir '
6 Brak e fl uid re se rvo ir .
7 - Wi nd sc reen w ash er c on tainer
8 Battery .
Attention
Particular care should be taken
when working in the engine com
partment!
• Switch off engine. remove ignition key_
•
Pull handbrake on firmly.
• Move gear lever into neutral or
"P" position.
• Allow engine to cool off.
• As long as the engine is at op
erating temperature:
-Do not put your hand into the
radiator fan. it could switch on
suddenly.
-Do not open the radiator cap be
cause the cooling system is
under pressure.
• Avoid causing short circuits in
the electrical system -particu
larly at the battery -.
. .. 96
. .. 99
10 3
100
• If tests have to be ca rried o ut with the engine running. there is an additional dang e r present from rotating parts - e.g . ribbedl V-belts, alternator, ra d iator fan etc. -and fro m the high voltage ignition system.
Attention m ust be paid to the w arn ings given in this Instruction Manual and to the generally ap plicable safety regulations.
When topp ing up fluids one should ensure that they are not mistaken. one for the other, under any circum stances. otherwise serious fu nctional defects will result.
rJjh So that leaks are quickly de(!J!J tected the ground underneath the vehicle should be checked regularly. If spots as caused by oil or other operating fluids can be seen, the vehicle should be taken to the workshop for checking.
91
Page 120 of 156
Downloaded from www.Manualslib.com manuals search engine DO-lT-YOURSELF
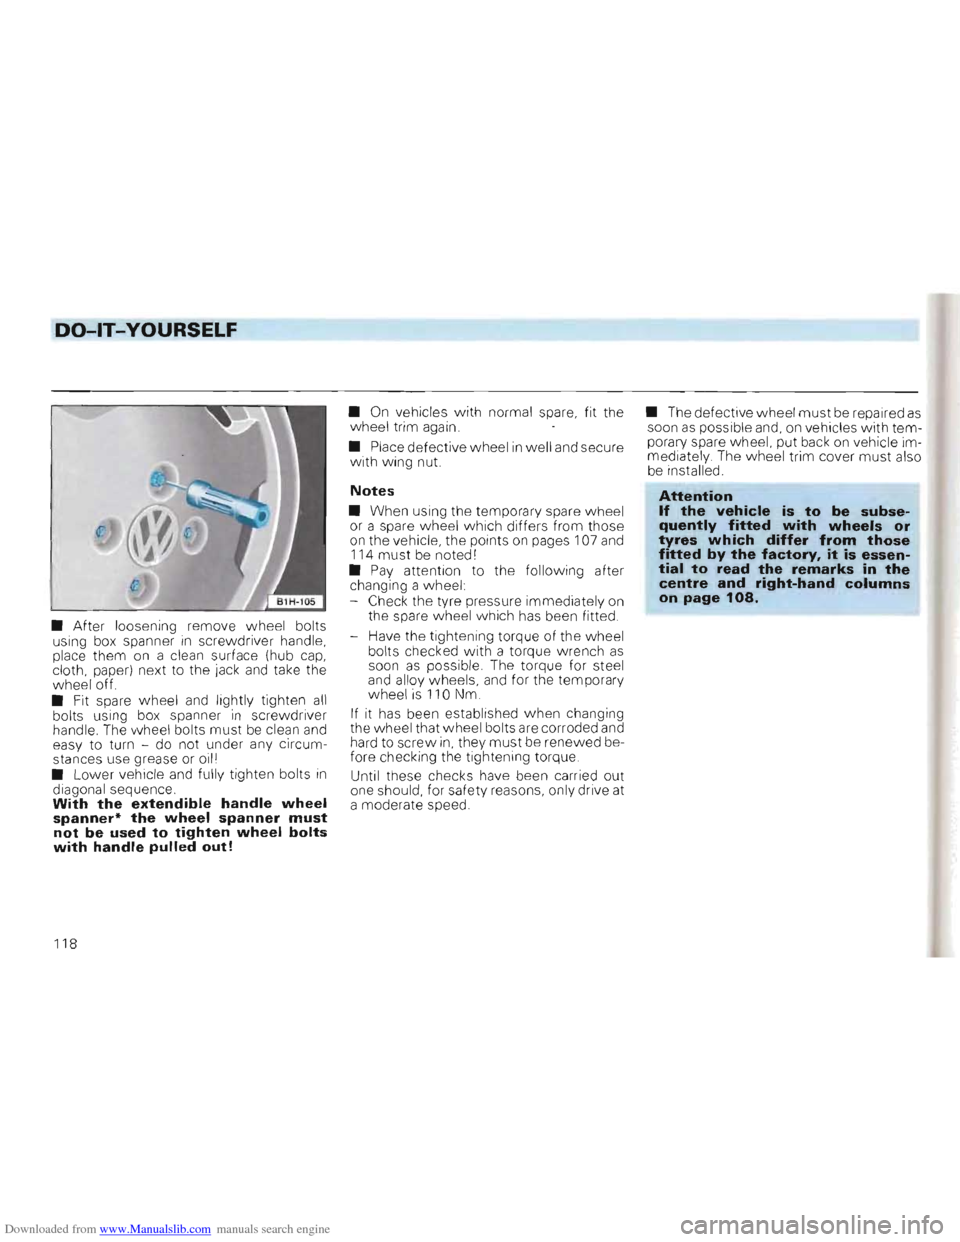
• After loosening remove wheel bolts
using box spanner in screwdriver handle,
place them on a clean surface (hub cap, cloth, paper) next to the jack and take the
wheel off.
• Fit spare w heel
and lightly tighten all bolts using box spanner in screwdriver
handle. The wheel bolts must be clean and
easy to turn -do not under any circum
stances use grease or oill
• L o
wer vehicle and fully tighten bolts in diagonal sequence. With the extendible handle wheel spanner* the wheel spanner must not be used to tighten wheel bolts with handle pulled out!
• On vehicles w ith normal spare, fit the
wheel trim again.
• Place defective wheel
in well and secure
with wing nut.
Notes
• When using the temporary spare wheel
or a spare wheel wh ich differs from those
on the vehicle, the points on pages 107 and
114 must be noted I
• Pay attention to the following after
changing a wheel:
- Check the tyre pressure immediatel y on
the spare wheel which has been fitted .
-
Have the tightening torque of the wheel
bolts checked with a torque wrench as soon as possible. The torque for steel and alloy wheels, and for the temporary
wheel is 110 Nm .
If it has been established when changing
the wheel that wheel bolts are corroded and
hard to screw
in, they must be renewed be
fore checking the tightening torque.
Until these checks have been carried out
one should, for safe ty reasons, only drive at
a moderate speed. •
The defective wheel
must be repaired as soon as possible and, on vehicles with tem
porary spare wheel, put back on vehicle im
mediately. The wheel trim cover must also be installed.
Attention If the vehicle is to be subsequently fitted with wheels or tyres which differ from those fitted by the factory. it is essential to read the remarks in the centre and right-hand columns on page 108.
118
Page 151 of 156
Downloaded from www.Manualslib.com manuals search engine ALPHABETICAL INDEX
E F H Electri
c windows 10.52 Fan . . .. 98 Hand brake 31 Emergency li ght s 51 Filling the tank ...... . . 81 Head restraints .. ............... 24
E me rgency startin g 128
Filter preheating .......... . . 84 Headlight flasher ........ .. . 53 Engine First
aid kit ........... . . . 112 Headlight range control ........... 51 -Code letters 147
Folding/sliding cover 30 Headlig ht washer system
55
- Data 134 Foot mats ............ . 31 Heated rear window 52 -Number 147 Four wheel drive 79 Heating
56 -Oil .. 92 Fresh air filte r ........ . 104 Height adjustable seat. 26
- Oil capacity. 146 Fresh air venti lation
58, 61 Height adjustable steering wheel
35
- Oil change intervals 2.95 Front fogligh ts ........... . .
50 High beams. ........... 48
- Oil consumption
94 Front
seats
25 Horn
4
- Oil level
..... . . .. . . 94 Fuel ........... . . . 82
- Oil pressure 47 -Additives. 83, 84
- Starting/stopping 36 -
Consumption ........ . 72,137 Engine compartment. 91 -Filter preh eating . 84 Identification
data
147
E ngine number. 147 -Gauge
45 Idling speed boost ......... 37 ~Environment -Saving
72 Ignition lock. . . . . . . . . 35
-Battery. . . . . . . . . . . . .
. . . . . . . .. 102 Fuel gauge Fuses. 45
119 Increasing
luggage space
I nertia reel belts ......... 27 14 -Brake fluid. . . . . . . . . . . . . . . . . . .. 99 InSide mirror . . . . . . . . . . . . 12 -Care ofcar. . . . . . . . . . . . . . . . . . .. -Coolant ...................... 85 98 G Inspection intervals
Instruments 95
39
-Driving with low emissions and n
oise......... ............... 72 Gear change marks
Gear stick ....... . . 39, 71 31 Interior
lights 67
-Engine oil .................... -En vironmentally conscious drivin g . . . . . . . . . . . . . . . . . . . . . .. - Exhaust gas system .... . .. . ...
95
72
74
Glove box light .......... .
Glow plugs
Gross vehicle
weight
67,126 37
143
- Filling th e tank ................ 81 -~~.......................... ~ -Maintenance. . . . . . . . . . . . . . . . . .. 2 - Old oil . ....................... 95 - Old tyres .................... 107 - Tyre pressure ................ 105 - Tvres .... . .. . . ............... 107 - Unfeade d fuel. . . . . . . . . . . . . . . .. 83 - Washing th e vehicle ........... 86 Exha..JS. gas system 74
149