1993 VOLKSWAGEN CORRADO height
[x] Cancel search: heightPage 609 of 920

HOW TO USE SYSTEM WIRING DIAGRAMS
Article Text (p. 6)
1993 Volkswagen Corrado
For Volkswagen Technical Site: http://vw.belcom.ru
Copyright © 1998 Mitchell Repair Information Company, LLC
Wednesday, March 22, 2000 09:11PM
Power Windows
Remote Keyless Entry
Evaporative (EVAP) Emissions Canister ........... Engine Performance
EVAP Canister Purge Solenoid .................... Engine Performance
EVAP Canister Vent Solenoid ..................... Engine Performance
Exhaust Gas Recirculation (EGR) Valve ........... Engine Performance
Fuel Tank Vacuum Sensor ......................... Engine Performance
Fog Lights ....................................... Headlight Systems
Daytime Running Lights
Fog Light Relay .................................. Headlight Systems
Daytime Running Lights
Fuel Door Release Solenoid ................. Power Fuel Door Release
Fuel Gauge Sending Unit ................... Analog Instrument Panels
Fuel Injectors .................................. Engine Performance
Fuel Pump ....................................... Engine Performance
Fuel Pump Relay ................................. Engine Performance
Power Distribution
Fuse/Relay Block ................................ Power Distribution
Fusible Links ................................... Power Distribution
Generators & Regulators
Starters
Generator .................................. Generators & Regulators
Engine Performance
Power Distribution
Generic Electronic Module (GEM) ............... Body Control Modules
Electronic Suspension
Glow Plug Relay ................................. Engine Performance
Glow Plugs ...................................... Engine Performance
Grounds ........................................ Ground Distribution
Headlight Door Module .............................. Headlight Doors
Headlight Relay .................................. Headlight Systems
Daytime Running Lights
Headlights ....................................... Headlight Systems
Daytime Running Lights
Heated Oxygen Sensor(s) (HO2S) .................. Engine Performance
Heated Windshield Control Module ................ Heated Windshields
Height Sensor ................................ Electronic Suspension
Horns ..................................... Steering Column Switches
Horn Relay ................................ Steering Column Switches
Idle Air Control (IAC) Motor/Valve .............. Engine Performance
Ignition Coil(s) ................................ Engine Performance
Ignition Key Lock Cylinder ....................... Anti-Theft System
Ignition Module ................................. Engine Performance
Ignition Switch ................................. Power Distribution
Engine Performance
Generators & Regulators
Starters
Illuminated Entry Module .............. Illumination/Interior Lights
Illumination Lights ................... Illumination/Interior Lights
Impact Sensor ............................. Air Bag Restraint System
Inertia Fuel Shutoff Switch ..................... Engine Performance
Inhibit Relay ............................................. Starters
Page 681 of 920

PRE-ALIGNMENT CHECKS
Article Text
1993 Volkswagen Corrado
For Volkswagen Technical Site: http://vw.belcom.ru
Copyright © 1998 Mitchell Repair Information Company, LLC
Wednesday, March 22, 2000 09:21PM
ARTICLE BEGINNING
Wheel Alignment
PRE-ALIGNMENT INSPECTION PROCEDURES
PRE-ALIGNMENT CHECKS
Before making wheel alignment adjustment, perform the
following checks:
1) Tires should be equal in size and runout must not be
excessive. Tires and wheels should be in balance, and inflated to
manufacturer's specifications.
2) Wheel bearings must be properly adjusted. Steering linkage
and suspension must not have excessive looseness. Check for wear in
tie rod ends and ball joints.
3) Steering gear box must not have excessive play. Check and
adjust to manufacturer's specifications.
4) Vehicle must be at curb height with full fuel load and
spare tire in vehicle. No extra load should be on vehicle.
5) Vehicle must be level with floor and with suspension
settled. Jounce front and rear of vehicle several times and allow it
to settle to normal curb height.
6) If steering wheel is not centered with front wheels in
straight-ahead position, correct by shortening one tie rod adjusting
sleeve and lengthening opposite sleeve equal amounts.
7) Ensure wheel lug nuts are tightened to torque
specifications.
END OF ARTICLE
Page 682 of 920

RIDING HEIGHT ADJUSTMENT
Article Text
1993 Volkswagen Corrado
For Volkswagen Technical Site: http://vw.belcom.ru
Copyright © 1998 Mitchell Repair Information Company, LLC
Wednesday, March 22, 2000 09:22PM
ARTICLE BEGINNING
1993 WHEEL ALIGNMENT
Volkswagen Specifications & Procedures
All Models
* PLEASE READ THIS FIRST *
NOTE: Prior to performing wheel alignment, perform preliminary
visual and mechanical inspection of wheels, tires and
suspension components. See PRE-ALIGNMENT INSTRUCTIONS in
WHEEL ALIGNMENT THEORY/OPERATION article in the
GENERAL INFORMATION section.
RIDING HEIGHT ADJUSTMENT
NOTE: On vehicles with electronic chassis controls, all systems
should be functional before attempting riding height or
wheel alignment adjustment.
Before adjusting alignment, ensure difference in riding
height between left and right sides of vehicle is less than 1" (25.4
mm). Riding height must be checked with vehicle on level floor and
tires properly inflated. Bounce vehicle several times and allow
suspension to settle.
Visually inspect vehicle for signs of abnormal height from
front to rear or side to side. Check passenger and luggage
compartments for extra heavy items and remove if present. If
difference in riding height between left and right sides of vehicle is
NOT less than 1" (25.4 mm), check suspension components and repair or
replace as necessary.
On EuroVan models, measure the distance between bolt head of
upper shock absorber mounting and center of bolt head of lower shock
absorber mounting. If distance measured is not 10.9-11.1" (278-280 mm)
turn torsion bar adjustment bolt until correct riding height is
obtained.
END OF ARTICLE
Page 733 of 920

STEERING COLUMN
Article Text (p. 2)
1993 Volkswagen Corrado
For Volkswagen Technical Site: http://vw.belcom.ru
Copyright © 1998 Mitchell Repair Information Company, LLC
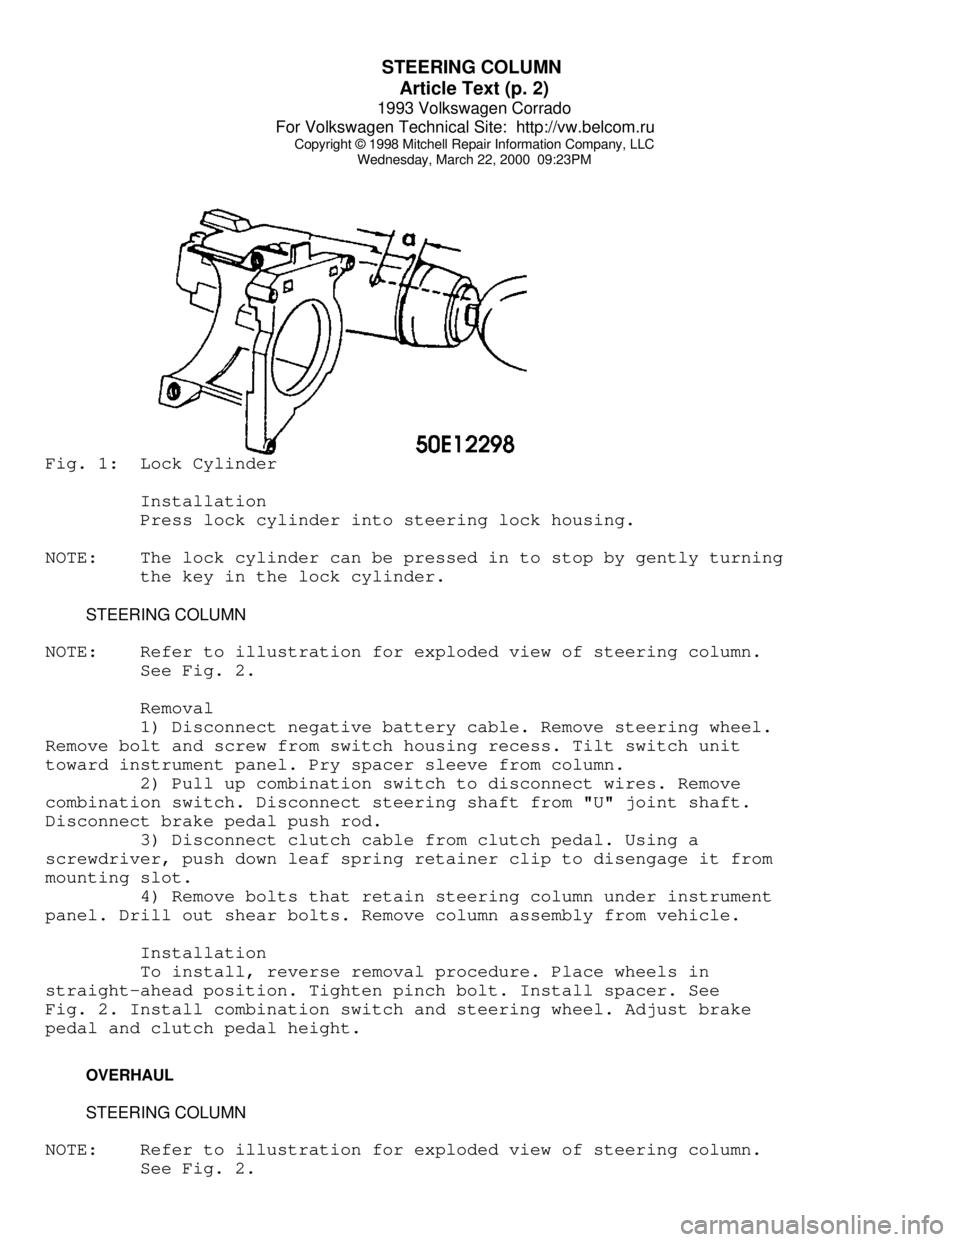
Wednesday, March 22, 2000 09:23PMFig. 1: Lock Cylinder
Installation
Press lock cylinder into steering lock housing.
NOTE: The lock cylinder can be pressed in to stop by gently turning
the key in the lock cylinder.
STEERING COLUMN
NOTE: Refer to illustration for exploded view of steering column.
See Fig. 2.
Removal
1) Disconnect negative battery cable. Remove steering wheel.
Remove bolt and screw from switch housing recess. Tilt switch unit
toward instrument panel. Pry spacer sleeve from column.
2) Pull up combination switch to disconnect wires. Remove
combination switch. Disconnect steering shaft from "U" joint shaft.
Disconnect brake pedal push rod.
3) Disconnect clutch cable from clutch pedal. Using a
screwdriver, push down leaf spring retainer clip to disengage it from
mounting slot.
4) Remove bolts that retain steering column under instrument
panel. Drill out shear bolts. Remove column assembly from vehicle.
Installation
To install, reverse removal procedure. Place wheels in
straight-ahead position. Tighten pinch bolt. Install spacer. See
Fig. 2. Install combination switch and steering wheel. Adjust brake
pedal and clutch pedal height.
OVERHAUL
STEERING COLUMN
NOTE: Refer to illustration for exploded view of steering column.
See Fig. 2.
Page 748 of 920

SUN ROOF - POWER
Article Text
1993 Volkswagen Corrado
For Volkswagen Technical Site: http://vw.belcom.ru
Copyright © 1998 Mitchell Repair Information Company, LLC
Wednesday, March 22, 2000 09:23PM
ARTICLE BEGINNING
1993 ACCESSORIES & EQUIPMENT
Volkswagen Power Sun Roof
Volkswagen; Corrado SLC, EuroVan, Golf, GTI, Jetta, Passat
DESCRIPTION & OPERATION
The power sun roof operates at all times when the ignition is
in the on position. Power sun roof will operate after the ignition is
turned off until driver's door is opened. Power sun roof can also be
closed by inserting key in door lock and holding in the locked
position. If power system fails, sun roof can be operated manually by
removing control panel and rotating crank.
ADJUSTMENTS
NOTE: Adjustment information for EuroVan is not available.
PARALLEL ALIGNMENT
Corrado SLC, Golf, GTI, Jetta & Passat
1) Obtain radio code. Disconnect negative battery cable.
Using Headliner Trim Remover (3195), disengage headliner trim frame
from guide rails and push toward rear as far as possible. See Fig. 5
or 7.
2) Pry off interior light. Remove sun roof cable drive cover.
Remove cable drive mounting screws. Lower pinion drive until drive
pinion no longer meshes with cables.
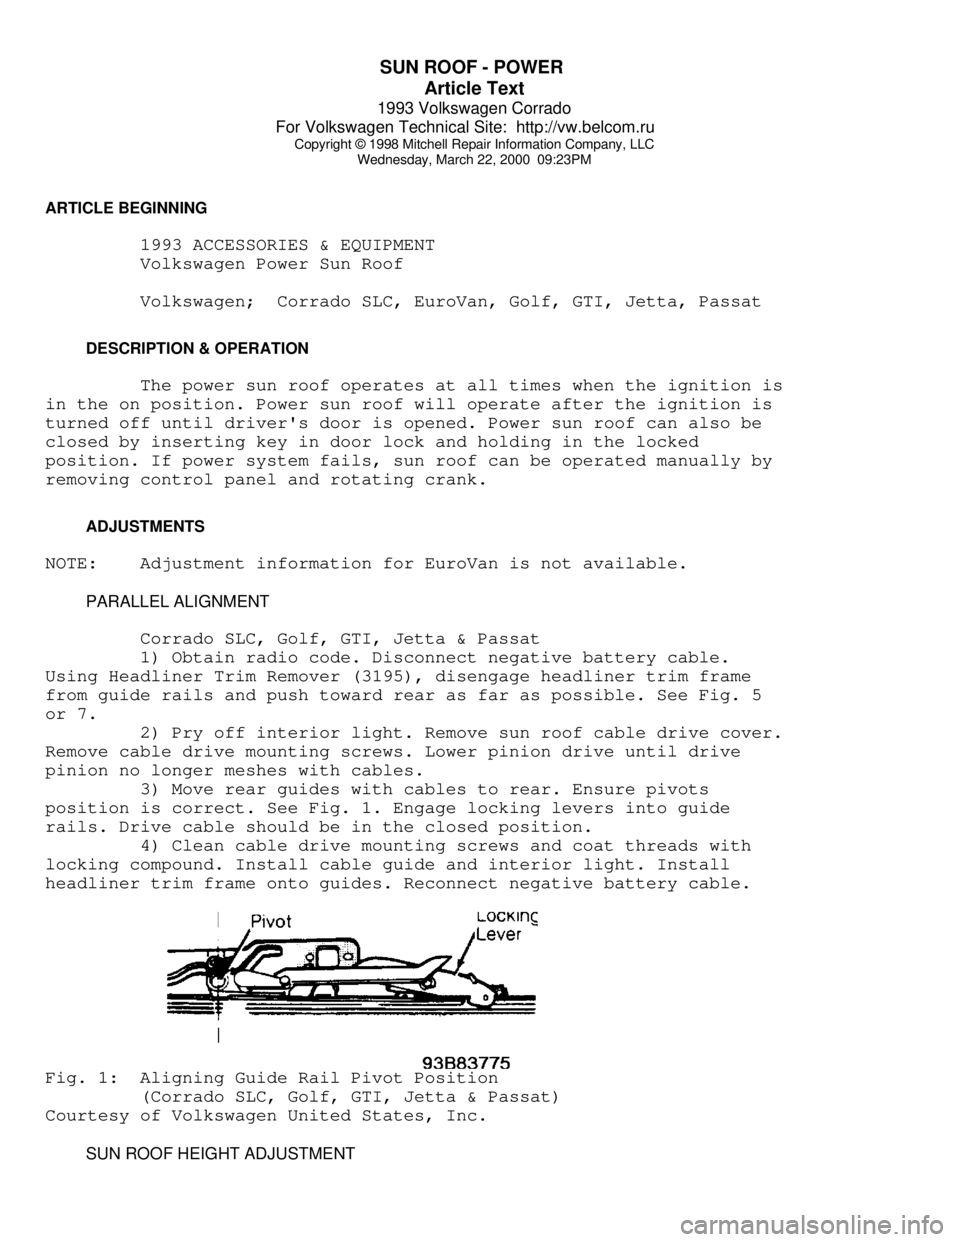
3) Move rear guides with cables to rear. Ensure pivots
position is correct. See Fig. 1. Engage locking levers into guide
rails. Drive cable should be in the closed position.
4) Clean cable drive mounting screws and coat threads with
locking compound. Install cable guide and interior light. Install
headliner trim frame onto guides. Reconnect negative battery cable.Fig. 1: Aligning Guide Rail Pivot Position
(Corrado SLC, Golf, GTI, Jetta & Passat)
Courtesy of Volkswagen United States, Inc.
SUN ROOF HEIGHT ADJUSTMENT
Page 749 of 920

SUN ROOF - POWER
Article Text (p. 2)
1993 Volkswagen Corrado
For Volkswagen Technical Site: http://vw.belcom.ru
Copyright © 1998 Mitchell Repair Information Company, LLC
Wednesday, March 22, 2000 09:23PM
Corrado SLC, Golf, GTI, Jetta & Passat
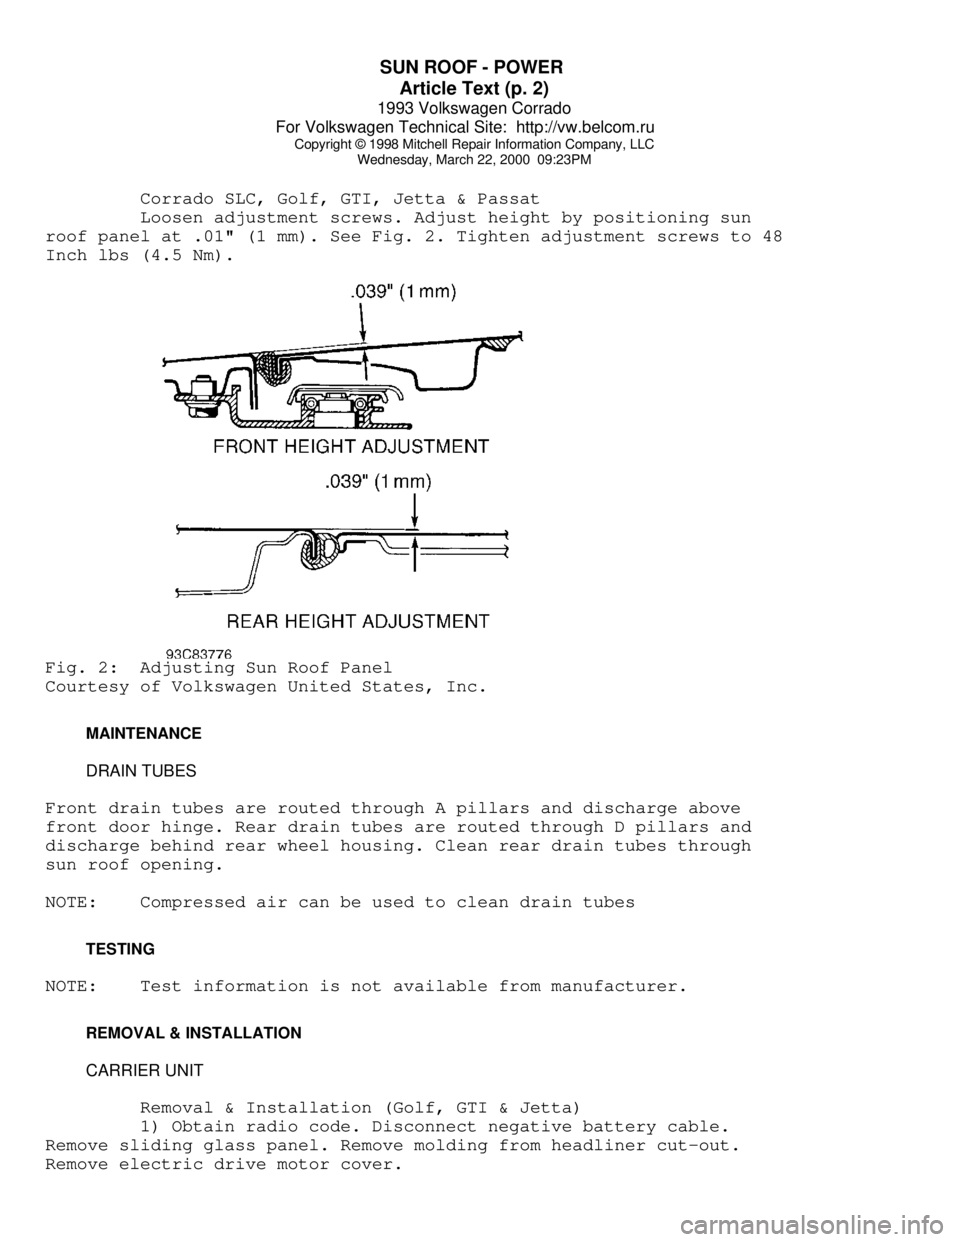
Loosen adjustment screws. Adjust height by positioning sun
roof panel at .01" (1 mm). See Fig. 2. Tighten adjustment screws to 48
Inch lbs (4.5 Nm).Fig. 2: Adjusting Sun Roof Panel
Courtesy of Volkswagen United States, Inc.
MAINTENANCE
DRAIN TUBES
Front drain tubes are routed through A pillars and discharge above
front door hinge. Rear drain tubes are routed through D pillars and
discharge behind rear wheel housing. Clean rear drain tubes through
sun roof opening.
NOTE: Compressed air can be used to clean drain tubes
TESTING
NOTE: Test information is not available from manufacturer.
REMOVAL & INSTALLATION
CARRIER UNIT
Removal & Installation (Golf, GTI & Jetta)
1) Obtain radio code. Disconnect negative battery cable.
Remove sliding glass panel. Remove molding from headliner cut-out.
Remove electric drive motor cover.
Page 815 of 920

TROUBLE SHOOTING - BASIC PROCEDURES
Article Text (p. 24)
1993 Volkswagen Corrado
For Volkswagen Technical Site: http://vw.belcom.ru
Copyright © 1998 Mitchell Repair Information Company, LLC
Wednesday, March 22, 2000 09:26PM
to be specific to any unique situation or individual vehicle
configuration. The purpose of this Trouble Shooting
information is to provide a list of common causes to
problem symptoms. For model-specific Trouble Shooting,
refer to SUBJECT, DIAGNOSTIC, or TESTING articles available
in the section(s) you are accessing.
BASIC FWD AXLE SHAFTS & CV JOINTS TROUBLE SHOOTING CHARTÄÄÄÄÄÄÄÄÄÄÄÄÄÄÄÄÄÄÄÄÄÄÄÄÄÄÄÄÄÄÄÄÄÄÄÄÄÄÄÄÄÄÄÄÄÄÄÄÄÄÄÄÄÄÄÄÄÄÄÄÄÄÄÄÄCONDITION POSSIBLE CAUSE
ÄÄÄÄÄÄÄÄÄÄÄÄÄÄÄÄÄÄÄÄÄÄÄÄÄÄÄÄÄÄÄÄÄÄÄÄÄÄÄÄÄÄÄÄÄÄÄÄÄÄÄÄÄÄÄÄÄÄÄÄÄÄÄÄÄGrease Leaks CV boot torn or cracked
ÄÄÄÄÄÄÄÄÄÄÄÄÄÄÄÄÄÄÄÄÄÄÄÄÄÄÄÄÄÄÄÄÄÄÄÄÄÄÄÄÄÄÄÄÄÄÄÄÄÄÄÄÄÄÄÄÄÄÄÄÄÄÄÄÄClicking Noise on Cornering Damaged outer CV
ÄÄÄÄÄÄÄÄÄÄÄÄÄÄÄÄÄÄÄÄÄÄÄÄÄÄÄÄÄÄÄÄÄÄÄÄÄÄÄÄÄÄÄÄÄÄÄÄÄÄÄÄÄÄÄÄÄÄÄÄÄÄÄÄÄClunk Noise on Acceleration Damaged inner CV
ÄÄÄÄÄÄÄÄÄÄÄÄÄÄÄÄÄÄÄÄÄÄÄÄÄÄÄÄÄÄÄÄÄÄÄÄÄÄÄÄÄÄÄÄÄÄÄÄÄÄÄÄÄÄÄÄÄÄÄÄÄÄÄÄÄVibration or Shudder Sticking, damaged or worn CV
on Acceleration Misalignment or spring height
ÄÄÄÄÄÄÄÄÄÄÄÄÄÄÄÄÄÄÄÄÄÄÄÄÄÄÄÄÄÄÄÄÄÄÄÄÄÄÄÄÄÄÄÄÄÄÄÄÄÄÄÄÄÄÄÄÄÄÄÄÄÄÄÄÄ FUEL INJECTION TROUBLE SHOOTING
WARNING: This is GENERAL information. This article is not intended
to be specific to any unique situation or individual vehicle
configuration. The purpose of this Trouble Shooting
information is to provide a list of common causes to
problem symptoms. For model-specific Trouble Shooting,
refer to SUBJECT, DIAGNOSTIC, or TESTING articles available
in the section(s) you are accessing.
BASIC FUEL INJECTION TROUBLE SHOOTING CHART
ÄÄÄÄÄÄÄÄÄÄÄÄÄÄÄÄÄÄÄÄÄÄÄÄÄÄÄÄÄÄÄÄÄÄÄÄÄÄÄÄÄÄÄÄÄÄÄÄÄÄÄÄÄÄÄÄÄÄÄÄÄÄÄÄÄÄÄÄÄÄCONDITION POSSIBLE CAUSE CORRECTION
ÄÄÄÄÄÄÄÄÄÄÄÄÄÄÄÄÄÄÄÄÄÄÄÄÄÄÄÄÄÄÄÄÄÄÄÄÄÄÄÄÄÄÄÄÄÄÄÄÄÄÄÄÄÄÄÄÄÄÄÄÄÄÄÄÄÄÄÄÄÄEngine Won't Cold start valve inoperative Test valve and
Start (Cranks circuit
Normally)
Poor connection;vacuum or Check vacuum and
wiring electrical
connections
Contaminated fuel Test fuel for water
or alcohol
Defective fuel pump relay Test relay and
or circuit wiring
Battery too low Charge and test
battery
Low fuel pressure Test pressure regul-
Page 856 of 920

TROUBLE SHOOTING - BASIC PROCEDURES
Article Text (p. 65)
1993 Volkswagen Corrado
For Volkswagen Technical Site: http://vw.belcom.ru
Copyright © 1998 Mitchell Repair Information Company, LLC
Wednesday, March 22, 2000 09:26PM
problem symptoms. For model-specific Trouble Shooting,
refer to SUBJECT, DIAGNOSTIC, or TESTING articles available
in the section(s) you are accessing.
NOTE: Diesel engines mechanical diagnosis is the same as gasoline
engines for items such as noisy valves, bearings, pistons,
etc. The following trouble shooting covers only items
pertaining to diesel engines.
VACUUM PUMP (DIESEL) TROUBLE SHOOTING CHARTÄÄÄÄÄÄÄÄÄÄÄÄÄÄÄÄÄÄÄÄÄÄÄÄÄÄÄÄÄÄÄÄÄÄÄÄÄÄÄÄÄÄÄÄÄÄÄÄÄÄÄÄÄÄÄÄÄÄÄÄÄÄÄÄÄÄÄÄÄÄCONDITION POSSIBLE CAUSE CORRECTION
ÄÄÄÄÄÄÄÄÄÄÄÄÄÄÄÄÄÄÄÄÄÄÄÄÄÄÄÄÄÄÄÄÄÄÄÄÄÄÄÄÄÄÄÄÄÄÄÄÄÄÄÄÄÄÄÄÄÄÄÄÄÄÄÄÄÄÄÄÄÄExcessive Noise Loose pump-to-drive Tighten screws
assembly screws
Loose tube on pump assembly Tighten tube
Valves not functioning Replace valves
properly
ÄÄÄÄÄÄÄÄÄÄÄÄÄÄÄÄÄÄÄÄÄÄÄÄÄÄÄÄÄÄÄÄÄÄÄÄÄÄÄÄÄÄÄÄÄÄÄÄÄÄÄÄÄÄÄÄÄÄÄÄÄÄÄÄÄÄÄÄÄÄOil Leakage Loose end plug Tighten end plug
Bad seal crimp Remove and re-crimp
seal
ÄÄÄÄÄÄÄÄÄÄÄÄÄÄÄÄÄÄÄÄÄÄÄÄÄÄÄÄÄÄÄÄÄÄÄÄÄÄÄÄÄÄÄÄÄÄÄÄÄÄÄÄÄÄÄÄÄÄÄÄÄÄÄÄÄÄÄÄÄÄ WHEEL ALIGNMENT TROUBLE SHOOTING
WARNING: This is GENERAL information. This article is not intended
to be specific to any unique situation or individual vehicle
configuration. The purpose of this Trouble Shooting
information is to provide a list of common causes to
problem symptoms. For model-specific Trouble Shooting,
refer to SUBJECT, DIAGNOSTIC, or TESTING articles available
in the section(s) you are accessing.
BASIC WHEEL ALIGNMENT TROUBLE SHOOTING CHART
ÄÄÄÄÄÄÄÄÄÄÄÄÄÄÄÄÄÄÄÄÄÄÄÄÄÄÄÄÄÄÄÄÄÄÄÄÄÄÄÄÄÄÄÄÄÄÄÄÄÄÄÄÄÄÄÄÄÄÄÄÄÄÄÄÄÄÄÄÄÄCONDITION POSSIBLE CAUSE CORRECTION
ÄÄÄÄÄÄÄÄÄÄÄÄÄÄÄÄÄÄÄÄÄÄÄÄÄÄÄÄÄÄÄÄÄÄÄÄÄÄÄÄÄÄÄÄÄÄÄÄÄÄÄÄÄÄÄÄÄÄÄÄÄÄÄÄÄÄÄÄÄÄPremature Tire Improper tire inflation Check tire pressure
Wear
Front alignment out of See ALIGNMENT SPECS in
tolerance WHEEL ALIGNMENT section
Suspension components worn See SUSPENSION section
Steering system components See STEERING section
worn
Improper standing height See WHEEL ALIGNMENT
Uneven or sagging springs See SUSPENSION section