1993 VOLKSWAGEN CORRADO transmission fluid
[x] Cancel search: transmission fluidPage 722 of 920

SCHEDULED SERVICES
Article Text (p. 40)
1993 Volkswagen Corrado
For Volkswagen Technical Site: http://vw.belcom.ru
Copyright © 1998 Mitchell Repair Information Company, LLC
Wednesday, March 22, 2000 09:22PM
Engine Oil (1)
Ambient Temperatures
Greater Than 50øF (10øC) .............. SAE 20W-50 API SF/CD
14
øF To 50øF (-10øC To +10øC) ......... SAE 10W-40 API SF/CD
Less Than 14
øF (-10ø C) ................ SAE 5W-30 API SF/CD
Brake Fluid ........................ SAE J1703 (DOT 3 Or DOT 4)
Power Steering Fluid ......................... VW Hydraulic Oil
(G 002000) Or Equivalent
Automatic Transmission ........... Dexron-IIE ATF Or Equivalent
Manual Transaxle .......................... SAE 80W API GL-4 Or
SAE 75W-90 (G50 Synthetic Gear Oil)
Final Drive (A/T & M/T)
(Differential) .......... SAE 75W-90 (G50 Synthetic Gear Oil)
Wheel Bearings .................... NLGI Grade 2 Category GC-LB
Drive Shaft U-Joints .............. NLGI Grade 2 Category GC-LB
Steering Linkage (2)(3) ........... NLGI Grade 2 Category GC-LB
Ball Joints (2)(4) ................ NLGI Grade 2 Category GC-LB
Weatherstrip ....................... Dielectric Silicone Grease
(1) - SAE 15W-40 or 20W-40 engine oil is recommended for extreme
conditions or extended highway operation.
(2) - Use low pressure grease gun to prevent seal damage.
(3) - Fill until lubricant squeezes out from the base of seals.
(4) - Fill ball joint until seal starts to swell.
ÄÄÄÄÄÄÄÄÄÄÄÄÄÄÄÄÄÄÄÄÄÄÄÄÄÄÄÄÄÄÄÄÄÄÄÄÄÄÄÄÄÄÄÄÄÄÄÄÄÄÄÄÄÄÄÄÄÄÄÄÄÄÄÄÄ FLUID CAPACITIES
FLUID CAPACITIES TABLE
ÄÄÄÄÄÄÄÄÄÄÄÄÄÄÄÄÄÄÄÄÄÄÄÄÄÄÄÄÄÄÄÄÄÄÄÄÄÄÄÄÄÄÄÄÄÄÄÄÄÄÄÄÄÄÄÄÄÄÄÄÄÄÄÄÄApplication Quantity (1)
A/C System R-12 Refrigerant
1990-92 (up to 7/92) ............................. 37-40 Ozs.
A/C System R-134a Refrigerant (2)
1993-94 (from 7/92) ........................... 28.2-31.8 Ozs.
Cooling System
4-Cyl. ...................................... 6.8 Qts. (6.5L)
V6 .......................................... 9.1 Qts. (8.6L)
Engine Oil (3)
4-Cyl. ...................................... 4.3 Qts. (4.0L)
V6 .......................................... 6.3 Qts. (6.0L)
Fuel Tank
4-Cyl. ..................................... 14.5 Gals. (55L)
V6 ......................................... 18.5 Gals. (55L)
Automatic Transmission
Fluid Change ................................ 3.2 Qts. (3.0L)
Overhaul .................................... 5.9 Qts. (5.6L)
Manual Transmission ........................... 2.1 Qts. (2.0L)
Final Drive
Differential (A/T) (4) ....................... 0.8 Qt. (.75L)
Page 746 of 920

STEERING GEAR - POWER RACK & PINION
Article Text (p. 3)
1993 Volkswagen Corrado
For Volkswagen Technical Site: http://vw.belcom.ru
Copyright © 1998 Mitchell Repair Information Company, LLC
Wednesday, March 22, 2000 09:23PM
Remove rack and pinion assembly. See POWER RACK & PINION
under REMOVAL & INSTALLATION. Loosen lock nut. Turn adjuster bolt
until pinion shaft can be turned by hand without binding. Hold
adjuster bolt in position while tightening lock nut.
REMOVAL & INSTALLATION
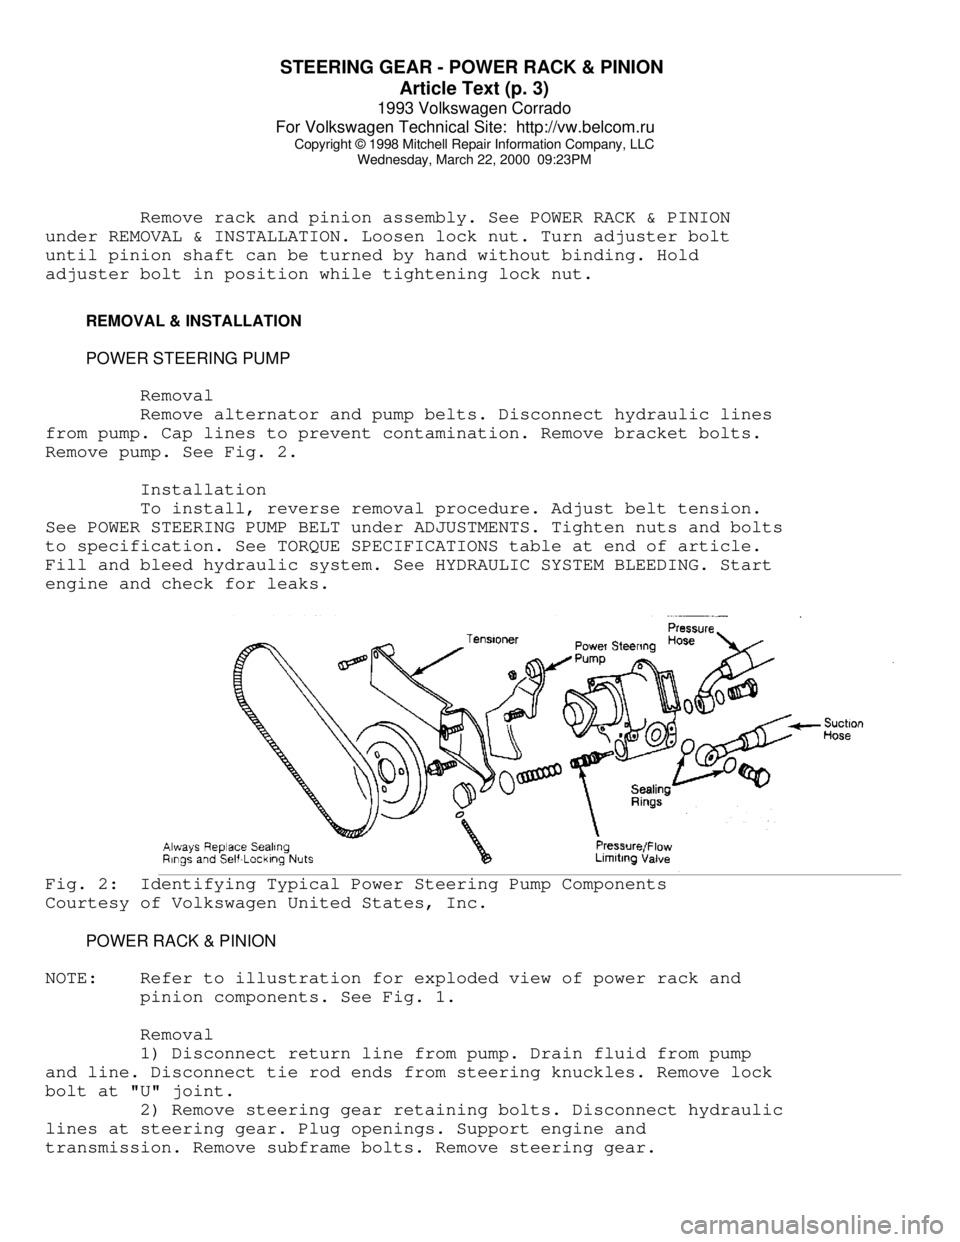
POWER STEERING PUMP
Removal
Remove alternator and pump belts. Disconnect hydraulic lines
from pump. Cap lines to prevent contamination. Remove bracket bolts.
Remove pump. See Fig. 2.
Installation
To install, reverse removal procedure. Adjust belt tension.
See POWER STEERING PUMP BELT under ADJUSTMENTS. Tighten nuts and bolts
to specification. See TORQUE SPECIFICATIONS table at end of article.
Fill and bleed hydraulic system. See HYDRAULIC SYSTEM BLEEDING. Start
engine and check for leaks.Fig. 2: Identifying Typical Power Steering Pump Components
Courtesy of Volkswagen United States, Inc.
POWER RACK & PINION
NOTE: Refer to illustration for exploded view of power rack and
pinion components. See Fig. 1.
Removal
1) Disconnect return line from pump. Drain fluid from pump
and line. Disconnect tie rod ends from steering knuckles. Remove lock
bolt at "U" joint.
2) Remove steering gear retaining bolts. Disconnect hydraulic
lines at steering gear. Plug openings. Support engine and
transmission. Remove subframe bolts. Remove steering gear.
Page 787 of 920

TRANSMISSION REMOVAL & INSTALLATION - M/T
Article Text (p. 3)
1993 Volkswagen Corrado
For Volkswagen Technical Site: http://vw.belcom.ru
Copyright © 1998 Mitchell Repair Information Company, LLC
Wednesday, March 22, 2000 09:25PM
Wipe off excess grease. If flywheel was removed, reinstall on engine.
Using flywheel lock or similar device, hold engine from turning.
Tighten flywheel bolts to specification. See TORQUE SPECIFICATIONS
table at end of article.
2) Mount clutch disk and pressure plate on engine. Install
pressure plate bolts finger tight. Using Clutch Centering Plug (3190),
align clutch disk and pilot bushing holes. Tighten pressure plate
bolts to specification using a crisscross pattern.
3) To install transaxle, reverse removal procedure. Plug
transaxle openings to prevent contamination or fluid loss. Push clutch
release lever rearward and temporarily install mounting pin or an 8 x
22 mm bolt through pivot arm. Remove pin or bolt after installation is
complete.
4) Ensure gear carrier housing cover fits properly. To
install gearshift lever cables, see GEARSHIFT LEVER CABLES under
ADJUSTMENTS. Tighten nuts and bolts to specification. See TORQUE
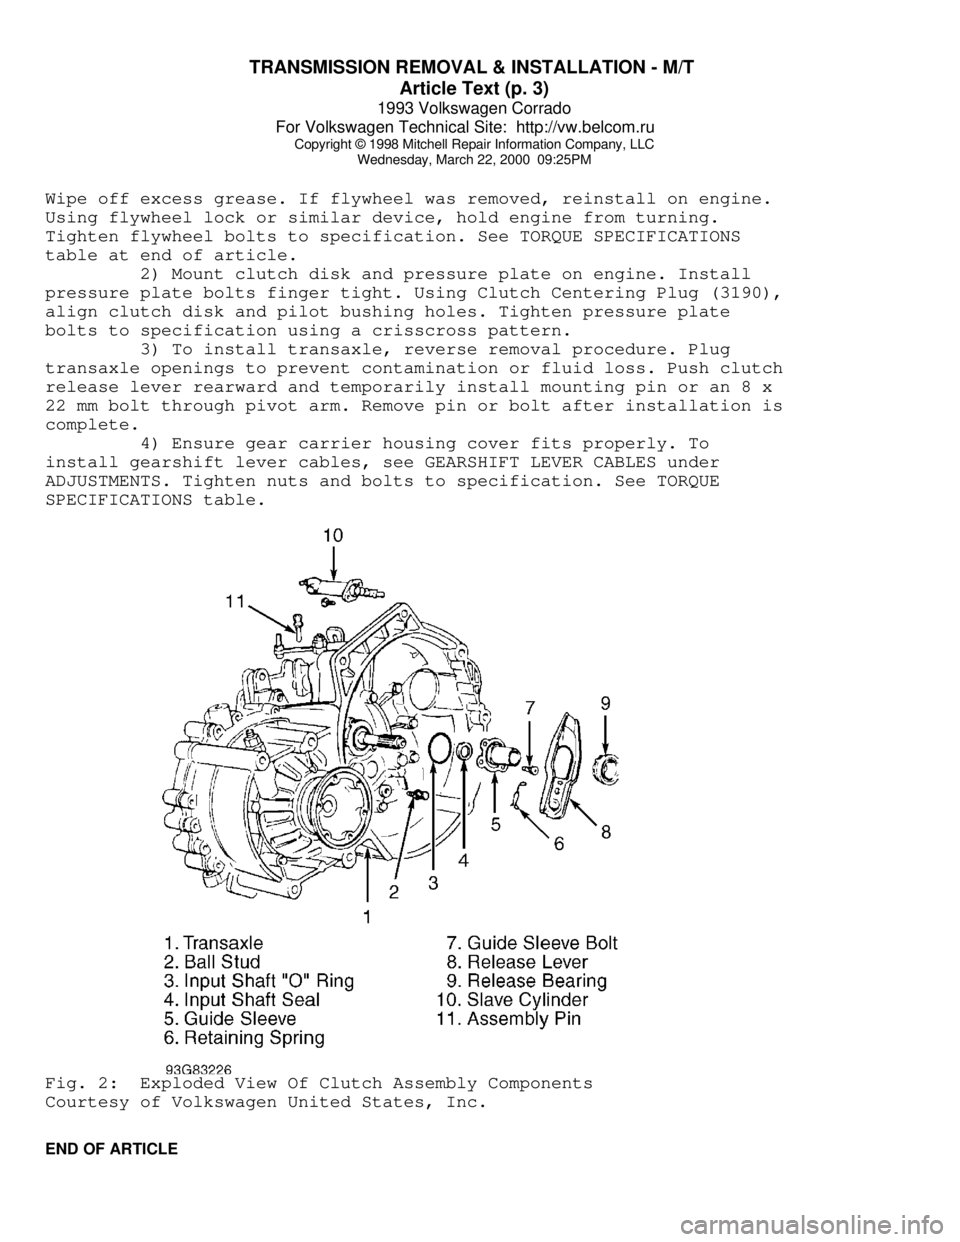
SPECIFICATIONS table.Fig. 2: Exploded View Of Clutch Assembly Components
Courtesy of Volkswagen United States, Inc.
END OF ARTICLE
Page 788 of 920

TRANSMISSION SERVICING - A/T
Article Text
1993 Volkswagen Corrado
For Volkswagen Technical Site: http://vw.belcom.ru
Copyright © 1998 Mitchell Repair Information Company, LLC
Wednesday, March 22, 2000 09:25PM
ARTICLE BEGINNING
TRANSMISSION SERVICING
Volkswagen Transmission Servicing - Automatic
Corrado SLC, EuroVan, Passat
IDENTIFICATION
AUTOMATIC TRANSMISSION APPLICATIONS TABLEÄÄÄÄÄÄÄÄÄÄÄÄÄÄÄÄÄÄÄÄÄÄÄÄÄÄÄÄÄÄÄÄÄÄÄÄÄÄÄÄÄÄÄÄÄÄÄÄÄÄÄÄÄÄÄÄÄÄÄÄModel Transmission
Corrado SLC & Passat ........................... Model 096
EuroVan ........................................ Model 098
ÄÄÄÄÄÄÄÄÄÄÄÄÄÄÄÄÄÄÄÄÄÄÄÄÄÄÄÄÄÄÄÄÄÄÄÄÄÄÄÄÄÄÄÄÄÄÄÄÄÄÄÄÄÄÄÄÄÄÄÄ LUBRICATION
SERVICE INTERVALS
Check fluid level at each oil change. Change fluid every 30,
000 miles under severe driving conditions. On Corrado SLC and Passat,
replace filter (if equipped) every 30,000 miles.
CHECKING FLUID LEVEL
Transmission
Park vehicle on level surface, with transmission at normal
operating temperature. Set selector lever to Park or Neutral. Apply
parking brake. Allow engine to idle. Remove dipstick, wipe clean, and
reinsert. Remove dipstick. Fluid level should be between marks on
dipstick.
Final Drive
Oil level in the final drive does not need to be checked.
RECOMMENDED FLUID
Transmission
Use Dexron or Dexron-II ATF.
Final Drive
Use G50 or SAE 75W-90.
FLUID CAPACITY
TRANSMISSION REFILL CAPACITIES TABLE
ÄÄÄÄÄÄÄÄÄÄÄÄÄÄÄÄÄÄÄÄÄÄÄÄÄÄÄÄÄÄÄÄÄÄÄÄÄÄÄÄÄÄÄÄÄÄÄÄÄÄÄÄÄÄÄÄÄÄÄÄ Refill Dry Fill
Application Qts. (L) Qts. (L)
Page 789 of 920

TRANSMISSION SERVICING - A/T
Article Text (p. 2)
1993 Volkswagen Corrado
For Volkswagen Technical Site: http://vw.belcom.ru
Copyright © 1998 Mitchell Repair Information Company, LLC
Wednesday, March 22, 2000 09:25PM
EuroVan, Corrado SLC
& Passat ................. 3.2 (3.0) ....... 5.9 (5.6)ÄÄÄÄÄÄÄÄÄÄÄÄÄÄÄÄÄÄÄÄÄÄÄÄÄÄÄÄÄÄÄÄÄÄÄÄÄÄÄÄÄÄÄÄÄÄÄÄÄÄÄÄÄÄÄÄÄÄÄÄFINAL DRIVE REFILL CAPACITIES TABLE
ÄÄÄÄÄÄÄÄÄÄÄÄÄÄÄÄÄÄÄÄÄÄÄÄÄÄÄÄÄÄÄÄÄÄÄÄÄÄÄÄÄÄÄÄÄÄÄÄÄÄÄÄÄÄÄÄÄÄÄÄModel Qts. (L)
All Models ...................................... .8 (.76)
ÄÄÄÄÄÄÄÄÄÄÄÄÄÄÄÄÄÄÄÄÄÄÄÄÄÄÄÄÄÄÄÄÄÄÄÄÄÄÄÄÄÄÄÄÄÄÄÄÄÄÄÄÄÄÄÄÄÄÄÄ DRAINING & REFILLING
1) Remove transmission protection plate (if necessary).
Remove rear pan bolts. Loosen front pan bolts. Carefully lower pan to
drain as much fluid as possible. Remove oil pan. Pour out remaining
fluid.
2) Remove filter. Clean oil pan. Install new filter. Tighten
filter retaining screws to 71 INCH lbs. (8 N.m). Install oil pan with
new gasket. Tighten oil pan bolts to 89 INCH lbs. (10 N.m).
3) Install protection plate if it was removed. Tighten bolts
to 18 ft. lbs. (25 N.m). Add 3.2 qts. (3.0L) transmission fluid. Check
fluid level. Add if necessary.
ADJUSTMENTS
SELECTOR LEVER CABLE
Corrado SLC, EuroVan & Passat
Set transmission selector to Park. Loosen screw at gear lever
shaft. Set gear lever in Park. Ensure detent engages parking lock.
Tighten screw to 15 ft. lbs. (20 N.m) on Corrado SLC and EuroVan.
Tighten screw to 18 ft. lbs. (25 N.m) on Passat.
NEUTRAL SAFETY SWITCH
Neutral safety switch is located in shift console. Remove
console cover. Adjust switch so that engine starts in Park and Neutral
positions only.
END OF ARTICLE
Page 790 of 920

TRANSMISSION SERVICING - M/T
Article Text
1993 Volkswagen Corrado
For Volkswagen Technical Site: http://vw.belcom.ru
Copyright © 1998 Mitchell Repair Information Company, LLC
Wednesday, March 22, 2000 09:25PM
ARTICLE BEGINNING
1993 TRANSMISSION SERVICING
Volkswagen Manual Transmission
Volkswagen; Corrado SLC, Passat
IDENTIFICATION
MANUAL TRANSAXLE APPLICATIONS TABLEÄÄÄÄÄÄÄÄÄÄÄÄÄÄÄÄÄÄÄÄÄÄÄÄÄÄÄÄÄÄÄÄÄÄÄÄÄÄÄÄÄÄÄÄÄÄÄÄÄÄÄÄÄÄÄÄÄÄÄÄModel Transaxle
Corrado .......................... 5-Speed - 02A Transaxle
Passat ........................... 5-Speed - 02A Transaxle
ÄÄÄÄÄÄÄÄÄÄÄÄÄÄÄÄÄÄÄÄÄÄÄÄÄÄÄÄÄÄÄÄÄÄÄÄÄÄÄÄÄÄÄÄÄÄÄÄÄÄÄÄÄÄÄÄÄÄÄÄ LUBRICATION
SERVICE INTERVALS
No oil changes are required.
CHECKING FLUID LEVEL
Manufacturer states that fluid level does not have to be
checked, and does not specify a procedure for doing so.
RECOMMENDED FLUID
Use API GL-4, SAE 80W or 80W-90.
FLUID CAPACITIES
TRANSAXLE REFILL CAPACITIES TABLE
ÄÄÄÄÄÄÄÄÄÄÄÄÄÄÄÄÄÄÄÄÄÄÄÄÄÄÄÄÄÄÄÄÄÄÄÄÄÄÄÄÄÄÄÄÄÄÄÄÄÄTransaxle Qts. (L)
02A .................................. 2.1 (2.0)
02B .................................. 2.9 (3.1)
013 & 014 ............................ 1.8 (1.7)
020 .................................. 2.1 (2.0)
ÄÄÄÄÄÄÄÄÄÄÄÄÄÄÄÄÄÄÄÄÄÄÄÄÄÄÄÄÄÄÄÄÄÄÄÄÄÄÄÄÄÄÄÄÄÄÄÄÄÄ ADJUSTMENTS
GEARSHIFT LINKAGE
1) Place gearshift lever in Neutral position. Remove knob and
boot. Loosen bolt "A" and nut "B" sufficiently so that operating
cables move freely in centering holes. See Fig. 1. Install Shift