1993 CHEVROLET PLYMOUTH ACCLAIM coolant temperature
[x] Cancel search: coolant temperaturePage 1717 of 2438
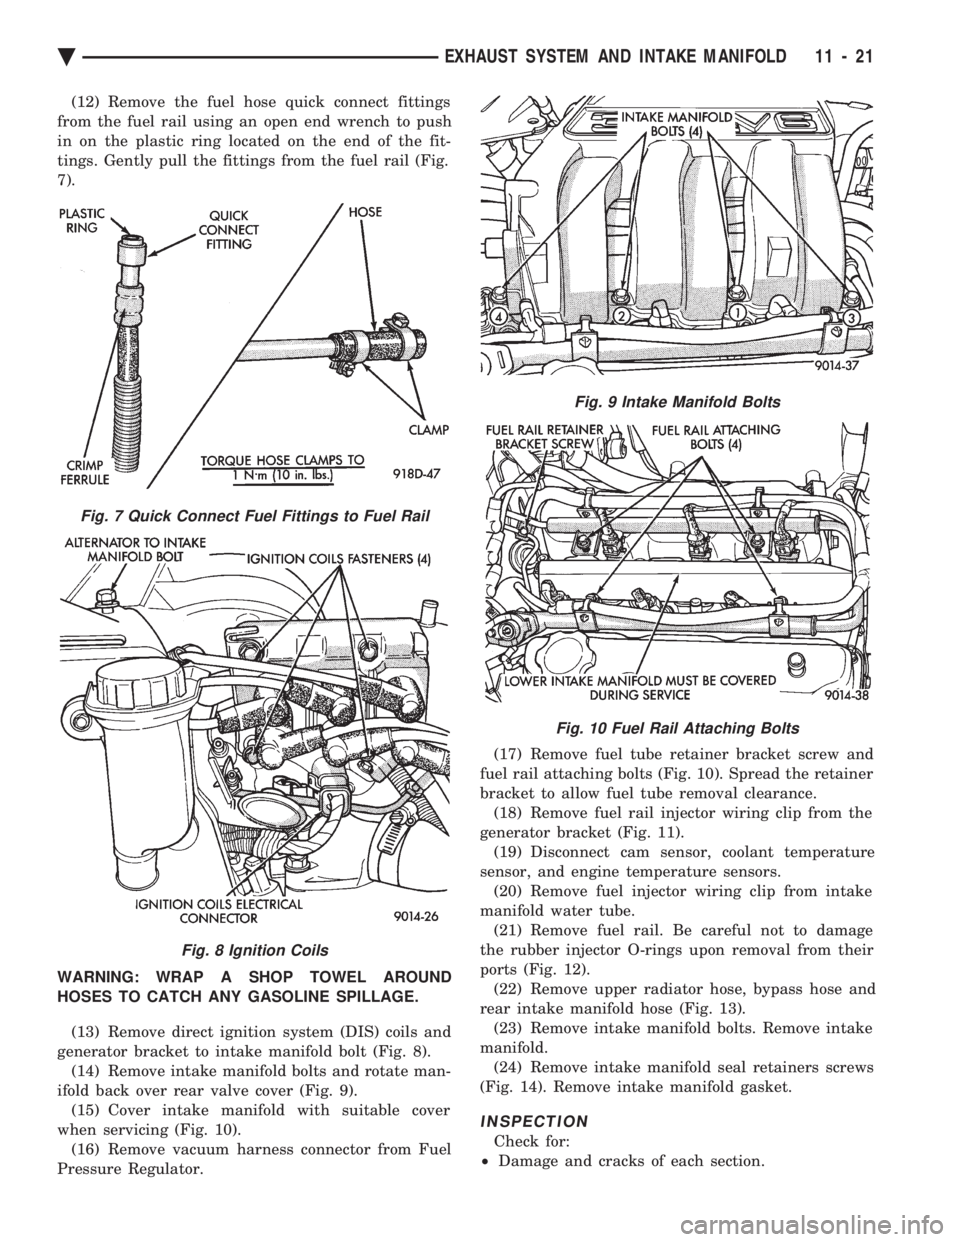
(12) Remove the fuel hose quick connect fittings
from the fuel rail using an open end wrench to push
in on the plastic ring located on the end of the fit-
tings. Gently pull the fittings from the fuel rail (Fig.
7).
WARNING: WRAP A SHOP TOWEL AROUND
HOSES TO CATCH ANY GASOLINE SPILLAGE.
(13) Remove direct ignition system (DIS) coils and
generator bracket to intake manifold bolt (Fig. 8). (14) Remove intake manifold bolts and rotate man-
ifold back over rear valve cover (Fig. 9). (15) Cover intake manifold with suitable cover
when servicing (Fig. 10). (16) Remove vacuum harness connector from Fuel
Pressure Regulator. (17) Remove fuel tube retainer bracket screw and
fuel rail attaching bolts (Fig. 10). Spread the retainer
bracket to allow fuel tube removal clearance. (18) Remove fuel rail injector wiring clip from the
generator bracket (Fig. 11). (19) Disconnect cam sensor, coolant temperature
sensor, and engine temperature sensors. (20) Remove fuel injector wiring clip from intake
manifold water tube. (21) Remove fuel rail. Be careful not to damage
the rubber injector O-rings upon removal from their
ports (Fig. 12). (22) Remove upper radiator hose, bypass hose and
rear intake manifold hose (Fig. 13). (23) Remove intake manifold bolts. Remove intake
manifold. (24) Remove intake manifold seal retainers screws
(Fig. 14). Remove intake manifold gasket.
INSPECTION
Check for:
² Damage and cracks of each section.
Fig. 7 Quick Connect Fuel Fittings to Fuel Rail
Fig. 8 Ignition Coils
Fig. 9 Intake Manifold Bolts
Fig. 10 Fuel Rail Attaching Bolts
Ä EXHAUST SYSTEM AND INTAKE MANIFOLD 11 - 21
Page 1719 of 2438
(7) Put the tip of each injector into their ports.
Push the assembly into place until the injectors are
seated in the ports (Fig. 12). (8) Install the (4) fuel rail attaching bolts and
tighten to 22 N Im (200 in. lbs.) torque (Fig. 10).
(9) Install fuel tube retaining bracket screw and
tighten to 4 N Im (35 in. lbs.) torque (Fig. 10).
(10) Reconnect cam sensor, coolant temperature
sensor and engine temperature sensors (Fig. 11). (11) Install fuel injector harness wiring clips on
the generator bracket and intake manifold water
tube (Fig. 11). (12) Connect fuel pressure regulator vacuum line.
(13) Remove covering on lower intake manifold
and clean surface. (14) Place intake manifold gasket on lower mani-
fold. Put upper manifold into place and install bolts
finger tight. (15) Install the generator bracket to intake mani-
fold bolt and the cylinder head to intake manifold
strut bolts. Do not torque.
(16) Tighten intake manifold bolts to 28 N Im (250
in. lbs.) torque in the sequence shown in (Fig. 9). (17) Tighten generator bracket to intake manifold
bolt to 54 N Im (40 ft. lbs.) torque (Fig. 8).
(18) Tighten the cylinder head to intake manifold
strut bolts to 54 N Im (40 ft. lbs.) torque (Fig. 5).
(19) Connect ground strap, MAP and heated oxy-
gen sensor electrical connectors (Fig. 6). (20) Connect charge temperature sensor electrical
connector (Fig. 5). (21) Connect vacuum harness to intake plenum
(Fig. 5). (22) Using a new gasket, connect the EGR tube
flange to the intake manifold and tighten to 22 N Im
(200 in. lbs.) torque. (23) Clip wiring harness into the hole in the throt-
tle cable bracket. (24) Connect the wiring connectors to the throttle
position sensor TPS and automatic idle speed AIS
motor (Fig. 4). (25) Connect vacuum harness to throttle body (Fig.
4). (26) Install the direct ignition system DIS coils.
Tighten fasteners to 12 N Im (105 in. lbs.) torque
(Fig. 8). (27) Lubricate the ends of the chassis fuel tubes
with 30 wt oil. Connect fuel supply and return hoses
to chassis fuel tube assembly. pull back on the quick
connect fitting to ensure complete insertion (Fig. 7).
(Refer to Fuel Hoses, Clamps and Quick Connect Fit-
tings in Group 14 Fuel Systems). (28) Install throttle cable (Fig. 3).
(29) Connect fuel injector wiring harness.
(30) Install air cleaner and hose assembly (Fig. 2).
(31) Connect negative battery cable. Fill Cooling
System. See Cooling System, Group 7. (32) With the DRBII Scan Tool use ASD Fuel Sys-
tem Test to pressurize system to check for leaks.
CAUTION: When using the ASD Fuel System Test,
the Auto Shutdown (ASD) relay will remain ener-
gized for 7 minutes or until the ignition switch is
turned to the OFF position, or Stop All Test is se-
lected.
EXHAUST MANIFOLDS
REMOVAL
(1) Raise vehicle and disconnect exhaust pipe from
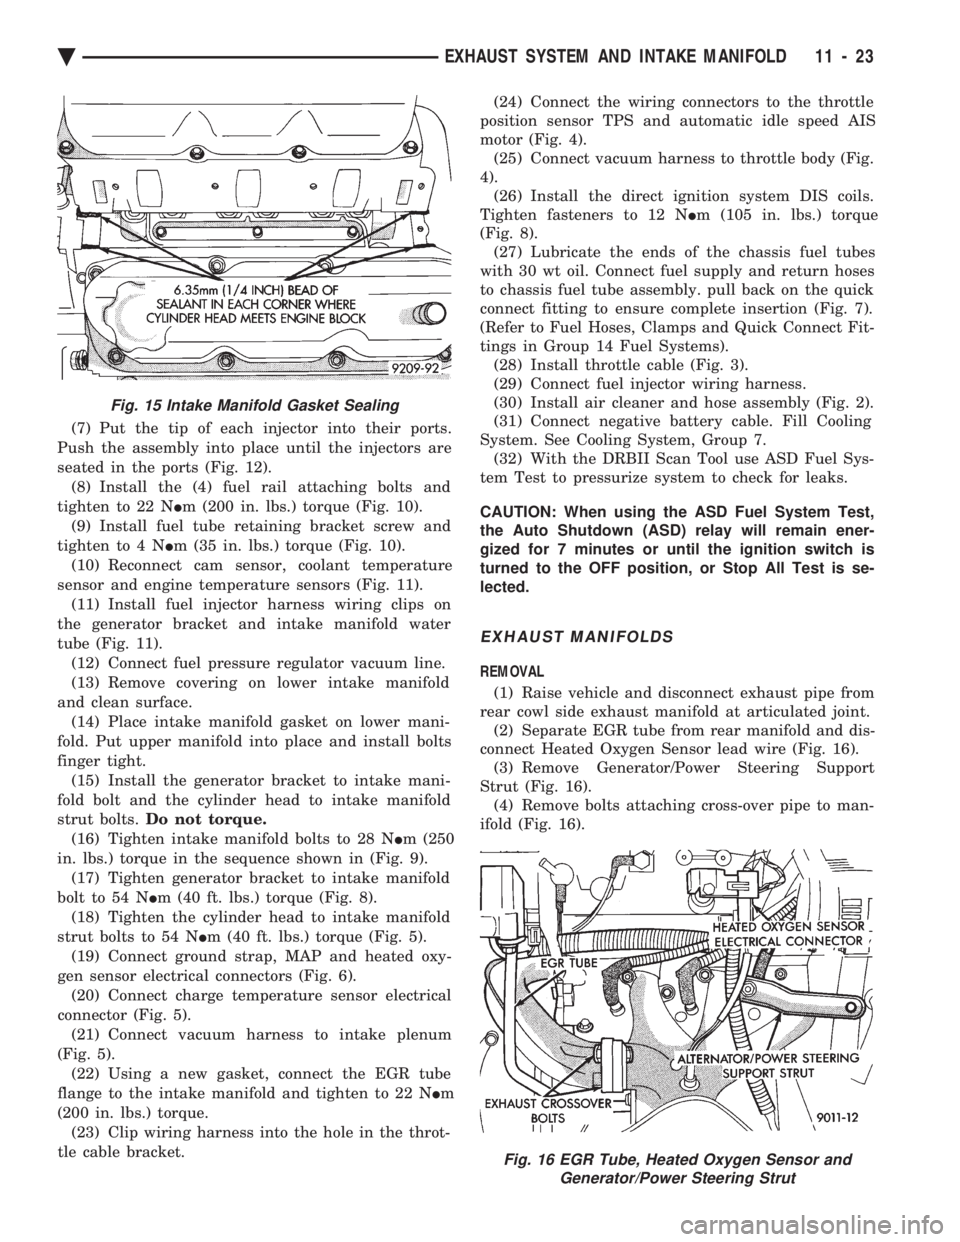
rear cowl side exhaust manifold at articulated joint. (2) Separate EGR tube from rear manifold and dis-
connect Heated Oxygen Sensor lead wire (Fig. 16). (3) Remove Generator/Power Steering Support
Strut (Fig. 16). (4) Remove bolts attaching cross-over pipe to man-
ifold (Fig. 16).
Fig. 15 Intake Manifold Gasket Sealing
Fig. 16 EGR Tube, Heated Oxygen Sensor and Generator/Power Steering Strut
Ä EXHAUST SYSTEM AND INTAKE MANIFOLD 11 - 23
Page 1764 of 2438
2.2L/2.5L SINGLE POINT FUEL INJECTIONÐSYSTEM OPERATION INDEX
page page
Air Conditioning (A/C) Clutch RelayÐPCM Output.28
Air Conditioning Switch SenseÐPCM Input ..... 26
Auto Shutdown (ASD) Relay and Fuel Pump RelayÐPCM Output ..................... 29
Battery VoltageÐPCM Input ................ 26
Brake SwitchÐPCM Input .................. 26
EVAP Canister Purge SolenoidÐPCM Output . . . 29
CCD Bus .............................. 25
Coolant Temperature SensorÐPCM Input ...... 26
Data Link ConnectorÐPCM Output ........... 30
Distributor (Hall Effect) Pick-UpÐPCM Input .... 26
Electric Electronic Gas RecirculationÐPCM Output.30
Fuel InjectorÐPCM Output ................. 31
Fuel Pressure Regulator ................... 33
General Information ....................... 24
Generator FieldÐPCM Output ............... 31
Heated Oxygen Sensor (O
2Sensor)ÐPCM Input . 27
Idle Air Control MotorÐPCM Output .......... 29 Ignition CoilÐPCM Output
.................. 31
Malfunction Indicator Lamp (Check Engine)ÐPCM Output ............................... 30
Manifold Absolute Pressure (MAP) SensorÐPCM Input ................................ 27
Modes of Operation ....................... 32
Part Throttle Unlock SolenoidÐPCM Output .... 31
Powertrain Control Module ................. 25
Radiator Fan RelayÐPCM Output ............ 31
Speed Control SolenoidsÐPCM Output ........ 31
Speed ControlÐPCM Input ................. 27
System Diagnosis ........................ 25
TachometerÐPCM Output .................. 32
Throttle Body ............................ 33
Throttle Position Sensor (TPS)ÐPCM Input ..... 28
Transaxle Park/Neutral SwitchÐPCM Input ..... 28
Vehicle Speed SensorÐPCM Input ........... 28
GENERAL INFORMATION
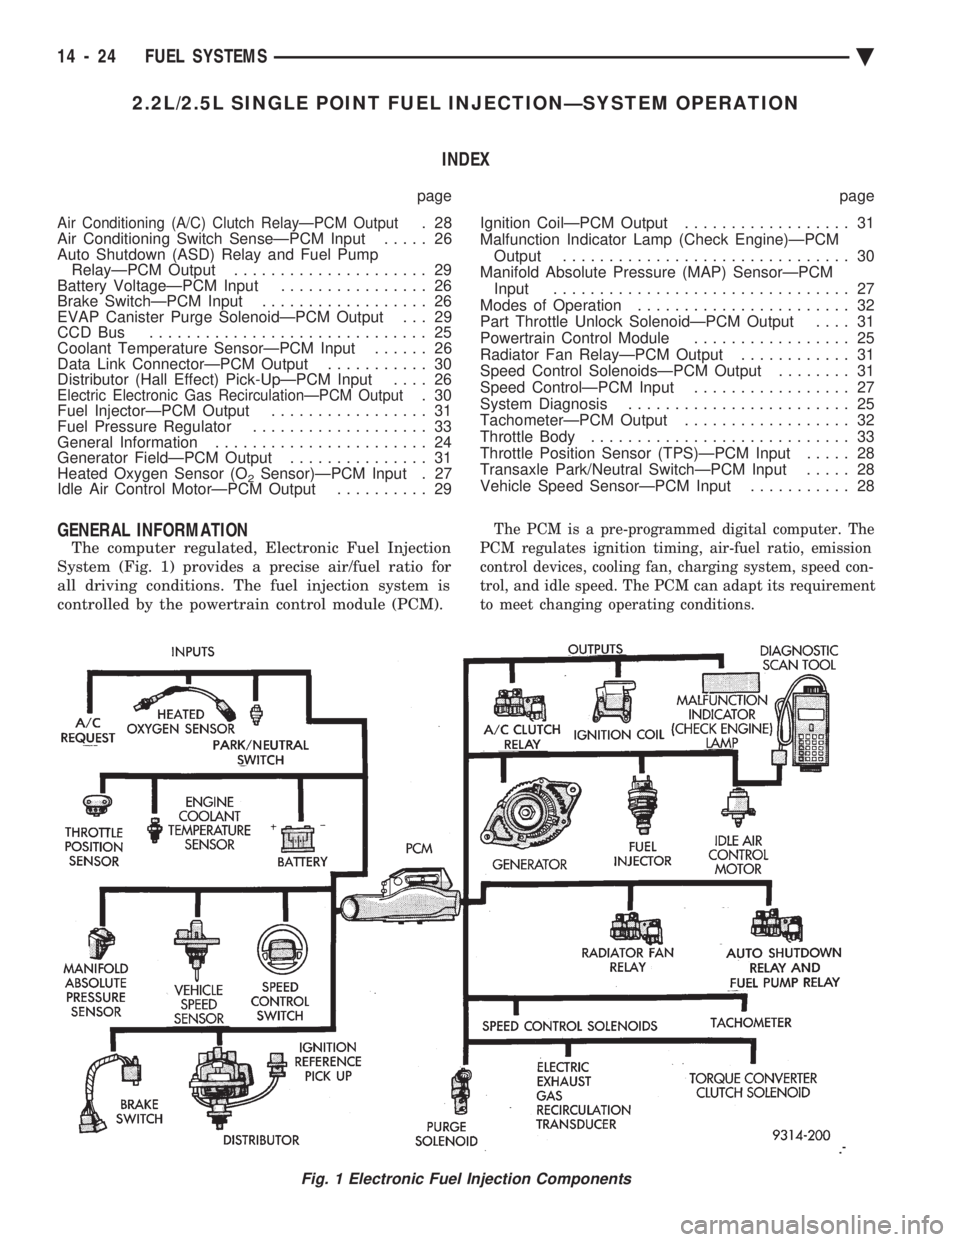
The computer regulated, Electronic Fuel Injection
System (Fig. 1) provides a precise air/fuel ratio for
all driving conditions. The fuel injection system is
controlled by the powertrain control module (PCM).
The PCM is a pre-programmed digital computer. The
PCM regulates ignition timing, air-fuel ratio, emission
control devices, cooling fan, charging system, speed con-
trol, and idle speed. The PCM can adapt its requirement
to meet changing operating conditions.
Fig. 1 Electronic Fuel Injection Components
14 - 24 FUEL SYSTEMS Ä
Page 1765 of 2438
Various sensors provide the inputs necessary for
the PCM to correctly regulate fuel flow at the fuel
injector. These include the manifold absolute pres-
sure, throttle position, oxygen sensor, coolant tem-
perature, and vehicle speed sensors. In addition to
the sensors, various switches and relays provide im-
portant information and system control. The inputs
include the park/neutral switch and air conditioning
clutch switch. The outputs include the auto shutdown
relay and fuel pump relay. All inputs to the PCM are converted into signals.
Based on these inputs the PCM adjusts air-fuel ratio,
ignition timing and other controlled outputs. The
PCM adjusts the air-fuel ratio by changing the injec-
tor pulse width. Injector pulse width is the period of
time the injector is energized.
SYSTEM DIAGNOSIS
The PCM tests many of its own input and output
circuits. If a fault is found in a major system, the in-
formation is stored in memory. Technicians can dis-
play fault information through the instrument panel
Malfunction Indicator lamp (instrument panel Check
Engine lamp) or by connecting the DRBII scan tool.
For diagnostic trouble code information, refer to On
Board Diagnostics in 2.2L/2.5L Single Point Fuel In-
jectionÐGeneral Diagnosis section of this group.
CCD BUS
Various modules exchange information through a
communications port called the CCD Bus. The pow-
ertrain control module (PCM) transmits vehicle load
data on the CCD Bus.
POWERTRAIN CONTROL MODULE
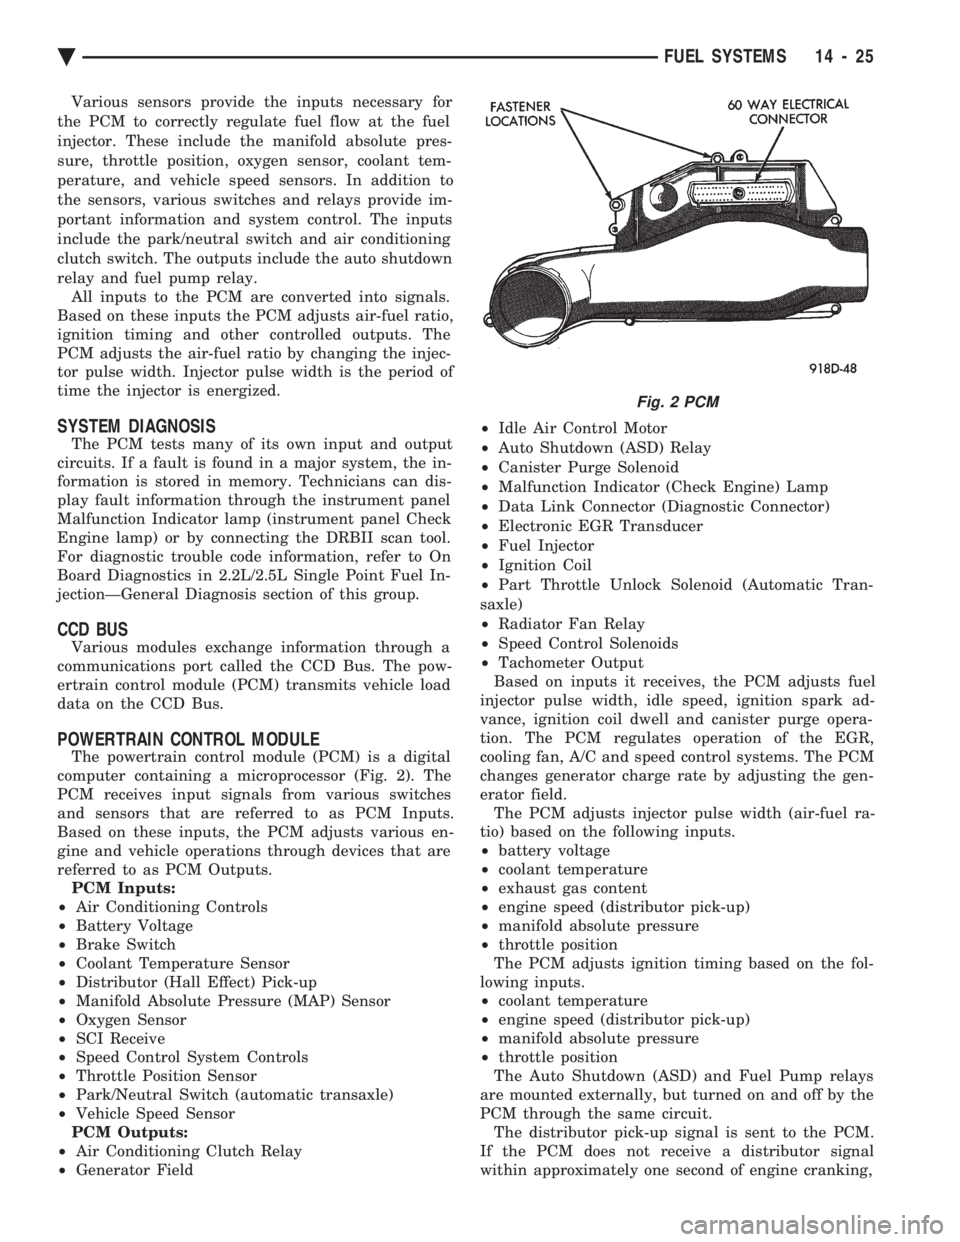
The powertrain control module (PCM) is a digital
computer containing a microprocessor (Fig. 2). The
PCM receives input signals from various switches
and sensors that are referred to as PCM Inputs.
Based on these inputs, the PCM adjusts various en-
gine and vehicle operations through devices that are
referred to as PCM Outputs. PCM Inputs:
² Air Conditioning Controls
² Battery Voltage
² Brake Switch
² Coolant Temperature Sensor
² Distributor (Hall Effect) Pick-up
² Manifold Absolute Pressure (MAP) Sensor
² Oxygen Sensor
² SCI Receive
² Speed Control System Controls
² Throttle Position Sensor
² Park/Neutral Switch (automatic transaxle)
² Vehicle Speed Sensor
PCM Outputs:
² Air Conditioning Clutch Relay
² Generator Field ²
Idle Air Control Motor
² Auto Shutdown (ASD) Relay
² Canister Purge Solenoid
² Malfunction Indicator (Check Engine) Lamp
² Data Link Connector (Diagnostic Connector)
² Electronic EGR Transducer
² Fuel Injector
² Ignition Coil
² Part Throttle Unlock Solenoid (Automatic Tran-
saxle)
² Radiator Fan Relay
² Speed Control Solenoids
² Tachometer Output
Based on inputs it receives, the PCM adjusts fuel
injector pulse width, idle speed, ignition spark ad-
vance, ignition coil dwell and canister purge opera-
tion. The PCM regulates operation of the EGR,
cooling fan, A/C and speed control systems. The PCM
changes generator charge rate by adjusting the gen-
erator field. The PCM adjusts injector pulse width (air-fuel ra-
tio) based on the following inputs.
² battery voltage
² coolant temperature
² exhaust gas content
² engine speed (distributor pick-up)
² manifold absolute pressure
² throttle position
The PCM adjusts ignition timing based on the fol-
lowing inputs.
² coolant temperature
² engine speed (distributor pick-up)
² manifold absolute pressure
² throttle position
The Auto Shutdown (ASD) and Fuel Pump relays
are mounted externally, but turned on and off by the
PCM through the same circuit. The distributor pick-up signal is sent to the PCM.
If the PCM does not receive a distributor signal
within approximately one second of engine cranking,
Fig. 2 PCM
Ä FUEL SYSTEMS 14 - 25
Page 1766 of 2438
it de-activates the ASD relay and fuel pump relay.
When these relays are deactivated, power is shut off
from the fuel injector, fuel pump, ignition coil, and
oxygen sensor heater element. The PCM contains a voltage converter that
changes battery voltage to a regulated 8.0 volts to
power the distributor pick-up and vehicle speed sen-
sor. The PCM also provides a 5.0 volts supply for the
coolant temperature sensor, manifold absolute pres-
sure sensor and throttle position sensor.
AIR CONDITIONING SWITCH SENSEÐPCM INPUT
ALL VEHICLES EXCEPT AC-BODY
When the air conditioning or defrost switch is put
in the ON position and the low pressure and high
pressure switches are closed, the PCM receives an in-
put indicating that the air conditioning has been se-
lected. After receiving this input, the PCM activates
the A/C compressor clutch by grounding the A/C
clutch relay. The PCM also adjusts idle speed to a
scheduled RPM to compensate for increased engine
load.
AC-BODY VEHICLES
When the air conditioning or defrost switch is put
in the ON position and the low pressure switch, high
pressure switch and electronic cycling switch close,
the PCM receives an air conditioning select input.
After receiving this input, the PCM activates the
A/C compressor clutch by grounding the A/C com-
pressor clutch relay. The PCM also adjusts idle speed
to a scheduled RPM to compensate for increased en-
gine load.
BATTERY VOLTAGEÐPCM INPUT
The PCM monitors the battery voltage input to de-
termine fuel injector pulse width and generator field
control. If battery voltage is low, the PCM increases
injector pulse width.
BRAKE SWITCHÐPCM INPUT
When the brake switch is activated, the PCM re-
ceives an input indicating that the brakes are being
applied. After receiving the input, the PCM vents the
speed control servo. Venting the servo turns the
speed control system off.
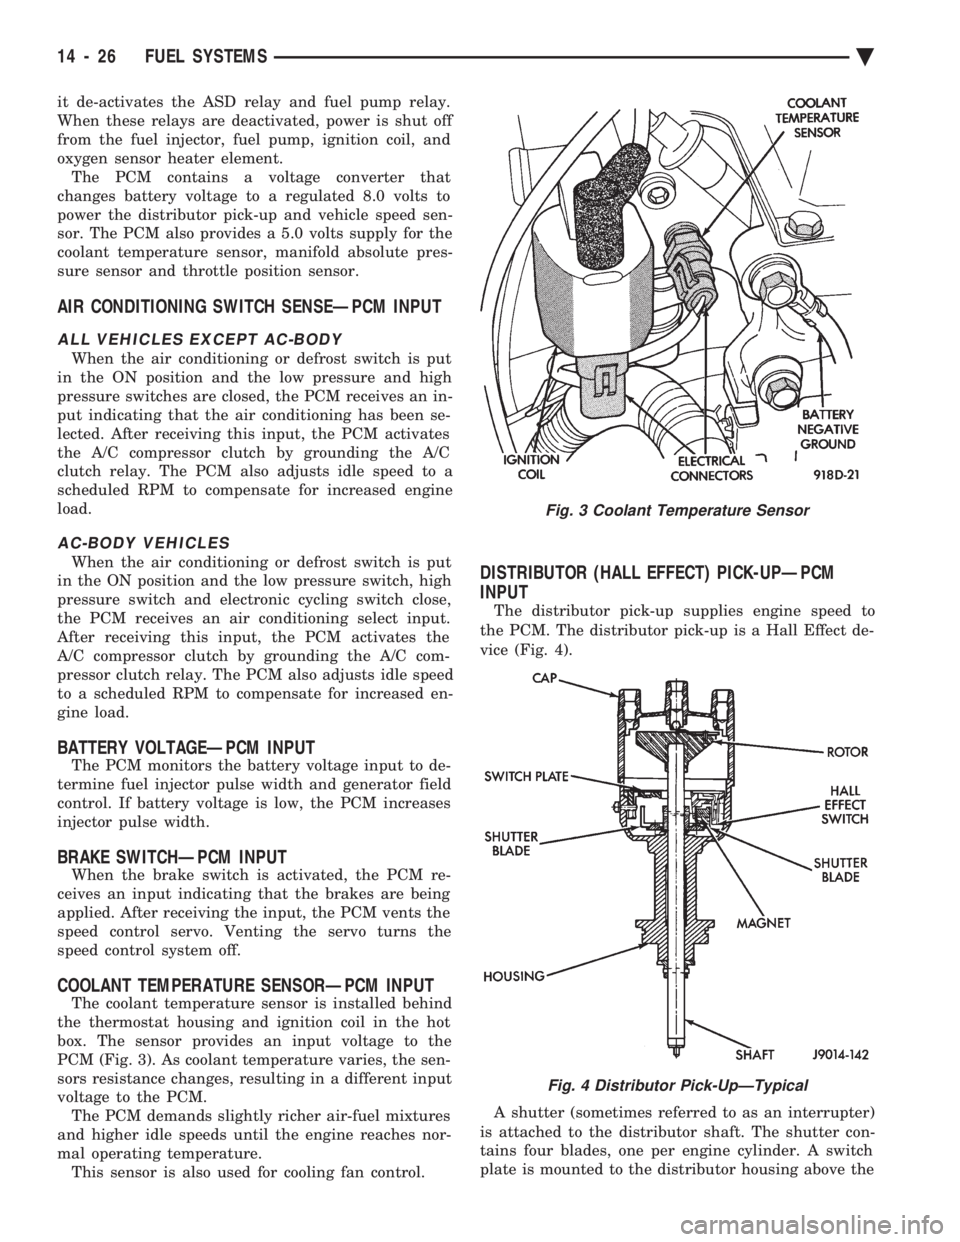
COOLANT TEMPERATURE SENSORÐPCM INPUT
The coolant temperature sensor is installed behind
the thermostat housing and ignition coil in the hot
box. The sensor provides an input voltage to the
PCM (Fig. 3). As coolant temperature varies, the sen-
sors resistance changes, resulting in a different input
voltage to the PCM. The PCM demands slightly richer air-fuel mixtures
and higher idle speeds until the engine reaches nor-
mal operating temperature. This sensor is also used for cooling fan control.
DISTRIBUTOR (HALL EFFECT) PICK-UPÐPCM
INPUT
The distributor pick-up supplies engine speed to
the PCM. The distributor pick-up is a Hall Effect de-
vice (Fig. 4).
A shutter (sometimes referred to as an interrupter)
is attached to the distributor shaft. The shutter con-
tains four blades, one per engine cylinder. A switch
plate is mounted to the distributor housing above the
Fig. 3 Coolant Temperature Sensor
Fig. 4 Distributor Pick-UpÐTypical
14 - 26 FUEL SYSTEMS Ä
Page 1769 of 2438
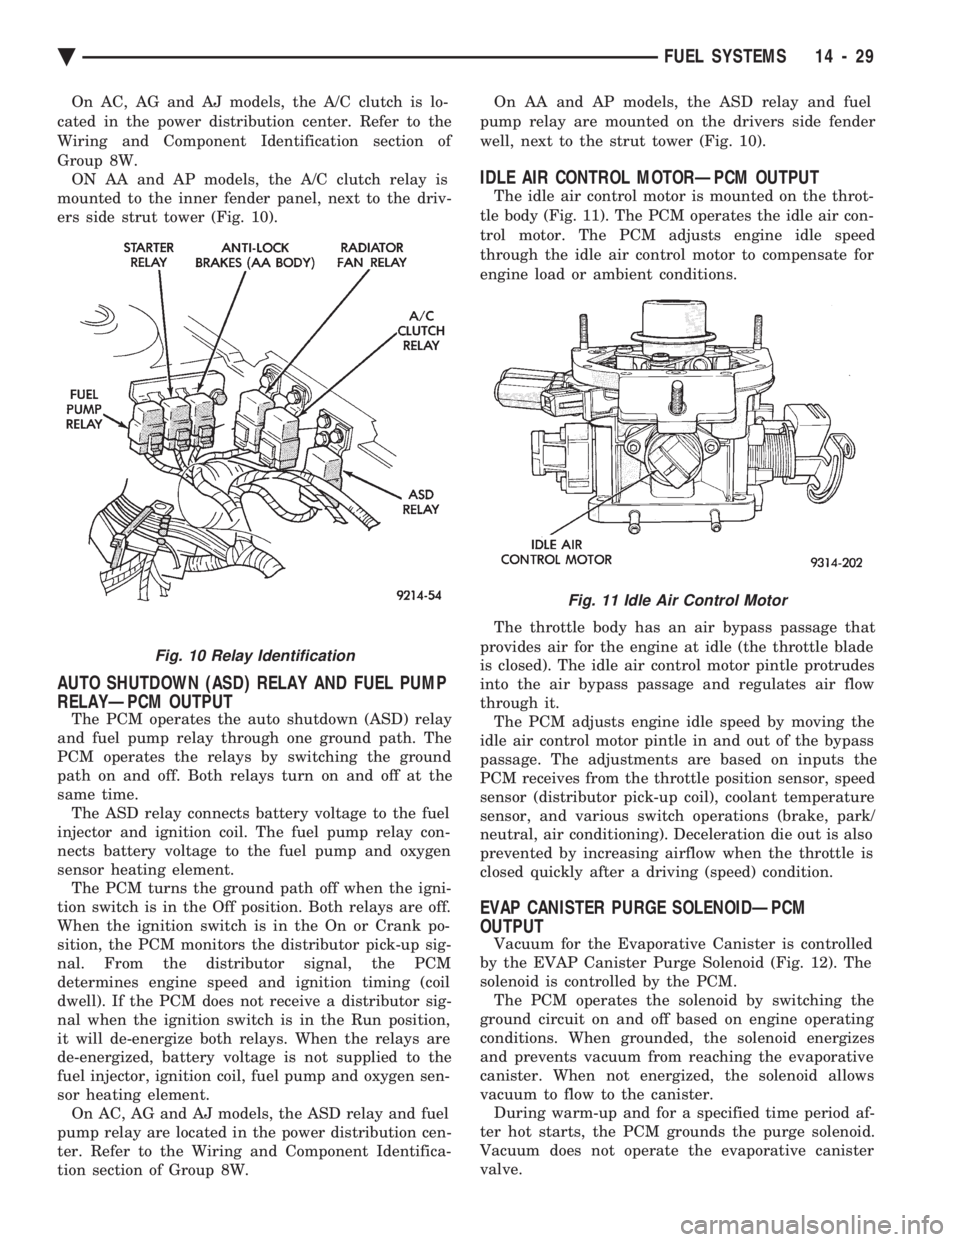
On AC, AG and AJ models, the A/C clutch is lo-
cated in the power distribution center. Refer to the
Wiring and Component Identification section of
Group 8W. ON AA and AP models, the A/C clutch relay is
mounted to the inner fender panel, next to the driv-
ers side strut tower (Fig. 10).
AUTO SHUTDOWN (ASD) RELAY AND FUEL PUMP
RELAYÐPCM OUTPUT
The PCM operates the auto shutdown (ASD) relay
and fuel pump relay through one ground path. The
PCM operates the relays by switching the ground
path on and off. Both relays turn on and off at the
same time. The ASD relay connects battery voltage to the fuel
injector and ignition coil. The fuel pump relay con-
nects battery voltage to the fuel pump and oxygen
sensor heating element. The PCM turns the ground path off when the igni-
tion switch is in the Off position. Both relays are off.
When the ignition switch is in the On or Crank po-
sition, the PCM monitors the distributor pick-up sig-
nal. From the distributor signal, the PCM
determines engine speed and ignition timing (coil
dwell). If the PCM does not receive a distributor sig-
nal when the ignition switch is in the Run position,
it will de-energize both relays. When the relays are
de-energized, battery voltage is not supplied to the
fuel injector, ignition coil, fuel pump and oxygen sen-
sor heating element. On AC, AG and AJ models, the ASD relay and fuel
pump relay are located in the power distribution cen-
ter. Refer to the Wiring and Component Identifica-
tion section of Group 8W. On AA and AP models, the ASD relay and fuel
pump relay are mounted on the drivers side fender
well, next to the strut tower (Fig. 10).
IDLE AIR CONTROL MOTORÐPCM OUTPUT
The idle air control motor is mounted on the throt-
tle body (Fig. 11). The PCM operates the idle air con-
trol motor. The PCM adjusts engine idle speed
through the idle air control motor to compensate for
engine load or ambient conditions.
The throttle body has an air bypass passage that
provides air for the engine at idle (the throttle blade
is closed). The idle air control motor pintle protrudes
into the air bypass passage and regulates air flow
through it. The PCM adjusts engine idle speed by moving the
idle air control motor pintle in and out of the bypass
passage. The adjustments are based on inputs the
PCM receives from the throttle position sensor, speed
sensor (distributor pick-up coil), coolant temperature
sensor, and various switch operations (brake, park/
neutral, air conditioning). Deceleration die out is also
prevented by increasing airflow when the throttle is
closed quickly after a driving (speed) condition.
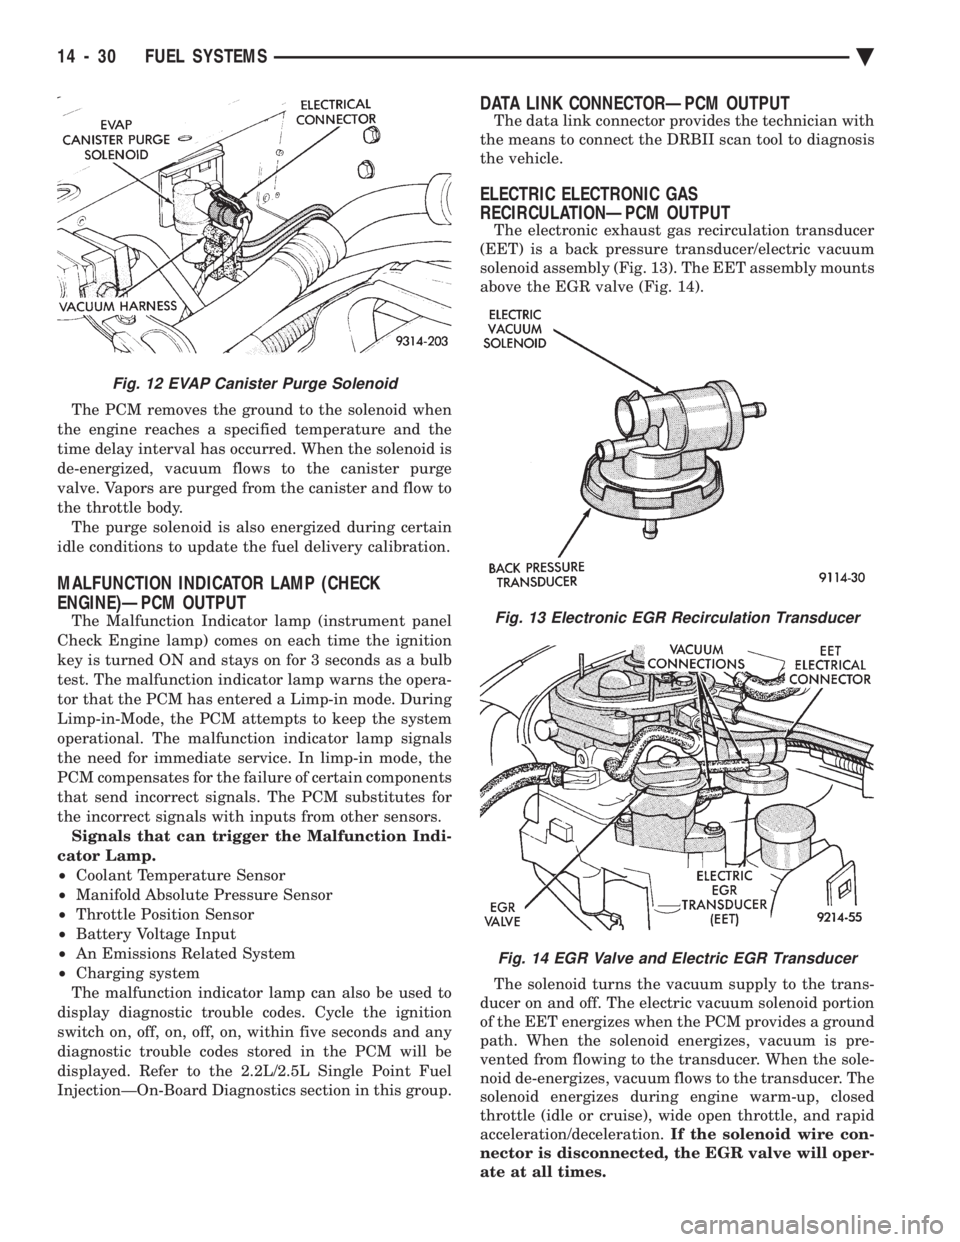
EVAP CANISTER PURGE SOLENOIDÐPCM
OUTPUT
Vacuum for the Evaporative Canister is controlled
by the EVAP Canister Purge Solenoid (Fig. 12). The
solenoid is controlled by the PCM. The PCM operates the solenoid by switching the
ground circuit on and off based on engine operating
conditions. When grounded, the solenoid energizes
and prevents vacuum from reaching the evaporative
canister. When not energized, the solenoid allows
vacuum to flow to the canister. During warm-up and for a specified time period af-
ter hot starts, the PCM grounds the purge solenoid.
Vacuum does not operate the evaporative canister
valve.
Fig. 10 Relay Identification
Fig. 11 Idle Air Control Motor
Ä FUEL SYSTEMS 14 - 29
Page 1770 of 2438
The PCM removes the ground to the solenoid when
the engine reaches a specified temperature and the
time delay interval has occurred. When the solenoid is
de-energized, vacuum flows to the canister purge
valve. Vapors are purged from the canister and flow to
the throttle body. The purge solenoid is also energized during certain
idle conditions to update the fuel delivery calibration.
MALFUNCTION INDICATOR LAMP (CHECK
ENGINE)ÐPCM OUTPUT
The Malfunction Indicator lamp (instrument panel
Check Engine lamp) comes on each time the ignition
key is turned ON and stays on for 3 seconds as a bulb
test. The malfunction indicator lamp warns the opera-
tor that the PCM has entered a Limp-in mode. During
Limp-in-Mode, the PCM attempts to keep the system
operational. The malfunction indicator lamp signals
the need for immediate service. In limp-in mode, the
PCM compensates for the failure of certain components
that send incorrect signals. The PCM substitutes for
the incorrect signals with inputs from other sensors. Signals that can trigger the Malfunction Indi-
cator Lamp.
² Coolant Temperature Sensor
² Manifold Absolute Pressure Sensor
² Throttle Position Sensor
² Battery Voltage Input
² An Emissions Related System
² Charging system
The malfunction indicator lamp can also be used to
display diagnostic trouble codes. Cycle the ignition
switch on, off, on, off, on, within five seconds and any
diagnostic trouble codes stored in the PCM will be
displayed. Refer to the 2.2L/2.5L Single Point Fuel
InjectionÐOn-Board Diagnostics section in this group.
DATA LINK CONNECTORÐPCM OUTPUT
The data link connector provides the technician with
the means to connect the DRBII scan tool to diagnosis
the vehicle.
ELECTRIC ELECTRONIC GAS
RECIRCULATIONÐPCM OUTPUT
The electronic exhaust gas recirculation transducer
(EET) is a back pressure transducer/electric vacuum
solenoid assembly (Fig. 13). The EET assembly mounts
above the EGR valve (Fig. 14).
The solenoid turns the vacuum supply to the trans-
ducer on and off. The electric vacuum solenoid portion
of the EET energizes when the PCM provides a ground
path. When the solenoid energizes, vacuum is pre-
vented from flowing to the transducer. When the sole-
noid de-energizes, vacuum flows to the transducer. The
solenoid energizes during engine warm-up, closed
throttle (idle or cruise), wide open throttle, and rapid
acceleration/deceleration. If the solenoid wire con-
nector is disconnected, the EGR valve will oper-
ate at all times.
Fig. 12 EVAP Canister Purge Solenoid
Fig. 13 Electronic EGR Recirculation Transducer
Fig. 14 EGR Valve and Electric EGR Transducer
14 - 30 FUEL SYSTEMS Ä
Page 1771 of 2438
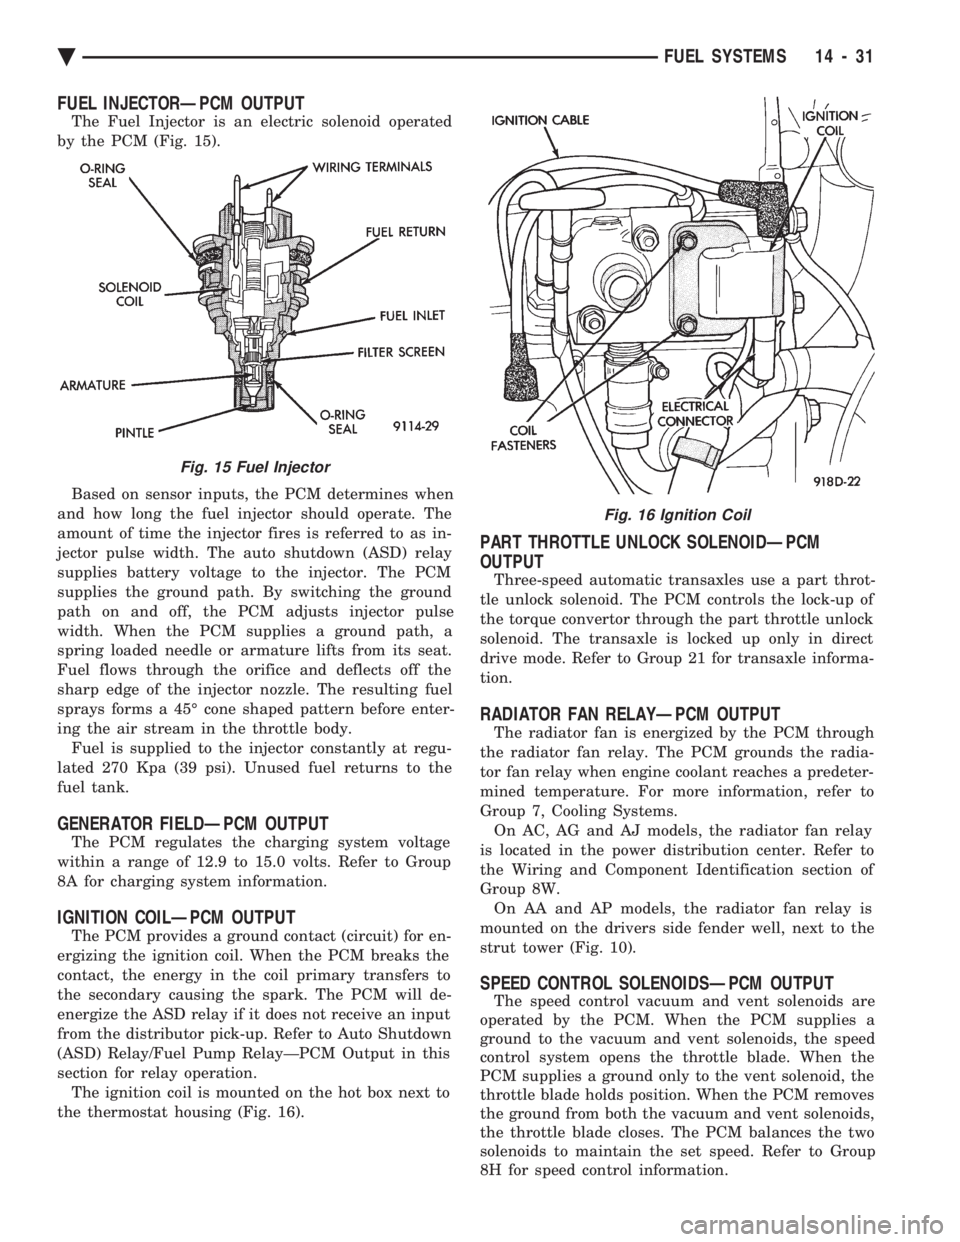
FUEL INJECTORÐPCM OUTPUT
The Fuel Injector is an electric solenoid operated
by the PCM (Fig. 15).
Based on sensor inputs, the PCM determines when
and how long the fuel injector should operate. The
amount of time the injector fires is referred to as in-
jector pulse width. The auto shutdown (ASD) relay
supplies battery voltage to the injector. The PCM
supplies the ground path. By switching the ground
path on and off, the PCM adjusts injector pulse
width. When the PCM supplies a ground path, a
spring loaded needle or armature lifts from its seat.
Fuel flows through the orifice and deflects off the
sharp edge of the injector nozzle. The resulting fuel
sprays forms a 45É cone shaped pattern before enter-
ing the air stream in the throttle body. Fuel is supplied to the injector constantly at regu-
lated 270 Kpa (39 psi). Unused fuel returns to the
fuel tank.
GENERATOR FIELDÐPCM OUTPUT
The PCM regulates the charging system voltage
within a range of 12.9 to 15.0 volts. Refer to Group
8A for charging system information.
IGNITION COILÐPCM OUTPUT
The PCM provides a ground contact (circuit) for en-
ergizing the ignition coil. When the PCM breaks the
contact, the energy in the coil primary transfers to
the secondary causing the spark. The PCM will de-
energize the ASD relay if it does not receive an input
from the distributor pick-up. Refer to Auto Shutdown
(ASD) Relay/Fuel Pump RelayÐPCM Output in this
section for relay operation. The ignition coil is mounted on the hot box next to
the thermostat housing (Fig. 16).
PART THROTTLE UNLOCK SOLENOIDÐPCM
OUTPUT
Three-speed automatic transaxles use a part throt-
tle unlock solenoid. The PCM controls the lock-up of
the torque convertor through the part throttle unlock
solenoid. The transaxle is locked up only in direct
drive mode. Refer to Group 21 for transaxle informa-
tion.
RADIATOR FAN RELAYÐPCM OUTPUT
The radiator fan is energized by the PCM through
the radiator fan relay. The PCM grounds the radia-
tor fan relay when engine coolant reaches a predeter-
mined temperature. For more information, refer to
Group 7, Cooling Systems. On AC, AG and AJ models, the radiator fan relay
is located in the power distribution center. Refer to
the Wiring and Component Identification section of
Group 8W. On AA and AP models, the radiator fan relay is
mounted on the drivers side fender well, next to the
strut tower (Fig. 10).
SPEED CONTROL SOLENOIDSÐPCM OUTPUT
The speed control vacuum and vent solenoids are
operated by the PCM. When the PCM supplies a
ground to the vacuum and vent solenoids, the speed
control system opens the throttle blade. When the
PCM supplies a ground only to the vent solenoid, the
throttle blade holds position. When the PCM removes
the ground from both the vacuum and vent solenoids,
the throttle blade closes. The PCM balances the two
solenoids to maintain the set speed. Refer to Group
8H for speed control information.
Fig. 15 Fuel Injector
Fig. 16 Ignition Coil
Ä FUEL SYSTEMS 14 - 31