1993 CHEVROLET PLYMOUTH ACCLAIM glove box
[x] Cancel search: glove boxPage 2357 of 2438
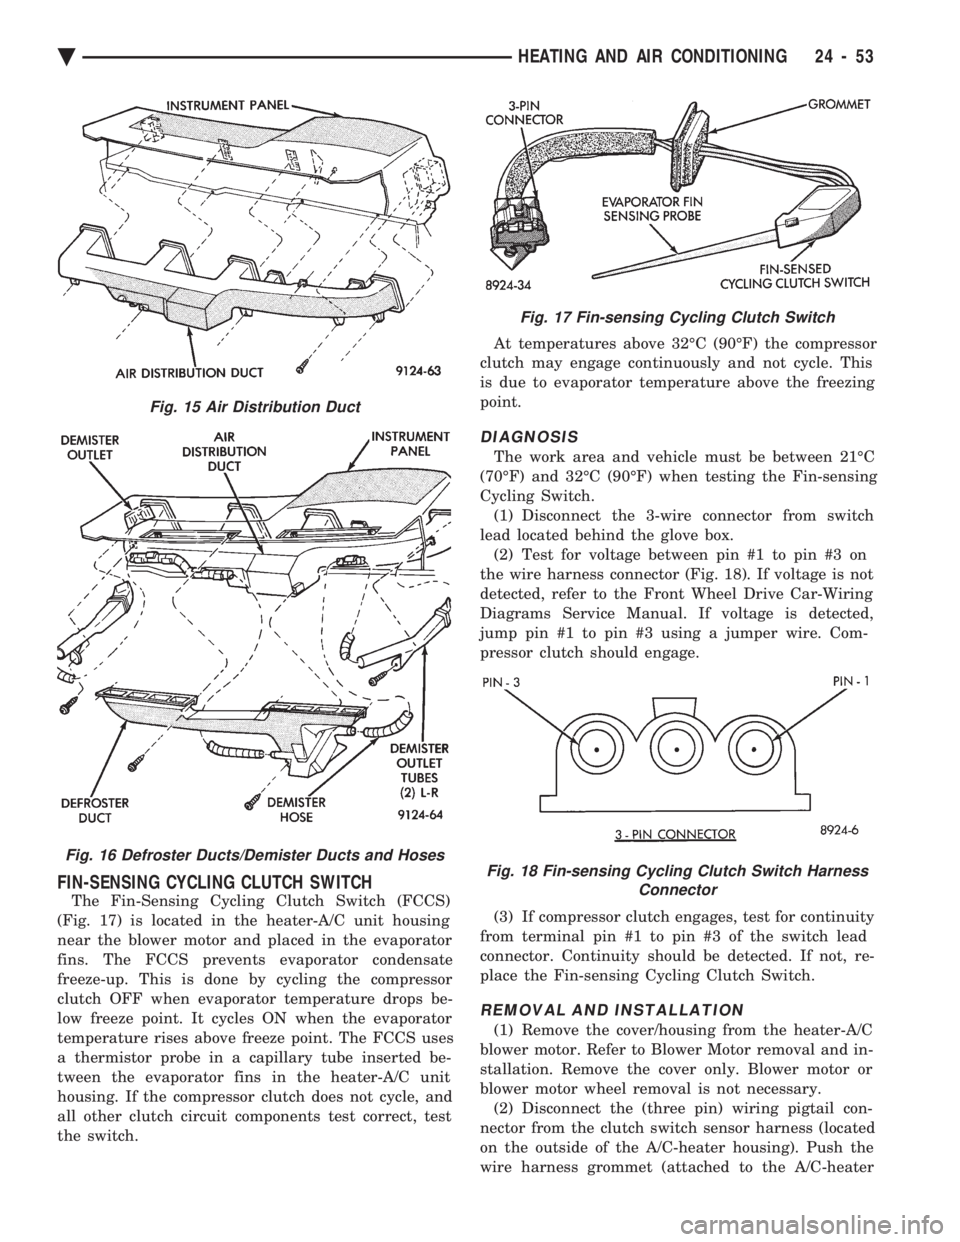
FIN-SENSING CYCLING CLUTCH SWITCH
The Fin-Sensing Cycling Clutch Switch (FCCS)
(Fig. 17) is located in the heater-A/C unit housing
near the blower motor and placed in the evaporator
fins. The FCCS prevents evaporator condensate
freeze-up. This is done by cycling the compressor
clutch OFF when evaporator temperature drops be-
low freeze point. It cycles ON when the evaporator
temperature rises above freeze point. The FCCS uses
a thermistor probe in a capillary tube inserted be-
tween the evaporator fins in the heater-A/C unit
housing. If the compressor clutch does not cycle, and
all other clutch circuit components test correct, test
the switch. At temperatures above 32ÉC (90ÉF) the compressor
clutch may engage continuously and not cycle. This
is due to evaporator temperature above the freezing
point.
DIAGNOSIS
The work area and vehicle must be between 21ÉC
(70ÉF) and 32ÉC (90ÉF) when testing the Fin-sensing
Cycling Switch. (1) Disconnect the 3-wire connector from switch
lead located behind the glove box. (2) Test for voltage between pin #1 to pin #3 on
the wire harness connector (Fig. 18). If voltage is not
detected, refer to the Front Wheel Drive Car-Wiring
Diagrams Service Manual. If voltage is detected,
jump pin #1 to pin #3 using a jumper wire. Com-
pressor clutch should engage.
(3) If compressor clutch engages, test for continuity
from terminal pin #1 to pin #3 of the switch lead
connector. Continuity should be detected. If not, re-
place the Fin-sensing Cycling Clutch Switch.
REMOVAL AND INSTALLATION
(1) Remove the cover/housing from the heater-A/C
blower motor. Refer to Blower Motor removal and in-
stallation. Remove the cover only. Blower motor or
blower motor wheel removal is not necessary. (2) Disconnect the (three pin) wiring pigtail con-
nector from the clutch switch sensor harness (located
on the outside of the A/C-heater housing). Push the
wire harness grommet (attached to the A/C-heater
Fig. 15 Air Distribution Duct
Fig. 16 Defroster Ducts/Demister Ducts and Hoses
Fig. 17 Fin-sensing Cycling Clutch Switch
Fig. 18 Fin-sensing Cycling Clutch Switch Harness Connector
Ä HEATING AND AIR CONDITIONING 24 - 53
Page 2362 of 2438
new condenser, refer to Oil Level in the Refrigerant
section. Tighten the refrigerant line mounting nut to
23 N Im (200 inch pounds).
Evacuate and recharge system.
BLOWER MOTOR
BLOWER MOTOR VIBRATION AND/OR NOISE DIAGNOSIS
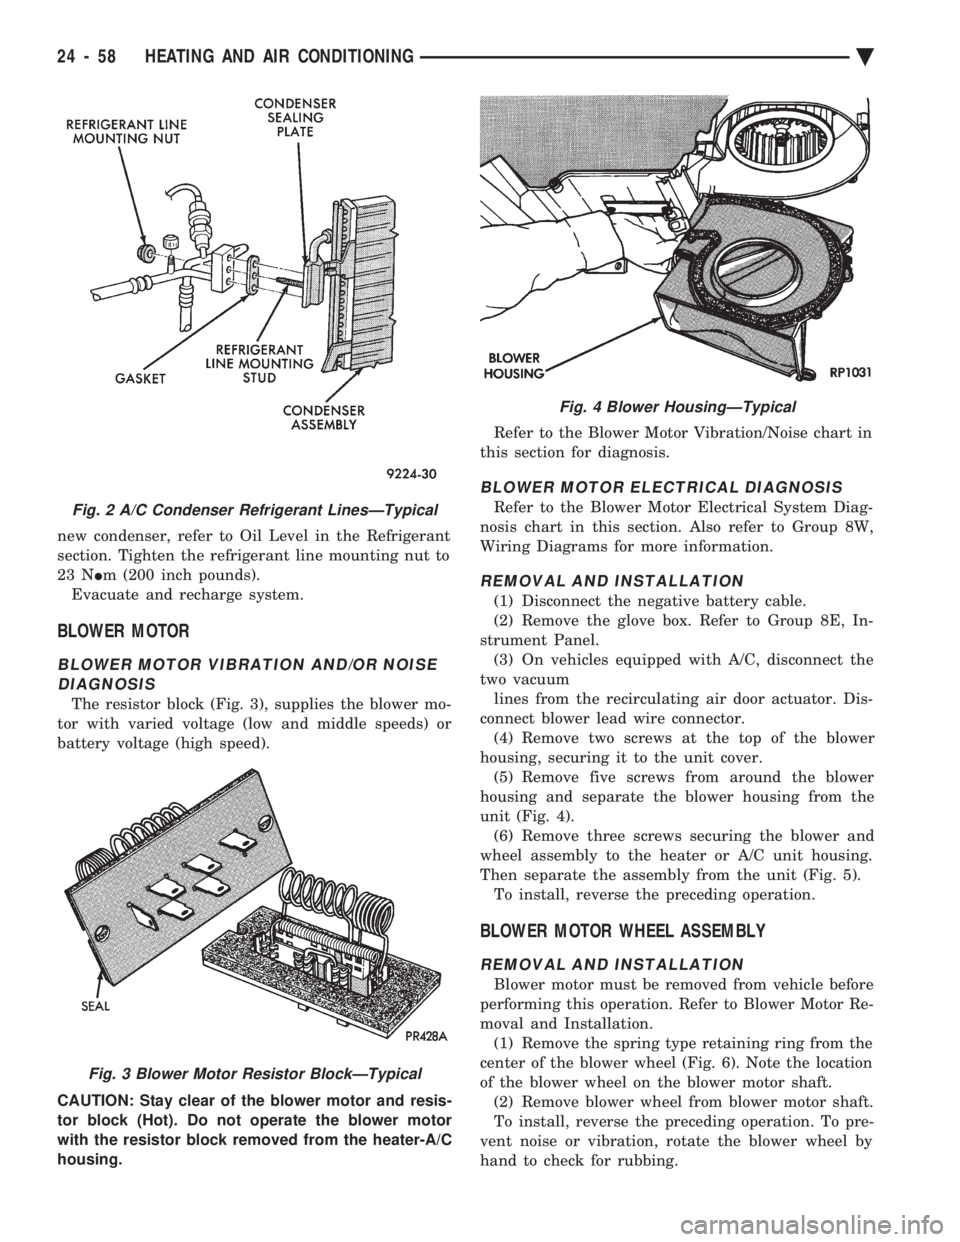
The resistor block (Fig. 3), supplies the blower mo-
tor with varied voltage (low and middle speeds) or
battery voltage (high speed).
CAUTION: Stay clear of the blower motor and resis-
tor block (Hot). Do not operate the blower motor
with the resistor block removed from the heater-A/C
housing. Refer to the Blower Motor Vibration/Noise chart in
this section for diagnosis.
BLOWER MOTOR ELECTRICAL DIAGNOSIS
Refer to the Blower Motor Electrical System Diag-
nosis chart in this section. Also refer to Group 8W,
Wiring Diagrams for more information.
REMOVAL AND INSTALLATION
(1) Disconnect the negative battery cable.
(2) Remove the glove box. Refer to Group 8E, In-
strument Panel. (3) On vehicles equipped with A/C, disconnect the
two vacuum lines from the recirculating air door actuator. Dis-
connect blower lead wire connector. (4) Remove two screws at the top of the blower
housing, securing it to the unit cover. (5) Remove five screws from around the blower
housing and separate the blower housing from the
unit (Fig. 4). (6) Remove three screws securing the blower and
wheel assembly to the heater or A/C unit housing.
Then separate the assembly from the unit (Fig. 5). To install, reverse the preceding operation.
BLOWER MOTOR WHEEL ASSEMBLY
REMOVAL AND INSTALLATION
Blower motor must be removed from vehicle before
performing this operation. Refer to Blower Motor Re-
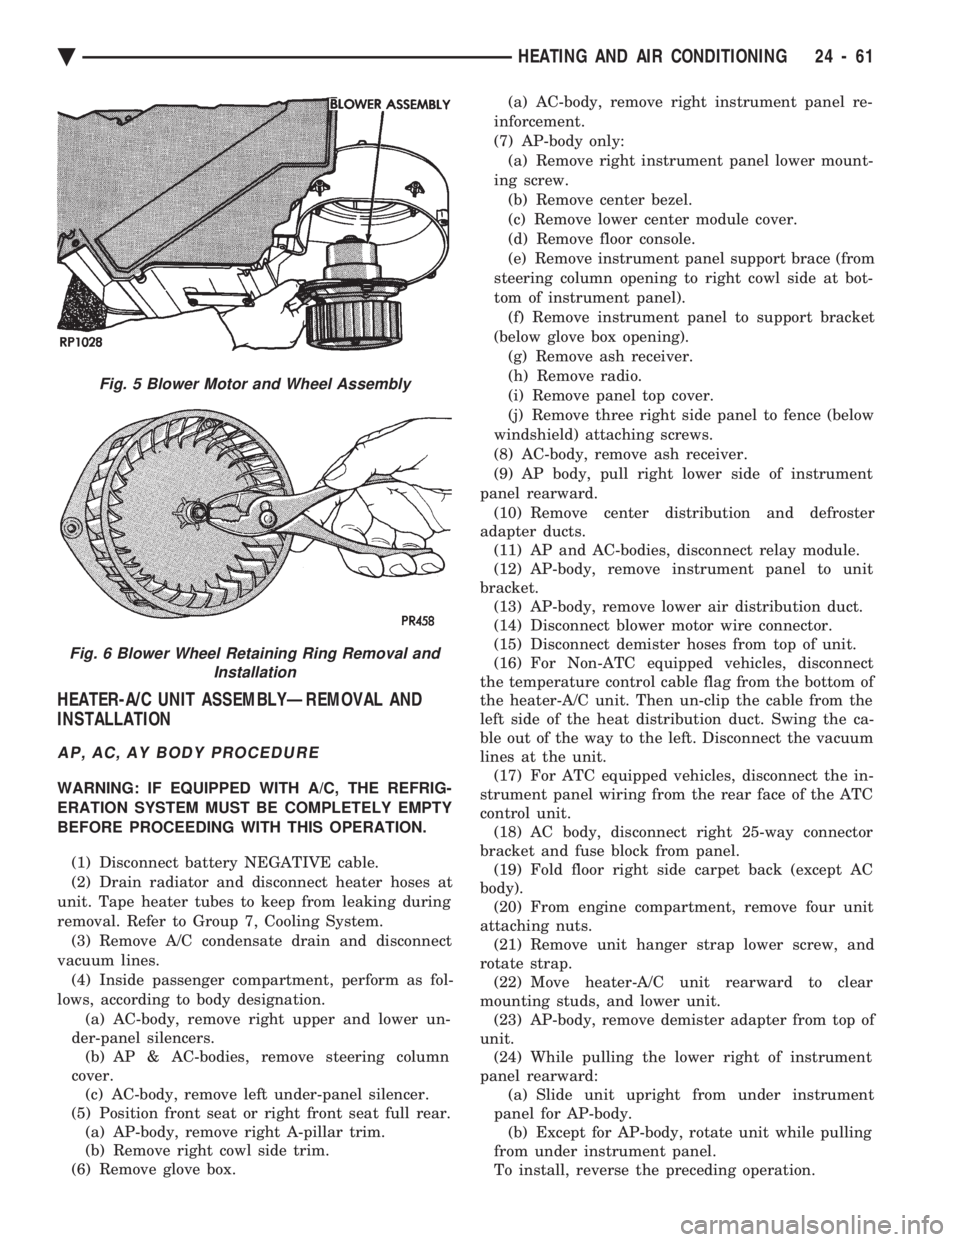
moval and Installation. (1) Remove the spring type retaining ring from the
center of the blower wheel (Fig. 6). Note the location
of the blower wheel on the blower motor shaft. (2) Remove blower wheel from blower motor shaft.
To install, reverse the preceding operation. To pre-
vent noise or vibration, rotate the blower wheel by
hand to check for rubbing.
Fig. 2 A/C Condenser Refrigerant LinesÐTypical
Fig. 3 Blower Motor Resistor BlockÐTypical
Fig. 4 Blower HousingÐTypical
24 - 58 HEATING AND AIR CONDITIONING Ä
Page 2365 of 2438
HEATER-A/C UNIT ASSEMBLYÐREMOVAL AND
INSTALLATION
AP, AC, AY BODY PROCEDURE
WARNING: IF EQUIPPED WITH A/C, THE REFRIG-
ERATION SYSTEM MUST BE COMPLETELY EMPTY
BEFORE PROCEEDING WITH THIS OPERATION.
(1) Disconnect battery NEGATIVE cable.
(2) Drain radiator and disconnect heater hoses at
unit. Tape heater tubes to keep from leaking during
removal. Refer to Group 7, Cooling System. (3) Remove A/C condensate drain and disconnect
vacuum lines. (4) Inside passenger compartment, perform as fol-
lows, according to body designation. (a) AC-body, remove right upper and lower un-
der-panel silencers. (b) AP & AC-bodies, remove steering column
cover. (c) AC-body, remove left under-panel silencer.
(5) Position front seat or right front seat full rear. (a) AP-body, remove right A-pillar trim.
(b) Remove right cowl side trim.
(6) Remove glove box. (a) AC-body, remove right instrument panel re-
inforcement.
(7) AP-body only: (a) Remove right instrument panel lower mount-
ing screw. (b) Remove center bezel.
(c) Remove lower center module cover.
(d) Remove floor console.
(e) Remove instrument panel support brace (from
steering column opening to right cowl side at bot-
tom of instrument panel). (f) Remove instrument panel to support bracket
(below glove box opening). (g) Remove ash receiver.
(h) Remove radio.
(i) Remove panel top cover.
(j) Remove three right side panel to fence (below
windshield) attaching screws.
(8) AC-body, remove ash receiver.
(9) AP body, pull right lower side of instrument
panel rearward. (10) Remove center distribution and defroster
adapter ducts. (11) AP and AC-bodies, disconnect relay module.
(12) AP-body, remove instrument panel to unit
bracket. (13) AP-body, remove lower air distribution duct.
(14) Disconnect blower motor wire connector.
(15) Disconnect demister hoses from top of unit.
(16) For Non-ATC equipped vehicles, disconnect
the temperature control cable flag from the bottom of
the heater-A/C unit. Then un-clip the cable from the
left side of the heat distribution duct. Swing the ca-
ble out of the way to the left. Disconnect the vacuum
lines at the unit. (17) For ATC equipped vehicles, disconnect the in-
strument panel wiring from the rear face of the ATC
control unit. (18) AC body, disconnect right 25-way connector
bracket and fuse block from panel. (19) Fold floor right side carpet back (except AC
body). (20) From engine compartment, remove four unit
attaching nuts. (21) Remove unit hanger strap lower screw, and
rotate strap. (22) Move heater-A/C unit rearward to clear
mounting studs, and lower unit. (23) AP-body, remove demister adapter from top of
unit. (24) While pulling the lower right of instrument
panel rearward: (a) Slide unit upright from under instrument
panel for AP-body. (b) Except for AP-body, rotate unit while pulling
from under instrument panel.
To install, reverse the preceding operation.
Fig. 5 Blower Motor and Wheel Assembly
Fig. 6 Blower Wheel Retaining Ring Removal and Installation
Ä HEATING AND AIR CONDITIONING 24 - 61
Page 2366 of 2438
AA BODY PROCEDURE
WARNING: IF EQUIPPED WITH A/C, THE REFRIG-
ERATION SYSTEM MUST BE COMPLETELY EMPTY
BEFORE PROCEEDING WITH THIS OPERATION. Refer to Group 8E and Group 23 for component re-
moval and installation when performing this opera-
tion. (1) Perform steps 1 through 7 of Blower Motor re-
moval and installation. (2) Remove relay panel above glove compartment
opening. (3) Disconnect the A/C vacuum line connector and
radio noise capacitor connectors. (4) Remove left windshield pillar trim cover.
(5) Remove left lower side cowl trim cover.
(6) Remove hood release handle mechanism attach-
ing screws. (7) Remove steering column trim covers.
(8) Disconnect parking brake release mechanism
connecting rod. Gain access through fuse panel open-
ing. (9) Remove lower left instrument panel silencer.
(10) Remove lower left instrument panel reinforce-
ment. (11) Remove instrument panel center (radio) bezel.
(12) Remove forward floor console.
(13) Remove the radio.
(14) Remove the heater-A/C control.
(15) Remove cigar lighter.
(16) Remove message center/trip computer, if
equipped. (17) Disconnect side window demister tubes from
top of heat A/C unit. (18) Remove steering column upper attaching bolts
and allow the steering wheel to rest on the driver
seat cushion. (19) Remove upper instrument panel (defroster
outlet) cover. (20) Remove upper instrument panel attaching
screws from below the windshield opening. (21) Loosen (do not remove) the left lower cowl in-
strument panel attaching screw. (22) Remove the right lower cowl instrument panel
attaching screw.
CAUTION: Protect the passenger seat cover from
soiling or damage using a suitable cover.
(23) Carefully pull the right side of the instrument
panel away from the vehicle. Allow the instrument
panel to rest on the passenger seat cushion.
CAUTION: Before proceeding with the next opera-
tion, review the Safety Precautions and Warnings at
the front of this Group. (24) From the engine compartment, drain the cool-
ing system and disconnect the heater hoses from the
heater core nipples. Plug the nipples to avoid spilling
coolant inside the vehicle. (25) Disconnect the refrigerant lines from the ex-
pansion-valve at the dash panel on the right side of
the vehicle. Seal the refrigerant lines to prevent con-
tamination. (26) Remove the expansion valve from the evapo-
rator plate. Seal the valve to avoid contamination. (27) Remove the condensate drain tube.
(28) Remove heater-A/C unit to dash panel attach-
ing nuts. (29) From inside the vehicle, pull rearward on the
heater-A/C unit to clear the dash panel silencer and
remove the unit from the vehicle. To install, reverse the preceding operation. Refill
cooling system and test for leaks. Evacuate and
charge the refrigerant system and test overall perfor-
mance.
AG, AJ BODY PROCEDURE
WARNING: IF EQUIPPED WITH A/C, THE REFRIG-
ERATION SYSTEM MUST BE COMPLETELY EMPTY
BEFORE PROCEEDING WITH THIS OPERATION.
(1) Disconnect the battery negative cable.
(2) Drain the coolant from cooling system. Refer to
Group 7, Cooling System. (3) Remove the air conditioner expansion valve (if
equipped). (4) Disconnect the heater hoses from heater core.
Then plug or cap the tubes on heater core. This will
prevent spilling coolant into the interior of vehicle
during unit removal. (5) Remove the condensate drain tube.
(6) Disconnect the A/C-heater vacuum supply line
from vacuum supply nipple (in the engine compart-
ment). (7) Remove the four A/C-heater assembly-to-dash
panel attaching nuts. (8) Remove the passenger side front seat. Refer to
Group 23, Body. (9) Remove the kick panel/sill cover at right door
opening. (10) Remove the body computer (Fig. 6) located at
the lower right section of the right front door pillar. (11) Remove the glove box assembly. Refer to
Group 8E, Instrument Panel. (12) Remove the carpeted panels from both sides of
the console. (13) Un-clip the radio antenna cable from the
metal support (Fig. 6) located behind and below the
glove box opening. (14) Instrument panel removal is not necessary to
remove the A/C-heater assembly from the vehicle.
24 - 62 HEATING AND AIR CONDITIONING Ä
Page 2367 of 2438
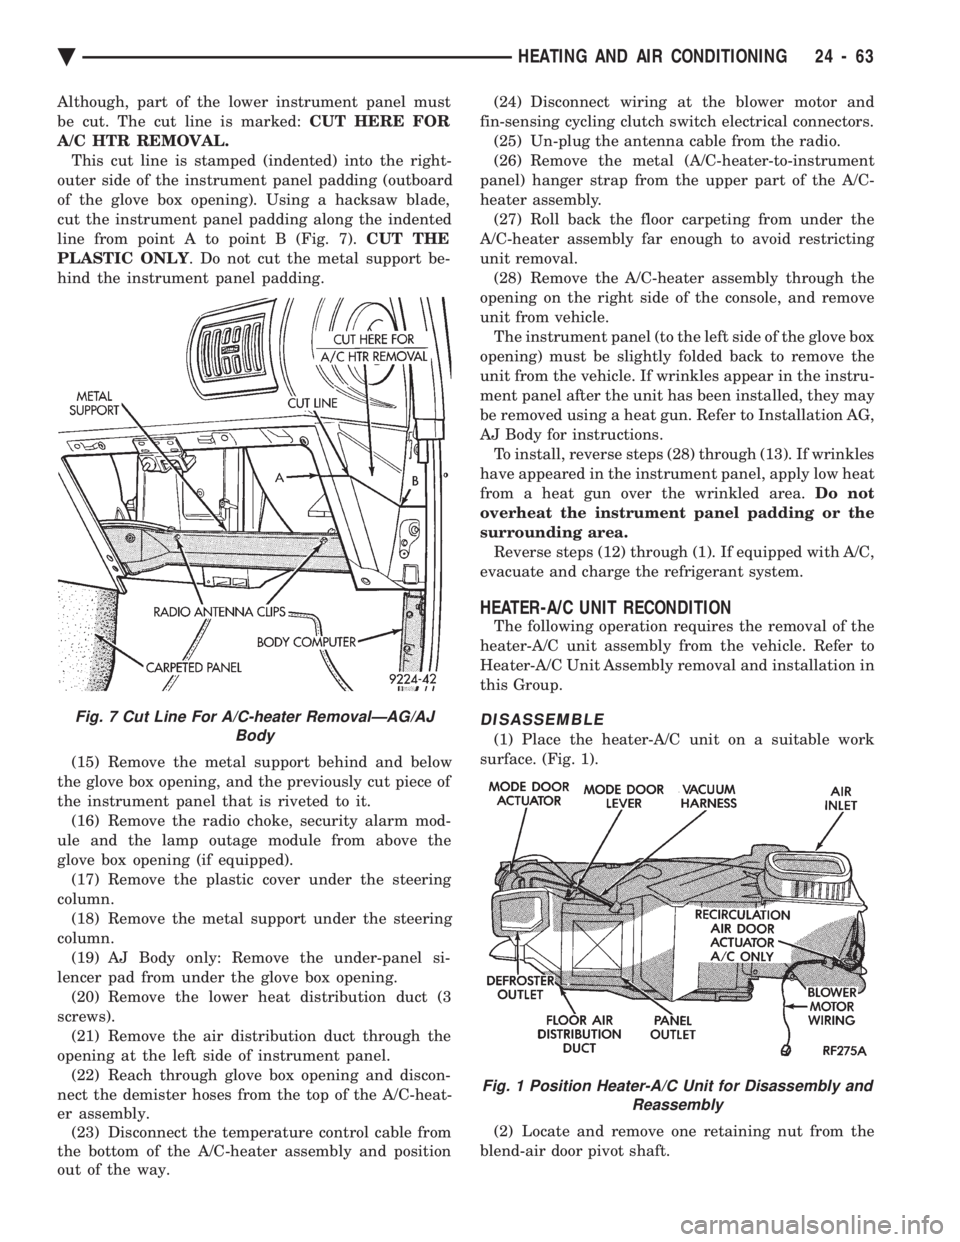
Although, part of the lower instrument panel must
be cut. The cut line is marked: CUT HERE FOR
A/C HTR REMOVAL. This cut line is stamped (indented) into the right-
outer side of the instrument panel padding (outboard
of the glove box opening). Using a hacksaw blade,
cut the instrument panel padding along the indented
line from point A to point B (Fig. 7). CUT THE
PLASTIC ONLY . Do not cut the metal support be-
hind the instrument panel padding.
(15) Remove the metal support behind and below
the glove box opening, and the previously cut piece of
the instrument panel that is riveted to it. (16) Remove the radio choke, security alarm mod-
ule and the lamp outage module from above the
glove box opening (if equipped). (17) Remove the plastic cover under the steering
column. (18) Remove the metal support under the steering
column. (19) AJ Body only: Remove the under-panel si-
lencer pad from under the glove box opening. (20) Remove the lower heat distribution duct (3
screws). (21) Remove the air distribution duct through the
opening at the left side of instrument panel. (22) Reach through glove box opening and discon-
nect the demister hoses from the top of the A/C-heat-
er assembly. (23) Disconnect the temperature control cable from
the bottom of the A/C-heater assembly and position
out of the way. (24) Disconnect wiring at the blower motor and
fin-sensing cycling clutch switch electrical connectors. (25) Un-plug the antenna cable from the radio.
(26) Remove the metal (A/C-heater-to-instrument
panel) hanger strap from the upper part of the A/C-
heater assembly. (27) Roll back the floor carpeting from under the
A/C-heater assembly far enough to avoid restricting
unit removal. (28) Remove the A/C-heater assembly through the
opening on the right side of the console, and remove
unit from vehicle. The instrument panel (to the left side of the glove box
opening) must be slightly folded back to remove the
unit from the vehicle. If wrinkles appear in the instru-
ment panel after the unit has been installed, they may
be removed using a heat gun. Refer to Installation AG,
AJ Body for instructions. To install, reverse steps (28) through (13). If wrinkles
have appeared in the instrument panel, apply low heat
from a heat gun over the wrinkled area. Do not
overheat the instrument panel padding or the
surrounding area. Reverse steps (12) through (1). If equipped with A/C,
evacuate and charge the refrigerant system.
HEATER-A/C UNIT RECONDITION
The following operation requires the removal of the
heater-A/C unit assembly from the vehicle. Refer to
Heater-A/C Unit Assembly removal and installation in
this Group.
DISASSEMBLE
(1) Place the heater-A/C unit on a suitable work
surface. (Fig. 1).
(2) Locate and remove one retaining nut from the
blend-air door pivot shaft.
Fig. 7 Cut Line For A/C-heater RemovalÐAG/AJ Body
Fig. 1 Position Heater-A/C Unit for Disassembly andReassembly
Ä HEATING AND AIR CONDITIONING 24 - 63
Page 2371 of 2438
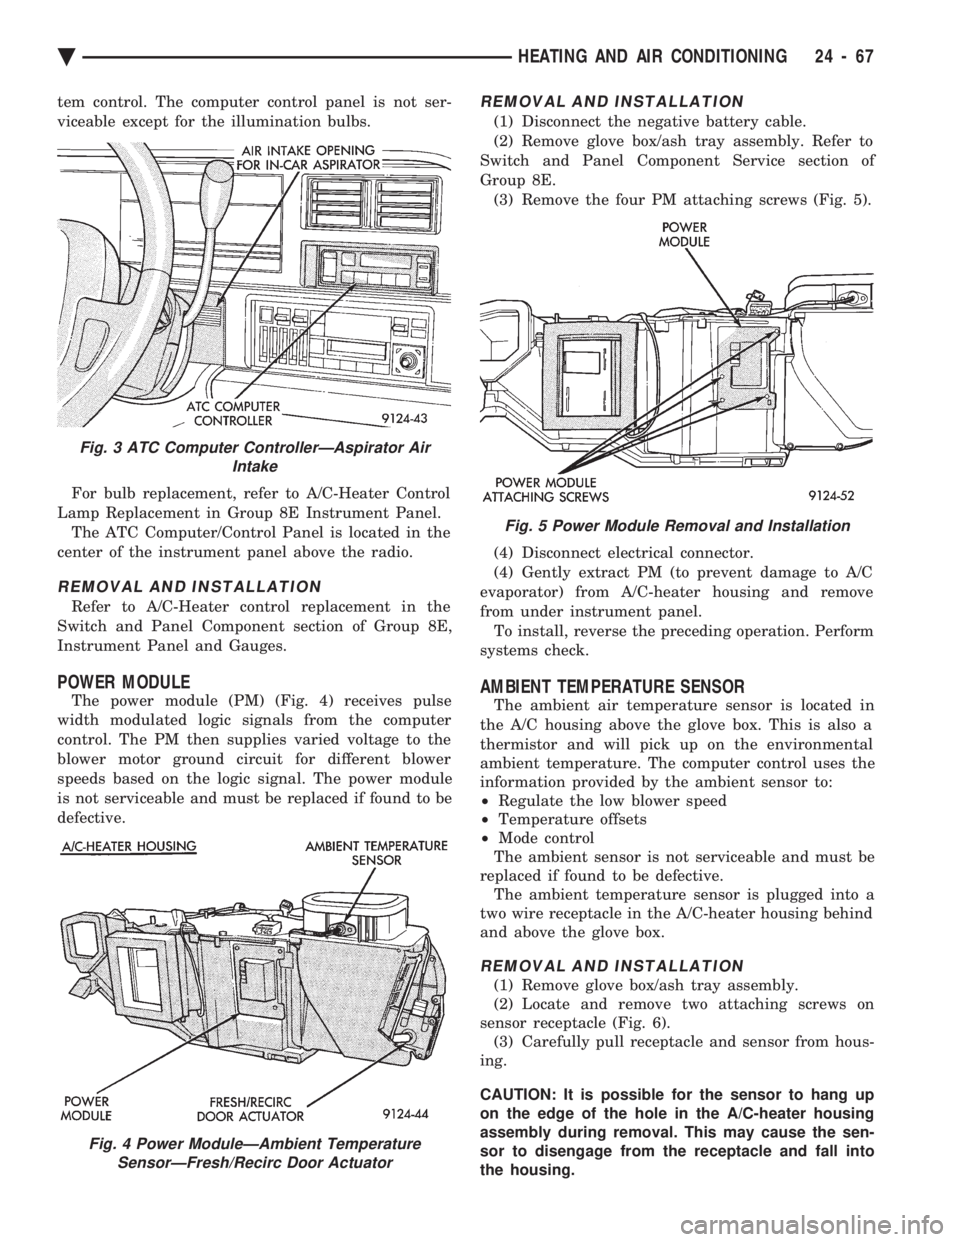
tem control. The computer control panel is not ser-
viceable except for the illumination bulbs. For bulb replacement, refer to A/C-Heater Control
Lamp Replacement in Group 8E Instrument Panel. The ATC Computer/Control Panel is located in the
center of the instrument panel above the radio.
REMOVAL AND INSTALLATION
Refer to A/C-Heater control replacement in the
Switch and Panel Component section of Group 8E,
Instrument Panel and Gauges.
POWER MODULE
The power module (PM) (Fig. 4) receives pulse
width modulated logic signals from the computer
control. The PM then supplies varied voltage to the
blower motor ground circuit for different blower
speeds based on the logic signal. The power module
is not serviceable and must be replaced if found to be
defective.
REMOVAL AND INSTALLATION
(1) Disconnect the negative battery cable.
(2) Remove glove box/ash tray assembly. Refer to
Switch and Panel Component Service section of
Group 8E. (3) Remove the four PM attaching screws (Fig. 5).
(4) Disconnect electrical connector.
(4) Gently extract PM (to prevent damage to A/C
evaporator) from A/C-heater housing and remove
from under instrument panel. To install, reverse the preceding operation. Perform
systems check.
AMBIENT TEMPERATURE SENSOR
The ambient air temperature sensor is located in
the A/C housing above the glove box. This is also a
thermistor and will pick up on the environmental
ambient temperature. The computer control uses the
information provided by the ambient sensor to:
² Regulate the low blower speed
² Temperature offsets
² Mode control
The ambient sensor is not serviceable and must be
replaced if found to be defective. The ambient temperature sensor is plugged into a
two wire receptacle in the A/C-heater housing behind
and above the glove box.
REMOVAL AND INSTALLATION
(1) Remove glove box/ash tray assembly.
(2) Locate and remove two attaching screws on
sensor receptacle (Fig. 6). (3) Carefully pull receptacle and sensor from hous-
ing.
CAUTION: It is possible for the sensor to hang up
on the edge of the hole in the A/C-heater housing
assembly during removal. This may cause the sen-
sor to disengage from the receptacle and fall into
the housing.
Fig. 3 ATC Computer ControllerÐAspirator Air Intake
Fig. 4 Power ModuleÐAmbient TemperatureSensorÐFresh/Recirc Door Actuator
Fig. 5 Power Module Removal and Installation
Ä HEATING AND AIR CONDITIONING 24 - 67
Page 2372 of 2438
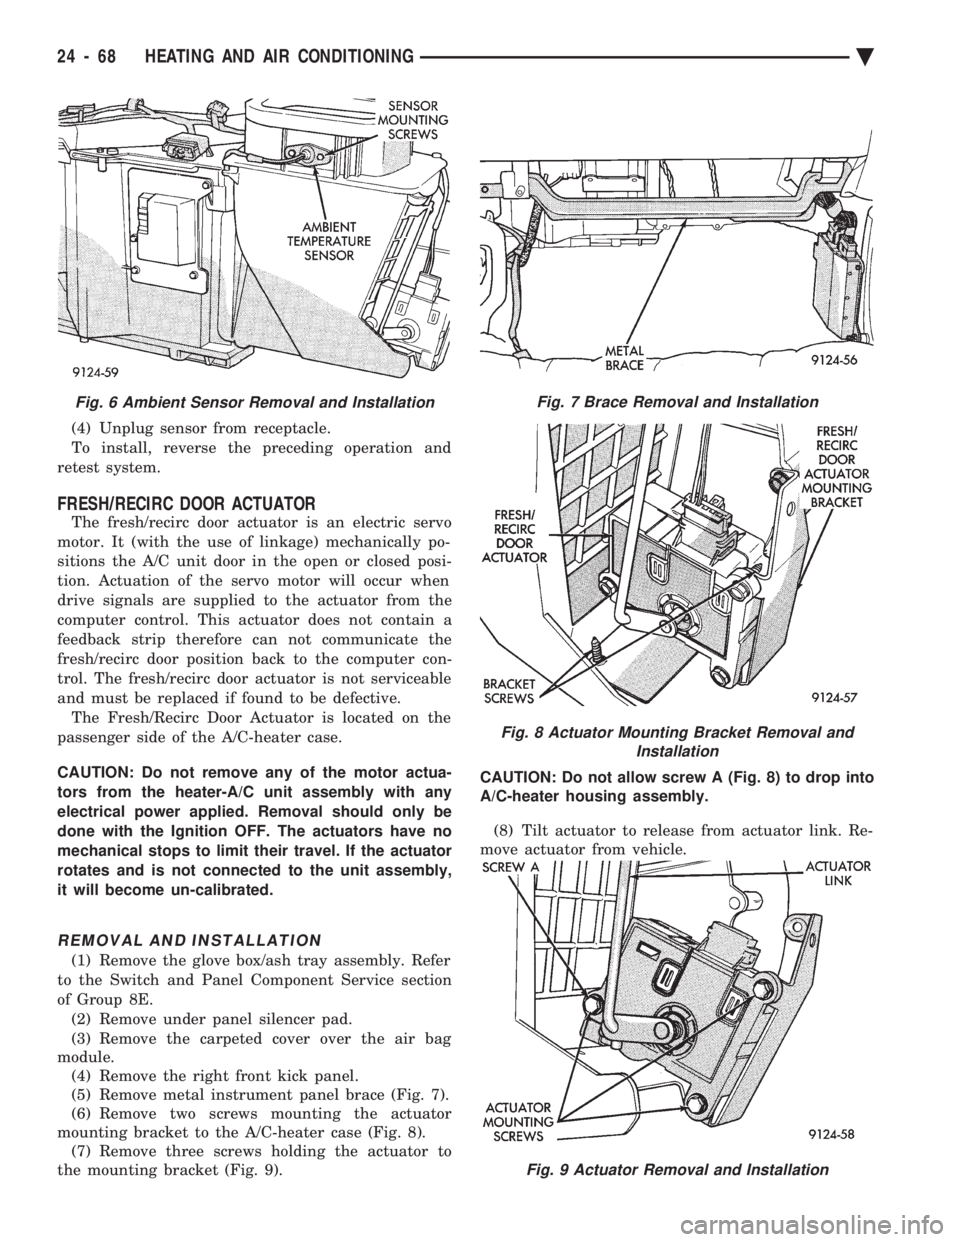
(4) Unplug sensor from receptacle.
To install, reverse the preceding operation and
retest system.
FRESH/RECIRC DOOR ACTUATOR
The fresh/recirc door actuator is an electric servo
motor. It (with the use of linkage) mechanically po-
sitions the A/C unit door in the open or closed posi-
tion. Actuation of the servo motor will occur when
drive signals are supplied to the actuator from the
computer control. This actuator does not contain a
feedback strip therefore can not communicate the
fresh/recirc door position back to the computer con-
trol. The fresh/recirc door actuator is not serviceable
and must be replaced if found to be defective. The Fresh/Recirc Door Actuator is located on the
passenger side of the A/C-heater case.
CAUTION: Do not remove any of the motor actua-
tors from the heater-A/C unit assembly with any
electrical power applied. Removal should only be
done with the Ignition OFF. The actuators have no
mechanical stops to limit their travel. If the actuator
rotates and is not connected to the unit assembly,
it will become un-calibrated.
REMOVAL AND INSTALLATION
(1) Remove the glove box/ash tray assembly. Refer
to the Switch and Panel Component Service section
of Group 8E. (2) Remove under panel silencer pad.
(3) Remove the carpeted cover over the air bag
module. (4) Remove the right front kick panel.
(5) Remove metal instrument panel brace (Fig. 7).
(6) Remove two screws mounting the actuator
mounting bracket to the A/C-heater case (Fig. 8). (7) Remove three screws holding the actuator to
the mounting bracket (Fig. 9). CAUTION: Do not allow screw A (Fig. 8) to drop into
A/C-heater housing assembly.
(8) Tilt actuator to release from actuator link. Re-
move actuator from vehicle.
Fig. 9 Actuator Removal and Installation
Fig. 6 Ambient Sensor Removal and InstallationFig. 7 Brace Removal and Installation
Fig. 8 Actuator Mounting Bracket Removal and Installation
24 - 68 HEATING AND AIR CONDITIONING Ä