1993 CHEVROLET PLYMOUTH ACCLAIM seats
[x] Cancel search: seatsPage 718 of 2438
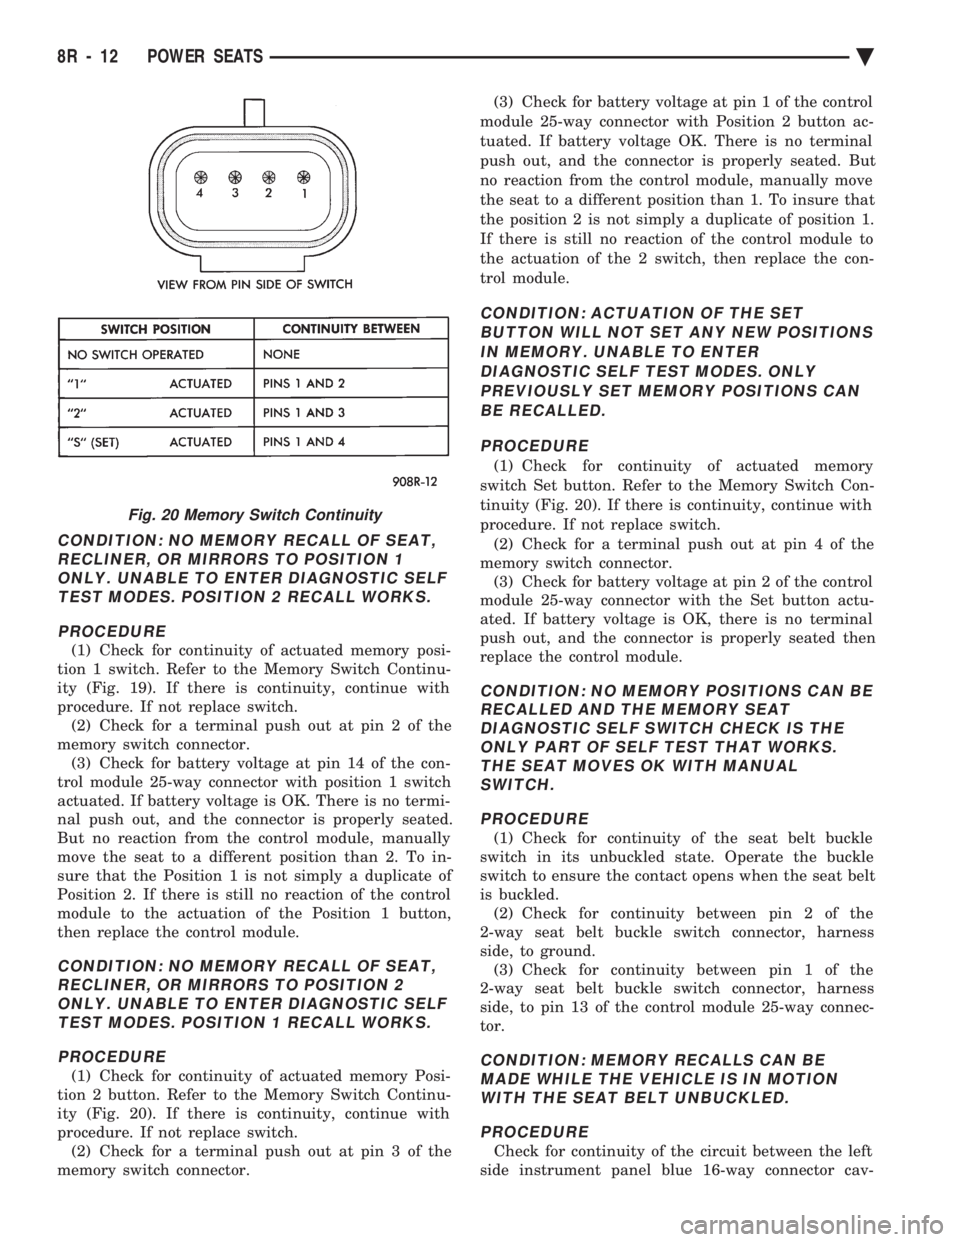
CONDITION: NO MEMORY RECALL OF SEAT, RECLINER, OR MIRRORS TO POSITION 1ONLY. UNABLE TO ENTER DIAGNOSTIC SELFTEST MODES. POSITION 2 RECALL WORKS.
PROCEDURE
(1) Check for continuity of actuated memory posi-
tion 1 switch. Refer to the Memory Switch Continu-
ity (Fig. 19). If there is continuity, continue with
procedure. If not replace switch. (2) Check for a terminal push out at pin 2 of the
memory switch connector. (3) Check for battery voltage at pin 14 of the con-
trol module 25-way connector with position 1 switch
actuated. If battery voltage is OK. There is no termi-
nal push out, and the connector is properly seated.
But no reaction from the control module, manually
move the seat to a different position than 2. To in-
sure that the Position 1 is not simply a duplicate of
Position 2. If there is still no reaction of the control
module to the actuation of the Position 1 button,
then replace the control module.
CONDITION: NO MEMORY RECALL OF SEAT, RECLINER, OR MIRRORS TO POSITION 2ONLY. UNABLE TO ENTER DIAGNOSTIC SELFTEST MODES. POSITION 1 RECALL WORKS.
PROCEDURE
(1) Check for continuity of actuated memory Posi-
tion 2 button. Refer to the Memory Switch Continu-
ity (Fig. 20). If there is continuity, continue with
procedure. If not replace switch. (2) Check for a terminal push out at pin 3 of the
memory switch connector. (3) Check for battery voltage at pin 1 of the control
module 25-way connector with Position 2 button ac-
tuated. If battery voltage OK. There is no terminal
push out, and the connector is properly seated. But
no reaction from the control module, manually move
the seat to a different position than 1. To insure that
the position 2 is not simply a duplicate of position 1.
If there is still no reaction of the control module to
the actuation of the 2 switch, then replace the con-
trol module.
CONDITION: ACTUATION OF THE SET BUTTON WILL NOT SET ANY NEW POSITIONSIN MEMORY. UNABLE TO ENTERDIAGNOSTIC SELF TEST MODES. ONLYPREVIOUSLY SET MEMORY POSITIONS CANBE RECALLED.
PROCEDURE
(1) Check for continuity of actuated memory
switch Set button. Refer to the Memory Switch Con-
tinuity (Fig. 20). If there is continuity, continue with
procedure. If not replace switch. (2) Check for a terminal push out at pin 4 of the
memory switch connector. (3) Check for battery voltage at pin 2 of the control
module 25-way connector with the Set button actu-
ated. If battery voltage is OK, there is no terminal
push out, and the connector is properly seated then
replace the control module.
CONDITION: NO MEMORY POSITIONS CAN BE RECALLED AND THE MEMORY SEATDIAGNOSTIC SELF SWITCH CHECK IS THEONLY PART OF SELF TEST THAT WORKS.THE SEAT MOVES OK WITH MANUALSWITCH.
PROCEDURE
(1) Check for continuity of the seat belt buckle
switch in its unbuckled state. Operate the buckle
switch to ensure the contact opens when the seat belt
is buckled. (2) Check for continuity between pin 2 of the
2-way seat belt buckle switch connector, harness
side, to ground. (3) Check for continuity between pin 1 of the
2-way seat belt buckle switch connector, harness
side, to pin 13 of the control module 25-way connec-
tor.
CONDITION: MEMORY RECALLS CAN BE MADE WHILE THE VEHICLE IS IN MOTIONWITH THE SEAT BELT UNBUCKLED.
PROCEDURE
Check for continuity of the circuit between the left
side instrument panel blue 16-way connector cav-
Fig. 20 Memory Switch Continuity
8R - 12 POWER SEATS Ä
Page 719 of 2438
ity 9 and pin 7 of the control module 25-way connec-
tor. The vehicle speed sensor signal can be tested
with a volt/ohmmeter at pin 7 of the control module
25-way connector. Turn on the vehicle ignition and
check fo r a 5 volt signal as the vehicle is moved
about 3 to 5 feet. If not repair open wiring, terminal
push out, bad crimp, drive in vehicle speed sensor,
etc., as necessary to correct condition. Ensure that
the 25-way connector is plugged into the control
module securely. Road test vehicle after repairs have
been made to ensure that no recalls can occur while
moving.
CONDITION: INSTRUMENT CLUSTER SPEEDOMETER STAYS AT 0 MPH/ (0 KM/H)WHILE VEHICLE IS MOVING, BODYCOMPUTER DOES NOT LOCK DOORS AT 15MPH (24 KM/H), AND THE SPEED CONTROLWILL NOT ACCEPT A SPEED SET.
PROCEDURE
(1) Remove driver's seat anchor bolts and nuts. Ad-
just the driver's seat to a safe driving position. Dis-
connect the 25-way connector from the memory seat
control module. Replace the driver's seat anchor bolts
and nuts. Road test the vehicle to complete this diag-
nosis. If the doors lock, the cruise control accepts a
set, and the speedometer now works, replace the
Memory Seat control module. (2) After replacing the Memory Seat control mod-
ule, perform the memory seat diagnostic self tests.
This teaches the new module it's soft limits and now
re-road test the vehicle before returning it to the cus-
tomer.
CONDITION: NO SEAT MOVEMENT IN THE RECALL MODE, SEAT WILL MOVE BYMANUAL SWITCH ACTUATION IN ALLDIRECTIONS WITHOUT STALL DETECTION.
PROCEDURE
(1) Check for 5 volts at pin 10 of the control mod-
ule 25-way connector. This is the 5 volt feed from the
control module to the seat track position sensing po-
tentiometer. (2) Check for ground at pin 8 of the control module
25-way connector. To test for ground, one lead of the
voltmeter must be connected to either the 5 volt sup-
ply for the control module or the battery positive. If
the sense voltage and ground are NOT present at the
above pins of the 21-way control module connector.
When the seat switch is pressed, replace the control
module. An inadvertent application of battery volt-
age to the circuit could damaged the control module.
If the voltage and ground circuits are present then
continue this procedure. (3) Check for 5 volts at pin 5 of the natural 5-way
connector plugged into the power seat adjuster mo-
tors end-bell. (4) Check for ground at pin 4 of the natural 5-way
connector plugged into the power seat adjuster mo-
tors end-bell. If the power seat adjuster still has no
movement in the recall mode, then continue this pro-
cedure. (5) Disconnect the natural 5-way connector from
the power seat adjuster motors end-bell. (6) Check with an ohmmeter for a resistance read-
ing that may be from 2600 to 4000 ohms between
pins 4 and 5 of the motors end-bell connector. If
there is an open circuit reading or the reading ob-
tained falls outside this range, then replace the seat
motor package assembly. After replacement of the
seat motor package, reconnect all wiring connectors
and reinstall seat assembly in vehicle. Operate the
switches manually to cause maximum seat move-
ment in all directions. Perform the memory seat di-
agnostic self check so the control module will learn
the new soft limits of the assembly.
CONDITION: NO SEAT TRACK FORWARD OR REARWARD MOVEMENT IN THE RECALLMODE, SEAT TRACK WILL MOVE FORWARDOR REARWARD BY MANUAL SWITCHACTUATION WITHOUT STALL DETECTION.
PROCEDURE
(1) Check for a voltage at pin 12 of the control
module 21-way connector. Less than 5 volts for the
seat track fully forward and more than 0 volts when
fully rearward. This voltage should vary correspond-
ing to the position. (2) Check for a voltage at pin 1 of the natural
5-way connector, Same as in step (1) above. The
ground lead connected to pin 4 of the 5-way connec-
tor. If the voltage reading is at 0 volts, disconnect
the 5-way natural connector and check for a short to
ground in the harness. If no short is found, reconnect
the connector and continue the procedure. (3) Check for the voltage to vary as noted above, if
it does not vary as the seat track is moved forward
and rearward, the sensing potentiometer is defective.
Replace the seat motor package assembly. After re-
placement of the seat motor package, reconnect all
wiring connectors and reinstall seat assembly in ve-
hicle. Operate the switches manually to cause maxi-
mum seat movement in all directions. Perform the
memory seat diagnostic self check so the control
module will learn the new soft limits of the assem-
bly.
Ä POWER SEATS 8R - 13
Page 720 of 2438
CONDITION: NO SEAT TRACK FRONT UP OR DOWN MOVEMENT IN THE RECALL MODE,SEAT TRACK FRONT WILL MOVE UP ORDOWN BY MANUAL SWITCH ACTUATIONWITHOUT STALL DETECTION.
PROCEDURE
(1) Check for a voltage at pin 2 of the control mod-
ule 21-way connector. Less than 5 volts for the seat
track front full up and more than 0 volts when fully
down. (2) Check for a voltage at pin 2 of the natural
5-way connector. Same as in step (1) above. With the
ground lead of the meter at pin 4 of this connector. If
the voltage reading is at 0 volts, disconnect the
5-way natural connector and check for a short to
ground in the harness. If no short is found, reconnect
the connector and continue the procedure. (3) Check for the voltage to vary as noted above, if
it does not vary as the seat track front is moved up
and down, the sensing potentiometer is defective. Re-
place the seat motor package assembly. After re-
placement of the seat motor package, reconnect all
wiring connectors and reinstall seat assembly in ve-
hicle. Operate the switches manually to cause maxi-
mum seat movement in all directions. Perform the
memory seat diagnostic self check so the control
module will learn the new soft limits of the assem-
bly.
CONDITION: NO SEAT TRACK REAR UP OR DOWN MOVEMENT IN THE RECALL MODE,SEAT TRACK REAR WILL MOVE UP OR DOWNBY MANUAL SWITCH ACTUATION WITHOUTSTALL DETECTION.
PROCEDURE
(1) Check for a voltage at pin 13 of the control
module 21-way connector. Less than 5 volts for the
seat track rear full up and more than 0 volts when
fully down. (2) Check for a voltage at pin 3 of the natural
5-way connector. Same as in step (1) above. The
ground lead connected to pin 4 of the 5-way connec-
tor. If the voltage reading is at 0 volts, disconnect
the 5-way natural connector and check for a short to
ground in the harness. If no short is found, reconnect
the connector and continue the procedure. (3) Check for the voltage to vary as noted above, if
it does not vary as the seat track rear is moved up
and down, the sensing potentiometer is defective. Re-
place the seat motor package assembly. After re-
placement of the seat motor package, reconnect all
wiring connectors and reinstall seat assembly in ve-
hicle. Operate the switches manually to cause maxi-
mum seat movement in all directions. Perform the
diagnostic self seat check so the control module will
learn the new soft limits of the assembly.
CONDITION: NO MOVEMENT OF THE SEAT,
SEAT WILL MOVE IN THE RECALL MODEONLY.
PROCEDURE
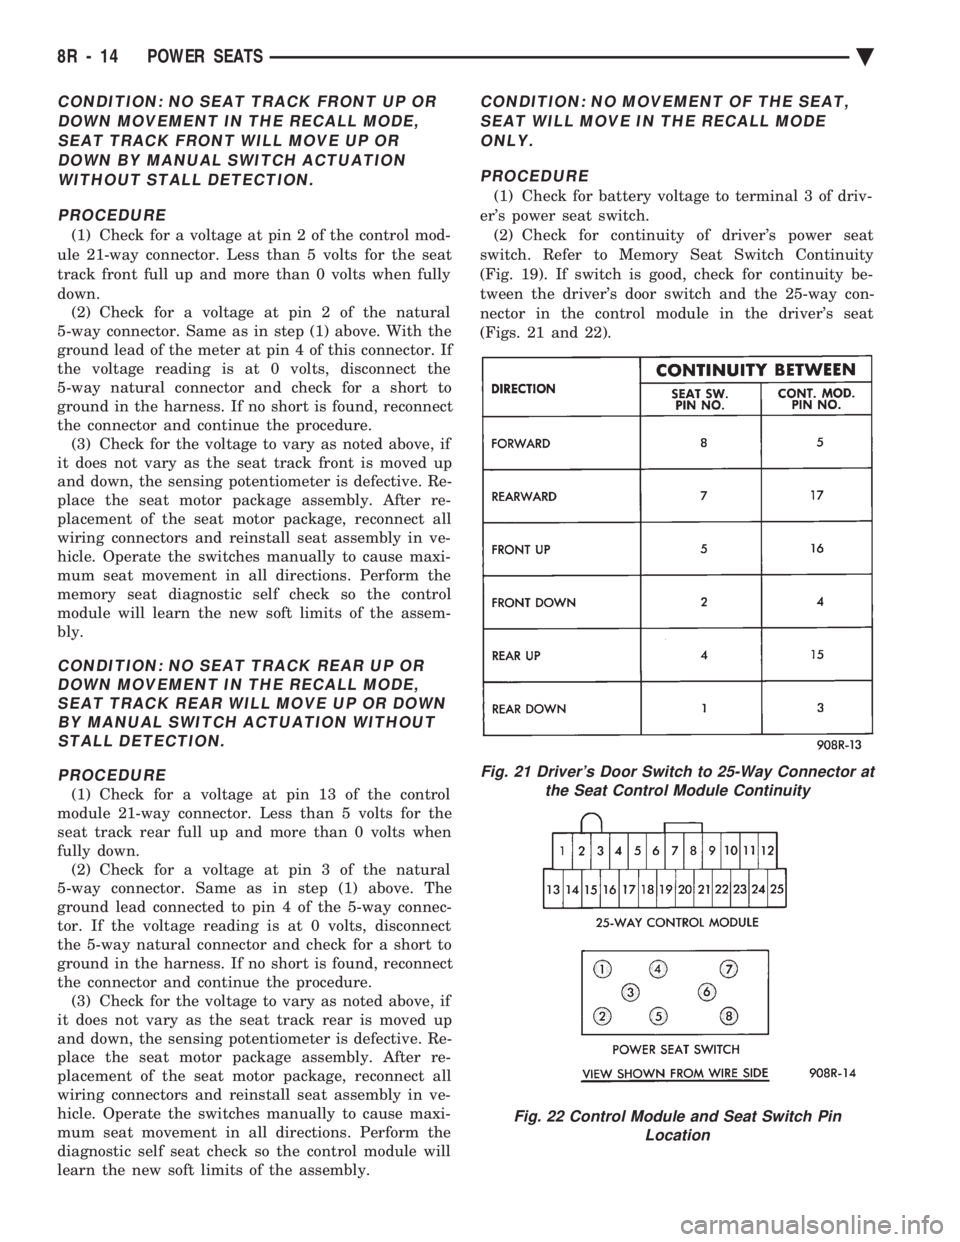
(1) Check for battery voltage to terminal 3 of driv-
er's power seat switch. (2) Check for continuity of driver's power seat
switch. Refer to Memory Seat Switch Continuity
(Fig. 19). If switch is good, check for continuity be-
tween the driver's door switch and the 25-way con-
nector in the control module in the driver's seat
(Figs. 21 and 22).
Fig. 21 Driver's Door Switch to 25-Way Connector at the Seat Control Module Continuity
Fig. 22 Control Module and Seat Switch Pin Location
8R - 14 POWER SEATS Ä
Page 721 of 2438

(3) Use an ohmmeter to test the wiring between
the door switch and the control module in the driv-
er's seat. The circuits should be disconnected from
their components at each end. Repair the wiring as
required for open circuits, terminal push outs, or bad
crimps. If the circuits are good to the control module
but the function is still missing, replace the control
module.
CONDITION: NO MOVEMENT OF THE SEAT, RELAYS CAN BE HEARD CLICKING WHENTHE SEAT SWITCH IS ACTIVATED.
PROCEDURE
(1) Check for battery voltage and ground at the ap-
propriate pins of the control module 10-way connec-
tor (Fig. 23). If the proper results are not obtained,
replace the control module. If the circuits are correct,
then continue the procedure.
(2) Check for continuity of the motor circuits from
the control module 10-way connector to the left
power seat motor package (Fig. 24). (3) Repair the wiring as required for open circuits,
terminal push outs, or bad crimps. If the circuits are
good but the seat movement direction is still missing,
replace the seat motor package assembly. After re-
placement of the seat motor package, reconnect all wiring connectors and reinstall seat assembly in ve-
hicle. Operate the switches manually to cause maxi-
mum seat movement in all directions. Perform the
memory seat diagnostic self check so the control
module will learn the new soft limits of the assem-
bly.
CONDITION: NO MOVEMENT OF THE MEMORY MIRRORS WHEN THE POWERMIRROR SWITCH IS ACTUATED, MEMORYMIRRORS MOVE DURING RECALL ONLY.
PROCEDURE
(1) Check for battery voltage at pin 1 of the mem-
ory mirror switch 8-way connector in the driver's
door. This battery feed is through a diode package
that is located in the left cowl side area. A grounded
wire on the switch side of the diode would most
likely cause the diode package to open. Solder and
tape the connections if replacement is necessary. The
fuse is in cavity 13 of the fuse block. (2) Check for ground at pin 5 of the memory mir-
ror switch 8-way connector. Repair as needed. (3) Check for continuity of the memory mirror
switch. Refer to the Group 8T, Mirror Switch Test
Procedure and the Continuity.
Fig. 23 Control Module 10-Way Connector Voltage and Ground Test
Fig. 24 Control Module 10-Way Connector to PowerSeat Motor Connector Continuity
Ä POWER SEATS 8R - 15
Page 722 of 2438
CONDITION: NO MOVEMENT OF BOTH MEMORY MIRRORS OR ONLY ONE MEMORY MIRROR DURING THE RECALL MODE,MEMORY MIRRORS WILL MOVE ONLY WHENTHE POWER MIRROR SWITCH IS ACTUATED.MEMORY SEAT AND RECLINER MOVE INRECALL.
PROCEDURE
(1) Determine the fault precisely. If all memory
mirror recall movements appear to be missing, first
set the mirrors to two different vertical and horizon-
tal positions for both mirrors. Refer to the General
Information paragraph at the beginning of this sec-
tion for position setting instructions. Try to recall
these set positions that were just placed in memory. (2) Observe for no movement in a specific direction
for a specific mirror. If there is still no movement of
either mirror in any direction, re place the control
module. Perform the memory seat diagnostic self
check so the control module will learn the new soft
limits of the assembly. If the non-movement is in a
specific direction or a specific mirror, continue with
the procedure. (3) Perform the diagnostic self tests, mirror check
mode, to determine if the fault is with a motor or
with a position sensing rheostat circuit. Refer to
Memory Seat and Mirror Diagnostic Self-Tests expla-
nation for further information and understanding of
the diagnostic process and identifying of the fault. If
the fault is with a motor, continue this procedure as
follows in step (4) below. If the fault is with a rheo-
stat, as indicated by the mirror nod in the vertical or
horizontal plane, continue the procedure with step (5)
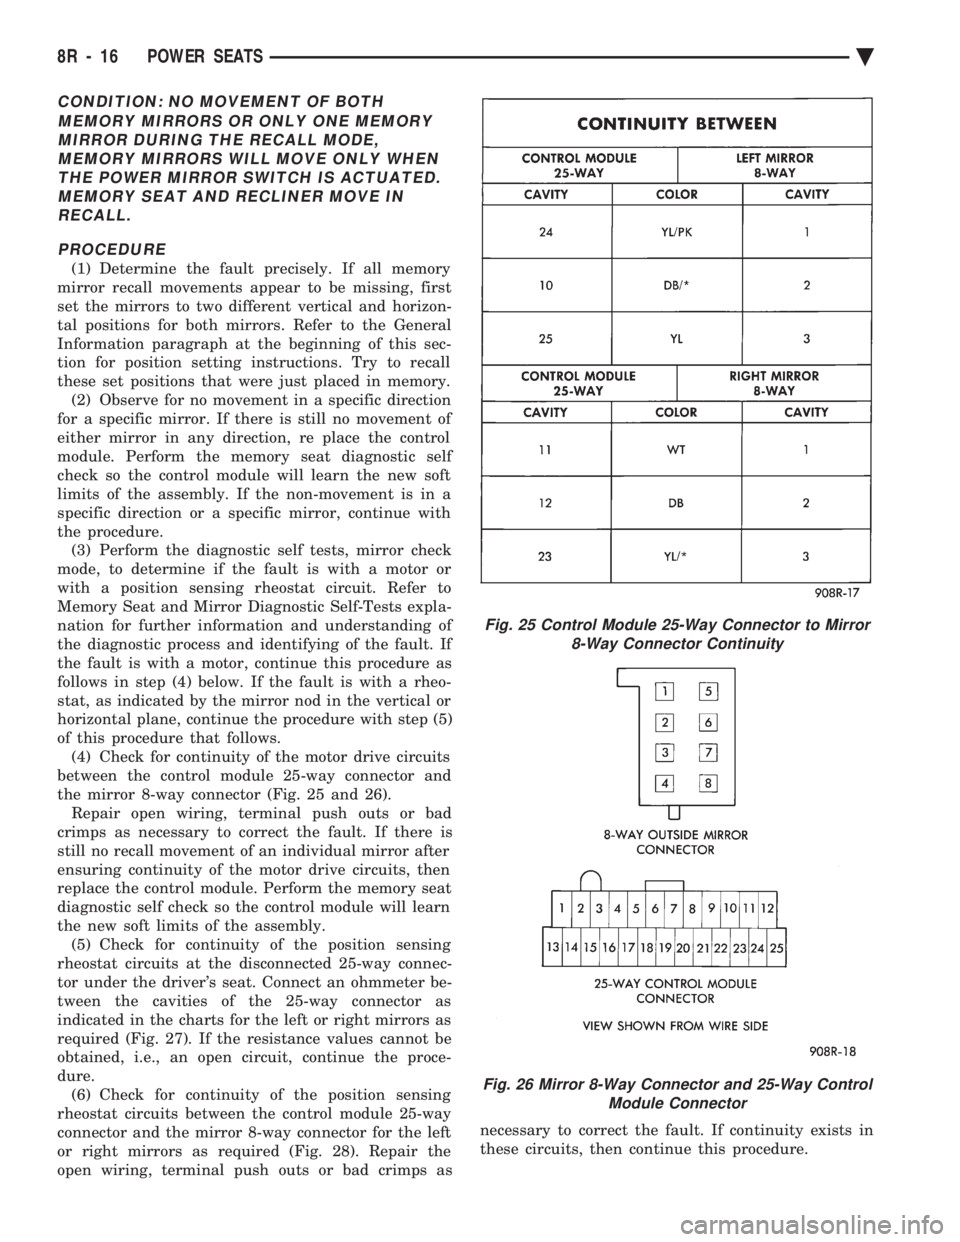
of this procedure that follows. (4) Check for continuity of the motor drive circuits
between the control module 25-way connector and
the mirror 8-way connector (Fig. 25 and 26). Repair open wiring, terminal push outs or bad
crimps as necessary to correct the fault. If there is
still no recall movement of an individual mirror after
ensuring continuity of the motor drive circuits, then
replace the control module. Perform the memory seat
diagnostic self check so the control module will learn
the new soft limits of the assembly. (5) Check for continuity of the position sensing
rheostat circuits at the disconnected 25-way connec-
tor under the driver's seat. Connect an ohmmeter be-
tween the cavities of the 25-way connector as
indicated in the charts for the left or right mirrors as
required (Fig. 27). If the resistance values cannot be
obtained, i.e., an open circuit, continue the proce-
dure. (6) Check for continuity of the position sensing
rheostat circuits between the control module 25-way
connector and the mirror 8-way connector for the left
or right mirrors as required (Fig. 28). Repair the
open wiring, terminal push outs or bad crimps as necessary to correct the fault. If continuity exists in
these circuits, then continue this procedure.
Fig. 25 Control Module 25-Way Connector to Mirror 8-Way Connector Continuity
Fig. 26 Mirror 8-Way Connector and 25-Way Control Module Connector
8R - 16 POWER SEATS Ä
Page 723 of 2438
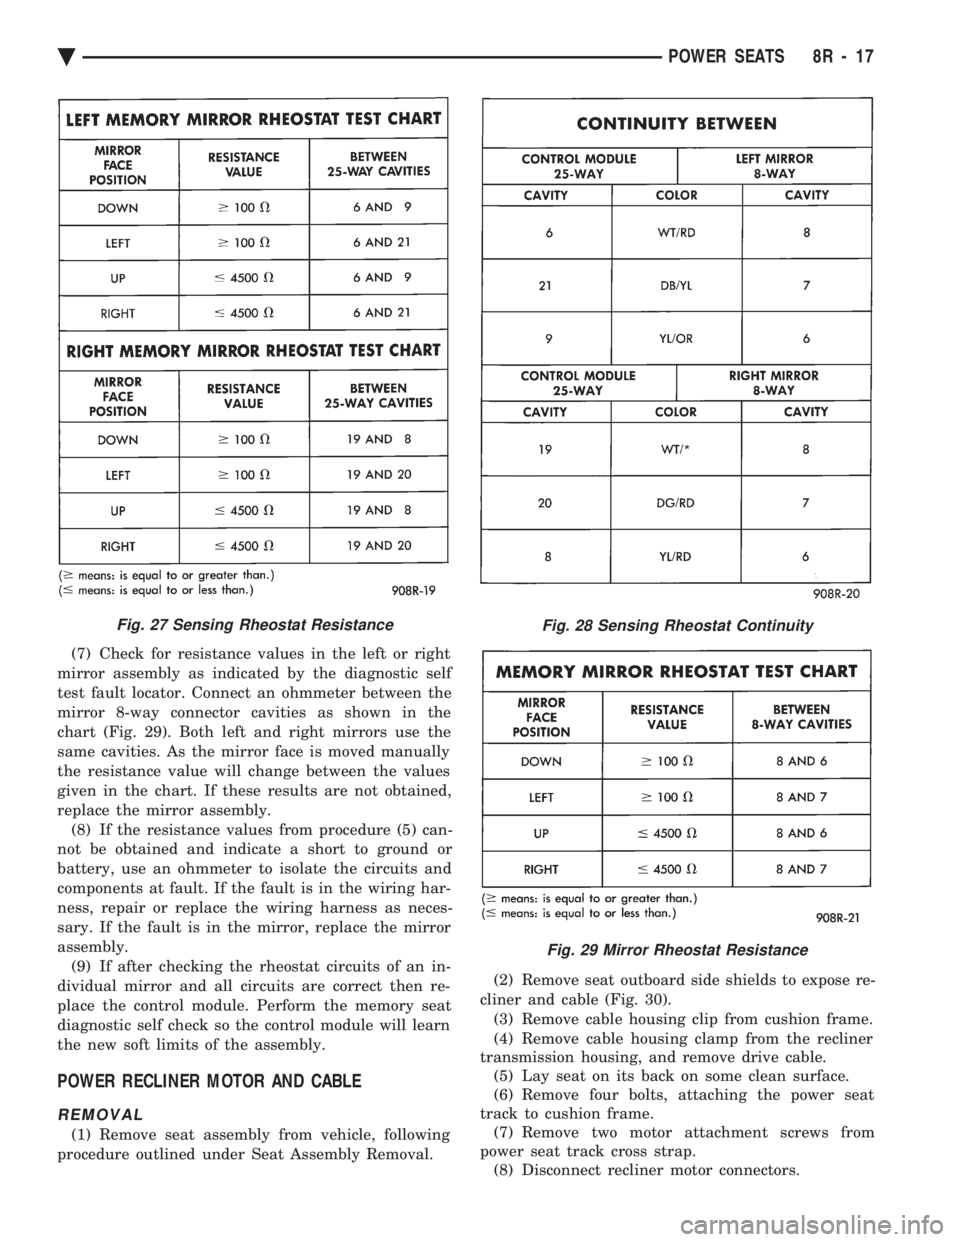
(7) Check for resistance values in the left or right
mirror assembly as indicated by the diagnostic self
test fault locator. Connect an ohmmeter between the
mirror 8-way connector cavities as shown in the
chart (Fig. 29). Both left and right mirrors use the
same cavities. As the mirror face is moved manually
the resistance value will change between the values
given in the chart. If these results are not obtained,
replace the mirror assembly. (8) If the resistance values from procedure (5) can-
not be obtained and indicate a short to ground or
battery, use an ohmmeter to isolate the circuits and
components at fault. If the fault is in the wiring har-
ness, repair or replace the wiring harness as neces-
sary. If the fault is in the mirror, replace the mirror
assembly. (9) If after checking the rheostat circuits of an in-
dividual mirror and all circuits are correct then re-
place the control module. Perform the memory seat
diagnostic self check so the control module will learn
the new soft limits of the assembly.
POWER RECLINER MOTOR AND CABLE
REMOVAL
(1) Remove seat assembly from vehicle, following
procedure outlined under Seat Assembly Removal. (2) Remove seat outboard side shields to expose re-
cliner and cable (Fig. 30). (3) Remove cable housing clip from cushion frame.
(4) Remove cable housing clamp from the recliner
transmission housing, and remove drive cable. (5) Lay seat on its back on some clean surface.
(6) Remove four bolts, attaching the power seat
track to cushion frame. (7) Remove two motor attachment screws from
power seat track cross strap. (8) Disconnect recliner motor connectors.
Fig. 27 Sensing Rheostat ResistanceFig. 28 Sensing Rheostat Continuity
Fig. 29 Mirror Rheostat Resistance
Ä POWER SEATS 8R - 17
Page 724 of 2438
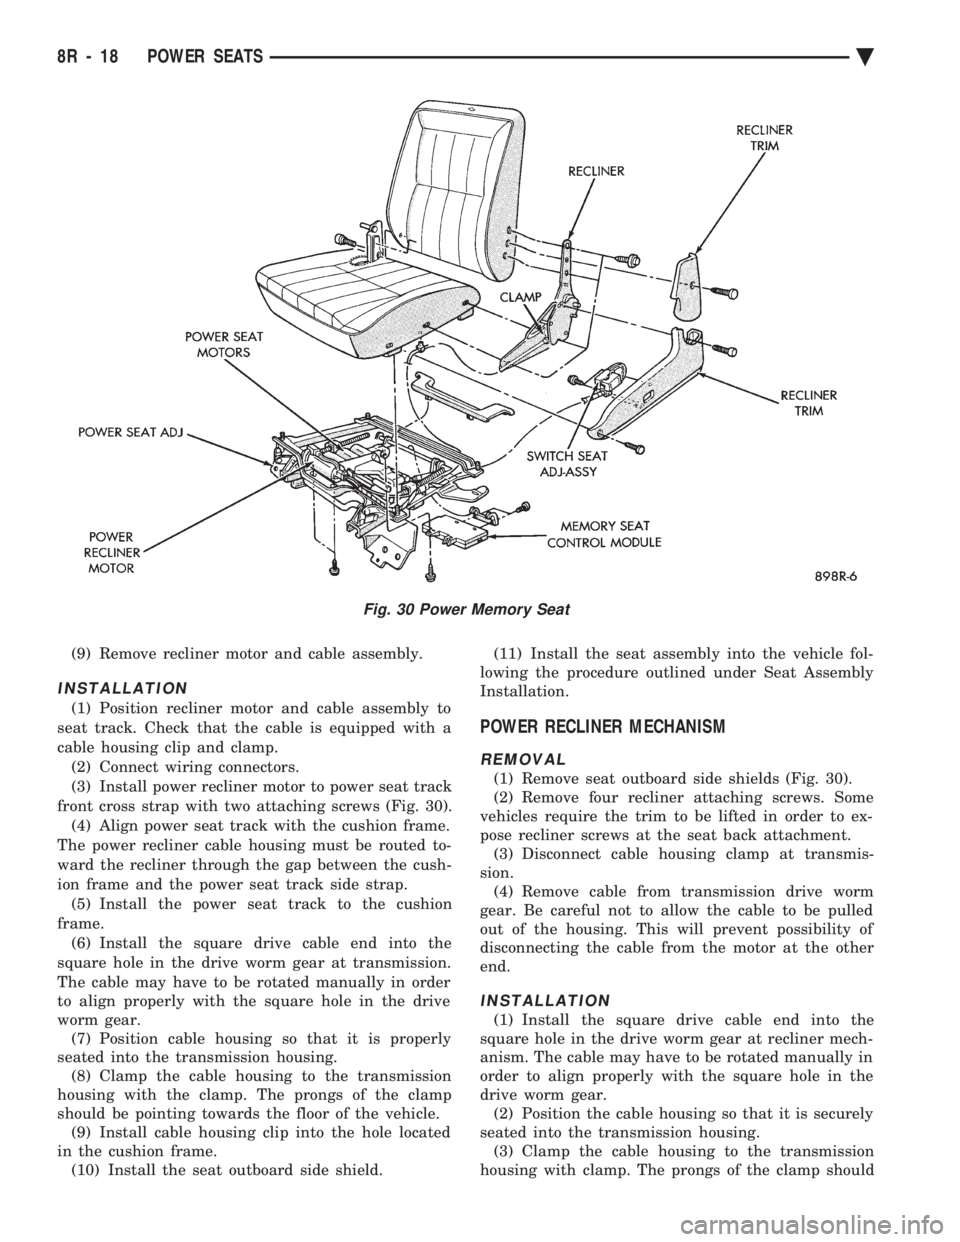
(9) Remove recliner motor and cable assembly.
INSTALLATION
(1) Position recliner motor and cable assembly to
seat track. Check that the cable is equipped with a
cable housing clip and clamp. (2) Connect wiring connectors.
(3) Install power recliner motor to power seat track
front cross strap with two attaching screws (Fig. 30). (4) Align power seat track with the cushion frame.
The power recliner cable housing must be routed to-
ward the recliner through the gap between the cush-
ion frame and the power seat track side strap. (5) Install the power seat track to the cushion
frame. (6) Install the square drive cable end into the
square hole in the drive worm gear at transmission.
The cable may have to be rotated manually in order
to align properly with the square hole in the drive
worm gear. (7) Position cable housing so that it is properly
seated into the transmission housing. (8) Clamp the cable housing to the transmission
housing with the clamp. The prongs of the clamp
should be pointing towards the floor of the vehicle. (9) Install cable housing clip into the hole located
in the cushion frame. (10) Install the seat outboard side shield. (11) Install the seat assembly into the vehicle fol-
lowing the procedure outlined under Seat Assembly
Installation.
POWER RECLINER MECHANISM
REMOVAL
(1) Remove seat outboard side shields (Fig. 30).
(2) Remove four recliner attaching screws. Some
vehicles require the trim to be lifted in order to ex-
pose recliner screws at the seat back attachment. (3) Disconnect cable housing clamp at transmis-
sion. (4) Remove cable from transmission drive worm
gear. Be careful not to allow the cable to be pulled
out of the housing. This will prevent possibility of
disconnecting the cable from the motor at the other
end.
INSTALLATION
(1) Install the square drive cable end into the
square hole in the drive worm gear at recliner mech-
anism. The cable may have to be rotated manually in
order to align properly with the square hole in the
drive worm gear. (2) Position the cable housing so that it is securely
seated into the transmission housing. (3) Clamp the cable housing to the transmission
housing with clamp. The prongs of the clamp should
Fig. 30 Power Memory Seat
8R - 18 POWER SEATS Ä
Page 725 of 2438
be pointing towards the floor of the vehicle. (4) Install the four recliner to seat frame fasteners
(Fig. 30). (5) Install seat outboard side shields and fix all
trim so that no foam is exposed. (6) Set system soft limits.
MEMORY CONTROL MODULE REPLACEMENT
(1) Remove seat assembly from vehicle and follow the
procedure outlined under Seat Assembly Removal.
(2) Lay seat on its back on a clean surface.
(3) Remove screws attaching control module to
seat track (Fig. 30). (4) Disconnect control module wiring.
(5) Remove control module.
(6) For installation reverse above procedures. Set
system soft limits by performing the memory seat di-
agnostic self check. So that the control module will
learn the soft limits of the assembly.
RECLINER SWITCH REPLACEMENT
(1) Remove seat side shields (Fig. 30).
(2) Disconnect wiring from switch.
(3) Remove attaching screws from side shields.
(4) Remove switch.
(5) For installation reverse above procedures.
RECLINER SWITCH TEST
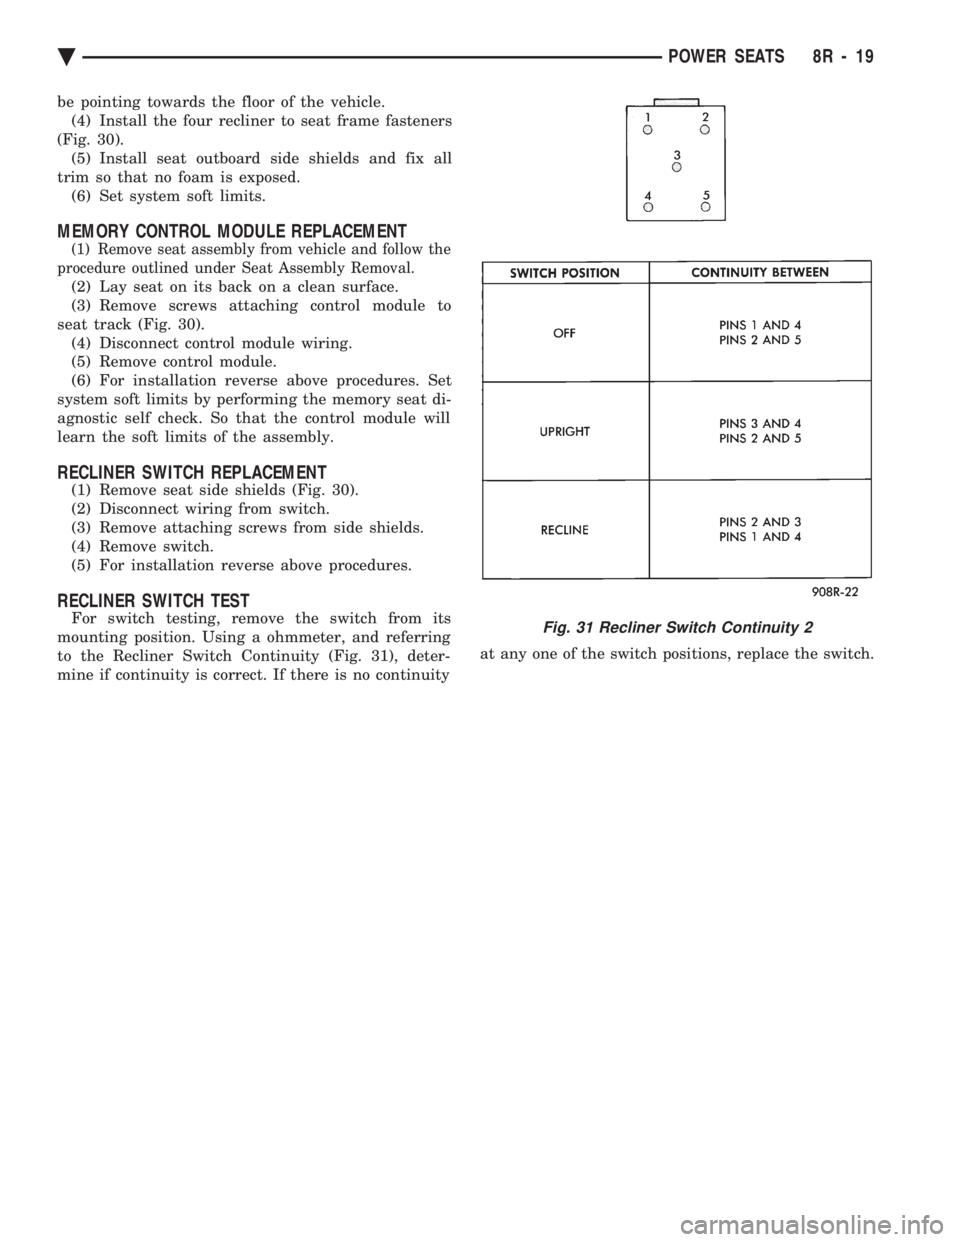
For switch testing, remove the switch from its
mounting position. Using a ohmmeter, and referring
to the Recliner Switch Continuity (Fig. 31), deter-
mine if continuity is correct. If there is no continuity at any one of the switch positions, replace the switch.Fig. 31 Recliner Switch Continuity 2
Ä
POWER SEATS 8R - 19