1993 CHEVROLET PLYMOUTH ACCLAIM relay
[x] Cancel search: relayPage 232 of 2438

The primary functions of the (CAB) are:
² (1) Detect wheel locking tendencies.
² (2) Control fluid modulation to the brakes while in
Anti-Lock mode.
² (3) Monitor the system for proper operation.
² (4) Provide communication to the DRB II while in
diagnostic mode. The (CAB) continuously monitors the speed of each
wheel, through the signals generated at the Wheel
Speed Sensors, to determine if any wheel is begin-
ning to lock. When a wheel locking tendency is de-
tected, the (CAB) will isolate the master cylinder
from the wheel brakes. This is done by activating the
Isolation Valves. The (CAB) then commands the ap-
propriate Build or Decay valves to modulate brake
fluid pressure in some or all of the hydraulic circuits.
The fluid used for modulation comes from the booster
servo circuit. The (CAB) continues to control pres-
sure in individual hydraulic circuits until a locking
tendency is no longer present. The (ABS) system is constantly monitored by the
(CAB) for proper operation. If the (CAB) detects a
fault, it can disable the Anti-Lock braking function.
Depending on the fault, the (CAB) will light one or
both of the brake warning lamps. The (CAB) contains a System Diagnostic Program
which triggers the brake system warning lamps
when a system fault is detected. Faults are stored in
a diagnostic program memory. There are 19 fault
codes that may be stored in the (CAB) and displayed
through the DRB II. These fault codes will remain in
the (CAB) memory even after the ignition has been
turned off. These fault codes will remain in memory
until they are cleared with the DRB II, or automati-
cally erased from the memory after (50) ignition
switch on/off cycles.
CONTROLLER ANTI-LOCK BRAKE (INPUTS)
² Four wheel speed sensors.
² Boost pressure transducer.
² Primary pressure transducer.
² Low fluid level switch.
² Differential pressure switch.
² Parking brake switch.
² Dual function pressure switch (warning pressure
only)
² Stop lamp switch.
² Ignition switch.
² System relay voltage.
² Ground.
² Low Accumulator
CONTROLLER ANTI-LOCK BRAKE (OUTPUTS)
²Ten modulator valves-3 decay, 3 build and 4 isola-
tion.
² Red Brake warning lamp.
² Amber Anti-Lock Warning Lamp.
² System relay actuation. ²
Diagnostic communication.
ABS SYSTEM DIAGNOSTIC CONNECTOR
The Bendix Anti-Lock system diagnostic connector
is located under the lower dash panel or in the area
of the fuse box (Fig. 8). The fuse box is located be-
hind the access panel that is on the bottom portion of
the dash panel, left of the steering column. The diag-
nostics connector is a blue 6 way connector.
ANTI-LOCK SYSTEM RELAYS AND WARNING
LAMPS
PUMP/MOTOR RELAY
Pump/Motor power is supplied by the Pump/Motor
Relay. The Pump/Motor relay is located inside the
Power Distribution Center (PDC). The relay coil is
energized by a ground from the Dual Function Pres-
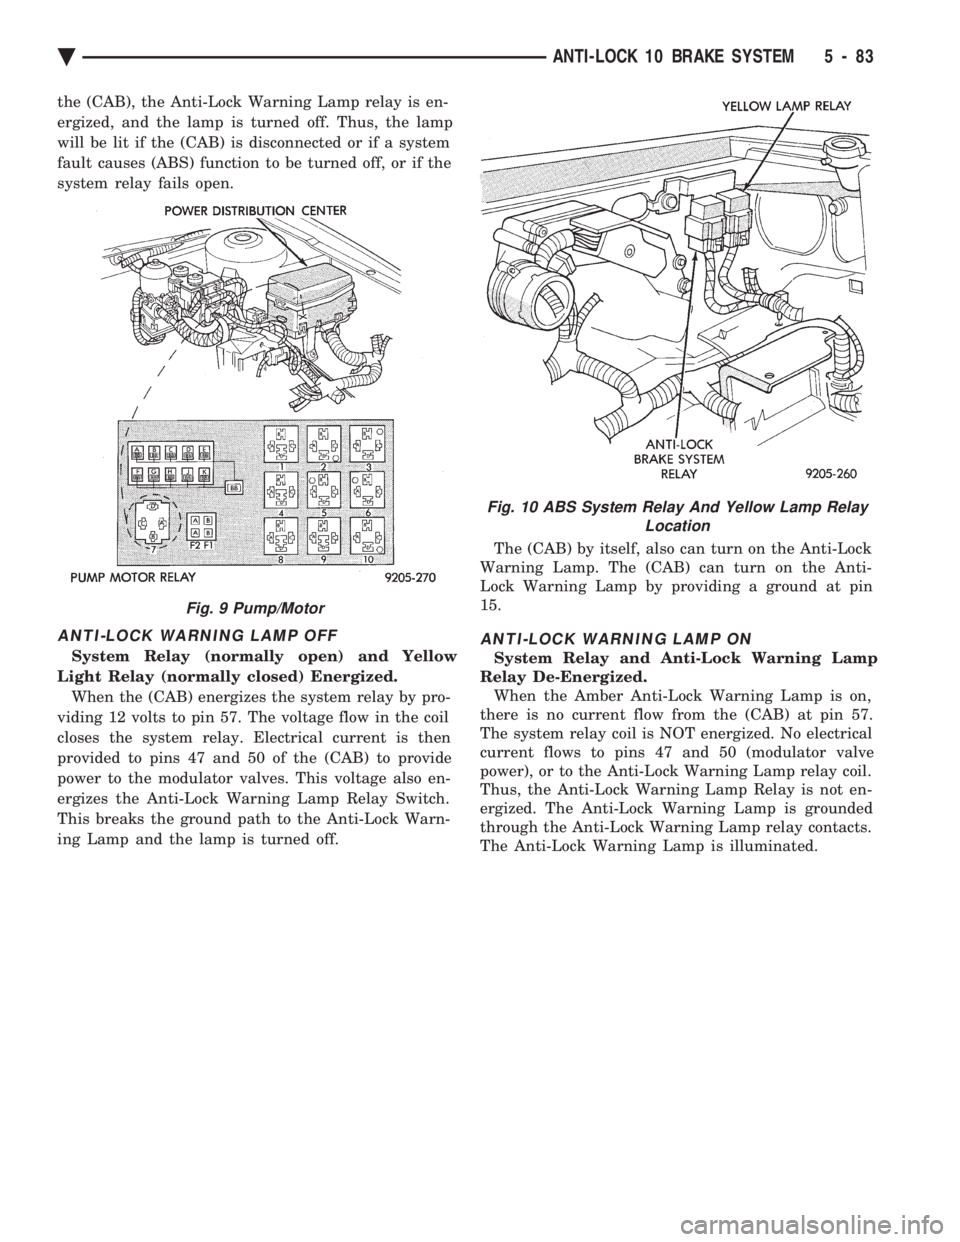
sure Switch. See (Fig. 9) for the location of the pump/
motor relay in the (PDC).
SYSTEM RELAY
The (ABS) Modulator Valves and Anti-Lock Warn-
ing Lamp Relay are controlled through a System Re-
lay. The System relay is located on the top left inner
fender behind the headlight (Fig. 10). The system re-
lay provides power to the (CAB) for modulator valve
operation (pins 47 and 50) after the start-up cycle
when the ignition is turned on.
ANTI-LOCK WARNING LAMP RELAY
The Anti-Lock Warning Lamp is controlled by the
Yellow Light Relay. See (Fig. 10) for location behind
the left headlight. With the relay de-energized, the
lamp is lit. When the system relay is energized by
Fig. 8 A.B.S. Diagnostic Connector Location
5 - 82 ANTI-LOCK 10 BRAKE SYSTEM Ä
Page 233 of 2438

the (CAB), the Anti-Lock Warning Lamp relay is en-
ergized, and the lamp is turned off. Thus, the lamp
will be lit if the (CAB) is disconnected or if a system
fault causes (ABS) function to be turned off, or if the
system relay fails open.
ANTI-LOCK WARNING LAMP OFF
System Relay (normally open) and Yellow
Light Relay (normally closed) Energized. When the (CAB) energizes the system relay by pro-
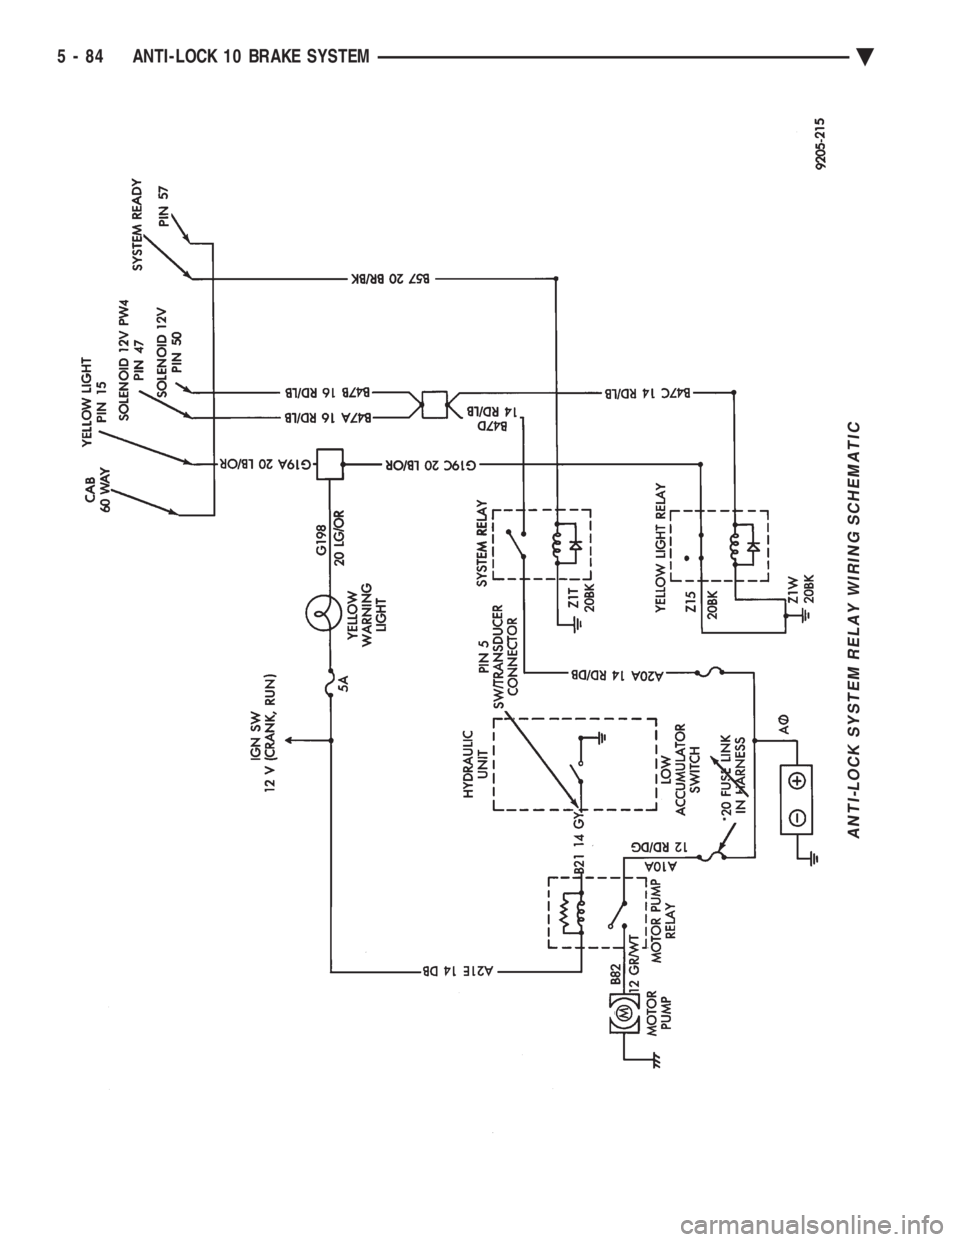
viding 12 volts to pin 57. The voltage flow in the coil
closes the system relay. Electrical current is then
provided to pins 47 and 50 of the (CAB) to provide
power to the modulator valves. This voltage also en-
ergizes the Anti-Lock Warning Lamp Relay Switch.
This breaks the ground path to the Anti-Lock Warn-
ing Lamp and the lamp is turned off. The (CAB) by itself, also can turn on the Anti-Lock
Warning Lamp. The (CAB) can turn on the Anti-
Lock Warning Lamp by providing a ground at pin
15.
ANTI-LOCK WARNING LAMP ON
System Relay and Anti-Lock Warning Lamp
Relay De-Energized. When the Amber Anti-Lock Warning Lamp is on,
there is no current flow from the (CAB) at pin 57.
The system relay coil is NOT energized. No electrical
current flows to pins 47 and 50 (modulator valve
power), or to the Anti-Lock Warning Lamp relay coil.
Thus, the Anti-Lock Warning Lamp Relay is not en-
ergized. The Anti-Lock Warning Lamp is grounded
through the Anti-Lock Warning Lamp relay contacts.
The Anti-Lock Warning Lamp is illuminated.
Fig. 9 Pump/Motor
Fig. 10 ABS System Relay And Yellow Lamp Relay Location
Ä ANTI-LOCK 10 BRAKE SYSTEM 5 - 83
Page 234 of 2438

ANTI-LOCK SYSTEM RELAY WIRING SCHEMATIC
5 - 84 ANTI-LOCK 10 BRAKE SYSTEM Ä
Page 242 of 2438

(11) Remove all special tools previously installed,
from the ABS hydraulic assembly. (12) Install accumulator port plug into hydraulic
assembly. Torque accumulator port plug to 12 N Im(9
ft. lbs.). (13) Install high pressure brake hose from the
pump motor assembly into hydraulic fitting on ABS
hydraulic assembly. Torque high pressure brake hose
tube nut to 16 N Im (145 in. lbs.).
(14) Turn ignition switch to the run position to en-
ergize the pump/motor assembly and pressurize hy-
draulic system. Check for leakage at the hydraulic
assembly to hydraulic bladder accumulator fitting. (15) Again de-pressurize accumulator by pumping
brake pedal a minimum of 40 times. Use procedure
described in De-Pressurizing Hydraulic Accumulator
in this section of the service manual. (16) Then check the brake fluid level in the hy-
draulic assembly reservoir. If brake fluid level is low,
fill reservoir to proper level with Mopar tbrake fluid
or equivalent conforming to DOT 3 requirements.
INTERMITTENT FAULTS
As with almost any electronic system, intermittent
faults in the ABS system may be difficult to accu-
rately diagnose. Most intermittent faults are caused by faulty elec-
trical connections or wiring. When an intermittent
fault is encountered, check suspect circuits for: (1) Poor mating of electrical connector halves, or
electrical terminals not fully seated in the connector
body. (2) Improperly formed or damaged electrical termi-
nals. All connector terminals in a suspect circuit
should be carefully reformed to increase contact ten-
sion. (3) Poor terminal to wire connection. This requires
removing the terminal from the connector body and
inspecting for proper terminal to wire connection. If a visual check does not find the cause of the
problem, operate the vehicle in an attempt to dupli-
cate the condition and record the Fault Code. Most failures of the ABS system will disable the
Anti-Lock function for the entire ignition cycle even
if the fault clears before ignition key-off. There are
some failure conditions however, which will allow
ABS operation to resume during the ignition cycle in
which a failure occurred. If the failure conditions are
no longer present. The following conditions may result in intermittent
illumination of the Red Brake Warning Lamp and/or
Amber Anti-Lock Warning Lamp. All other failures
will cause the lamp(s) to remain on until the ignition
switch is turned off. Circuits and or components in-
volving these inputs to the (CAB) should be investi-
gated if a complaint of intermittent warning system
operation is encountered. ²
Low system voltage. If low system voltage is de-
tected by the (CAB), the (CAB) will turn on the Am-
ber Anti-Lock Warning Lamp until normal system
voltage is achieved. Once normal voltage is seen at
the (CAB), normal operation resumes.
² Low Brake Fluid. A low brake fluid condition will
cause the Red Brake Warning Lamp to illuminate.
When the fluid sensor again indicates an acceptable
fluid level, the Red Brake Warning Lamp will go out.
This condition may exist during hard cornering or
while the vehicle is on a grade. If the vehicle is in
motion above 3 M.P.H. the Amber Anti-Lock Warn-
ing Lamp will also be turned on.
² Low Accumulator Pressure. Low Accumulator
Pressure will cause both the Red Brake Warning and
Amber Anti-Lock Warning Lamps to illuminate.
Once normal operating pressure is achieved, the
lamps will extinguish and the system will return to
normal operation. Additionally, any condition that results in an inter-
ruption of power to the (CAB) or hydraulic assembly.
May cause the Red Brake Warning and Amber Anti-
Lock Warning Lamps to illuminate intermittently. All the conditions (or faults) mentioned above, can
store a fault code in the (CAB) module.
ABS BRAKE SYSTEM DIAGNOSTIC FEATURES
SYSTEM SELF DIAGNOSIS
The ABS system is equipped with a diagnostic ca-
pability that may be used to assist in isolation of
ABS faults. The features of the diagnostics system
are described below.
CONTROLLER ANTI-LOCK BRAKE (CAB)
Fault codes are kept in a Non-Volatile memory un-
til either erased by the technician using the DRB II
or erased automatically after 50 ignition cycles (key
ON-OFF cycles). The only fault that will not be
erased after 50 (KEY CYCLES) is the (CAB) fault.
The (CAB) fault can only be erased by using the
DRB II diagnostic tester. More than one fault can be
stored at a time. The number of key cycles since the
most recent fault was stored is also displayed. Most
functions of the (CAB) and (ABS) system can be ac-
cessed by the technician for testing and diagnostic
purposes by using the DRB II Diagnostic Tester.
START-UP CYCLE
The START-UP CYCLE takes place immediately
after the ignition switch is turned on. It is an elec-
trical check of basic electrical functions such as the
System Relay and Anti-Lock Warning Lamp Relay.
During this check, the Amber Anti-Lock Warning
Lamp is turned on, then turned off at the end of the
test. The test takes approximatel y1-2seconds to
complete.
5 - 92 ANTI-LOCK 10 BRAKE SYSTEM Ä
Page 254 of 2438

SYSTEM RELAY, ANTI-LOCK WARNING LAMP RELAY AND PUMP/MOTOR RELAYS (FIG. 2)
REMOVE
See (Fig. 2) Power Distribution Center. Find the lo-
cation of the pump/motor relay in the (PDC). Remove
pump/motor relay by pulling upward and install by
pushing firmly into position. Do not twist the relay
when removing or installing it. See (Fig. 10) in the Relay And Warning Lamp Sec-
tion of this group, for the location of the Anti-Lock
system relay and the Yellow Lamp relay. Remove
the relay from the vehicle using the following proce-
dure. (1) Disconnect the wiring harness connectors from
the relays. Connectors are removed from the relays
by disengaging the connector locking tab from relay
and pulling strait off relay, do not twist. (2) Then remove the relay pack to inner fender at-
taching bolt.
INSTALL The Anti-Lock system and Yellow Lamp relay are
installed using the following procedure. (1) Mount the relay pack to the inner fender with
the anti-rotation tab on the bracket around lip of in-
ner fender hole (Fig. 10). (2) Install the relay pack to inner fender mounting
bolt and torque to 4 N Im (35 in. lbs.). (3) Connect the wiring harness connectors onto the
relays until the locking tabs on the connectors and
relays are fully engaged. Do not twist connectors when
installing them on the relays.
WHEEL SPEED SENSORS
INSPECTION
Inspect tone wheels (Fig. 3) for any missing or broken
teeth, this can cause erratic speed sensor signals.
Tone wheels should show no evidence of contact with
the wheel speed sensor. If contact was made, determine
cause and correct. Excessive runout of the tone wheels can cause erratic
wheel speed sensor signals. Replace assembly if runout
exceeds approximately 0.25 mm (0.010 inch).
FRONT WHEEL SPEED SENSOR
REMOVAL
(1) Raise vehicle and remove front wheel and tire
assembly. (2) Remove screw from clip (Fig. 4) that holds sensor
assembly grommet into fender shield. (3) Carefully, pull sensor assembly grommet from
fender shield. When removing grommet from
fender shield, do not pull on speed sensor cable. (4) Unplug speed sensor cable connector, from ve-
hicle wiring harness. (5) Remove the 2 screws (Fig. 4) that secure the
speed sensor cable, routing tube to the fender well. (6) Remove the 2 sensor assembly grommets from
the retainer bracket, on the strut damper (Fig. 4). (7) Remove speed sensor assembly to steering
knuckle attaching bolt (Fig. 4). (8) Carefully, remove sensor head from steering
knuckle. If the sensor has seized, due to corrosion, use
a hammer and punch to tap edge of sensor ear
Fig. 2 Pump/Motor and Anti-Lock System Relays
Fig. 3 Tone Wheel (Typical)
5 - 104 ANTI-LOCK 10 BRAKE SYSTEM Ä
Page 263 of 2438

ANTI-LOCK BRAKE SYSTEMÐBENDIX ANTI-LOCK 6 AA,AG,AJ,AP BODY INDEX
page page
ABS Brake System Diagnosis .............. 123
ABS Brake System Diagnostic Features ...... 125
ABS Computer System Service Precautions . . . 124
ABS General Service Precautions ........... 124
Anti-Lock Brake System Components ........ 116
Anti-Lock Brake System Definitions .......... 113
Anti-Lock Brakes Operation and Performance . . 115
Anti-Lock System Relays and Warning Lamps . . 120
Controller Anti-Lock Brake (CAB) ............ 119
Diagnostic Connector ..................... 120
Electronic Components ................... 130 General Information
...................... 113
Hydraulic Circuits and Valve Operation ....... 121
Major Components ...................... 114
Mechanical Diagnostics and Service Procedures . 125
Normal Braking System Function ............ 114
On-Car ABS Brake System Service .......... 126
Specifications .......................... 135
System Self-Diagnostics .................. 115
Vehicle Performance ..................... 115
Warning Systems Operation ............... 116
GENERAL INFORMATION
The purpose of the Anti-Lock Brake System (ABS)
is to prevent wheel lock-up under heavy braking con-
ditions on virtually any type of road surface. Anti-
Lock Braking is desirable because a vehicle which is
stopped without locking the wheels will retain direc-
tional stability and some steering capability. This al-
lows the driver to retain greater control of the
vehicle during heavy braking. This section of the service manual covers the de-
scription, diagnostics, and on car service for the Ben-
dix Anti-Lock 6 Brake System. If other service is required on the non ABS related components of the
brake system. Refer to the appropriate section in this
group of the manual for the specific service procedure
required.
ANTI-LOCK BRAKE SYSTEM DEFINITIONS
In this section of the manual several abbreviations
are used for the components that are in the Anti-
Lock Braking System They are listed below for your
reference.
² CABÐController Anti-Lock Brake
² ABSÐAnti-Lock Brake System
Fig. 1 Four-Wheel Anti-Lock Brake System Components AA/AG/AJ Body
Ä ANTI-LOCK 6 BRAKE SYSTEM 5 - 113
Page 265 of 2438

CONTROLLER ANTI-LOCK BRAKE (CAB)
The (CAB) (Fig. 5) is a small control computer
which receives wheel speed information, controls An-
ti-Lock operation and monitors system operation.
ANTI-LOCK BRAKES OPERATION AND
PERFORMANCE
This Anti-Lock Braking System represents the cur-
rent state-of-the-art in vehicle braking systems and
offers the driver increased safety and control during
braking. This is accomplished by a sophisticated sys-
tem of electrical and hydraulic components. As a re-
sult, there are a few performance characteristics that
may at first seem different but should be considered
normal. These characteristics are discussed below.
More technical details are discussed further in this
section.
PEDAL FEEL
Since the Bendix Anti-Lock 6 Braking System uses
the conventional Booster/Master Cylinder. The brake
pedal feel during normal braking is the same as con-
ventional Non ABS equipped cars. When Anti-Lock is activated during hard braking
due to a wheel lockup tendency. Brake pedal effort
will increase do to the master cylinder pressure be-
ing isolated from the brake system. Some brake
pedal movement and associated noises may be felt
and herd by the driver. This is normal of a Anti-Lock
Braking System due to pressurized fluid being trans-
ferred to and from the wheel brakes.
ANTI-LOCK BRAKE SYSTEM OPERATION
During Anti-Lock Braking, brake pressures are
modulated by cycling electric solenoid valves. The cy-
cling of these valves can be faintly heard as a series
of popping or ticking noises. In addition, the cycling
may be felt as a pulsation in the brake pedal, al-
though no pedal movement will be noticed. If Anti-
Lock Operation occurs during hard braking, some pulsation may be felt in the vehicle body due to fore
and aft movement of the suspension as brake pres-
sures are modulated.
Although ABS operation is available at virtually
all vehicle speeds. It will automatically turn off at
speeds below 3 to 5 mph. Wheel lockup may be per-
ceived at the very end of an anti lock stop and is con-
sidered normal.
TIRE NOISE & MARKS
Although the ABS system prevents complete wheel
lock-up, some wheel slip is desired in order to
achieve optimum braking performance. During brake
pressure modulation, as brake pressure is increased,
wheel slip is allowed to reach up to 30%. This means
that the wheel rolling velocity is 30% less than that
of a free rolling wheel at a given vehicle speed. This
slip may result in some tire chirping, depending on
the road surface. This sound should not be inter-
preted as total wheel lock-up. Complete wheel lock up normally leaves black tire
marks on dry pavement. The Anti-Lock Braking Sys-
tem will not leave dark black tire marks since the
wheel never reaches a locked condition. Tire marks
may however be noticeable as light patched marks.
VEHICLE PERFORMANCE
Anti-Lock Brakes provide the driver with some
steering control during hard braking, however there
are conditions where the system does not provide any
benefit. In particular, hydroplaning is still possible
when the tires ride on a film of water. This results in
the vehicles tires leaving the road surface rendering
the vehicle virtually uncontrollable. In addition, ex-
treme steering maneuvers at high speed or high
speed cornering beyond the limits of tire adhesion to
the road surface may cause vehicle skidding, inde-
pendent of vehicle braking. For this reason, the ABS
system is termed Anti-Lock instead of Anti-Skid.
SYSTEM SELF-DIAGNOSTICS
The Bendix Anti-Lock 6 Brake System has been
designed with the following self diagnostics capabil-
ity. The self diagnostic ABS startup cycle begins when
the ignition switch is in the on position. An electrical
check is completed on the ABS components such as
Wheel Speed Sensor Continuity and System and
other Relay continuity. During this check the Amber
Anti-Lock Light is on for approximately 1-2 seconds. Further Functional testing is accomplished once
the vehicle is set in motion. (1) The solenoid valves and the pump/motor are ac-
tivated briefly to verify function. (2) The voltage output from the wheel speed sen-
sors is verified to be within the correct operating
range.
Fig. 5 Controller Anti-Lock Brake (CAB)
Ä ANTI-LOCK 6 BRAKE SYSTEM 5 - 115
Page 267 of 2438

HYDRAULIC SPRING ACCUMULATOR
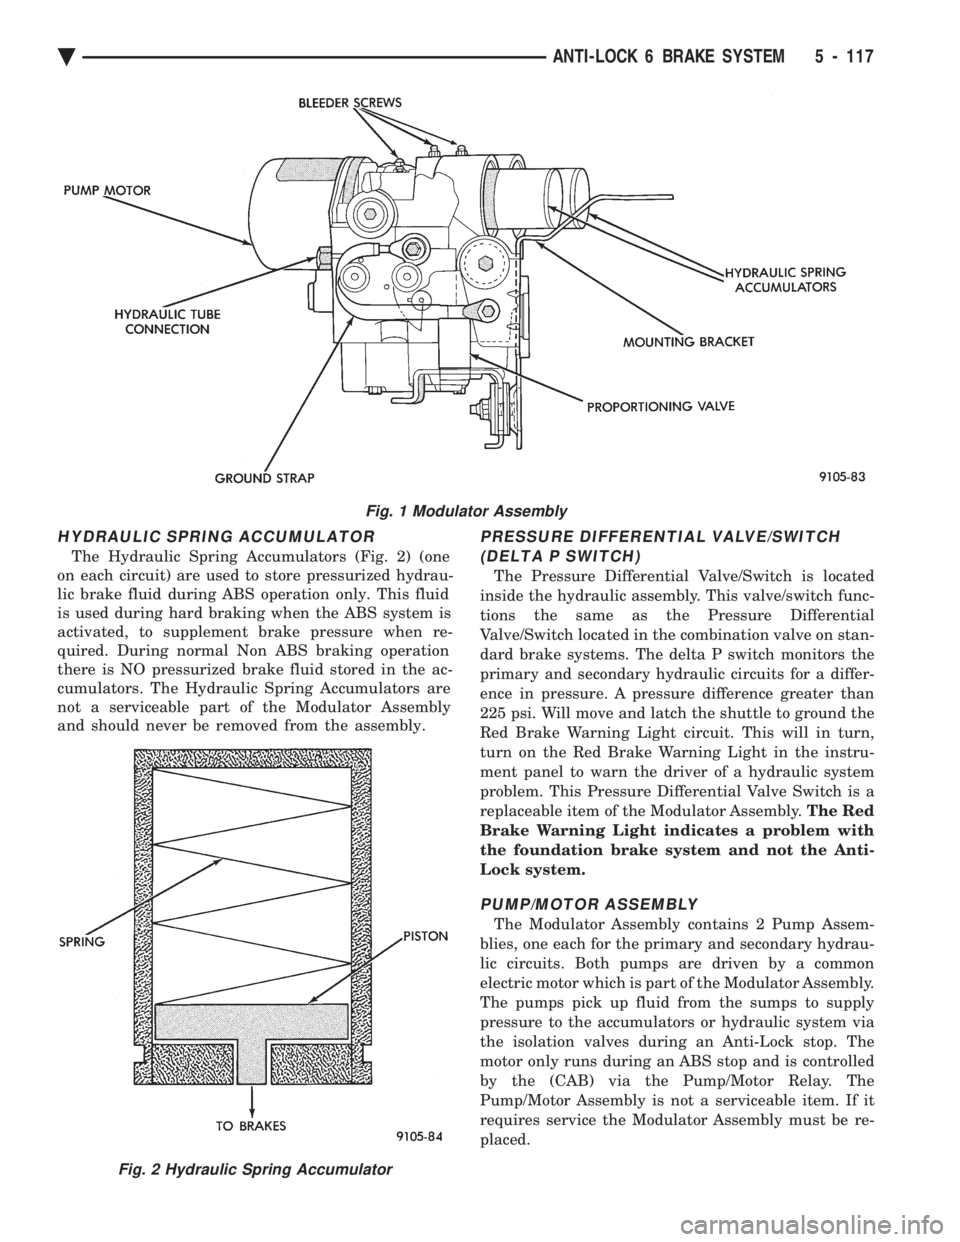
The Hydraulic Spring Accumulators (Fig. 2) (one
on each circuit) are used to store pressurized hydrau-
lic brake fluid during ABS operation only. This fluid
is used during hard braking when the ABS system is
activated, to supplement brake pressure when re-
quired. During normal Non ABS braking operation
there is NO pressurized brake fluid stored in the ac-
cumulators. The Hydraulic Spring Accumulators are
not a serviceable part of the Modulator Assembly
and should never be removed from the assembly.
PRESSURE DIFFERENTIAL VALVE/SWITCH
(DELTA P SWITCH)
The Pressure Differential Valve/Switch is located
inside the hydraulic assembly. This valve/switch func-
tions the same as the Pressure Differential
Valve/Switch located in the combination valve on stan-
dard brake systems. The delta P switch monitors the
primary and secondary hydraulic circuits for a differ-
ence in pressure. A pressure difference greater than
225 psi. Will move and latch the shuttle to ground the
Red Brake Warning Light circuit. This will in turn,
turn on the Red Brake Warning Light in the instru-
ment panel to warn the driver of a hydraulic system
problem. This Pressure Differential Valve Switch is a
replaceable item of the Modulator Assembly. The Red
Brake Warning Light indicates a problem with
the foundation brake system and not the Anti-
Lock system.
PUMP/MOTOR ASSEMBLY
The Modulator Assembly contains 2 Pump Assem-
blies, one each for the primary and secondary hydrau-
lic circuits. Both pumps are driven by a common
electric motor which is part of the Modulator Assembly.
The pumps pick up fluid from the sumps to supply
pressure to the accumulators or hydraulic system via
the isolation valves during an Anti-Lock stop. The
motor only runs during an ABS stop and is controlled
by the (CAB) via the Pump/Motor Relay. The
Pump/Motor Assembly is not a serviceable item. If it
requires service the Modulator Assembly must be re-
placed.
Fig. 1 Modulator Assembly
Fig. 2 Hydraulic Spring Accumulator
Ä ANTI-LOCK 6 BRAKE SYSTEM 5 - 117