1993 CHEVROLET PLYMOUTH ACCLAIM parking brake
[x] Cancel search: parking brakePage 210 of 2438

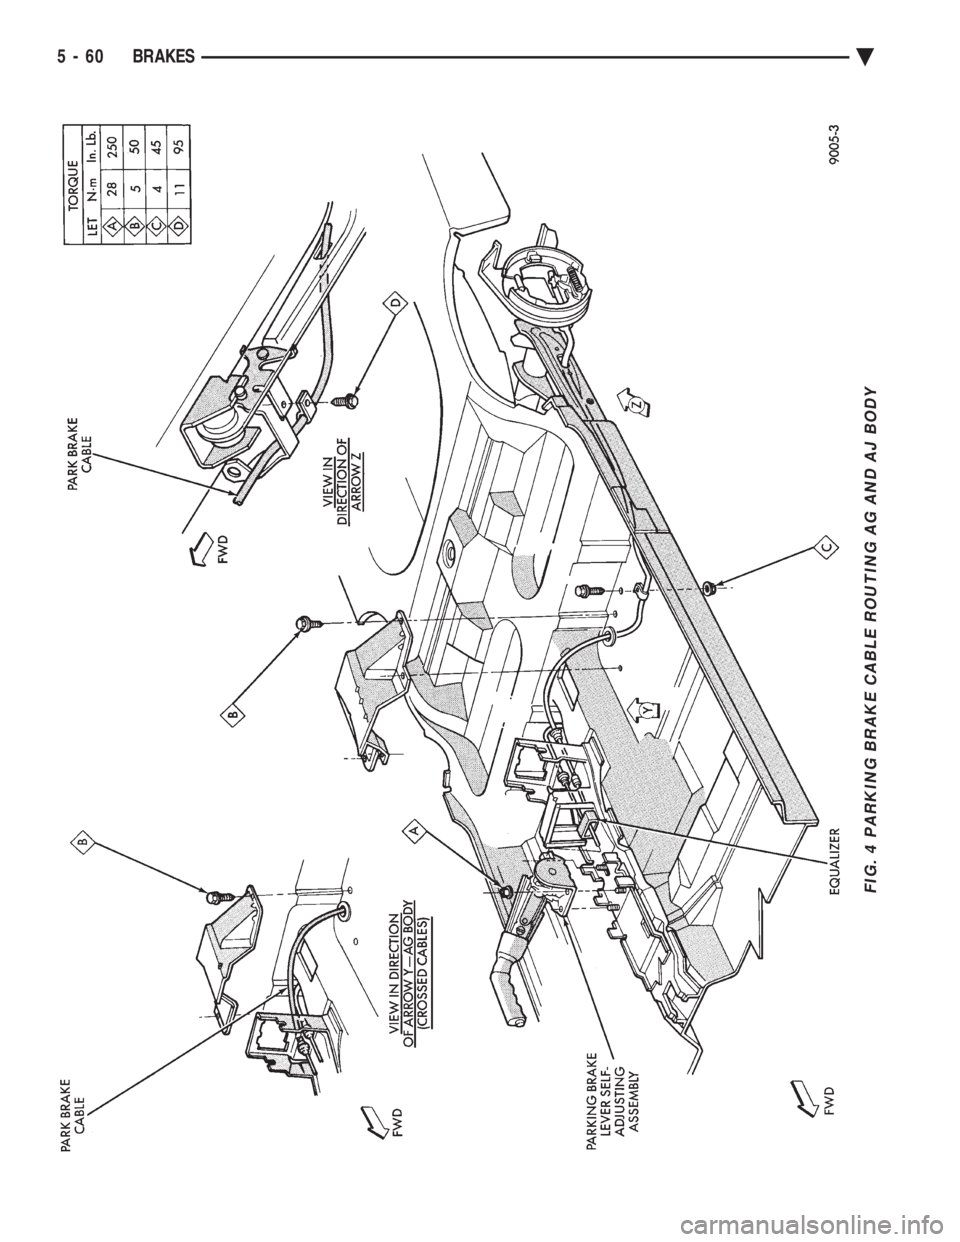
FIG. 4 PARKING BRAKE CABLE ROUTING AG AND AJ BODY
5 - 60 BRAKES Ä
Page 211 of 2438

WARNING: THE SELF ADJUSTING FEATURE OF THIS
PARKING BRAKE LEVER ASSEMBLY CONTAINS A
CLOCK SPRING LOADED TO APPROXIMATELY 30
POUNDS. CARE MUST BE TAKEN TO PREVENT EX-
CESSIVE JARRING OF THE ASSEMBLY. DO NOT
RELEASE THE SELF ADJUSTER LOCKOUT DEVICE
BEFORE INSTALLING CABLES INTO THE EQUAL-
IZER. KEEP HANDS OUT OF SELF ADJUSTER SEC-
TOR AND PAWL AREA. FAILURE TO OBSERVE CAU-
TION IN HANDLING THIS MECHANISM COULD LEAD
TO SERIOUS INJURY.
When repairs to the hand lever assembly or cable
system are required the self adjuster must be reloaded
and locked out.
SELF ADJUSTING PROCEDURES (AG & AJ BODY)
TO RELOAD SELF ADJUSTER
(1) Remove ash receiver or courtesy light from rear
of center console to gain access to self adjuster. Also,
remove carpet from sides of console. (2) Pull on equalizer/output cable to wind up sprin-
g(requires greater than 30 pounds effort). Continue
until self adjuster lockout pawl is positioned about
midway on the self adjuster sector (Fig. 6). Rotate
lockout pawl into self adjuster sector by turning allen
screw clockwise. Rotating lockout device requires
very little effort. Do not force or failure of lock-
out device will occur. (3) When repairs are complete, adjust rear brakes
before adjusting parking brake. On drum-in-hat type of
rear disc brake adjust shoe diameter to 171.5 mm (6.75
inch).
ADJUST PARKING BRAKE (AG & AJ BODY)
Be sure that the cables are properly assembled to the
equalizer bracket prior to cable adjustment. (1) Insert a 7/32 inch allen wrench into hex socket
and turn counter-clockwise through approximately 15É
of rotation (Fig. 4). In turning lockout device, self
adjuster release is a loud snapping noise followed by
reaching a more felt than heard detent. Very light
effort is required to seat lockout arm into detent.
Follow through to the detent is important in prevent-
ing the lockout rod from rattling. Note: The parking brake handle can be in any
position when releasing self adjuster. (2) Cycle lever to position cables. Rear wheels should
rotate freely without dragging.
REAR PARKING BRAKE CABLE REMOVAL (AA, AC,
AP, AY BODY)
The rear brake cables are attached to rear connec-
tors. Should it become necessary to remove either parking
brake cable for installation of a new cable, proceed as
follows: With vehicle jacked up on a suitable hoist, remove
wheel and tire assembly (Fig. 6). Back off cable adjusting nut to provide slack and
disconnect rear brake cable from connector.
DRUM BRAKES
(1) Disconnect park brake cable from park brake
lever in rear wheel brakes. (2) Using an aircraft type hose clamp compress re-
tainers on end of cable housing and start cable out of
retaining hole in the support plate. Remove clamp
when retainers are free of the mounting hole in the
support plate, (Fig. 6).
(3) Remove clip from brake cable at support
bracket and pull cable away from trailing arm as-
sembly (Figs. 3 and 4).
DISC BRAKES
(1) Remove disc brake caliper from adapter, and
brake disc (rotor) from rear hub.
Fig. 5 Self Adjusting Parking Brake Lever Assembly
Fig. 6 Removing Brake Cable from Support Plate
Ä BRAKES 5 - 61
Page 212 of 2438

(2) Disconnect parking brake cable from brake
shoe lever. (3) Using an aircraft type hose clamp compress re-
tainers on end of cable housing and start cable out of
retaining hole in the adapter. Remove clamp when
retainers are free of mounting hole in the adapter
(Fig. 6). (4) Remove clip from parking brake cable at
hanger bracket and pull cable away from trailing
arm.
REAR PARKING BRAKE CABLE INSTALLATION
DRUM BRAKES (AA, AC, AP, AY BODY)
(1) Route parking brake cable assembly through
trailing arm and hanger bracket. (2) Install parking brake cable retaining clip.
(3) Install parking brake cable into rear brake sup-
port plate. Be sure all retainers are expanded around
mounting hole in brake support plate, and then con-
nect parking brake cable end to brake shoe lever. (4) Insert forward end of parking brake cable into
connector. (5) Install brake drum, and wheel and tire assem-
bly.
DRUM BRAKES (AG & AJ BODY)
(1) Route each parking brake cable assembly
through trailing arm and mounting bracket. (2) Install parking brake cable retaining clip.
(3) Install parking brake cable into rear brake sup-
port plate. Be sure the retainers are expanded
around mounting hole in the brake support plate and
connect parking brake cable end to brake shoe lever. (4) Insert forward end of parking brake cable into
floor pan of vehicle. Then connector park brake cable
to equalizer at park brake hand lever. (5) Install brake drum, and wheel and tire assem-
bly.
DISC BRAKES (AA, AC, AP, AY BODY)
(1) Route parking brake cable assembly through
trailing arm and parking brake cable hanger
bracket. (2) Install parking brake cable to hanger bracket
retaining clip. (3) Install parking brake cable into rear brake
adapter. Be sure all cable retainers on parking brake
cable are expanded around mounting hole in adapter
and connect cable end to brake shoe lever. (4) Insert forward end of cable into connector.
(5) Adjust parking brake shoe diameter to 171 mm
(6.75 inch). (6) Install rear braking disc, caliper assembly and
wheel and tire assembly.
DISC BRAKES (AG & AJ BODY)
(1) Route each individual parking brake cable as-
sembly through trailing arm and parking brake ca-
ble mounting bracket. (2) Install parking brake cable to mounting
bracket retaining clip. (3) Install parking brake cable into rear disc brake
adapter. Be sure all cable retainers on parking brake
cable are expanded around mounting hole in adapter,
and then connect cable end to brake shoe lever. (4) Insert forward end of parking brake cable into
floor pan of vehicle. Then connector park brake cable
to equalizer at park brake hand lever. (5) Adjust parking brake shoe diameter to 171 mm
(6.75 inch). (6) Install rear braking disc, caliper assembly and
wheel and tire assembly.
REMOVING PARKING BRAKE FRONT CABLE (AA,
AC, AP, AY BODY)
(1) Loosen parking brake cable adjusting nut un-
der car. Disengage front cable from intermediate ca-
ble connector (Fig. 2). (2) Remove park brake cable retaining clip from
floor pan of vehicle. (3) Lift floor mat for access to floor pan.
(4) Remove floor pan seal.
(5) Pull parking brake cable strand end forward
and disconnect from foot lever clevis. Separate park-
ing brake cable from parking brake foot lever and
bracket on body rail. (6) Pull parking brake cable assembly through
hole in floor pan and up into vehicle.
INSTALLING PARKING BRAKE FRONT CABLE (AA,
AC, AP AY Body)
(1) Insert parking brake cable housing retainers
into hole in rail bracket and parking brake foot lever
assembly (Fig. 2). (2) Feed parking brake cable end through holes in
floor pan and rail bracket, from the interior of the
vehicle. (3) Install floor pan seal.
(4) Engage parking brake cable strand end in foot
lever clevis. Seat cable ends in parking brake assem-
bly and parking brake cable rail bracket. (5) Replace floor mat.
(6) Attach park brake cable retaining clip to floor
pan of vehicle. (7) Engage rear parking brake cable end to inter-
mediate cable connector. (8) Adjust service and parking brakes.
5 - 62 BRAKES Ä
Page 213 of 2438

PARKING BRAKE HAND LEVER ASSEMBLY
REMOVAL AND INSTALLATION
REMOVAL (AG AND AJ BODY)
Remove ash receiver or courtesy light from rear of
console. Remove carpet from sides of console. Remove
parking brake trim cover from passenger side of con-
sole (pulls off). Load and lockout parking brake self adjuster (Fig.
6). Disconnect rear cables from equalizer bracket. Remove the 3 hold down nuts and remove hand le-
ver assembly through opening created by removing
console trim cover. Passenger seat might have to be
removed. Also, if metal tab at bottom of console pre-
vents removal of hand brake assembly, bend tab out
of the way. (Bend the tab back to original position af-
terR&Rof hand brake).
INSTALLATION (AG AND AJ BODY)
Install hand lever assembly through side opening
in console and bolt into place. Connect rear parking brake cables to equalizer.
Adjust parking brakes.
Install console trim cover, carpet, passenger seat
and rear ash receiver or courtesy light.
REMOVAL AND INSTALLATION PARKING BRAKE
SHOES
ALL WITH REAR DISK BRAKES
(1) Remove rear disc brake caliper assembly from
adapter and braking disc (See Disc Brake Shoe Re-
moval). (2) Remove rear braking disc from rear hub (See
Removing Braking Disk). (3) Remove grease cap.
(4) Remove cotter pin, lock nut, hub bearing re-
taining nut, and washer. (5) Remove hub and bearings.(See Wheel Bearing
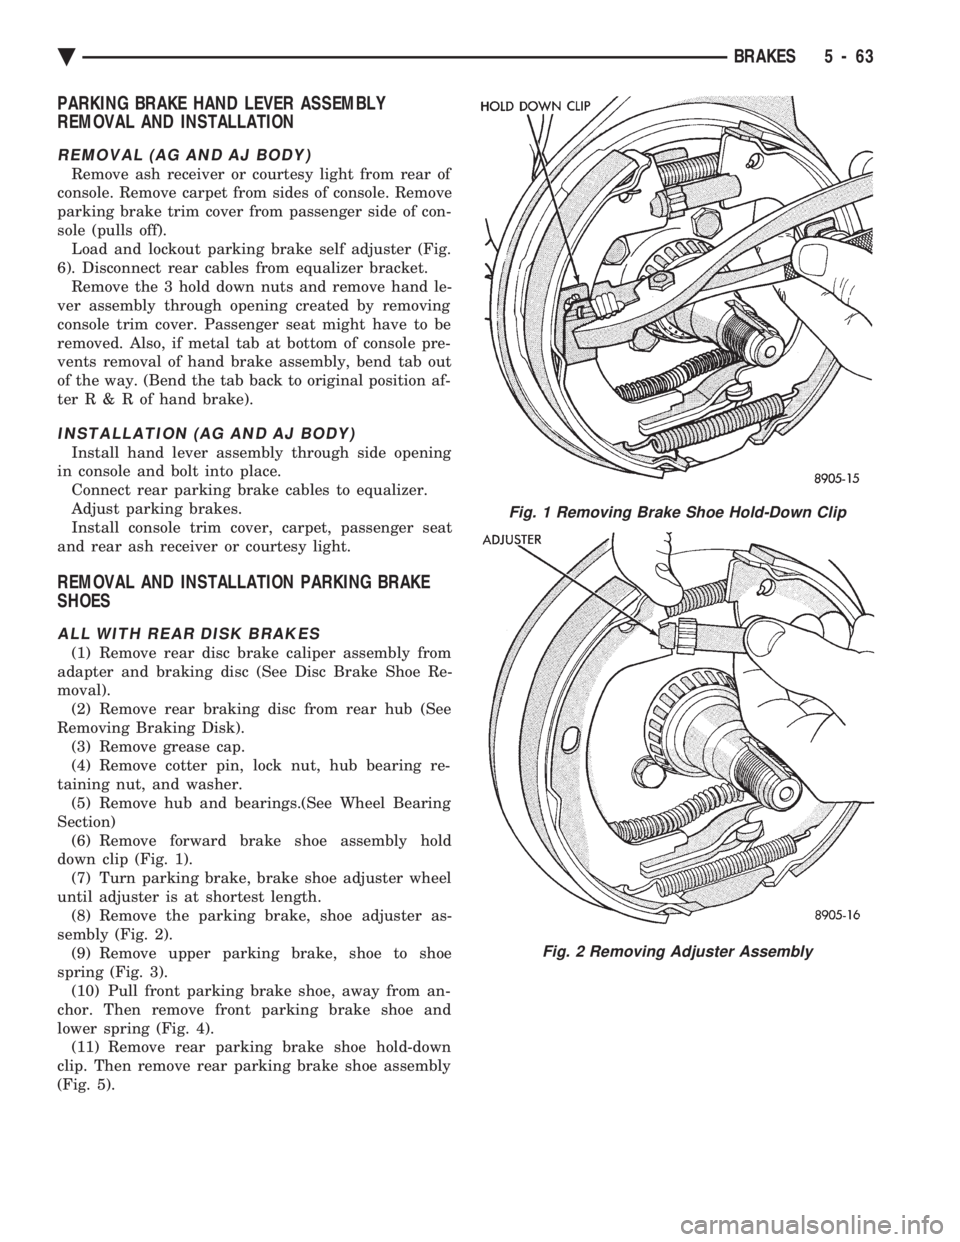
Section) (6) Remove forward brake shoe assembly hold
down clip (Fig. 1). (7) Turn parking brake, brake shoe adjuster wheel
until adjuster is at shortest length. (8) Remove the parking brake, shoe adjuster as-
sembly (Fig. 2). (9) Remove upper parking brake, shoe to shoe
spring (Fig. 3). (10) Pull front parking brake shoe, away from an-
chor. Then remove front parking brake shoe and
lower spring (Fig. 4). (11) Remove rear parking brake shoe hold-down
clip. Then remove rear parking brake shoe assembly
(Fig. 5).
Fig. 1 Removing Brake Shoe Hold-Down Clip
Fig. 2 Removing Adjuster Assembly
Ä BRAKES 5 - 63
Page 214 of 2438

INSTALLING PARKING BRAKE SHOES
(1) Install rear parking brake shoe and holddown
clip (Fig. 6). (2) Install lower parking brake, shoe to shoe re-
turn spring (Fig. 7). (3) Pull forward parking brake shoe over anchor
block until properly located on adapter. (4) Install upper parking brake, shoe to shoe re-
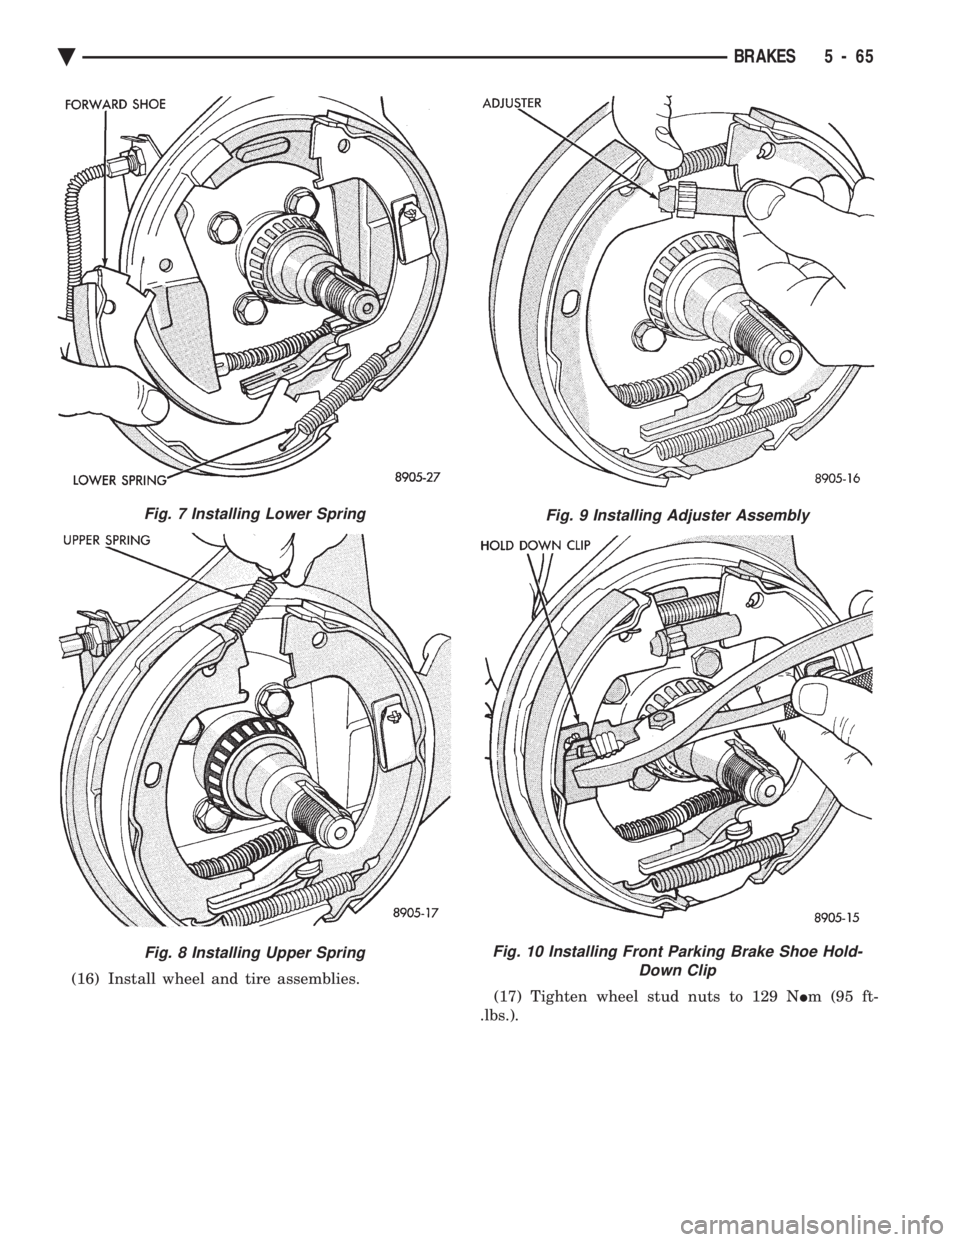
turn spring (Fig. 8). (5) Install parking brake shoe adjuster assembly
with star wheel forward (Fig. 9). (6) Install front, parking brake shoe holddown clip
(Fig. 10). (7) Adjust parking brake shoes to a diameter to
171 mm (6.75 inch). (8) Install hub assembly on spindle.
(9) Install outer bearing, thrust washer and nut.
(10) Tighten wheel bearing adjusting nut to 27 to
34 N Im (240 to 300 in. lbs.) torque while rotating
hub. This seats the bearings. (11) Back off adjusting nut 1/4 turn (90É) then
tighten adjusting nut finger tight. (12) Position lock on nut with one pair of slots in
line with cotter pin hole. Install cotter pin. (13) Install grease cap.
(14) Install rear braking disc.
(15) Install rear, disc brake caliper on the adapter
(See Brake Shoe Removal).
Fig. 3 Removing Upper Spring
Fig. 4 Removing Shoe and Lower Spring
Fig. 5 Removing Rear Holddown Clip and Shoe
Fig. 6 Installing Rear Shoe and Hold-Down Clip
5 - 64 BRAKES Ä
Page 215 of 2438

(16) Install wheel and tire assemblies. (17) Tighten wheel stud nuts to 129 N Im (95 ft-
.lbs.).
Fig. 7 Installing Lower Spring
Fig. 8 Installing Upper Spring
Fig. 9 Installing Adjuster Assembly
Fig. 10 Installing Front Parking Brake Shoe Hold- Down Clip
Ä BRAKES 5 - 65
Page 225 of 2438

ABS EQUIPPED VEHICLE PERFORMANCE
Anti-Lock Brakes provide the driver with some
steering control during hard braking. However there
are conditions where the system does not provide any
benefit. In particular, hydroplaning is still possible
when the tires ride on a film of water. Hydroplaning
results in the vehicle tires leaving the road surface
rendering the vehicle almost uncontrollable. In addi-
tion, extreme steering maneuvers at high speed or
high speed cornering beyond limits of tire adhesion
to the road surface may cause vehicle skidding. So,
the ABS system is termed Anti-Lock instead of Anti-
Skid. One of the significant benefits of the ABS system is
that of maintaining steering control during hard
braking or during braking on slippery surfaces. It is
therefore possible to steer the vehicle while braking
on almost any road surface.
ABS SYSTEM SELF-DIAGNOSTICS
The ABS system has been designed with Self Diag-
nostic Capability. There are two self checks the sys-
tems performs every time the vehicle is started.
First, when the key is turned on the system performs
an electrical check called Start-Up Cycle. During this
check, the Red Brake Warning Lamp and the Amber
Anti-Lock Warning Lamp are illuminated. Then
turned off at the end of the test, after about 1 to 2
seconds. When the vehicle reaches a speed of about 3
to 4 miles per hour. The system performs a func-
tional check called Drive-Off. During Drive-Off. hy-
draulic valves are activated briefly to test their
function. Drive-Off can be detected as a series of
rapid clicks upon driving off the first time the car is
started. If the brake pedal is applied during Drive-
Off, the test is by-passed. Both of these conditions
are a normal part of the system self test. Most fault
conditions will set a ABS Fault Code in the (CAB),
which can be retrieved to aid in fault diagnosis. De-
tails can be found in Diagnosis Section.
ABS WARNING SYSTEMS OPERATION
The ABS system uses two methods for notifying
the driver of a system malfunction. These include the
standard Red Brake Warning Lamp and an Amber
Anti-Lock Warning Lamp, both located in the instru-
ment cluster. The purpose of these two lamps are dis-
cussed in detail below.
RED BRAKE WARNING LAMP
The Red Brake Warning Lamp, located in the in-
strument cluster, will Turn On to warn the driver of
brake system conditions that may result in reduced
braking ability. The lamp is also turned on when the
parking brake is not fully released. Conditions which
may cause the Red Brake Warning Lamp to Turn On
include: ²
Parking brake not fully released. If the parking
brake is applied or not fully released. The switch on the
parking brake pedal assembly will ground the Red
Brake Warning Lamp circuit and cause the lamp to
turn on. On vehicles equipped with mechanical instru-
ment clusters, the Amber Anti-Lock Lamp will turn on
if the vehicle is driven above 3 miles per hour with the
Parking Brake applied.
² Low brake fluid. The fluid level sensor in the hy-
draulic assembly reservoir will ground the Red Brake
Warning Lamp circuit if low brake fluid level is de-
tected. In addition, ABS will be deactivated above 3
miles per hour and the Amber Anti-Lock Warning
Lamp will be illuminated. If the vehicle is equipped
with EVIC, a low fluid condition will also cause the
Low Brake Fluid message to appear.
² Low Accumulator Pressure. In the event of low
accumulator pressure, the dual function pressure
switch in the hydraulic assembly will signal the (CAB)
to ground the Red Brake Warning Lamp circuit. This
will cause the Red Brake Warning Lamp to turn on.
Low accumulator pressure also results in the activa-
tion of the Yellow Anti-Lock Warning Lamp. Low accu-
mulator pressure may result in loss of power assist.
² Modulator Or (CAB) Faults. The modulator assem-
bly or (CAB) may turn on the Yellow Anti-Lock Warn-
ing Lamp, if certain faults are detected in either the
modulator assembly or the (CAB).
² Bulb check. As a bulb check, the Red Brake Warning
Lamp will illuminate whenever the ignition switch is
placed in the crank position. Illumination of the red Brake Warning Lamp
may indicate reduced braking ability. A vehicle
that has the Red Brake Warning Lamp ON should
not be driven except to do diagnostic procedures
described in Section 2 of this manual. Most con-
ditions that turn on the Red Brake Warning
Lamp will also turn on the Amber Anti-Lock
Warning Lamp, consequently disabling the Anti-
Lock function.
ANTI-LOCK WARNING LAMP
The Anti-Lock Warning Lamp is located in the in-
strument cluster and is Amber in color. The Amber
Anti-Lock Warning Lamp is illuminated when the
(CAB) detects a condition that results in a shutdown of
Anti-Lock function. The Amber Anti-Lock Warning
Lamp is normally on until the (CAB) completes its self
tests and turns the lamp off. For example, if the (CAB)
is disconnected, the lamp is on. Display of the Amber Anti-Lock Warning Lamp
without the Red Brake Warning Lamp indicates
only that Anti-Lock function has been disabled.
Power assisted normal braking is unaffected.
Ä ANTI-LOCK 10 BRAKE SYSTEM 5 - 75
Page 232 of 2438

The primary functions of the (CAB) are:
² (1) Detect wheel locking tendencies.
² (2) Control fluid modulation to the brakes while in
Anti-Lock mode.
² (3) Monitor the system for proper operation.
² (4) Provide communication to the DRB II while in
diagnostic mode. The (CAB) continuously monitors the speed of each
wheel, through the signals generated at the Wheel
Speed Sensors, to determine if any wheel is begin-
ning to lock. When a wheel locking tendency is de-
tected, the (CAB) will isolate the master cylinder
from the wheel brakes. This is done by activating the
Isolation Valves. The (CAB) then commands the ap-
propriate Build or Decay valves to modulate brake
fluid pressure in some or all of the hydraulic circuits.
The fluid used for modulation comes from the booster
servo circuit. The (CAB) continues to control pres-
sure in individual hydraulic circuits until a locking
tendency is no longer present. The (ABS) system is constantly monitored by the
(CAB) for proper operation. If the (CAB) detects a
fault, it can disable the Anti-Lock braking function.
Depending on the fault, the (CAB) will light one or
both of the brake warning lamps. The (CAB) contains a System Diagnostic Program
which triggers the brake system warning lamps
when a system fault is detected. Faults are stored in
a diagnostic program memory. There are 19 fault
codes that may be stored in the (CAB) and displayed
through the DRB II. These fault codes will remain in
the (CAB) memory even after the ignition has been
turned off. These fault codes will remain in memory
until they are cleared with the DRB II, or automati-
cally erased from the memory after (50) ignition
switch on/off cycles.
CONTROLLER ANTI-LOCK BRAKE (INPUTS)
² Four wheel speed sensors.
² Boost pressure transducer.
² Primary pressure transducer.
² Low fluid level switch.
² Differential pressure switch.
² Parking brake switch.
² Dual function pressure switch (warning pressure
only)
² Stop lamp switch.
² Ignition switch.
² System relay voltage.
² Ground.
² Low Accumulator
CONTROLLER ANTI-LOCK BRAKE (OUTPUTS)
²Ten modulator valves-3 decay, 3 build and 4 isola-
tion.
² Red Brake warning lamp.
² Amber Anti-Lock Warning Lamp.
² System relay actuation. ²
Diagnostic communication.
ABS SYSTEM DIAGNOSTIC CONNECTOR
The Bendix Anti-Lock system diagnostic connector
is located under the lower dash panel or in the area
of the fuse box (Fig. 8). The fuse box is located be-
hind the access panel that is on the bottom portion of
the dash panel, left of the steering column. The diag-
nostics connector is a blue 6 way connector.
ANTI-LOCK SYSTEM RELAYS AND WARNING
LAMPS
PUMP/MOTOR RELAY
Pump/Motor power is supplied by the Pump/Motor
Relay. The Pump/Motor relay is located inside the
Power Distribution Center (PDC). The relay coil is
energized by a ground from the Dual Function Pres-
sure Switch. See (Fig. 9) for the location of the pump/
motor relay in the (PDC).
SYSTEM RELAY
The (ABS) Modulator Valves and Anti-Lock Warn-
ing Lamp Relay are controlled through a System Re-
lay. The System relay is located on the top left inner
fender behind the headlight (Fig. 10). The system re-
lay provides power to the (CAB) for modulator valve
operation (pins 47 and 50) after the start-up cycle
when the ignition is turned on.
ANTI-LOCK WARNING LAMP RELAY
The Anti-Lock Warning Lamp is controlled by the
Yellow Light Relay. See (Fig. 10) for location behind
the left headlight. With the relay de-energized, the
lamp is lit. When the system relay is energized by
Fig. 8 A.B.S. Diagnostic Connector Location
5 - 82 ANTI-LOCK 10 BRAKE SYSTEM Ä