1993 CHEVROLET PLYMOUTH ACCLAIM low oil pressure
[x] Cancel search: low oil pressurePage 1690 of 2438
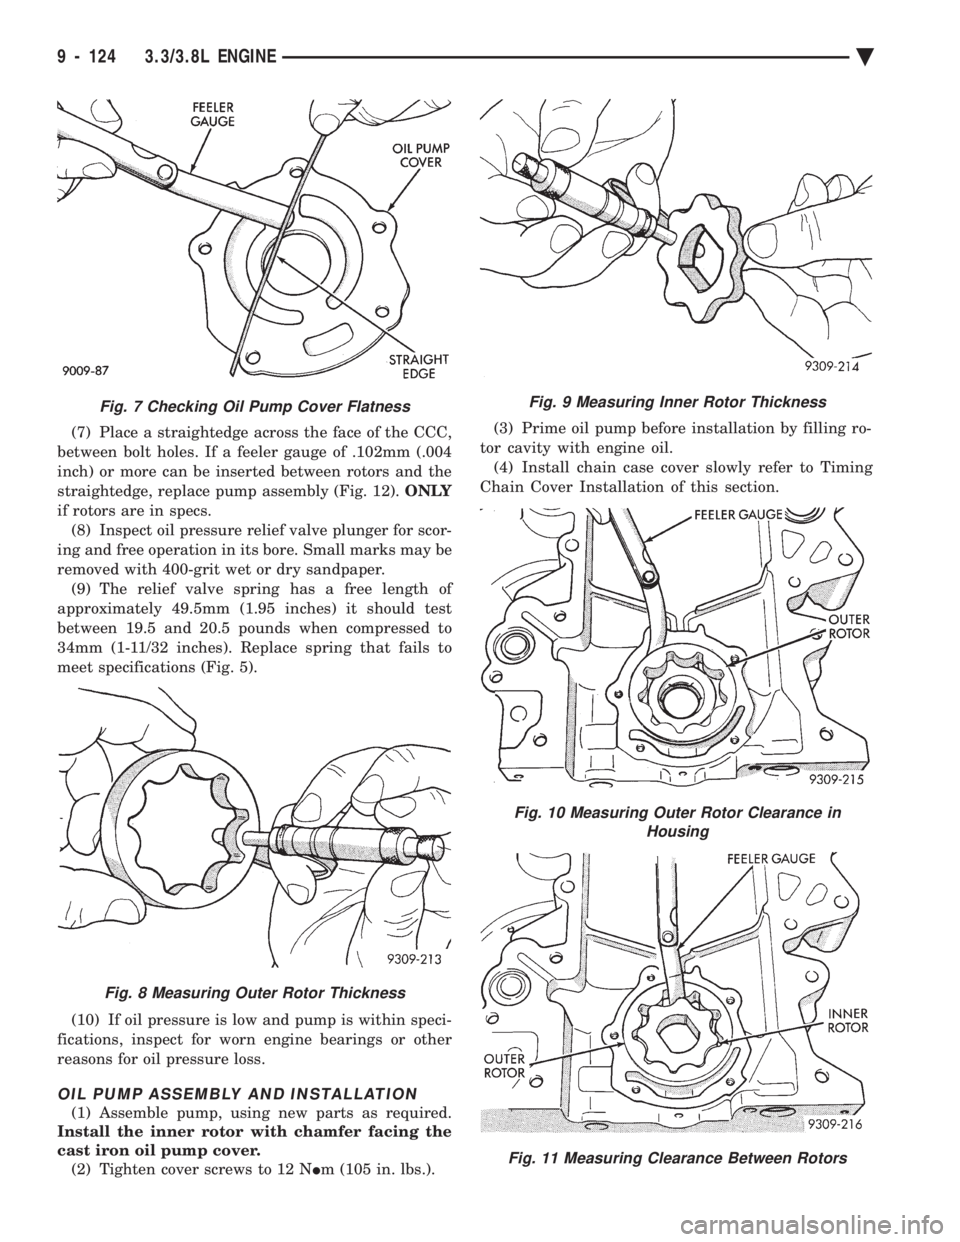
(7) Place a straightedge across the face of the CCC,
between bolt holes. If a feeler gauge of .102mm (.004
inch) or more can be inserted between rotors and the
straightedge, replace pump assembly (Fig. 12). ONLY
if rotors are in specs. (8) Inspect oil pressure relief valve plunger for scor-
ing and free operation in its bore. Small marks may be
removed with 400-grit wet or dry sandpaper. (9) The relief valve spring has a free length of
approximately 49.5mm (1.95 inches) it should test
between 19.5 and 20.5 pounds when compressed to
34mm (1-11/32 inches). Replace spring that fails to
meet specifications (Fig. 5).
(10) If oil pressure is low and pump is within speci-
fications, inspect for worn engine bearings or other
reasons for oil pressure loss.
OIL PUMP ASSEMBLY AND INSTALLATION
(1) Assemble pump, using new parts as required.
Install the inner rotor with chamfer facing the
cast iron oil pump cover. (2) Tighten cover screws to 12 N Im (105 in. lbs.). (3) Prime oil pump before installation by filling ro-
tor cavity with engine oil. (4) Install chain case cover slowly refer to Timing
Chain Cover Installation of this section.
Fig. 9 Measuring Inner Rotor Thickness
Fig. 10 Measuring Outer Rotor Clearance in Housing
Fig. 11 Measuring Clearance Between Rotors
Fig. 7 Checking Oil Pump Cover Flatness
Fig. 8 Measuring Outer Rotor Thickness
9 - 124 3.3/3.8L ENGINE Ä
Page 1711 of 2438
(e) Remove jumper wires.
(f) Continue fuel system service.
(4) Remove throttle cable and transaxle kickdown
linkage (Fig. 4). (5) Remove automatic idle speed (AIS) motor and
throttle position sensor (TPS) wiring connectors from
throttle body (Fig. 5). (6) Remove vacuum hose harness from throttle body
(Fig. 5). (7) Remove PCV and Brake booster hoses from Air
Intake Plenum. (8) Remove ignition coil from intake plenum (Fig. 6).
(9) Remove wiring connectors from coolant tempera-
ture sensor (Fig. 7). (10) Remove vacuum connections from air intake
plenum vacuum connector. (11) Remove fuel hoses from fuel rail (Fig. 7).
WARNING: WRAP SHOP TOWELS AROUND HOSES
TO CATCH ANY GASOLINE SPILLAGE. (12) Remove (8) Fasteners from Air Intake Plenum
to Intake Manifold (Fig. 8). (13) Remove air intake plenum (Fig. 9).
(14) Cover intake manifold with suitable cover when
servicing. (15) Remove vacuum hoses from fuel rail and fuel
pressure regulator (Fig. 10). (16) Disconnect Fuel Injector wiring harness from
engine wiring harness (Fig. 11). (17) Remove fuel pressure regulator attaching bolts
and remove regulator from rail (Fig. 12). Be careful
not to damage the rubber injector O-rings upon
removal from the ports. (18) Remove fuel rail attaching bolts and lift fuel rail
assembly from intake manifold. (19) Separate radiator hose from thermostat hous-
ing and heater hose from heater pipe. (20) Remove (8) nut and washer assemblies and
remove intake manifold (Fig. 2).
INSPECTION
Check for:
² Damage and cracks of each section (Fig. 13).
² Clogged water passages in end cross overs.
² Check for distortion of the cylinder head mounting
surface using a straightedge and thickness gauge (Fig.
14). Refer to (Fig. 15) for Specifications.
INSTALLATION
(1) Position new intake manifold gaskets on cylinder
head and install intake (cross) manifold. (2) Install (8) nuts and washers and tighten in
several steps in order shown in (Fig. 16) to 20 N Im
(174 in. lbs.). (3) Make sure the injector holes are clean and all
plugs have been removed. (4) Lube injector O-ring with a drop of clean en-
gine oil to ease installation. (5) Put the tip of each injector into their ports.
Push the assembly into place until the injectors are
seated in the ports. (6) Install the (3) fuel rail attaching bolts and
torque to 13 N Im (115 in. lbs.).
(7) Install fuel pressure regulator onto fuel rail. In-
stall attaching bolts to intake manifold. Torque reg-
ulator nuts and bracket bolts to 10 N Im (95 in. lbs.)
(Fig. 12). (8) Install fuel supply and return tube hold-down
bolt and the vacuum crossover tube hold-down bolt
and torque to 10 N Im (95 in. lbs.).
(9) Connect fuel injector wiring harness to engine
wiring harness (Fig. 11). (10) Connect vacuum harness to fuel pressure reg-
ulator and fuel rail assembly (Fig. 10). (11) Remove covering from lower intake manifold
and clean surface. (12) Place intake manifold gaskets with beaded
sealant side up on lower manifold. Put air intake in
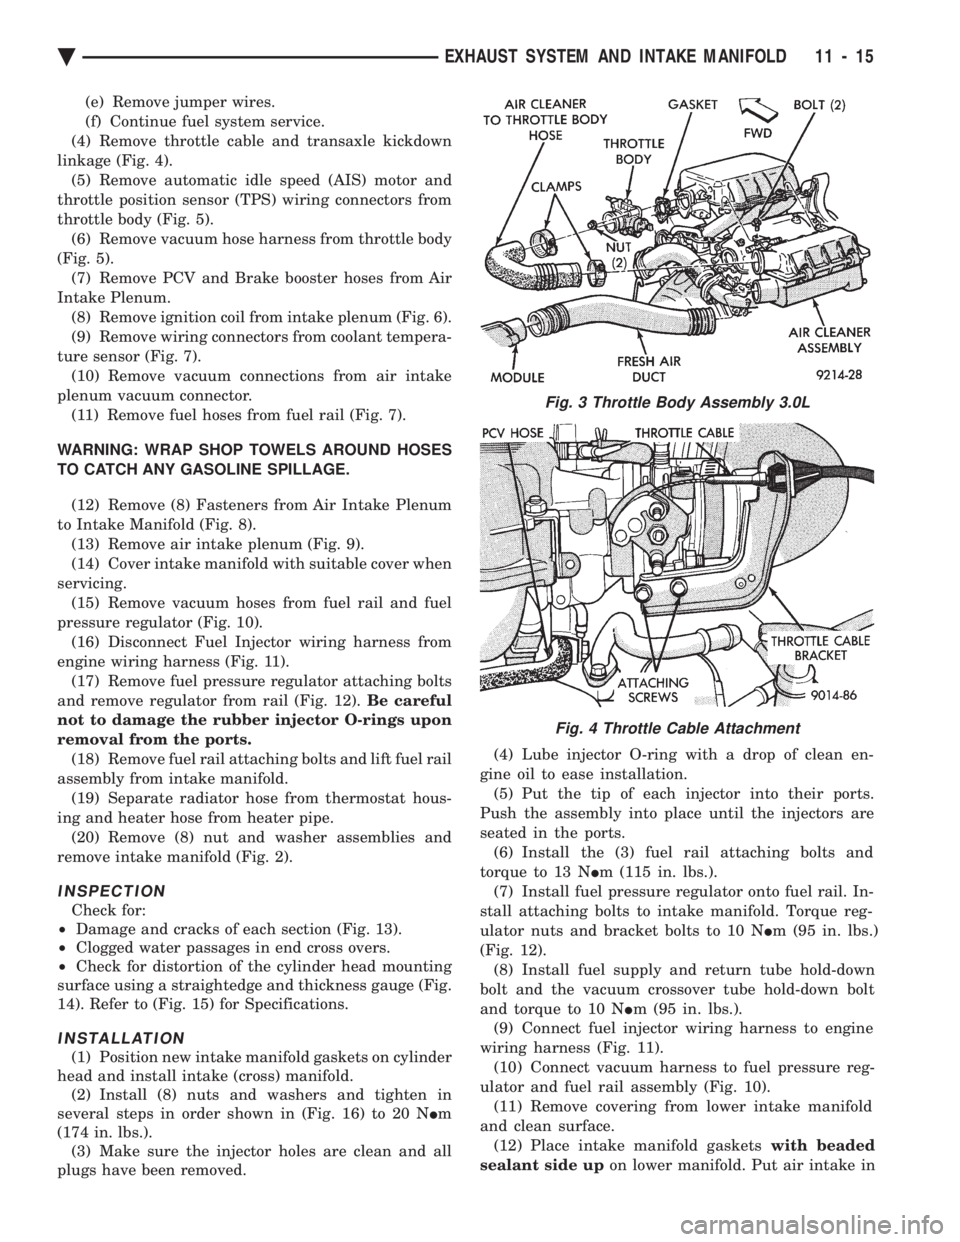
Fig. 3 Throttle Body Assembly 3.0L
Fig. 4 Throttle Cable Attachment
Ä EXHAUST SYSTEM AND INTAKE MANIFOLD 11 - 15
Page 1717 of 2438
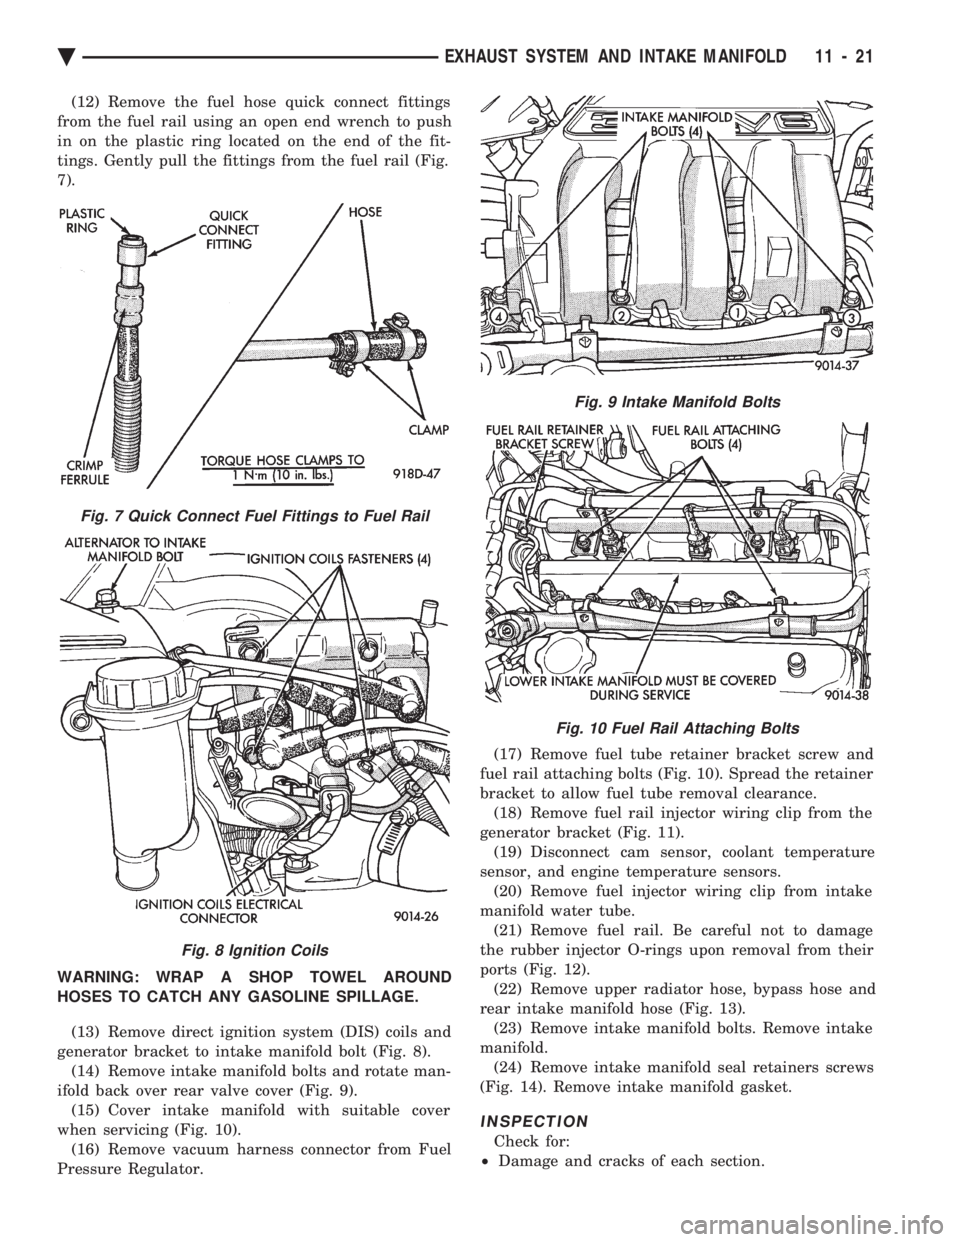
(12) Remove the fuel hose quick connect fittings
from the fuel rail using an open end wrench to push
in on the plastic ring located on the end of the fit-
tings. Gently pull the fittings from the fuel rail (Fig.
7).
WARNING: WRAP A SHOP TOWEL AROUND
HOSES TO CATCH ANY GASOLINE SPILLAGE.
(13) Remove direct ignition system (DIS) coils and
generator bracket to intake manifold bolt (Fig. 8). (14) Remove intake manifold bolts and rotate man-
ifold back over rear valve cover (Fig. 9). (15) Cover intake manifold with suitable cover
when servicing (Fig. 10). (16) Remove vacuum harness connector from Fuel
Pressure Regulator. (17) Remove fuel tube retainer bracket screw and
fuel rail attaching bolts (Fig. 10). Spread the retainer
bracket to allow fuel tube removal clearance. (18) Remove fuel rail injector wiring clip from the
generator bracket (Fig. 11). (19) Disconnect cam sensor, coolant temperature
sensor, and engine temperature sensors. (20) Remove fuel injector wiring clip from intake
manifold water tube. (21) Remove fuel rail. Be careful not to damage
the rubber injector O-rings upon removal from their
ports (Fig. 12). (22) Remove upper radiator hose, bypass hose and
rear intake manifold hose (Fig. 13). (23) Remove intake manifold bolts. Remove intake
manifold. (24) Remove intake manifold seal retainers screws
(Fig. 14). Remove intake manifold gasket.
INSPECTION
Check for:
² Damage and cracks of each section.
Fig. 7 Quick Connect Fuel Fittings to Fuel Rail
Fig. 8 Ignition Coils
Fig. 9 Intake Manifold Bolts
Fig. 10 Fuel Rail Attaching Bolts
Ä EXHAUST SYSTEM AND INTAKE MANIFOLD 11 - 21
Page 1719 of 2438
(7) Put the tip of each injector into their ports.
Push the assembly into place until the injectors are
seated in the ports (Fig. 12). (8) Install the (4) fuel rail attaching bolts and
tighten to 22 N Im (200 in. lbs.) torque (Fig. 10).
(9) Install fuel tube retaining bracket screw and
tighten to 4 N Im (35 in. lbs.) torque (Fig. 10).
(10) Reconnect cam sensor, coolant temperature
sensor and engine temperature sensors (Fig. 11). (11) Install fuel injector harness wiring clips on
the generator bracket and intake manifold water
tube (Fig. 11). (12) Connect fuel pressure regulator vacuum line.
(13) Remove covering on lower intake manifold
and clean surface. (14) Place intake manifold gasket on lower mani-
fold. Put upper manifold into place and install bolts
finger tight. (15) Install the generator bracket to intake mani-
fold bolt and the cylinder head to intake manifold
strut bolts. Do not torque.
(16) Tighten intake manifold bolts to 28 N Im (250
in. lbs.) torque in the sequence shown in (Fig. 9). (17) Tighten generator bracket to intake manifold
bolt to 54 N Im (40 ft. lbs.) torque (Fig. 8).
(18) Tighten the cylinder head to intake manifold
strut bolts to 54 N Im (40 ft. lbs.) torque (Fig. 5).
(19) Connect ground strap, MAP and heated oxy-
gen sensor electrical connectors (Fig. 6). (20) Connect charge temperature sensor electrical
connector (Fig. 5). (21) Connect vacuum harness to intake plenum
(Fig. 5). (22) Using a new gasket, connect the EGR tube
flange to the intake manifold and tighten to 22 N Im
(200 in. lbs.) torque. (23) Clip wiring harness into the hole in the throt-
tle cable bracket. (24) Connect the wiring connectors to the throttle
position sensor TPS and automatic idle speed AIS
motor (Fig. 4). (25) Connect vacuum harness to throttle body (Fig.
4). (26) Install the direct ignition system DIS coils.
Tighten fasteners to 12 N Im (105 in. lbs.) torque
(Fig. 8). (27) Lubricate the ends of the chassis fuel tubes
with 30 wt oil. Connect fuel supply and return hoses
to chassis fuel tube assembly. pull back on the quick
connect fitting to ensure complete insertion (Fig. 7).
(Refer to Fuel Hoses, Clamps and Quick Connect Fit-
tings in Group 14 Fuel Systems). (28) Install throttle cable (Fig. 3).
(29) Connect fuel injector wiring harness.
(30) Install air cleaner and hose assembly (Fig. 2).
(31) Connect negative battery cable. Fill Cooling
System. See Cooling System, Group 7. (32) With the DRBII Scan Tool use ASD Fuel Sys-
tem Test to pressurize system to check for leaks.
CAUTION: When using the ASD Fuel System Test,
the Auto Shutdown (ASD) relay will remain ener-
gized for 7 minutes or until the ignition switch is
turned to the OFF position, or Stop All Test is se-
lected.
EXHAUST MANIFOLDS
REMOVAL
(1) Raise vehicle and disconnect exhaust pipe from
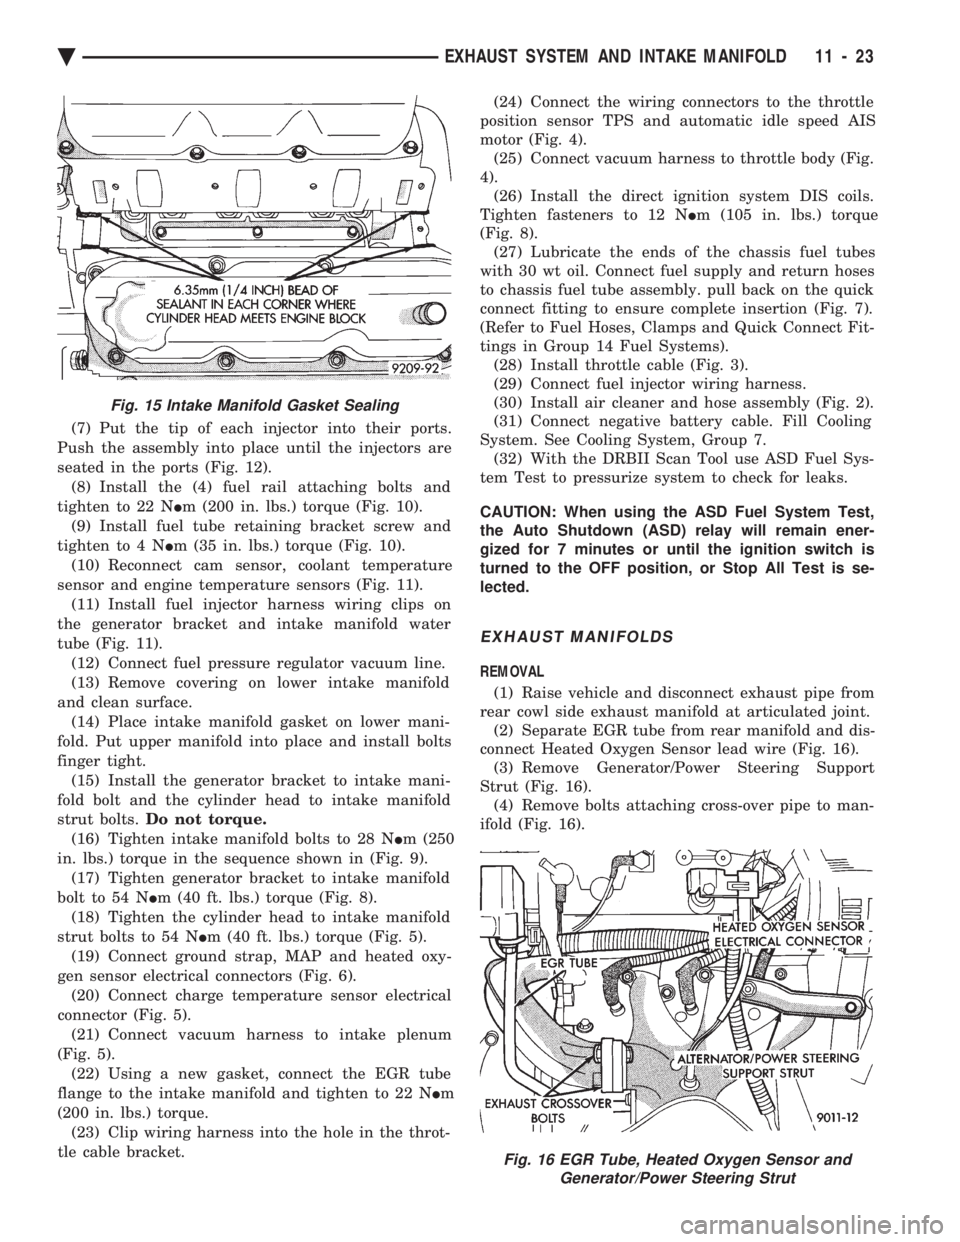
rear cowl side exhaust manifold at articulated joint. (2) Separate EGR tube from rear manifold and dis-
connect Heated Oxygen Sensor lead wire (Fig. 16). (3) Remove Generator/Power Steering Support
Strut (Fig. 16). (4) Remove bolts attaching cross-over pipe to man-
ifold (Fig. 16).
Fig. 15 Intake Manifold Gasket Sealing
Fig. 16 EGR Tube, Heated Oxygen Sensor and Generator/Power Steering Strut
Ä EXHAUST SYSTEM AND INTAKE MANIFOLD 11 - 23
Page 1758 of 2438
INSTALLATION
WARNING: FUEL TANKS DESIGNED FOR GASO-
LINE ONLY VEHICLES CANNOT BE USED ON
FLEXIBLE FUEL AA-BODY VEHICLES. WHEN SER-
VICING THE FUEL SYSTEM OF A FLEXIBLE FUEL
VEHICLE, ONLY USE ORIGINAL EQUIPMENT OR
EQUIVALENT REPLACEMENT COMPONENTS. (1) Position fuel tank on transmission jack. Con-
nect vapor separator/rollover valve hose and position
insulator pad on fuel tank. Position vapor vent so
that it is not pinched between tank and floor pan
during installation. (2) Raise tank and fuel filler tube carefully into
position. Use a light coating of power steering fluid
to ease fuel filler tube installation. Ensure filler tube
grommet is not damaged. Verify that the tube is in-
stalled correctly. (3) Tighten fuel tank strap nuts to 23 N Im (250 in.
lbs.) torque. Remove transmission jack. Ensure
straps are not twisted or bent. (4) Lubricate the metal tubes on the fuel pump
with clean 30 weight engine oil. Install the quick
connect fuel fittings. Refer to Quick Connect Fittings
in the Fuel Delivery section of this Group. (5) Attach electrical connector to fuel pump mod-
ule and level sensor unit. (6) Lower the vehicle.
(7) Attach filler tube to filler neck opening in
quarter panel. Tighten quarter panel screws to 2
N Im (17 in. lbs.) torque.
(8) Fill fuel tank, install filler cap, and connect
battery cable.
CAUTION: When using the ASD Fuel System Test,
the Auto Shutdown (ASD) Relay remains energized
for either 7 minutes, until the test is stopped, or un-
til the ignition switch is turned to the Off position.
(9) Use the DRBII scan tool ASD Fuel System Test
to pressurize the fuel system. Check for leaks.
FUEL PUMP MODULE
Refer to the Fuel Delivery section of this group.
METHANOL CONCENTRATION SENSOR
Refer to the Fuel Delivery section of this group.
FUEL RESERVOIR
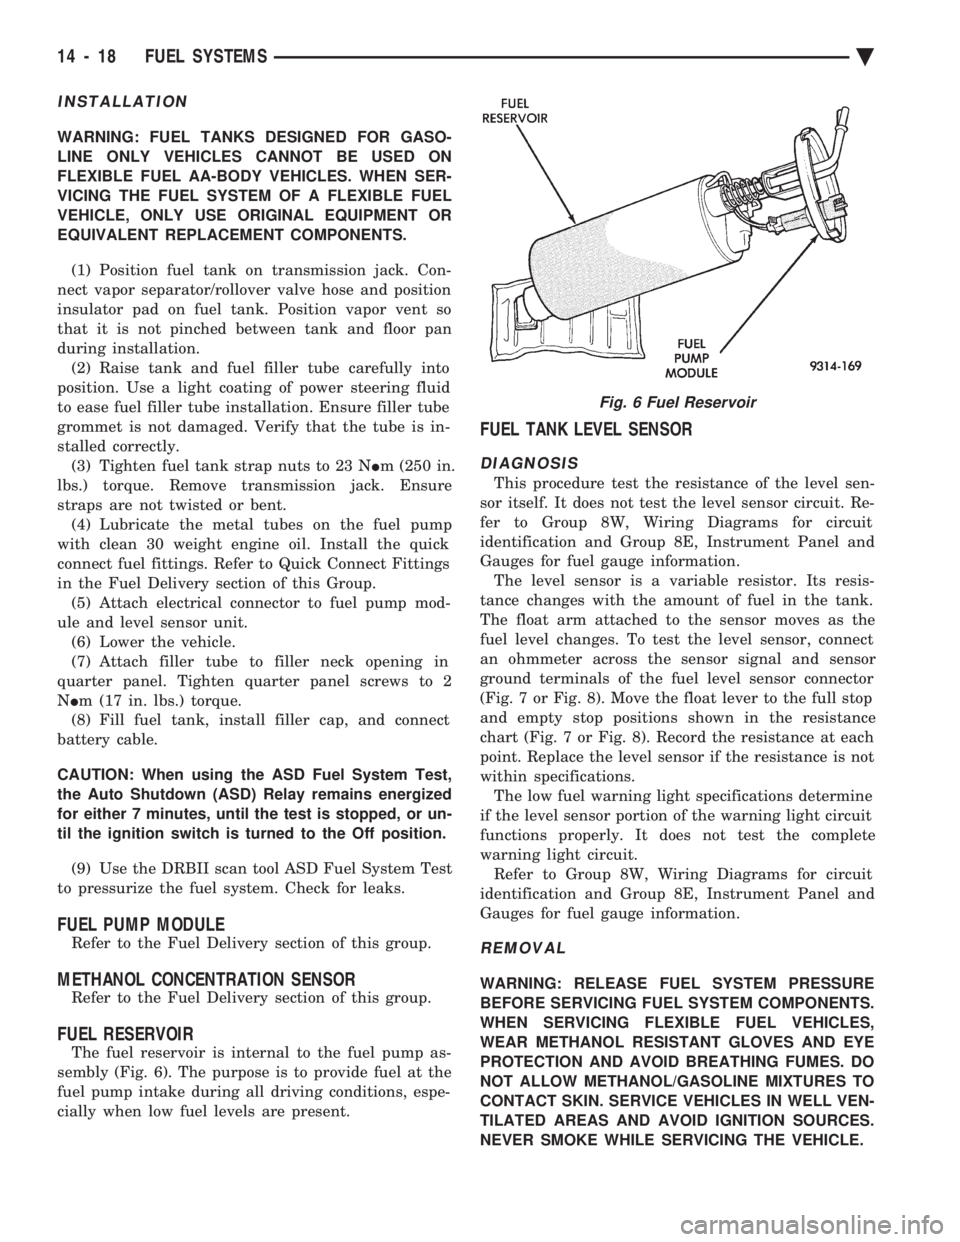
The fuel reservoir is internal to the fuel pump as-
sembly (Fig. 6). The purpose is to provide fuel at the
fuel pump intake during all driving conditions, espe-
cially when low fuel levels are present.
FUEL TANK LEVEL SENSOR
DIAGNOSIS
This procedure test the resistance of the level sen-
sor itself. It does not test the level sensor circuit. Re-
fer to Group 8W, Wiring Diagrams for circuit
identification and Group 8E, Instrument Panel and
Gauges for fuel gauge information. The level sensor is a variable resistor. Its resis-
tance changes with the amount of fuel in the tank.
The float arm attached to the sensor moves as the
fuel level changes. To test the level sensor, connect
an ohmmeter across the sensor signal and sensor
ground terminals of the fuel level sensor connector
(Fig. 7 or Fig. 8). Move the float lever to the full stop
and empty stop positions shown in the resistance
chart (Fig. 7 or Fig. 8). Record the resistance at each
point. Replace the level sensor if the resistance is not
within specifications. The low fuel warning light specifications determine
if the level sensor portion of the warning light circuit
functions properly. It does not test the complete
warning light circuit. Refer to Group 8W, Wiring Diagrams for circuit
identification and Group 8E, Instrument Panel and
Gauges for fuel gauge information.
REMOVAL
WARNING: RELEASE FUEL SYSTEM PRESSURE
BEFORE SERVICING FUEL SYSTEM COMPONENTS.
WHEN SERVICING FLEXIBLE FUEL VEHICLES,
WEAR METHANOL RESISTANT GLOVES AND EYE
PROTECTION AND AVOID BREATHING FUMES. DO
NOT ALLOW METHANOL/GASOLINE MIXTURES TO
CONTACT SKIN. SERVICE VEHICLES IN WELL VEN-
TILATED AREAS AND AVOID IGNITION SOURCES.
NEVER SMOKE WHILE SERVICING THE VEHICLE.
Fig. 6 Fuel Reservoir
14 - 18 FUEL SYSTEMS Ä
Page 1765 of 2438
Various sensors provide the inputs necessary for
the PCM to correctly regulate fuel flow at the fuel
injector. These include the manifold absolute pres-
sure, throttle position, oxygen sensor, coolant tem-
perature, and vehicle speed sensors. In addition to
the sensors, various switches and relays provide im-
portant information and system control. The inputs
include the park/neutral switch and air conditioning
clutch switch. The outputs include the auto shutdown
relay and fuel pump relay. All inputs to the PCM are converted into signals.
Based on these inputs the PCM adjusts air-fuel ratio,
ignition timing and other controlled outputs. The
PCM adjusts the air-fuel ratio by changing the injec-
tor pulse width. Injector pulse width is the period of
time the injector is energized.
SYSTEM DIAGNOSIS
The PCM tests many of its own input and output
circuits. If a fault is found in a major system, the in-
formation is stored in memory. Technicians can dis-
play fault information through the instrument panel
Malfunction Indicator lamp (instrument panel Check
Engine lamp) or by connecting the DRBII scan tool.
For diagnostic trouble code information, refer to On
Board Diagnostics in 2.2L/2.5L Single Point Fuel In-
jectionÐGeneral Diagnosis section of this group.
CCD BUS
Various modules exchange information through a
communications port called the CCD Bus. The pow-
ertrain control module (PCM) transmits vehicle load
data on the CCD Bus.
POWERTRAIN CONTROL MODULE
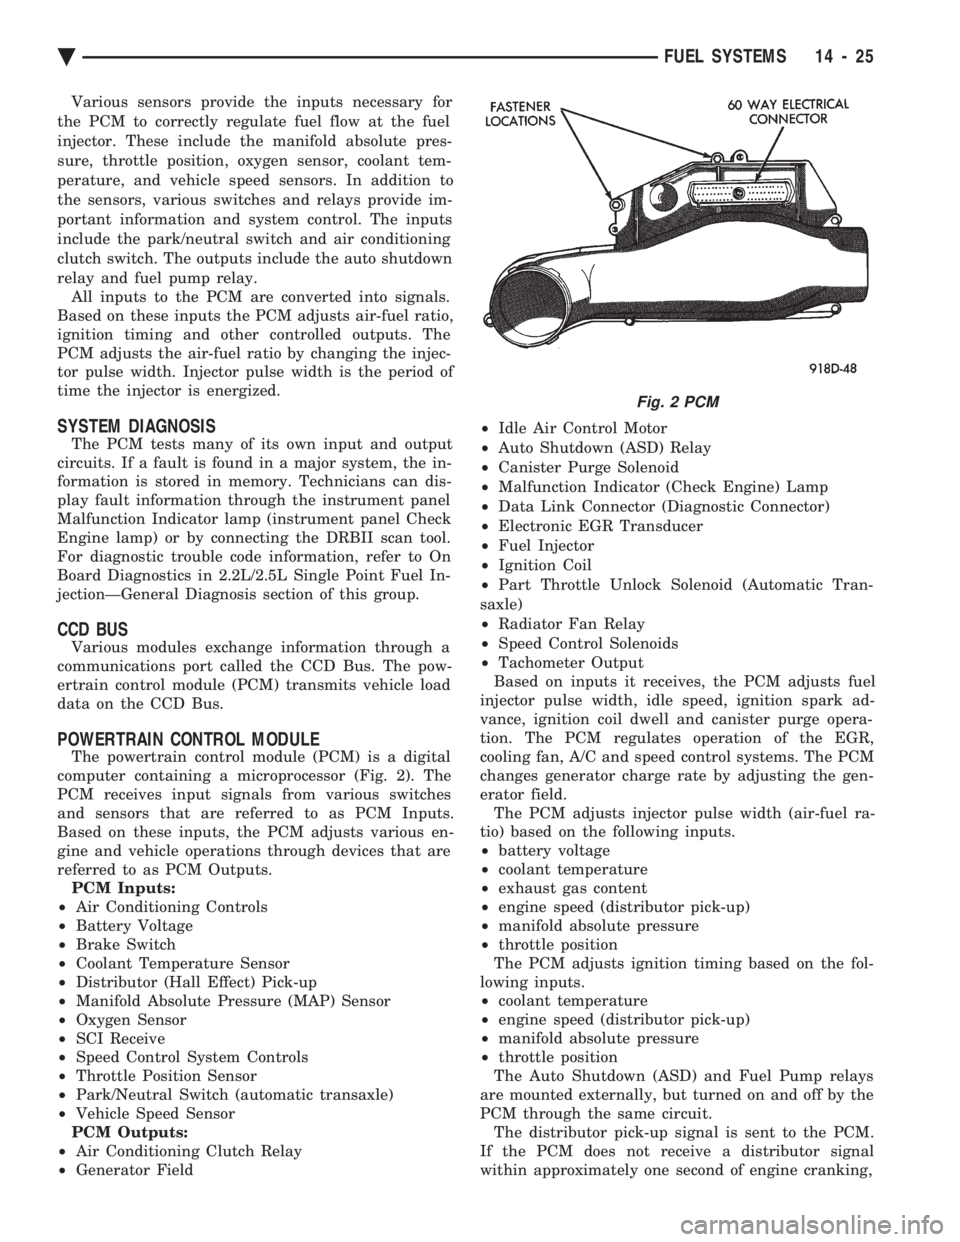
The powertrain control module (PCM) is a digital
computer containing a microprocessor (Fig. 2). The
PCM receives input signals from various switches
and sensors that are referred to as PCM Inputs.
Based on these inputs, the PCM adjusts various en-
gine and vehicle operations through devices that are
referred to as PCM Outputs. PCM Inputs:
² Air Conditioning Controls
² Battery Voltage
² Brake Switch
² Coolant Temperature Sensor
² Distributor (Hall Effect) Pick-up
² Manifold Absolute Pressure (MAP) Sensor
² Oxygen Sensor
² SCI Receive
² Speed Control System Controls
² Throttle Position Sensor
² Park/Neutral Switch (automatic transaxle)
² Vehicle Speed Sensor
PCM Outputs:
² Air Conditioning Clutch Relay
² Generator Field ²
Idle Air Control Motor
² Auto Shutdown (ASD) Relay
² Canister Purge Solenoid
² Malfunction Indicator (Check Engine) Lamp
² Data Link Connector (Diagnostic Connector)
² Electronic EGR Transducer
² Fuel Injector
² Ignition Coil
² Part Throttle Unlock Solenoid (Automatic Tran-
saxle)
² Radiator Fan Relay
² Speed Control Solenoids
² Tachometer Output
Based on inputs it receives, the PCM adjusts fuel
injector pulse width, idle speed, ignition spark ad-
vance, ignition coil dwell and canister purge opera-
tion. The PCM regulates operation of the EGR,
cooling fan, A/C and speed control systems. The PCM
changes generator charge rate by adjusting the gen-
erator field. The PCM adjusts injector pulse width (air-fuel ra-
tio) based on the following inputs.
² battery voltage
² coolant temperature
² exhaust gas content
² engine speed (distributor pick-up)
² manifold absolute pressure
² throttle position
The PCM adjusts ignition timing based on the fol-
lowing inputs.
² coolant temperature
² engine speed (distributor pick-up)
² manifold absolute pressure
² throttle position
The Auto Shutdown (ASD) and Fuel Pump relays
are mounted externally, but turned on and off by the
PCM through the same circuit. The distributor pick-up signal is sent to the PCM.
If the PCM does not receive a distributor signal
within approximately one second of engine cranking,
Fig. 2 PCM
Ä FUEL SYSTEMS 14 - 25
Page 1766 of 2438
it de-activates the ASD relay and fuel pump relay.
When these relays are deactivated, power is shut off
from the fuel injector, fuel pump, ignition coil, and
oxygen sensor heater element. The PCM contains a voltage converter that
changes battery voltage to a regulated 8.0 volts to
power the distributor pick-up and vehicle speed sen-
sor. The PCM also provides a 5.0 volts supply for the
coolant temperature sensor, manifold absolute pres-
sure sensor and throttle position sensor.
AIR CONDITIONING SWITCH SENSEÐPCM INPUT
ALL VEHICLES EXCEPT AC-BODY
When the air conditioning or defrost switch is put
in the ON position and the low pressure and high
pressure switches are closed, the PCM receives an in-
put indicating that the air conditioning has been se-
lected. After receiving this input, the PCM activates
the A/C compressor clutch by grounding the A/C
clutch relay. The PCM also adjusts idle speed to a
scheduled RPM to compensate for increased engine
load.
AC-BODY VEHICLES
When the air conditioning or defrost switch is put
in the ON position and the low pressure switch, high
pressure switch and electronic cycling switch close,
the PCM receives an air conditioning select input.
After receiving this input, the PCM activates the
A/C compressor clutch by grounding the A/C com-
pressor clutch relay. The PCM also adjusts idle speed
to a scheduled RPM to compensate for increased en-
gine load.
BATTERY VOLTAGEÐPCM INPUT
The PCM monitors the battery voltage input to de-
termine fuel injector pulse width and generator field
control. If battery voltage is low, the PCM increases
injector pulse width.
BRAKE SWITCHÐPCM INPUT
When the brake switch is activated, the PCM re-
ceives an input indicating that the brakes are being
applied. After receiving the input, the PCM vents the
speed control servo. Venting the servo turns the
speed control system off.
COOLANT TEMPERATURE SENSORÐPCM INPUT
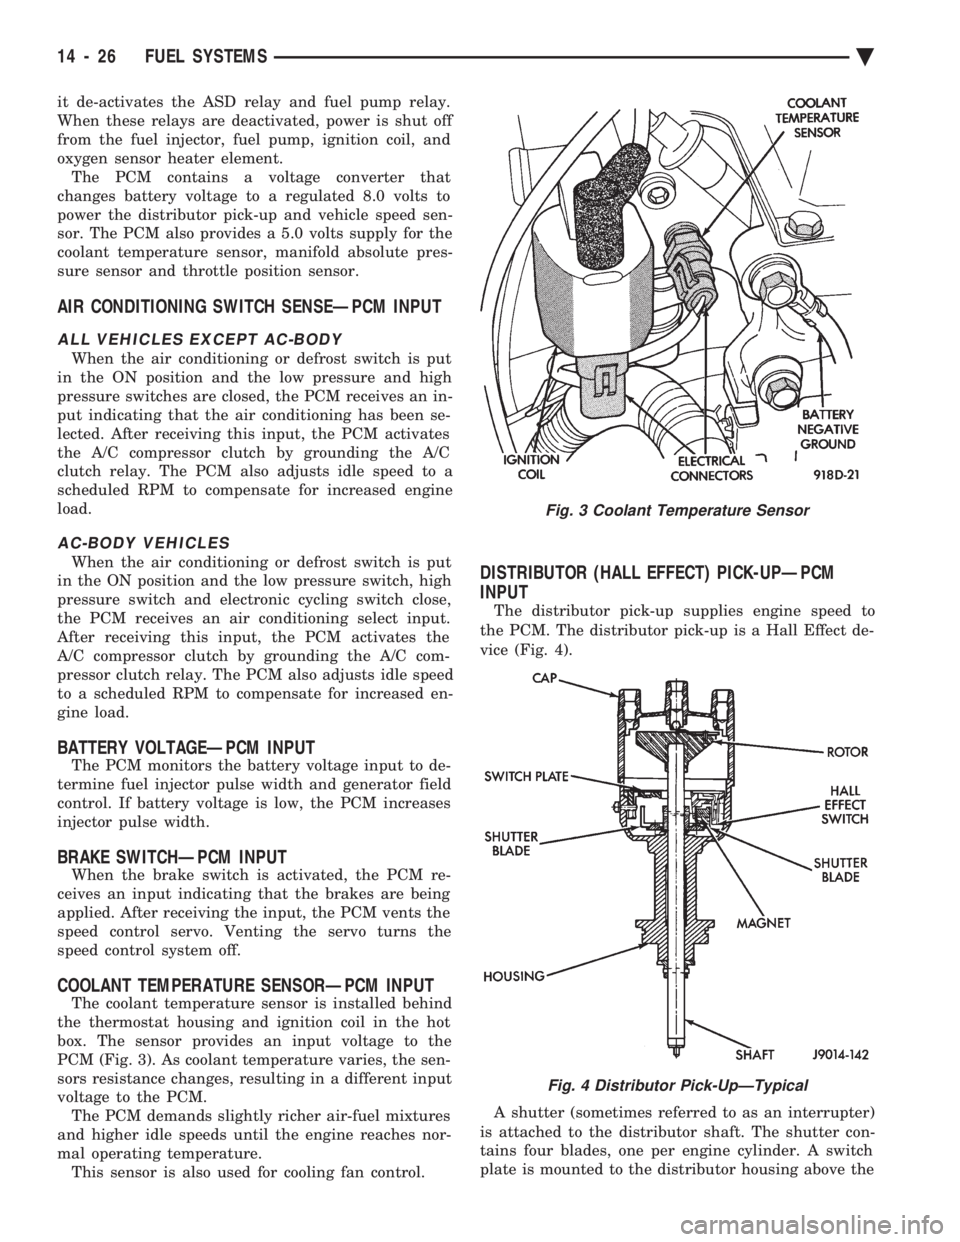
The coolant temperature sensor is installed behind
the thermostat housing and ignition coil in the hot
box. The sensor provides an input voltage to the
PCM (Fig. 3). As coolant temperature varies, the sen-
sors resistance changes, resulting in a different input
voltage to the PCM. The PCM demands slightly richer air-fuel mixtures
and higher idle speeds until the engine reaches nor-
mal operating temperature. This sensor is also used for cooling fan control.
DISTRIBUTOR (HALL EFFECT) PICK-UPÐPCM
INPUT
The distributor pick-up supplies engine speed to
the PCM. The distributor pick-up is a Hall Effect de-
vice (Fig. 4).
A shutter (sometimes referred to as an interrupter)
is attached to the distributor shaft. The shutter con-
tains four blades, one per engine cylinder. A switch
plate is mounted to the distributor housing above the
Fig. 3 Coolant Temperature Sensor
Fig. 4 Distributor Pick-UpÐTypical
14 - 26 FUEL SYSTEMS Ä
Page 1772 of 2438
TACHOMETERÐPCM OUTPUT
The PCM supplies engine RPM to the instrument
panel tachometer. Refer to Group 8 for tachometer
information.
MODES OF OPERATION
As input signals to the PCM change, the PCM
adjusts its response to the output devices. For example,
the PCM must calculate a different injector pulse
width and ignition timing for idle than it does for wide
open throttle (WOT). There are several different modes
of operation that determine how the PCM responds to
the various input signals. There are two different areas of operation, OPEN
LOOP and CLOSED LOOP. During OPEN LOOP modes, the PCM receives input
signals and responds according to preset PCM pro-
gramming. Input from the oxygen (O
2) sensor is not
monitored during OPEN LOOP modes. During CLOSED LOOP modes, the PCM does moni-
tor the oxygen (O
2) sensor input. This input tells the
PCM if the calculated injector pulse width results in an
air-fuel ratio of 14.7 to 1. By monitoring the exhaust
oxygen content, the can PCM fine tune injector pulse
width for optimum fuel economy and low emissions. The single point fuel injection system has the follow-
ing modes of operation:
² Ignition switch ON - Zero RPM
² Engine start-up
² Engine warm-up
² Cruise (Idle)
² Acceleration
² Deceleration
² Wide Open Throttle
² Ignition switch OFF
The engine start-up (cranking), engine warm-up, and
wide open throttle modes are OPEN LOOP modes. The
acceleration, deceleration, and cruise modes, with the
engine at operating temperature are CLOSED
LOOP modes (under most operating conditions).
IGNITION SWITCH ON (ZERO RPM) MODE
When the single point fuel injection system is acti-
vated by the ignition switch, the following actions
occur:
² The PCM determines atmospheric air pressure from
the MAP sensor input to calculate basic fuel strategy.
² The PCM monitors the coolant temperature sensor
and throttle position sensor inputs. The PCM modifies
fuel strategy based on these inputs. When the key is in the ON position and the engine is
not running, the (ASD) and fuel pump relays are not
energized. Therefore, battery voltage is not supplied to
the fuel pump, ignition coil, fuel injector or oxygen
sensor heating element. ENGINE START-UP MODE
This is an OPEN LOOP mode. The following actions
occur when the starter motor is engaged. If the PCM receives a distributor signal it energizes
the auto shutdown (ASD) relay and fuel pump relay to
supply battery voltage to the fuel injector, ignition coil
and oxygen sensor heating element. If the PCM does
not receive a distributor input, it de-energizes the ASD
and fuel pump relays after approximately one second. When the engine idles within 664 RPM of the target
RPM, the PCM compares the current MAP value with
the atmospheric pressure value it received during the
Ignition Switch On (Zero RPM) Mode. If a minimum
difference between the two is not detected, a MAP
sensor fault is set into memory. Once the ASD relay and fuel pump relay have ener-
gized, the PCM:
² Supplies a ground path to the injector. The injector
is pulsed four times per engine revolution instead of
the normal two pulses per revolution.
² Determines injector pulse width based on coolant
temperature, MAP sensor input, throttle position, and
the number of engine revolutions since cranking was
initiated.
² Monitors the coolant temperature sensor, distribu-
tor pick-up, MAP sensor, and throttle position sensor to
determine correct ignition timing.
ENGINE WARM-UP MODE
This is a OPEN LOOP mode. The following inputs
are received by the PCM:
² coolant temperature
² manifold absolute pressure (MAP)
² engine speed (distributor pick-up)
² throttle position
² A/C switch
² battery voltage
The PCM provides a ground path for the injector to
precisely control injector pulse width (by switching the
ground on and off) and fires the injector twice per
engine revolution. The PCM regulates ignition timing.
It also adjusts engine idle speed through the idle air
control motor.
CRUISE OR IDLE MODE
When the engine is at operating temperature this is
a CLOSED LOOP mode. During cruising speed and at
idle the following inputs are received by the PCM:
² coolant temperature
² manifold absolute pressure
² engine speed
² throttle position
² exhaust gas oxygen content
² A/C control positions
² battery voltage
14 - 32 FUEL SYSTEMS Ä