1993 CHEVROLET DYNASTY wheel
[x] Cancel search: wheelPage 172 of 2438
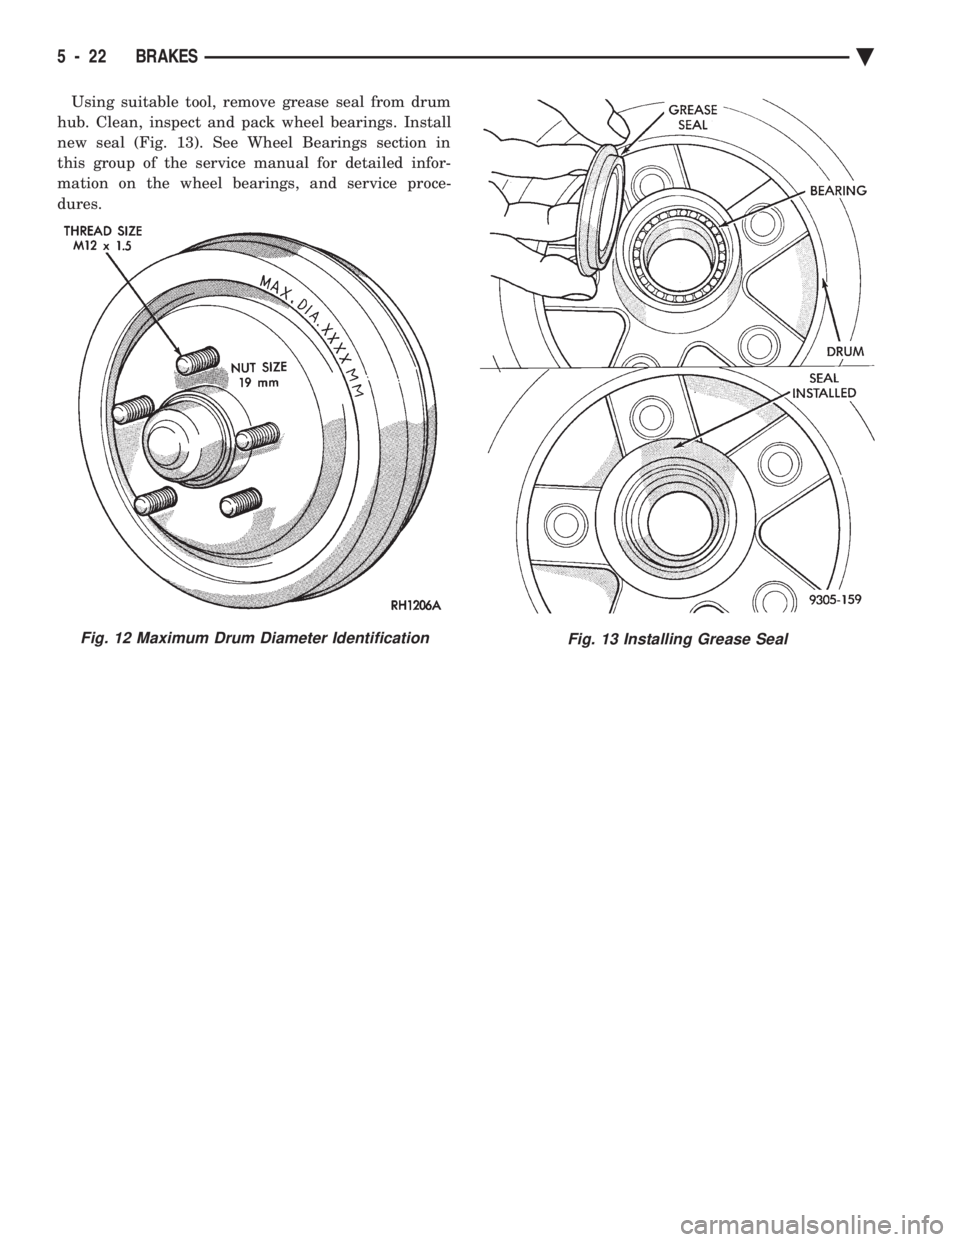
Using suitable tool, remove grease seal from drum
hub. Clean, inspect and pack wheel bearings. Install
new seal (Fig. 13). See Wheel Bearings section in
this group of the service manual for detailed infor-
mation on the wheel bearings, and service proce-
dures.
Fig. 12 Maximum Drum Diameter IdentificationFig. 13 Installing Grease Seal
5 - 22 BRAKES Ä
Page 173 of 2438
WHEEL CYLINDERS INDEX
page page
General Information ....................... 23
Installing Wheel Cylinders .................. 24 Service Procedures
....................... 23
GENERAL INFORMATION
The piston boots are of the push-on type and pre-
vent moisture from entering the wheel cylinder. To perform service operations or inspections of the
rear wheel brake cylinders. It will be necessary to re-
move the cylinders from the support plate and disas-
semble on the bench.
CAUTION: Wheel cylinders with cup expanders
must have cup expanders after any service proce-
dures (reconditioning or replacement).
SERVICE PROCEDURES
REMOVING WHEEL CYLINDERS FROM BRAKE SUPPORT PLATES
With brake drums removed, inspect the wheel cyl-
inder boots for evidence of a brake fluid leak. Then
block the brake pedal in the stroke position, and vi-
sually check the boots for cuts, tears, or heat cracks.
If any of these conditions exist, the wheel cylinders
should be completely cleaned, inspected and new
parts installed. (A slight amount of fluid on the boot
may not be a leak, but may be preservative fluid
used at assembly.) (1) In case of a leak, remove brake shoes, (replace
if soaked with grease or brake fluid.) (2) Thoroughly clean area of wheel cylinder, where
hydraulic brake line connects to wheel cylinder. Dis-
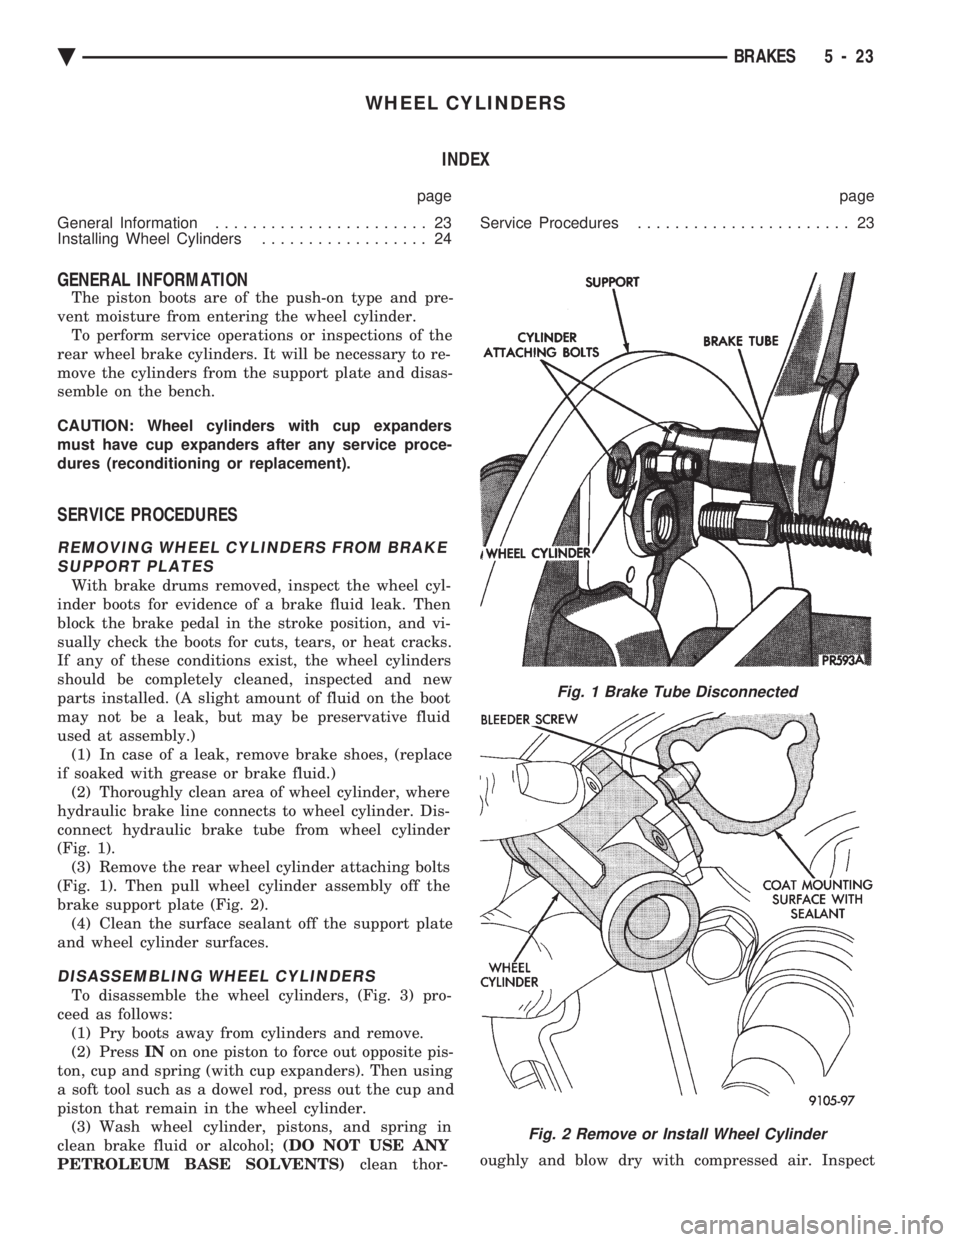
connect hydraulic brake tube from wheel cylinder
(Fig. 1). (3) Remove the rear wheel cylinder attaching bolts
(Fig. 1). Then pull wheel cylinder assembly off the
brake support plate (Fig. 2). (4) Clean the surface sealant off the support plate
and wheel cylinder surfaces.
DISASSEMBLING WHEEL CYLINDERS
To disassemble the wheel cylinders, (Fig. 3) pro-
ceed as follows: (1) Pry boots away from cylinders and remove.
(2) Press INon one piston to force out opposite pis-
ton, cup and spring (with cup expanders). Then using
a soft tool such as a dowel rod, press out the cup and
piston that remain in the wheel cylinder. (3) Wash wheel cylinder, pistons, and spring in
clean brake fluid or alcohol; (DO NOT USE ANY
PETROLEUM BASE SOLVENTS) clean thor- oughly and blow dry with compressed air. Inspect
Fig. 1 Brake Tube Disconnected
Fig. 2 Remove or Install Wheel Cylinder
Ä
BRAKES 5 - 23
Page 174 of 2438
cylinder bore and piston for scoring and pitting. (Do
not use a rag as lint from the rag will stick to bore
surfaces.) Wheel cylinder bores and pistons that are scored or
pitted in any way should be replaced. Cylinder walls
that have light scratches, or show signs of corrosion,
can usually be cleaned with crocus cloth, using a cir-
cular motion. Black stains on the cylinder walls are
caused by piston cups and will not impair operation
of cylinder.
ASSEMBLING WHEEL CYLINDERS
Before assembling the pistons and new cups in the
wheel cylinders, dip them in clean brake fluid. If the
boots are deteriorated, cracked or do not fit tightly
on the pistons or the cylinder casting, install new
boots. (1) Coat cylinder bore with clean brake fluid.
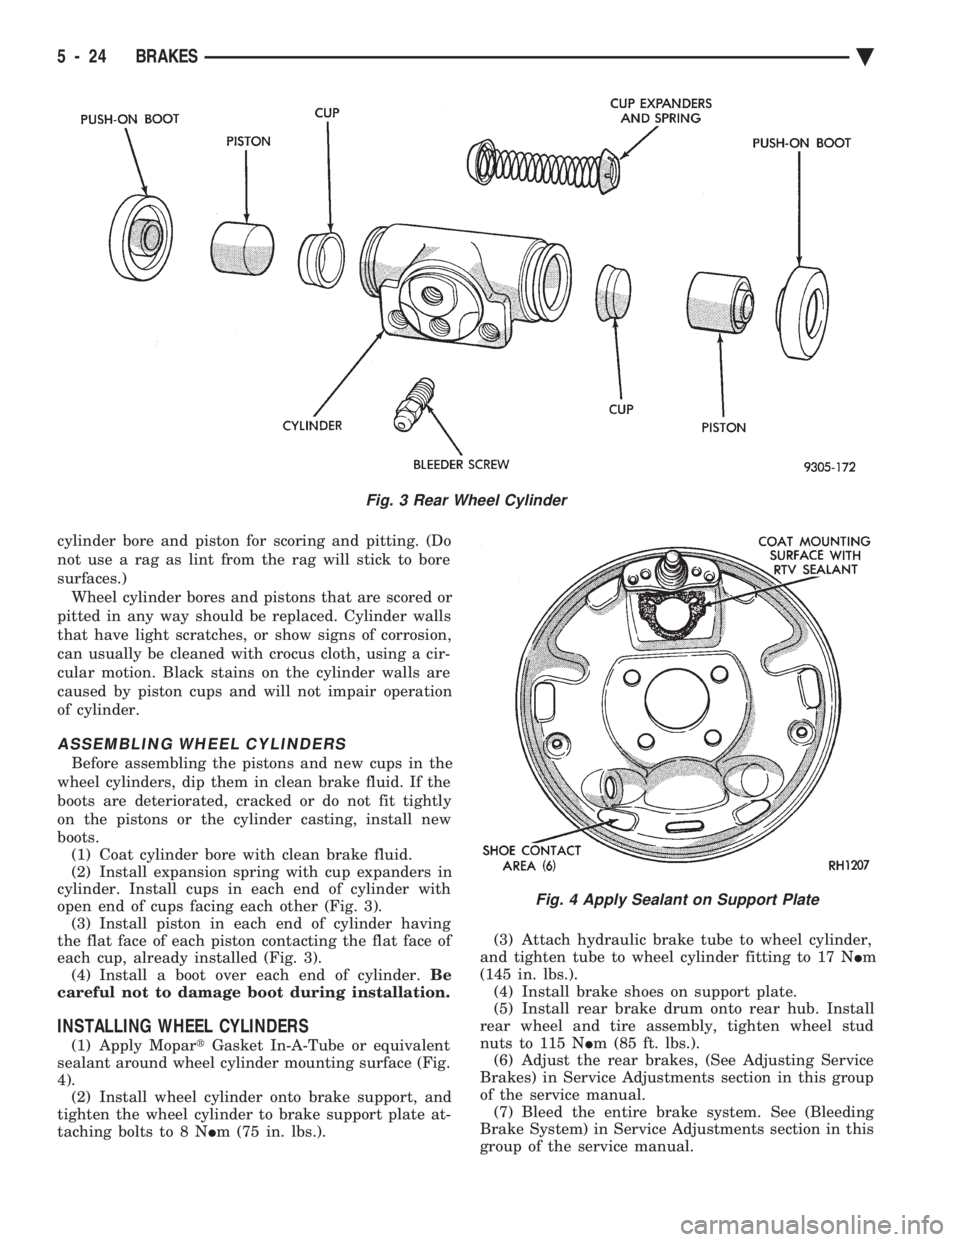
(2) Install expansion spring with cup expanders in
cylinder. Install cups in each end of cylinder with
open end of cups facing each other (Fig. 3). (3) Install piston in each end of cylinder having
the flat face of each piston contacting the flat face of
each cup, already installed (Fig. 3). (4) Install a boot over each end of cylinder. Be
careful not to damage boot during installation.
INSTALLING WHEEL CYLINDERS
(1) Apply Mopar tGasket In-A-Tube or equivalent
sealant around wheel cylinder mounting surface (Fig.
4). (2) Install wheel cylinder onto brake support, and
tighten the wheel cylinder to brake support plate at-
taching bolts to 8 N Im (75 in. lbs.). (3) Attach hydraulic brake tube to wheel cylinder,
and tighten tube to wheel cylinder fitting to 17 N Im
(145 in. lbs.). (4) Install brake shoes on support plate.
(5) Install rear brake drum onto rear hub. Install
rear wheel and tire assembly, tighten wheel stud
nuts to 115 N Im (85 ft. lbs.).
(6) Adjust the rear brakes, (See Adjusting Service
Brakes) in Service Adjustments section in this group
of the service manual. (7) Bleed the entire brake system. See (Bleeding
Brake System) in Service Adjustments section in this
group of the service manual.
Fig. 3 Rear Wheel Cylinder
Fig. 4 Apply Sealant on Support Plate
5 - 24 BRAKES Ä
Page 175 of 2438
BRAKE SUPPORT ASSEMBLY
REMOVAL
Back off parking brake adjusting nut to provide
slack in cable. With wheel and brake drum removed, disconnect
hydraulic tube from wheel cylinder.Disconnect park-
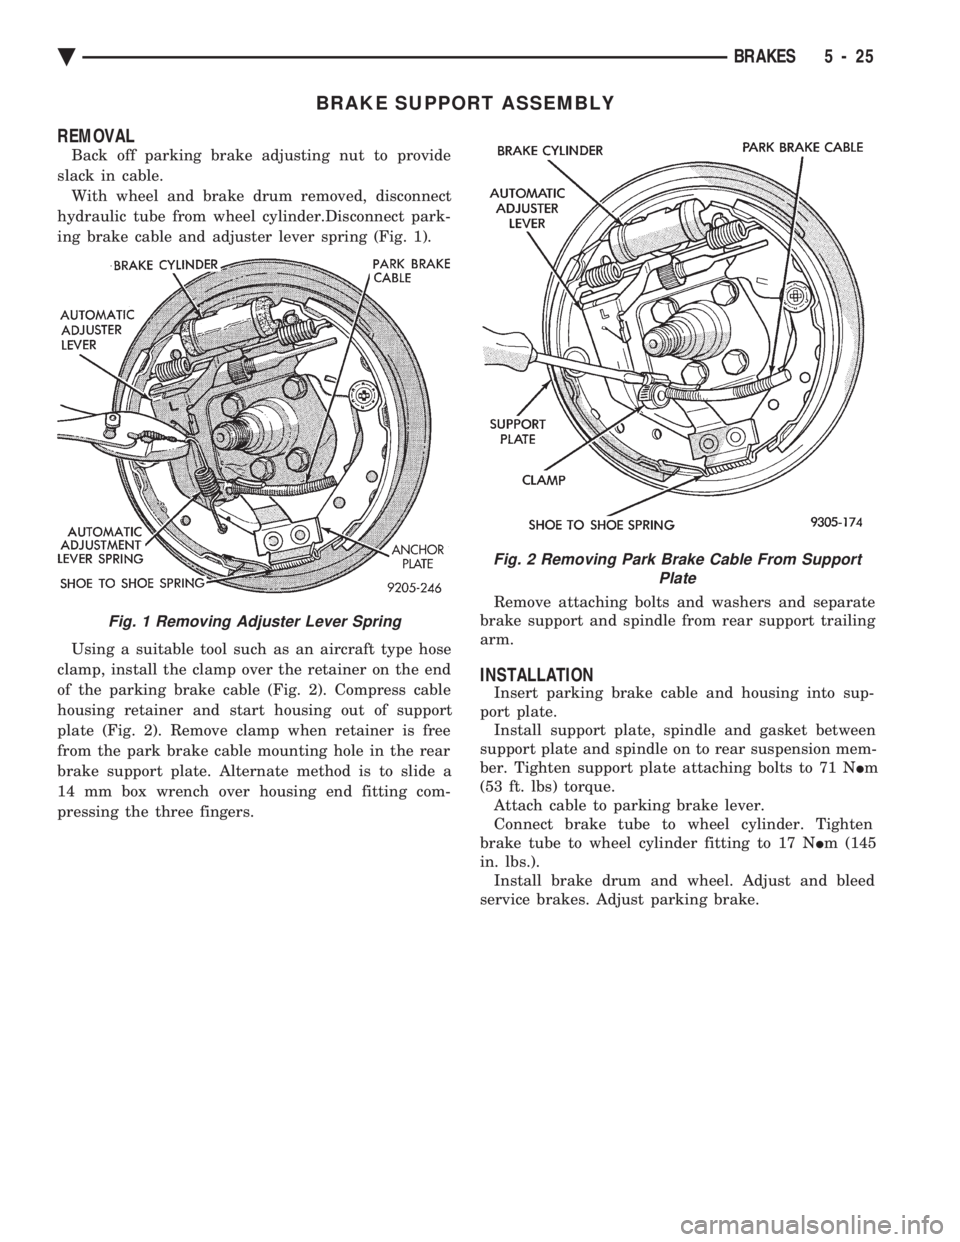
ing brake cable and adjuster lever spring (Fig. 1).
Using a suitable tool such as an aircraft type hose
clamp, install the clamp over the retainer on the end
of the parking brake cable (Fig. 2). Compress cable
housing retainer and start housing out of support
plate (Fig. 2). Remove clamp when retainer is free
from the park brake cable mounting hole in the rear
brake support plate. Alternate method is to slide a
14 mm box wrench over housing end fitting com-
pressing the three fingers. Remove attaching bolts and washers and separate
brake support and spindle from rear support trailing
arm.
INSTALLATION
Insert parking brake cable and housing into sup-
port plate. Install support plate, spindle and gasket between
support plate and spindle on to rear suspension mem-
ber. Tighten support plate attaching bolts to 71 N Im
(53 ft. lbs) torque. Attach cable to parking brake lever.
Connect brake tube to wheel cylinder. Tighten
brake tube to wheel cylinder fitting to 17 N Im (145
in. lbs.). Install brake drum and wheel. Adjust and bleed
service brakes. Adjust parking brake.
Fig. 1 Removing Adjuster Lever Spring
Fig. 2 Removing Park Brake Cable From Support Plate
Ä BRAKES 5 - 25
Page 177 of 2438
to the rear will be lower than the front brakes. This will
prevent premature rear wheel lock-up and skid. If
hydraulic pressure is lost in one half of the diagonally
split system, the operation of the proportioning valve
in the remaining half is not effected.
ABS BRAKE PROPORTIONING VALVE OPERATION
On vehicles using the ABS braking system, screw in
proportioning valves are used in place of the conven-
tional differential pressure/proportioning valve. Each rear brake circuit has its own screw-in propor-
tioning valve which is attached to the rear brake outlet
ports of the hydraulic assembly. These valves limit
brake pressure to the rear brakes after a certain
pressure is reached. This improves front to rear brake
balance during normal braking.
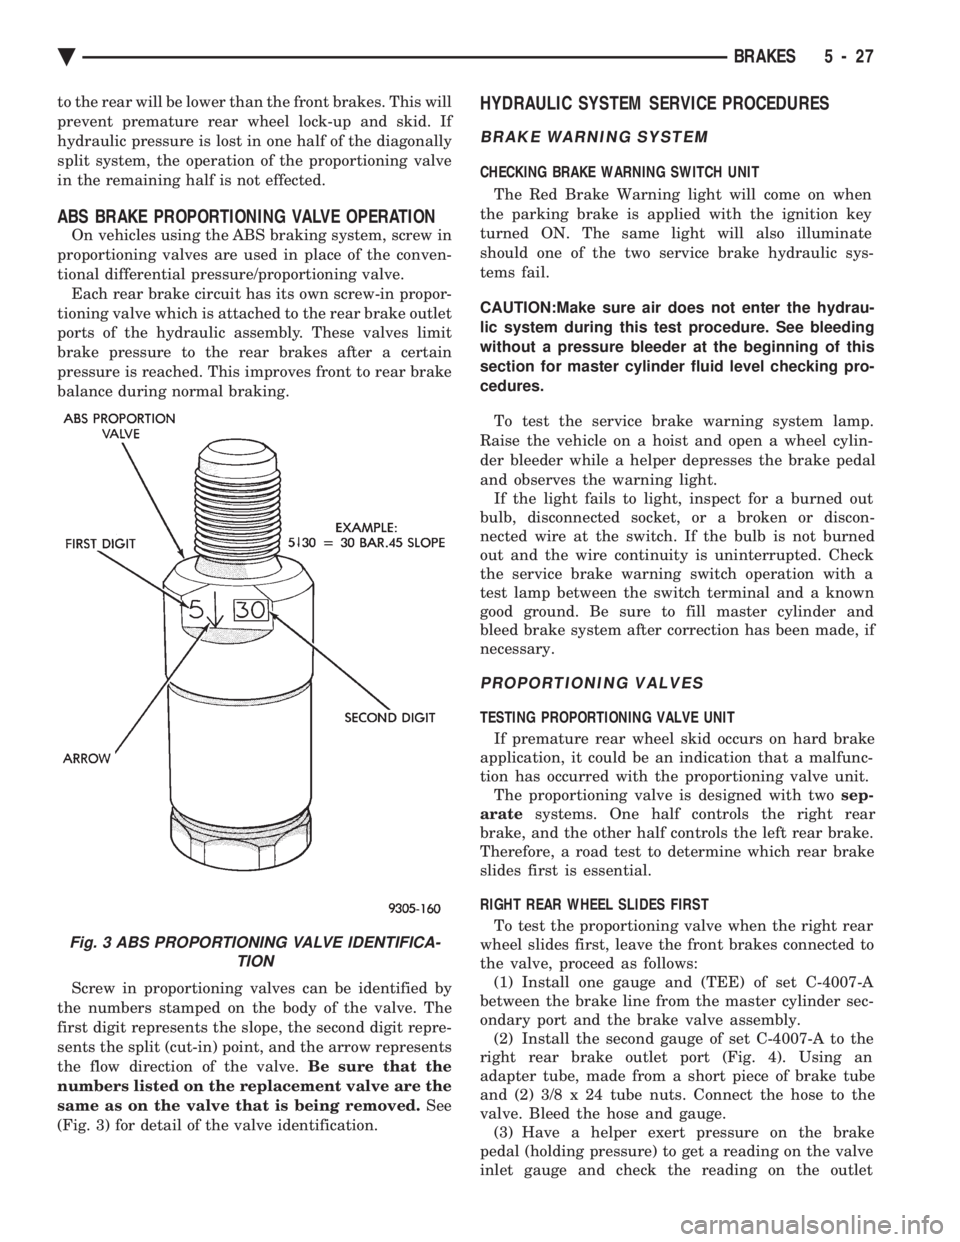
Screw in proportioning valves can be identified by
the numbers stamped on the body of the valve. The
first digit represents the slope, the second digit repre-
sents the split (cut-in) point, and the arrow represents
the flow direction of the valve. Be sure that the
numbers listed on the replacement valve are the
same as on the valve that is being removed. See
(Fig. 3) for detail of the valve identification.
HYDRAULIC SYSTEM SERVICE PROCEDURES
BRAKE WARNING SYSTEM
CHECKING BRAKE WARNING SWITCH UNIT
The Red Brake Warning light will come on when
the parking brake is applied with the ignition key
turned ON. The same light will also illuminate
should one of the two service brake hydraulic sys-
tems fail.
CAUTION:Make sure air does not enter the hydrau-
lic system during this test procedure. See bleeding
without a pressure bleeder at the beginning of this
section for master cylinder fluid level checking pro-
cedures.
To test the service brake warning system lamp.
Raise the vehicle on a hoist and open a wheel cylin-
der bleeder while a helper depresses the brake pedal
and observes the warning light. If the light fails to light, inspect for a burned out
bulb, disconnected socket, or a broken or discon-
nected wire at the switch. If the bulb is not burned
out and the wire continuity is uninterrupted. Check
the service brake warning switch operation with a
test lamp between the switch terminal and a known
good ground. Be sure to fill master cylinder and
bleed brake system after correction has been made, if
necessary.
PROPORTIONING VALVES
TESTING PROPORTIONING VALVE UNIT
If premature rear wheel skid occurs on hard brake
application, it could be an indication that a malfunc-
tion has occurred with the proportioning valve unit. The proportioning valve is designed with two sep-
arate systems. One half controls the right rear
brake, and the other half controls the left rear brake.
Therefore, a road test to determine which rear brake
slides first is essential.
RIGHT REAR WHEEL SLIDES FIRST To test the proportioning valve when the right rear
wheel slides first, leave the front brakes connected to
the valve, proceed as follows: (1) Install one gauge and (TEE) of set C-4007-A
between the brake line from the master cylinder sec-
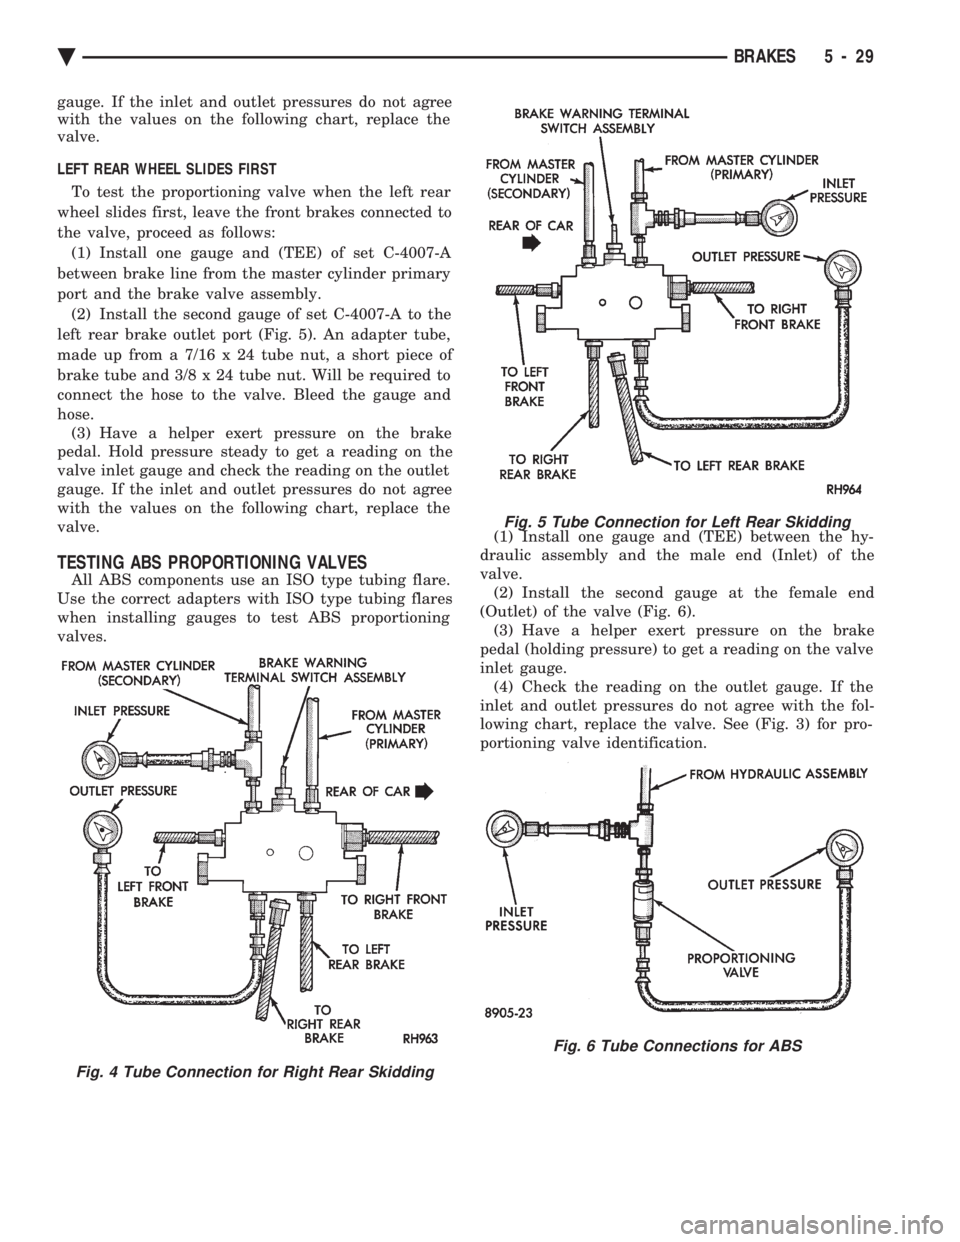
ondary port and the brake valve assembly. (2) Install the second gauge of set C-4007-A to the
right rear brake outlet port (Fig. 4). Using an
adapter tube, made from a short piece of brake tube
and (2) 3/8 x 24 tube nuts. Connect the hose to the
valve. Bleed the hose and gauge. (3) Have a helper exert pressure on the brake
pedal (holding pressure) to get a reading on the valve
inlet gauge and check the reading on the outlet
Fig. 3 ABS PROPORTIONING VALVE IDENTIFICA- TION
Ä BRAKES 5 - 27
Page 179 of 2438
gauge. If the inlet and outlet pressures do not agree
with the values on the following chart, replace the
valve.
LEFT REAR WHEEL SLIDES FIRST To test the proportioning valve when the left rear
wheel slides first, leave the front brakes connected to
the valve, proceed as follows: (1) Install one gauge and (TEE) of set C-4007-A
between brake line from the master cylinder primary
port and the brake valve assembly. (2) Install the second gauge of set C-4007-A to the
left rear brake outlet port (Fig. 5). An adapter tube,
made up from a 7/16 x 24 tube nut, a short piece of
brake tube and 3/8 x 24 tube nut. Will be required to
connect the hose to the valve. Bleed the gauge and
hose. (3) Have a helper exert pressure on the brake
pedal. Hold pressure steady to get a reading on the
valve inlet gauge and check the reading on the outlet
gauge. If the inlet and outlet pressures do not agree
with the values on the following chart, replace the
valve.
TESTING ABS PROPORTIONING VALVES
All ABS components use an ISO type tubing flare.
Use the correct adapters with ISO type tubing flares
when installing gauges to test ABS proportioning
valves. (1) Install one gauge and (TEE) between the hy-
draulic assembly and the male end (Inlet) of the
valve. (2) Install the second gauge at the female end
(Outlet) of the valve (Fig. 6). (3) Have a helper exert pressure on the brake
pedal (holding pressure) to get a reading on the valve
inlet gauge. (4) Check the reading on the outlet gauge. If the
inlet and outlet pressures do not agree with the fol-
lowing chart, replace the valve. See (Fig. 3) for pro-
portioning valve identification.
Fig. 4 Tube Connection for Right Rear Skidding
Fig. 5 Tube Connection for Left Rear Skidding
Fig. 6 Tube Connections for ABS
Ä BRAKES 5 - 29
Page 183 of 2438

semblies. This sensor when emitting a sound signals
that brake lining may need inspection and/or re-
placement.
SHOE AND LINING WEAR
If a visual inspection does not adequately deter-
mine the condition of the lining, a physical check
will be necessary. To check the amount of lining
wear, remove the wheel and tire assemblies, and the
calipers. Remove the shoe and lining assemblies. (See Brake
Shoe Removal paragraph). Combined shoe and lining thickness should be
measured at the thinnest part of the assembly. When a shoe and lining assembly is worn to a
thickness of approximately 7.95 mm (5/16 inch) it
should be replaced. Replace bothshoe assemblies (inboard and out-
board) on the front wheels. It is necessary that both
front wheel sets be replaced whenever shoe assem-
blies on either side are replaced. If a shoe assembly does not require replacement.
Reinstall, the shoe assemblies making sure each shoe
assembly is returned to the original position. (See
Brake Shoe Installation).
Fig. 4 Disc Brake Caliper Mounting (Non-Family Caliper)
Fig. 5 Disc Brake Caliper Mounting (Typical)
Fig. 6 Piston Seal Function for Automatic Adjustment
Ä BRAKES 5 - 33
Page 184 of 2438
SERVICE PRECAUTIONS
WARNING: DUST AND DIRT ON BRAKE PARTS
GENERATED DURING THE NORMAL USE AND
WEAR OF MOTOR VEHICLE BRAKE SYSTEMS CAN
CONTAIN ASBESTOS FIBERS. BREATHING EXCES-
SIVE CONCENTRATIONS OF ASBESTOS FIBERS
CAN CAUSE SERIOUS BODILY HARM, SUCH AS
ASBESTOSIS AND CANCER. EXTREME CARE
SHOULD BE EXERCISED WHILE SERVICING
BRAKE ASSEMBLIES OR COMPONENTS. DO NOT CLEAN BRAKE ASSEMBLIES OR COM-
PONENTS WITH COMPRESSED AIR OR BY DRY
BRUSHING; USE A VACUUM CLEANER SPECIFI-
CALLY RECOMMENDED FOR USE WITH ASBES-
TOS FIBERS. IF A SUITABLE VACUUM CLEANER IS
NOT AVAILABLE, CLEANING SHOULD BE DONE
WET USING A WATER DAMPENED CLOTH. DO NOT CREATE DUST BY SANDING, GRINDING,
AND/OR SHAVING BRAKE LININGS OR PADS UN-
LESS SUCH OPERATION IS DONE WHILE USING
PROPERLY EXHAUST VENTILATED EQUIPMENT. DISPOSE OF ALL DUST AND DIRT SUSPECTED
TO CONTAIN ANY ASBESTOS FIBERS IN SEALED
BAGS OR CONTAINERS TO MINIMIZE DUST EXPO-
SURE TO YOURSELF AND OTHERS. FOLLOW ALL RECOMMENDED PRACTICES PRE-
SCRIBED BY THE OCCUPATIONAL SAFETY AND
HEALTH ADMINISTRATION AND THE ENVIRONMEN-
TAL PROTECTION AGENCY. FOR THE HANDLING,
PROCESSING, AND DISPOSITION OF DUST OR DIRT
WHICH MAY CONTAIN ASBESTOS FIBERS. IT IS RECOMMENDED NOT TO BREATH ANY TYPE
OF BRAKE LINING MATERIAL DUST EVEN ASBES-
TOS FREE, DUE TO THE FIBROUS NATURE OF THE
MATERIALS BEING USED.
Grease or any other foreign material must be kept off
caliper assembly, surfaces of braking disc and external
surfaces of hub, during service procedures. Handling of the braking disc and caliper. Should be
done in such a way as to avoid deformation of the disc
and scratching or nicking of the brake linings. If inspection reveals that the square sectioned cali-
per piston seal is worn or damaged, it should be
replaced immediately. During removal and installation of a wheel and tire
assembly, use care not to strike the caliper. Before vehicle is moved after any brake service
work, be sure to obtain a firm brake pedal.
5 - 34 BRAKES Ä