1992 VOLKSWAGEN TRANSPORTER Page 97
[x] Cancel search: Page 97Page 67 of 164

Downloaded from www.Manualslib.com manuals search engine
CONTROLS
AND EQUIPMENT
12
3 4 5 6 m.bc
"fy
7 8 9 10 111
Timer*
'. ih the timer in the instrument panel up to
r-ee different switch-on times can be se
eded
for the auxiliary heater*. It is thus
::ssible
to start the heater without having
go
to the vehicle.
e
heater runs for maximum 120 minutes
ie'.d
it switches itself off. It can be switched
c~
prematurely by pressing button 9. The
preset
time is stored and can be called up
again
so that the heater switches on again =: the same time.
~ne
switch-on time can be programmed up :: one week in advance. 1- Display for 3 possible pre-selected
times
2-
Time display/pre-selected time
3-
System malfunction display
4-
Temperature display*
5-
"On" or "Off" display
6-
Display for pre-selected day 7-
Push
button for time and day of week
8-
Push
button for selecting time and day
9-
Push
button for "On" or "Off"
10-
Push
button for re-setting time or pre
selected
time and calling up remaining running time
11-
Push
button for setting time or pre-se
lected
time, setting pre-selected day
and
temperature display*
Notes
• As a temperature sender is not
fitted
at the factory an incorrect temperature figure
appears
when button 11 is
pressed.
• Displays 2 and 6 appear continuously after switching on the ignition. After switching off the ignition both displays will only ap
pear
if button 7 is
pressed.
Setting
the
actual
time
•
Press
and hold button 7.
• Set correct time with buttons
":1c".
Setting
the
actual
day of week
•
Press
and hold button 7.
• Set correct day of week with button 8.
Switching
heater
on (without preset
operation)
•
Press
button 9; symbol 5 appears r 're
display.
A
prerequisite is that rocker switch D z" control panel of heater is in centre pos : z~
With the ignition switched off the heate' .•.
be
switched on for approx. max. MZ —-
utes.
The
remaining running time can ce := e: by pressing button 10 briefly. If the c_r.c~
is
pressed longer than one second :~e
ning time will be shortened.
Note
If continuous operation of :~e -ea:e •
wanted,
it must be switcher :" B: re ::'-
trol
panel (see page 63).
www.vwT4camper.info - a useful website for owners and enthusiasts of VW T4 Transporter Campervans
Page 68 of 164

Downloaded from www.Manualslib.com manuals search engine
CONTROLS AND
EQUIPMENT
Switching
heater
off
•
Press
button
9/symbol 5 disappears.
Setting
the
pre-selected
times
•
Press
button
8/the
three possible pre
selected
times and actual time can be called up separately as follows:
1st pre-selected time
2nd pre-selected time
3rd pre-selected time
Actual
time etc.
At the same time the day of week is dis played in each level.
For
the initial input and for each change to
an old input
first
call up the corresponding pre-selected time level
with
button
8. It is
then possible to set the desired pre-se lected time in each level
with
buttons 10 or
11.
If a time is set before the actual time of
day, the next day of the week appears in the display automatically. If a different day of the week is desired, it is
necessary
to wait
until
the weekday display
flashes
before setting the new day of the
week by pressing
button
11.
The inputs are stored in the memory if no
further
inputs are made
within
about 10
sec
onds after setting a pre-selected time and
day of the week. With the ignition switched
on the actual time is
displayed,
with
the igni
tion
switched off the display disappears. However the numbers 1,2 or 3 remain in the
display 1 to indicate
that
a pre-selected
time is activated.
Notes
• If not activated the heater will not start at the pre-selected time!
• Only one pre-selected time can be acti
vated,
which in
turn
also runs only once. However, the time can be repeated by acti
vating again. When doing this the inputs re main stored in the memory.
• The switched-on period is determined
as
described in the "Switching heater on"
section (see previous page).
If the activation (not the pre-selected set
tings!) is to be cancelled, press
button
8
until
the number in display
1
is no longer vis
ible.
66
www.vwT4camper.info - a useful website for owners and enthusiasts of VW T4 Transporter Campervans
Page 69 of 164
Downloaded from www.Manualslib.com manuals search engine
CONTROLS
AND
EQUIPVE\
Additional
water
heater*
E
additional water heater heats the
cool-
— ;he heater circuit and supplies the nor- • ^eating heat exchanger and the addi-
:~a
heat exchanger* for heating up the
rsaenger
compartment
with
heated
cool-
' ""e engine coolant circuit is not heated.
I current is supplied from a 2nd battery.
:ching
on and off and pre-selecting the
. :ch on/off times is effected via the timer,
- :h can be found in the instrument panel.
~a
air distribution and the air flow is ef-
:::ed
via the normal heating and ventila- : li aontrol elements (operating see page
a
additional water heater can be used
•en
stationary (short term operation) or -g the journey (continuous operation). If
.a;
when the vehicle is stationary the
•Her
runs for maximum 30 minutes,
;eoy
preserving the battery. Apart from
• 5 t switches off automatically, when a .: ant temperature of 92 degrees C is
Bcned.
"
an
the coolant temperature has dropped
-: .v 84 degrees C the heater switches on
The
additional water heater is supplied
with
fuel from the vehicle tank. It consumes up
to
1
litre
of fuel per hour. The heater output
is
approx. 7.0 kW.
Notes
• If the coolant temperature in the heater circuit reaches 55 degrees C, the fresh air
blower is automatically switched to stage 2.
• The additional water heater will only switch on when the temperature selector
lever
(see page 55, lever C) is pushed fully
to the
right.
• With the heater switched on the tem perature selector lever must not be pushed
to the
left.
• Regulating the heat output is not
poss
ible
with
the temperature selector lever.
• When driving across country through mud or deep snow the heater exhaust pipe
can
become blocked. Therefore under
these
conditions check
that
the pipe is clear before switching on the heater.
Attention
The
heater
must
be s . ::'-
a
: : in confined spaces and when fil
ling
the
tank.
•
Each
time the heater is sw :ce:
circu
at .-' pump and the comes::-blower continues to run for a v. K.e :: :::
down the heater
unit
quicker. Wher,-:. rg
the tank it is not necessary to vva :
end
of the run-on.
www.vwT4camper.info - a useful website for owners and enthusiasts of VW T4 Transporter Campervans
Page 71 of 164

Downloaded from www.Manualslib.com manuals search engine
CONTROLS AND
EQUIPMENT
Switching
heater
off
• -'ess
button
9; symbol 5 disappears. '.;te
-_e"
switching off the heater the circulation
b-~o and the combustion blower con- " • ^es to run for 2 minutes.
2
jring
this
time
the
temperature
se
lector
lever
must
not be pushed to
ae
left
-
danger
that
heater
unit
will
: .
erheat!
Setting
the
pre-selected
times
•
r-ess
button
8/the
three possible pre ss ect times and the actual time can be .i ed up one after the other as follows:
r. cre-selected time
I-; ore-selected time •-z ore-selected time
jfcrjal
time
: -jltaneously the day of the week is dis-
: z.ed at each level.
::' :he initial input and for each change to
r" Did input
first
call up the corresponding
:'e-selected
time level
with
button
8. It is "en possible to set the desired pre-select
~e
at each level
with
buttons 10 or 11. If
I: Tie is set before the actual time of day,
re next day of the week appears automati- za y in the display. If a different day of the week is desired, it is
necessary
to wait
until
the week day display
flashes
before setting the new day of the
week by pressing
button
11.
The inputs are stored in the memory if no
further
inputs are made
within
about 10
sec
onds after setting a pre-select time and day
of the week. With the ignition switched on
the actual time is displayed,
with
the ignition switched off the display disappears. How
ever
the numbers 1, 2 or 3 remain in the dis
play 1 to indicate
that
a pre-selected time is
activated.
Notes
• If not activated the heater will not
start
at
the pre-selected time!
• Only one pre-selected time can ce act •
vated,
which in
turn
only runs once, r: ever, the time can be repeated by activating
again.
When doing this the input remains stored in the memory.
• The switched-on period is determined
as
described in "Switching heater on" (see previous page). If the activation (not the pre-selected set
tings!) is to be cancelled, press
button
8
until
the number in display 1 is no longer vis
ible.
69
www.vwT4camper.info - a useful website for owners and enthusiasts of VW T4 Transporter Campervans
Page 75 of 164
Downloaded from www.Manualslib.com manuals search engine
Sun visors
Ashtrays CONTROLS AND EQUIPMENT
Cigarette
lighter
•= sun visors can be pulled out of the
x~:re mountings and swung towards the
*
i
z
'S.
"*"
e
make-up mirror can also have a sliding
'." :he mirror
with
light* (illustration), mov-•: :ne sliding cover switches mirror lighting
:" and off. The lighting is also automatically
= '. iched off and on when the sun visor is
'= sed or lowered. Ashtray in dash
panel
To
empty - Open ashtray, press spring down and pull ashtray out.
To
replace -
Push
ashtray into the
guides.
Ashtray in passenger
compart
ment
Removing:
Open
ashtray, press down and take out.
Replacing:
Insert ashtray in from above and then push
fully in.
The
cigarette
lighter
is switched on by
pushing in the element. When the heating
element glows, the lighter springs back
automatically - pull it out immediately and
use
it.
The
cigarette
lighter
socket can be
used
for other electrical
accessories
with
a
capacity
of up to 120 watts. When the en
gine is not running this will however dis
charge
the battery. Further information see
chapter
Accessories
on page 117 .
Attention
Be
careful
when
using the ciga
rette
lighter!
Careless or
uncontrolled
use of
the
cigarette
lighter
can cause burns.
The
cigarette
lighter
and the socket also
work
when
the igni
tion
is
switched
off and the key removed.
For
this
reason
children
should
never
be
left
in the
vehicle
on
their
own.
73
www.vwT4camper.info - a useful website for owners and enthusiasts of VW T4 Transporter Campervans
Page 77 of 164
Downloaded from www.Manualslib.com manuals search engine
CONTROLS AND
EQUIPMENT
Roof
rack
"en loads are to be carried on the
roof,
the
~: cwing should be noted:
• As the rain channels are moulded
into
~e roof for streamlining reasons, the nor- type of roof rack cannot be
used.
To
izd risks we advise
that
only the cross
:5"s
provided by the factory are
used.
• _hese cross bars are the basis for a com- : e:e roof load carrying system. For safety
pasons
when carrying luggage, bicycles, K-~f boards, skis and boats, the appropriate
::ecial
adapters are required.
- :he components of this system are avail- .-: e
from
Volkswagen dealers. • The roof rack system must be secured
exactly as described in the instructions
supplied.
• Any damage which may occur to the ve hicle as a result of using other roof load
carrying systems or by incorrect
fitting
will
not be covered by the Warranty.
• Distribute the load evenly.
Each
cross bar may carry 50 kg if loaded uniformly over
the
full
length. The permissible roof load (in cluding the carrier system) of 100 kg and the permissible gross vehicle weight must not
be exceeded - see page 148 . • When carrying heavy or large objects on
the
roof,
bear in mind
that
the vehicle handling changes due to the displacement of the
centre of gravity and the increased area ex
posed
to the wind. Driving style and speed
must be adapted to allow for this.
75
www.vwT4camper.info - a useful website for owners and enthusiasts of VW T4 Transporter Campervans
Page 78 of 164
Downloaded from www.Manualslib.com manuals search engine
DRIVING
TIPS
The
first
1500 km - and
afterwards
Running-in
I/-c :he
first
few operating hours the en-
5ine
internal friction is higher than later on .-.hen all the moving parts have bedded
down.
How well this running-in process is
::cne
depends to a considerable extent on
the way the vehicle is driven during the
first
1500
km.
Up to 1000
kilometers
the following general rules apply:
• Do not use
full
throttle
• Do not
drive
faster
than
3/4 of top speed
• Avoid
high
engine
speeds
• Trailer towing should if possible be
avoided.
Attention
• New
tyres
must
also be "run in" because
they
do not
have
maximum
adhesion at the
start.
This
must
be
taken
into
account by
driving
carefully
during
the
first
100 km. • New
brake
linings
must
also be
run in and do not
have
the opti
mum
friction
properties
during
the
first
200 km. The
slightly
re duced
braking
effect
can be com
pensated
for by
more
pressure on
the
brake
pedal. This also applies
when
new linings
have
been
fitted.
From 1000 - 1500 km
The
speed can be gradually increased to the road or engine maximum.
During
and
after
the
running-in
period
the
following
applies:
• Do not overrev the engine when cold - either in neutral or in the gears.
All
speeds and revs given are only valid
when engine is
properly
warm.
Do not
drive
with
the
engine
speed
unnecessarily
high
changing
up
early
helps
to
save
fuel,
reduces
noise
and
protects
the
envi
ronment
- see
also
page
79.
• Do not let engine labour - change down when engine no longer runs smoothly.
76
www.vwT4camper.info - a useful website for owners and enthusiasts of VW T4 Transporter Campervans
Page 79 of 164
Downloaded from www.Manualslib.com manuals search engine
I
DRIVING
TIPS
After
the
running-in
period
I
jn vehicles with gear change marks on
~r
speedometer dial the
gears
must be
CE'ged
up at the latest by the time the
r^eaie reaches the marks.
I
Dn vehicles with a rev counter* the
r;;.;mum permissible engine speed is
r:
-vn
by the beginning of the red zone on
H
"ev counter scale. The needle of the
c.^.ter
must not move into this zone.
!"~e additional red dotted area which some
r:;e!s
have before the red zone can be
k£r3
in isolated cases, for example when
c
staking - see
page
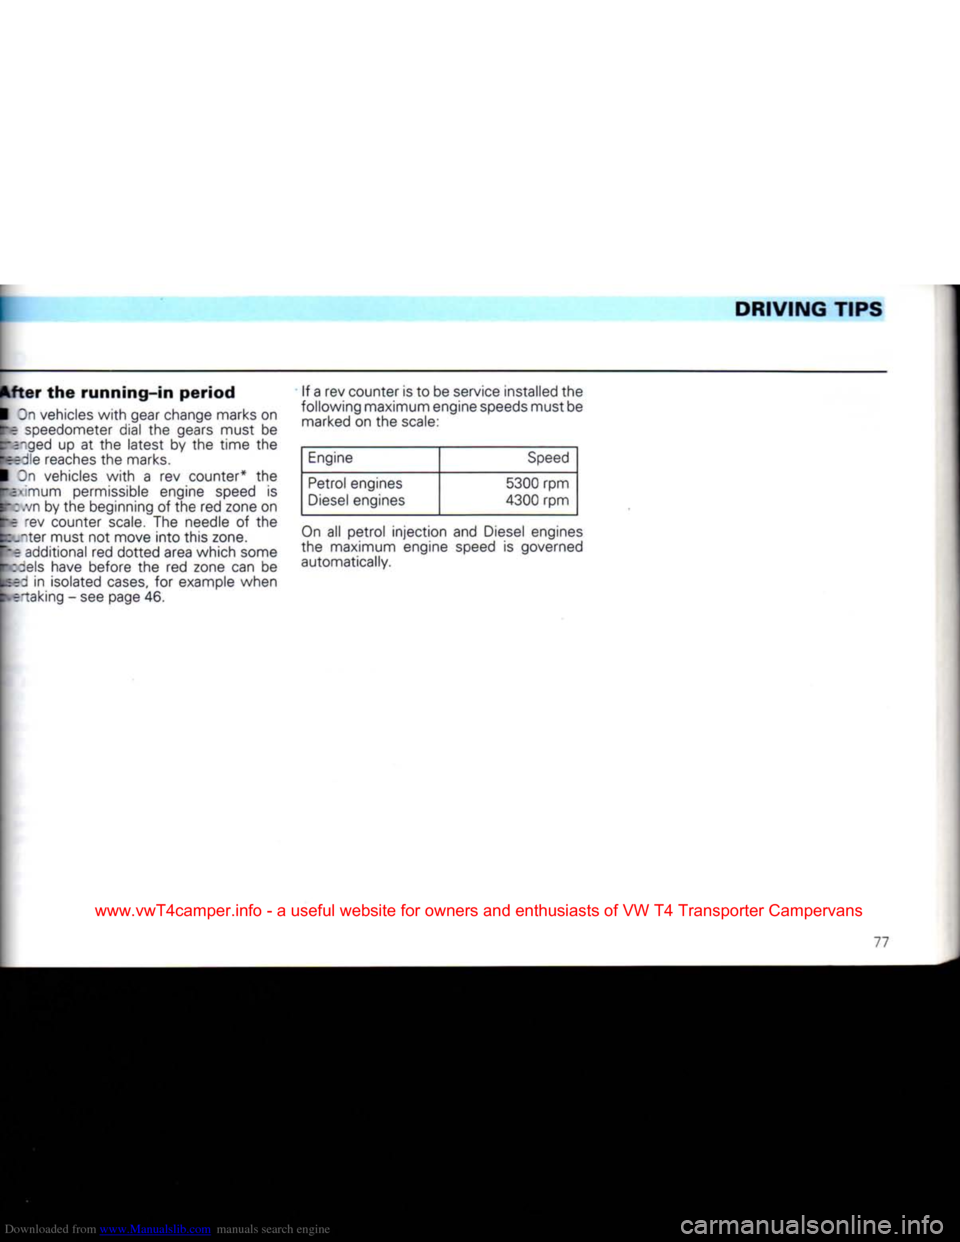
46. If a rev counter is to be service installed the
following
maximum engine speeds must be marked on the scale:
Engine Speed
Petrol
engines
Diesel engines 5300 rpm
4300 rpm
On all petrol injection and Diesel engines
the
maximum engine speed is governed
automatically.
77
www.vwT4camper.info - a useful website for owners and enthusiasts of VW T4 Transporter Campervans