Page 143 of 225
Transmission Oil
5-Speed Transmission
Check the oil level a couple of mi-
nutes after shutting off the engine.
Make sure the car is on level
ground. Remove the transmission
filler bolt. The oil level should be
up to the edge of the bolt hole. Feel
inside the bolt hole with your finger.
If you do not feel any oil, slowly
add oil until it starts to run out of
the hole. Reinstall the filler bolt
and tighten it securely. Only use an SF or SG grade motor
oil with a weight of 10W-30 or
10W-40.
The transmission should be drained and refilled with new oil every 24
months or 48,000 km (30,000 miles),
whichever comes first.
Maintenance
Correct
level
FILLER
BOLTProCarManuals.comMain Menu Table of Contents s t
Page 144 of 225
Brake and Clutch Fluid
Brake and Clutch Fluid
Check the fluid level in the reser-
voirs monthly. There are up to
three reservoirs, depending on
model. They are:
Brake fluid reservoir (all models) Clutch fluid reservoir
(5-speed transmission only)
ABS reservoir
(Si and Si 4WS models in U.S.
and SR and SR 4WS models in
Canada)
The brake fluid in the brake and
Anti-lock brake systems should be
replaced every 2 years or 48,000 km
(30,000 miles).
Brake System
The fluid should be between the MIN and MAX marks on the side
of the reservoir. If the level is at or
below the MIN mark, it is an indication that your brake system
needs attention. Have the brake
system inspected for leaks or worn
brake pads. If you add brake fluid to bring it up
to the MAX mark, use Genuine
Honda Brake Fluid or an equiva-
lent that is marked DOT3 or DOT4
only. Brake fluid marked DOT5 is
not compatible with your car's
braking system.
Maintenance
MAX
MINProCarManuals.comMain Menu Table of Contents s t
Page 145 of 225

Brake and Clutch Fluid
Anti-lock Brake System
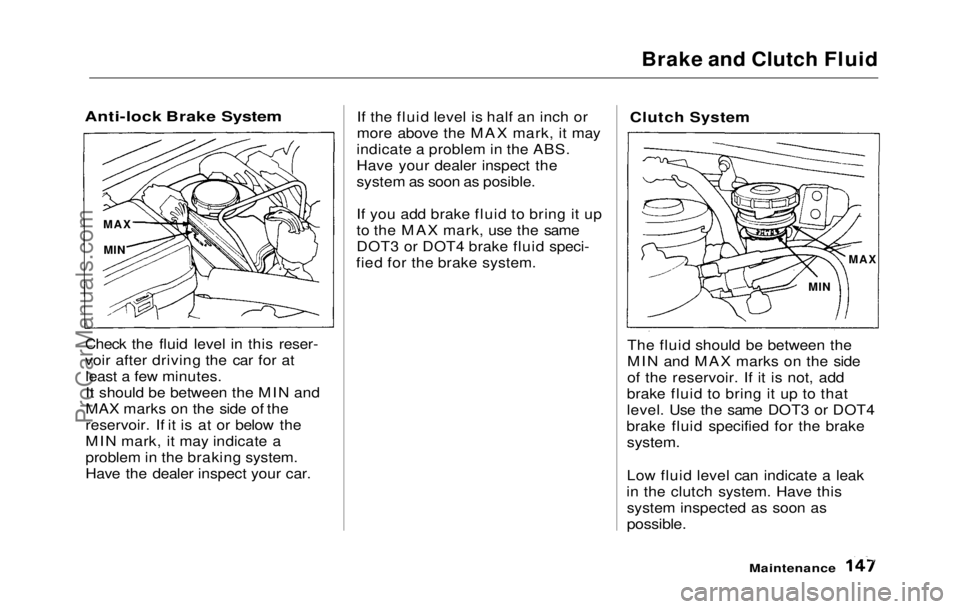
Check the fluid level in this reser-
voir after driving the car for atleast a few minutes.
It should be between the MIN and
MAX marks on the side of the
reservoir. If it is at or below the
MIN mark, it may indicate a
problem in the braking system.
Have the dealer inspect your car. If the fluid level is half an inch or
more above the MAX mark, it may
indicate a problem in the ABS.
Have your dealer inspect the
system as soon as posible.
If you add brake fluid to bring it up
to the MAX mark, use the same
DOT3 or DOT4 brake fluid speci-
fied for the brake system.
Clutch System
The fluid should be between the
MIN and MAX marks on the side
of the reservoir. If it is not, add
brake fluid to bring it up to that
level. Use the same DOT3 or DOT4
brake fluid specified for the brake
system.
Low fluid level can indicate a leak
in the clutch system. Have this system inspected as soon as
possible.
Maintenance
MAX
MIN MAX
MINProCarManuals.comMain Menu Table of Contents s t
Page 146 of 225
Power Steering
You should check the fluid level in
the power steering reservoir
monthly. Check the level when the
engine is cold. Look at the side of
the reservoir. The fluid should be
between the UPPER LEVEL and LOWER LEVEL. If it is below the
LOWER LEVEL, add power
steering fluid to the UPPER
LEVEL.
Using automatic transmission fluid
or another brand of power steering
fluid will damage the system. Use
only genuine Honda power steering
fluid.
A low power steering fluid levelcan indicate a leak in the system.
Check the fluid level frequently
and have the system inspected as
soon as possible.
Maintenance
UPPER
LEVEL
LOWER
LEVEL
NOTICEProCarManuals.comMain Menu Table of Contents s t
Page 147 of 225

Air Filter
The air filter element should be
replaced every 2 years or 48,000 km
(30,000 miles), whichever comes
first. Under severe driving condi-
tions, it should also be cleaned every 12 months or 24,000 km
(15,000 miles), whichever comes
first.
Cleaning (Severe Conditions)
Clean the air cleaner element by
blowing compressed air through it in the opposite direction to normal
air flow. If you do not have access
to compressed air (such as a gas station), ask your Honda dealer to
do this service.
Follow the replacement procedure
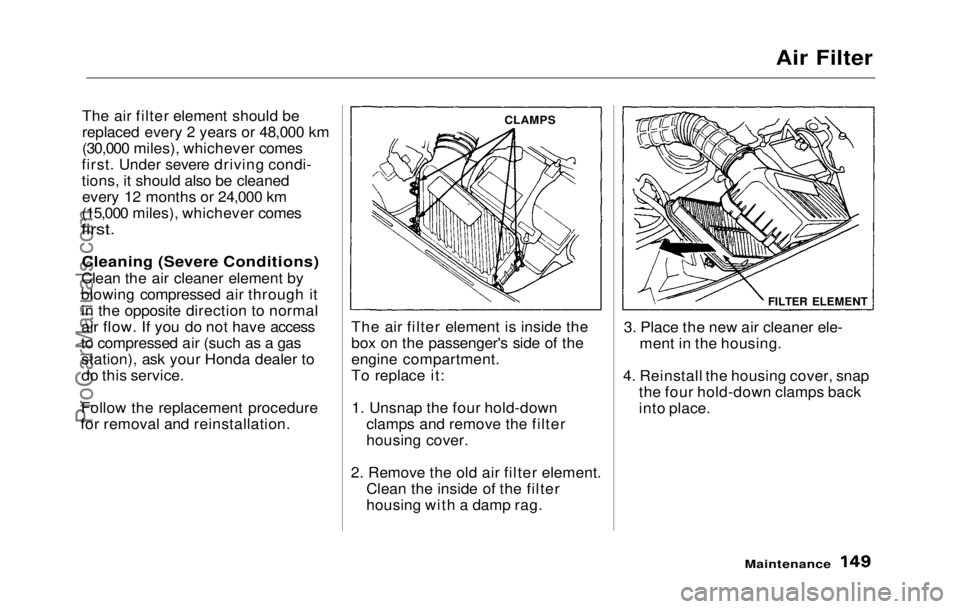
for removal and reinstallation. The air filter element is inside the
box on the passenger's side of the
engine compartment.
To replace it:
1. Unsnap the four hold-down clamps and remove the filter
housing cover.
2. Remove the old air filter element. Clean the inside of the filter
housing with a damp rag. 3. Place the new air cleaner ele-
ment in the housing.
4. Reinstall the housing cover, snap the four hold-down clamps back
into place.
Maintenance
FILTER ELEMENT
CLAMPSProCarManuals.comMain Menu Table of Contents s t
Page 148 of 225
Fuel Filter, Spark Plugs
Fuel Filter
The fuel filter should be replaced
every 4 years or 96,000 km (60,000
miles), whichever comes first.
Have a qualified technician change
the fuel filter. Since the fuel system is under pressure, gasoline can
spray out and create a hazard if all
fuel line connections are not han- dled correctly.
The filter may require replacement sooner if you happen to buy one ormore tankfuls of contaminated
gasoline. Have the filter tested or
replaced if you suspect it has been
clogged by contaminants.
Spark Plugs
The original spark plugs in your
car need to be replaced every 2
years or 48,000 km (30,000 miles),
whichever comes first.
Replacement
1. Clean up any dirt and oil that have collected around the spark
plug caps.
2. Remove the spark plug cap by pulling it straight out.
3. Remove the spark plug, using a 16 mm (5/8 inch) spark plug
socket.
Maintenance
SPARK PLUG CAPProCarManuals.comMain Menu Table of Contents s t
Page 149 of 225
Spark Plugs
4. Set the gap on the new spark plug with a wire-type spark plug
gapping tool. Do not use a blade-
type feeler gauge. Plug gap should be: 1.1 mm (0.04 in)
5. Put the new spark plug into the socket, then thread it into the
hole. Screw it in by hand so you do not crossthread it.
6. Torque the spark plug. (If you do
not have a torque wrench, tight-
en the spark plug one-quarter
turn after it contacts the cylinder
head.)
Tightening torque:
18 N .
m(1.8 kg-m, 13 Ib-ft)
Tighten the spark plugs carefully.
A spark plug that is too loose can overheat and damage the engine.
Overtightening can cause damage
to the threads in the cylinder head.
7. Install the spark plug cap.
8. Repeat this procedure for the other three spark plugs.
CONTINUED
Maintenance
NOTICEProCarManuals.comMain Menu Table of Contents s t
Page 150 of 225

Spark Plugs, Battery
Specifications:
Battery
Check the condition of your car's
battery monthly. You should check
for proper electrolyte level and
corrosion on the terminals.
Maintenance
The battery gives off explo-
sive hydrogen gas during nor-
mal operation. A spark or open
flame can cause the battery to
explode with enough force to
kill or seriously hurt you.
Wear protective clothing and a
face shield, or have a skilled mechanic do the battery main-
tenance. The battery contains sulfuric
acid (electrolyte) which is
highly corrosive and poisonous.
Getting electrolyte in your
eyes or on your skin can cause
serious burns. Wear protective
clothing and eye protection
when working near the battery.
Swallowing electrolyte can
cause fatal poisoning if immedi- ate action is not taken.
KEEP OUT OF THE REACH OF
CHILDREN
(US: S, Canada: S)
Normal driving conditions
NGK:
Nippondenso:
Hot climates, or continuous high
speed driving NGK:
Nippondenso:
(US: Si, Si 4WS, Canada: SR, SR 4WS)
Normal driving conditions NGK:
Nippondenso:
Hot climates, or continuous high
speed driving NGK:
Nippondenso:
ZFR5F-11
KJ16CR-L11
ZFR6F-11
KJ20CR-L11
ZFR6F-11
KJ20CR-L11
ZFR7F-11
KJ22CR-L11ProCarManuals.comMain Menu Table of Contents s t