1992 HONDA PRELUDE tow
[x] Cancel search: towPage 151 of 225
Battery
Emergency Procedures
Eyes — Flush with water from a
cup or other container for at least
fifteen minutes. (Water under
pressure can damage the eye.)
Immediately call a physician or 911.
Skin — Remove contaminated
clothing. Flush the skin with large quantities of water. Call a physi-
cian immediately.
Swallowing — Drink water or
milk. Call your local Poison Control
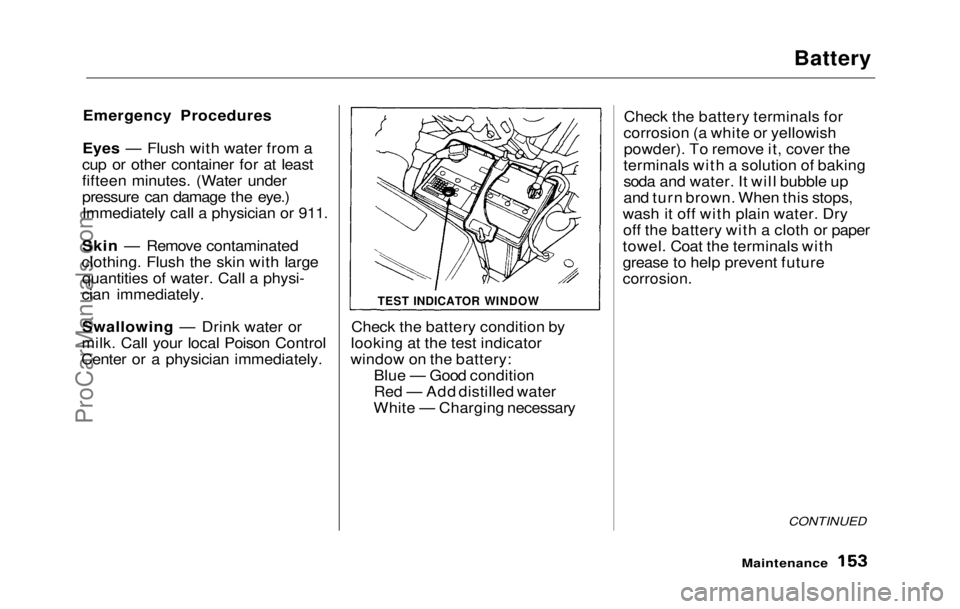
Center or a physician immediately. Check the battery condition by
looking at the test indicator
window on the battery: Blue — Good condition
Red — Add distilled water
White — Charging necessary Check the battery terminals for
corrosion (a white or yellowish powder). To remove it, cover the
terminals with a solution of baking
soda and water. It will bubble up
and turn brown. When this stops,
wash it off with plain water. Dry off the battery with a cloth or paper
towel. Coat the terminals with
grease to help prevent future
corrosion.
CONTINUED
Maintenance
TEST INDICATOR WINDOWProCarManuals.comMain Menu Table of Contents s t
Page 153 of 225
Windshield Wipers
Check the condition of the wind-
shield wiper blades at least every
six months. Look for signs of crack- ing in the rubber, or areas that are
getting hard. Replace the blades if
you find these signs, or they leavestreaks and unwiped areas when
used.
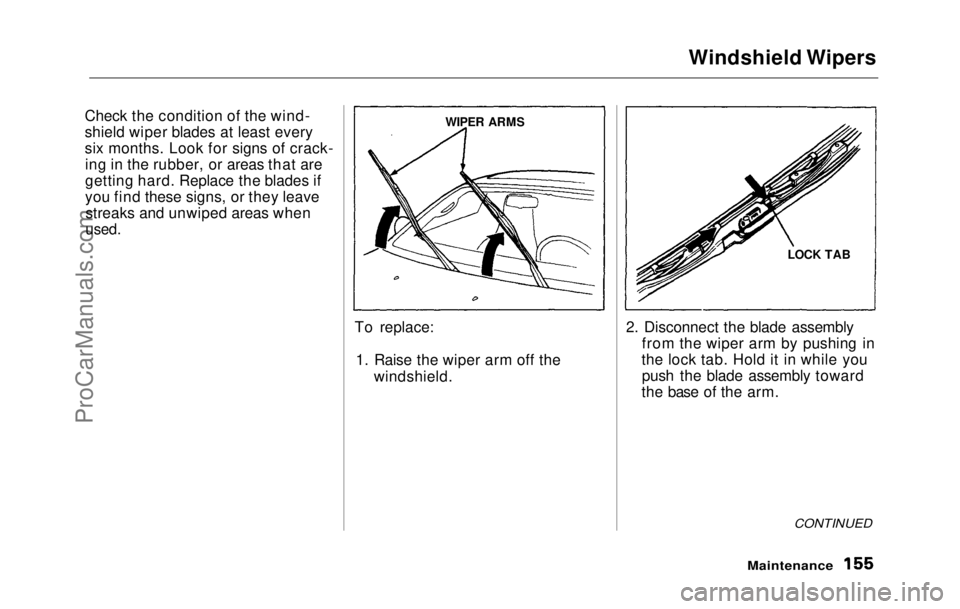
To replace:1. Raise the wiper arm off the windshield. 2. Disconnect the blade assembly
from the wiper arm by pushing in
the lock tab. Hold it in while you push the blade assembly toward
the base of the arm.
CONTINUED
Maintenance
WIPER ARMS
LOCK TABProCarManuals.comMain Menu Table of Contents s t
Page 173 of 225
Exterior Care
Washing
Frequent washing helps preserve
your car's beauty. Dirt and grit can
scratch the paint, while tree sap
and bird droppings can perma-
nently ruin the finish.
Wash your car in a shady area, not
in direct sunlight. If the car is
parked in the sun, move it into the
shade and let the exterior cool
down before you start.
Chemical solvents and strong
cleaners can damage the paint,
metal and plastic on your car. Only
use the solvents and cleaners
recommended in this Owner's
Manual.
Rinse the car thoroughly with
cool water to remove loose dirt.
Fill a bucket with cool water.
Mix in a mild detergent, such as
dishwashing liquid or a product
made especially for car washing.
Wash the car, using the water and detergent solution and a soft-bristle brush, sponge or soft cloth.
Start at
the top and work your
way down. Rinse frequently.
Check the body for road tar, tree
sap, etc. Remove these stains
with tar remover or turpentine.
Rinse it off immediately so it
does not harm the finish. Remem-
ber to re-wax these areas, even if the rest of the car does not need
waxing. When you have washed and
rinsed the whole exterior, dry it
with a chamois or soft towel.
Letting it air-dry will cause
dulling and water spots.
As you dry the car, inspect it for
chips and scratches that could allow corrosion to start. Repair
them with touch-up paint (see page
178).
Appearance Care
NOTICEProCarManuals.comMain Menu Table of Contents s t
Page 177 of 225
Interior Care, Corrosion Protection
Windows
Clean the windows, inside and out,
with a commercially-available glass
cleaner. You can also use a mixture of one part white vinegar to ten
parts water. This will remove the
haze that builds up on the inside of
the windows. Use a soft cloth or
paper towels to clean all glass and
clear plastic surfaces.
The rear window defogger wires
are bonded to the inside of the glass.
Wiping vigorously up-and-down
can dislodge and break the defog-
ger wires. When cleaning the rear
window, use gentle pressure and
wipe side-to-side.
Air Fresheners
If you want to use an air freshener/
deodorizer in the interior of your
car, it is best to use a solid type.
Some liquid air fresheners contain
chemicals that may cause parts of
the interior trim and fabric to crack or discolor.
If you use a liquid air freshener,
make sure you fasten it securely so
it does not spill as you drive.
Corrosion Protection
Two factors normally contribute to causing corrosion in your car:
1. Moisture trapped in body cavi-
ties. Dirt and road salt that col-
lects in hollows on th
e underside
of the car stays damp, promotin
g
corrosion in that area.
2. Remova l
of paint and protective
coatings from the exterior and
underside of the car.
Many corrosion-preventive mea
-
sures are built into your Honda.
You can help keep your car from
corroding by performing some
simple periodic maintenance: Repair chips and scratches in the
paint as soon as you discover
them.
Appearance Care
NOTICEProCarManuals.comMain Menu Table of Contents s t
Page 179 of 225

Taking Care of the Unexpected
This section covers the more- common problems that motorists
experience with their cars. It gives
you information about how to
safely evaluate the problem and
what to do to correct it. If the problem has stranded you on the
side of the road, you may be able to
get going again. If not, you will also
find instructions on getting your
car towed. Compact Spare Tire..................... 184
Changing a Flat Tire................... 185
If Your Engine Won't Start........ 190 Nothing Happens...................... 190
The Starter OperatesNormally................................ 191
Jump Starting................................ 191 If Your Engine Overheats.......... 193
Low Oil Pressure.......................... 195
Charging System Indication ...... 196
Check Engine Light..................... 197
Closing the Sunroof ..................... 198
Fuses............................................... 199 Checking and Replacing.........
200
Towing...........................................
202
Taking Car e
of the UnexpectedProCarManuals.comMain Menu s t
Page 186 of 225

If Your Engine Won't Start
Diagnosing why your engine won't
start falls into two areas, depending
on what you hear when you turn
the key to START (III): You hear nothing, or almost
nothing. The engine's starter
motor does not operate at all, or
operates very slowly.
You can hear the starter motor
operating normally, but the
engine does not start up and run. Nothing Happens or the
Starter Motor Operates Very
Slowly
When you turn the ignition switchto START (III), you do not hear the
normal noise of the engine trying to
start. You may hear
a clicking
sound or series of clicks, or nothing
at all.
Check these things:
Check the
transmission interlock.
If you have a 5-speed, the clutch
pedal must be pushed all the way
to the floor or the starter will not operate. With an automatic
transmission, it must be in Park
or Neutral.
Turn the ignition switch to ON
(II). Turn on the headlights and
check their brightness. If the
headlights are very dim or don't
light at all, the battery is dis-
charged.
See Jump Starting on
page 191
.
Turn the ignition switch to
START (III). If the headlights do
not dim, check the condition of
the fuses. If the fuses are OK,
there is probably something
wrong with the electrical circuit
for the ignition switch or starter
motor. You will need a qualified
technician to determine the
problem. (See Towing on page
202.)
If the headlights dim noticeably
or go out when you try to start
the engine, either the battery is
discharged or the connections
are corroded. Check the condi-
tion of the battery and terminal
connections (see page 153 ). You
can then try jump starting the
car from a booster battery (see
page 191).
Taking Care of the UnexpectedProCarManuals.comMain Menu Table of Contents s t
Page 187 of 225

If Your Engine Won't Start, Jump Starting
The Starter Operates
Normally
In this case, the starter motor
sounds normal when you turn the
ignition switch to START (III), but
the engine does not run. Are you using the proper starting
procedure? Refer to Starting
the Engine on page 109 . Do you have gas? Turn the
ignition switch to ON (II) for a
minute and watch the fuel gauge.
There may be an electrical
problem, such as no power to the
fuel pump. Check all the fuses
(see page 199 ).
If you find nothing wrong, you will
need a qualified technician to find
the problem. See Towing on page
202.
Jump Starting
If your car's battery has run down,
you may be able to start the engine
by using a booster battery. Although this seems like a simple
procedure, there are several precau-
tions you should take. Follow the
directions closely.
You cannot start a Honda with an
automatic transmision by pushingor pulling it. To jump start your car:
1. Open the hood and check the physical condition of the battery
(see page 152 ). In very cold
weather, check the condition of the electrolyte. If it seems slushy
or like ice, do not try jump
starting until it thaws.
If a battery sits in extreme cold, the
electrolyte inside can freeze.
Attempting to jump start with a frozen battery can cause it to
rupture or explode.
2. Turn off all the electrical acces- sories: heater, A/C, stereo system,
lights, etc. Put the transmission in Neutral
or Park and set the parking
brake.
Taking Care of the Unexpected
CONTINUED
A battery can explode if you
do not follow the correct
procedure, seriously injuring
anyone nearby.
Keep all sparks, open flames,
and smoking materials away
from the battery.
NOTICE
ProCarManuals.comMain Menu Table of Contents s t
Page 190 of 225
If Your Engine Overheats
6. Look for any obvious coolant
leaks, such as a split radiator
hose. Everything is still extreme-
ly hot, so use caution. If you find
a leak, it must be repaired before
you continue driving (see
Towing on page 202 ).
7. If
you don't find an obvious leak,
check the coolant level in the
radiator reserve tank (see page
139). If the level is below the
MIN mark, add coolant to half-
way between the MIN and MAX
marks.
8. I f
there was no coolant in the
reserve tank, you may also have
to add coolant to the radiator. Let the engine cool down until
the temperature gauge registers
below the midpoint, or lower,
before checking the radiator. 9. Using gloves or a large heavy
cloth, turn the radiator cap
counterclockwise, without
pushing down, to the first stop.
This releases any remaining
pressure in the cooling system.
After the pressure releases, push down on the cap and turn it until
it comes off.
10.Start th e
engine and set the
heater control lever to maximum.
Add coolant to the radiator up to
the base of the filler neck. If you
do not have the proper coolant
mixture available, you can add
plain water. Remember to have
the cooling system drained and
refilled with the proper mixture as soon as you can.
11.Put the radiato
r cap back on
tightly. Run the engine and
watch the temperature gauge. If
it illuminates the red marker
again, the engine needs repair.
(See Towing on page
202.)
12.If th e
temperature stays normal,
check the coolant level in the
radiator reserve tank. If it has
gone down, add coolant to the MAX mark. Put the cap back on
tightly.
Taking Care of the Unexpected
Removing the radiator cap
while the engine is hot can
cause the coolant to spray out, seriously scalding you.
Always let the engine and radiator cool down before
removing the radiator cap.ProCarManuals.comMain Menu Table of Contents s t