Page 341 of 1216
ENGINE <1.8L Engine> - Cylinder Head and Valve9-57
Enamel-
coating
sideSpring
retainerStem seal
Spring- seat
3EN324intake side
3EN315Front of engine
I,Exhaust side
11./7. INSTALLATION OF VALVE SPRINGInstall the valve spring with its enamel coated end toward
the valve spring retainer.
9.15. INSTALLATION OF RETAINER LOCK(1) Using the special tool, compress the spring, and then
install the retainer lock.
Caution
When compressing the spring, check to see that the
valve stem seal is not pressed to the bottom of the
retainer.
(2) Make certain that retainer locks are positively installed.
1. INSTALLATION OF CYLINDER HEAD BOLTSUsing the special tool, tighten in the order shown in two or
three steps, gradually tighten. Finally tighten to the speci-
fied torque.
Page 344 of 1216
S-60ENGINE <1.8L Engine> -Front Case, Oil Pump and Silent Shaft
3EN040
7LUOOO6
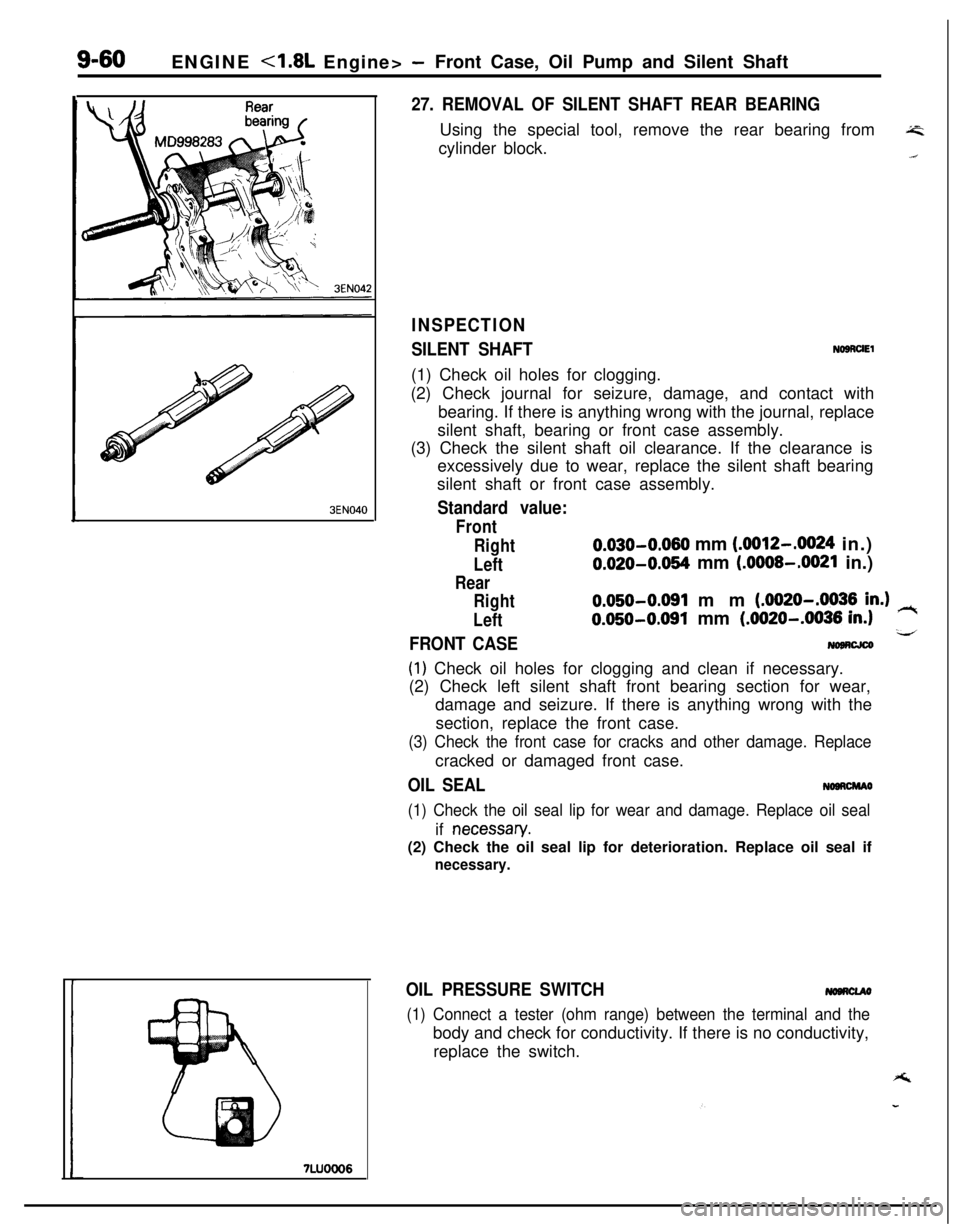
27. REMOVAL OF SILENT SHAFT REAR BEARINGUsing the special tool, remove the rear bearing from
A=cylinder block..i
INSPECTION
SILENT SHAFTNOSRUEl(1) Check oil holes for clogging.
(2) Check journal for seizure, damage, and contact with
bearing. If there is anything wrong with the journal, replace
silent shaft, bearing or front case assembly.
(3) Check the silent shaft oil clearance. If the clearance is
excessively due to wear, replace the silent shaft bearing
silent shaft or front case assembly.
Standard value:
Front
Right
0.030-0.060 mm (.0012-.0024 in.)
LeftO.O20-0.064 mm (.OOOS-.0021 in.)
Rear
Right
Left
0.050-0.091 mm (.0020-.0036 in.) rt
0.050-0.091 mm (.0020-.0036 in.1-4FRONT CASE
(1) Check oil holes for clogging and clean if necessary.
(2) Check left silent shaft front bearing section for wear,
damage and seizure. If there is anything wrong with the
section, replace the front case.
(3) Check the front case for cracks and other damage. Replacecracked or damaged front case.
OIL SEALNOORCMAO
(1) Check the oil seal lip for wear and damage. Replace oil sealif
necessan/.(2) Check the oil seal lip for deterioration. Replace oil seal if
necessary.
OIL PRESSURE SWITCH
(1) Connect a tester (ohm range) between the terminal and thebody and check for conductivity. If there is no conductivity,
replace the switch.
Page 345 of 1216
ENGINE <1.8L Engine> -Front Case, Oil Pump and Silent Shaft9-61
Fine
7LUOOO7
3LUOOOl
3LUOOO2
I
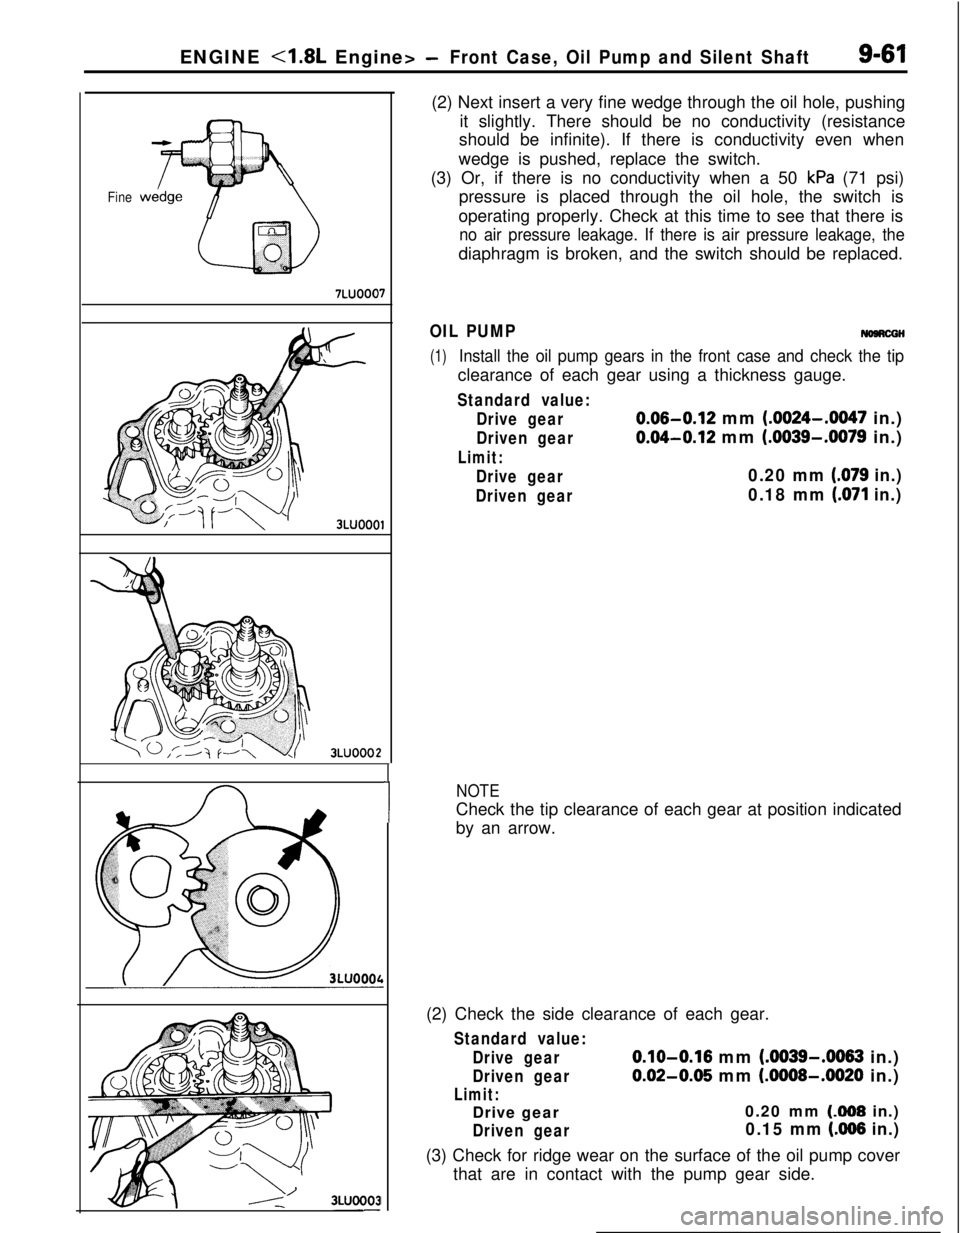
1(2) Next insert a very fine wedge through the oil hole, pushing
it slightly. There should be no conductivity (resistance
should be infinite). If there is conductivity even when
wedge is pushed, replace the switch.
(3) Or, if there is no conductivity when a 50
kPa (71 psi)
pressure is placed through the oil hole, the switch is
operating properly. Check at this time to see that there is
no air pressure leakage. If there is air pressure leakage, thediaphragm is broken, and the switch should be replaced.
OIL PUMPNomcGH
(1)Install the oil pump gears in the front case and check the tipclearance of each gear using a thickness gauge.
Standard value:
Drive gear
0.06-0.12 mm (.0024-.0047 in.)
Driven gear0.04-0.12 mm (.0039-.0079 in.)
Limit:
Drive gear0.20 mm (.079 in.)
Driven gear0.18 mm (.071 in.)
NOTECheck the tip clearance of each gear at position indicated
by an arrow.
(2) Check the side clearance of each gear.
Standard value:
Drive gear
0.10-0.16 mm (.0039-.0063 in.)
Driven gear0.02-0.05 mm (.0008-.0020 in.)
Limit:Drive gear0.20 mm (308 in.)
Driven gear0.15 mm (AI66 in.)(3) Check for ridge wear on the surface of the oil pump cover
that are in contact with the pump gear side.
Page 346 of 1216
9-62ENGINE -4.8L Engine> -Front Case, Oil Pump and Silent Shaft
OIL RELIEF PLUNGER(1) Check that the relief plunger slides smoothly.
(2) Check the relief spring for breakage.
3EN044J
MD998280
3EN270
0M D998304
SERVICE POINTS OF REASSEMBLYNOBRHAF
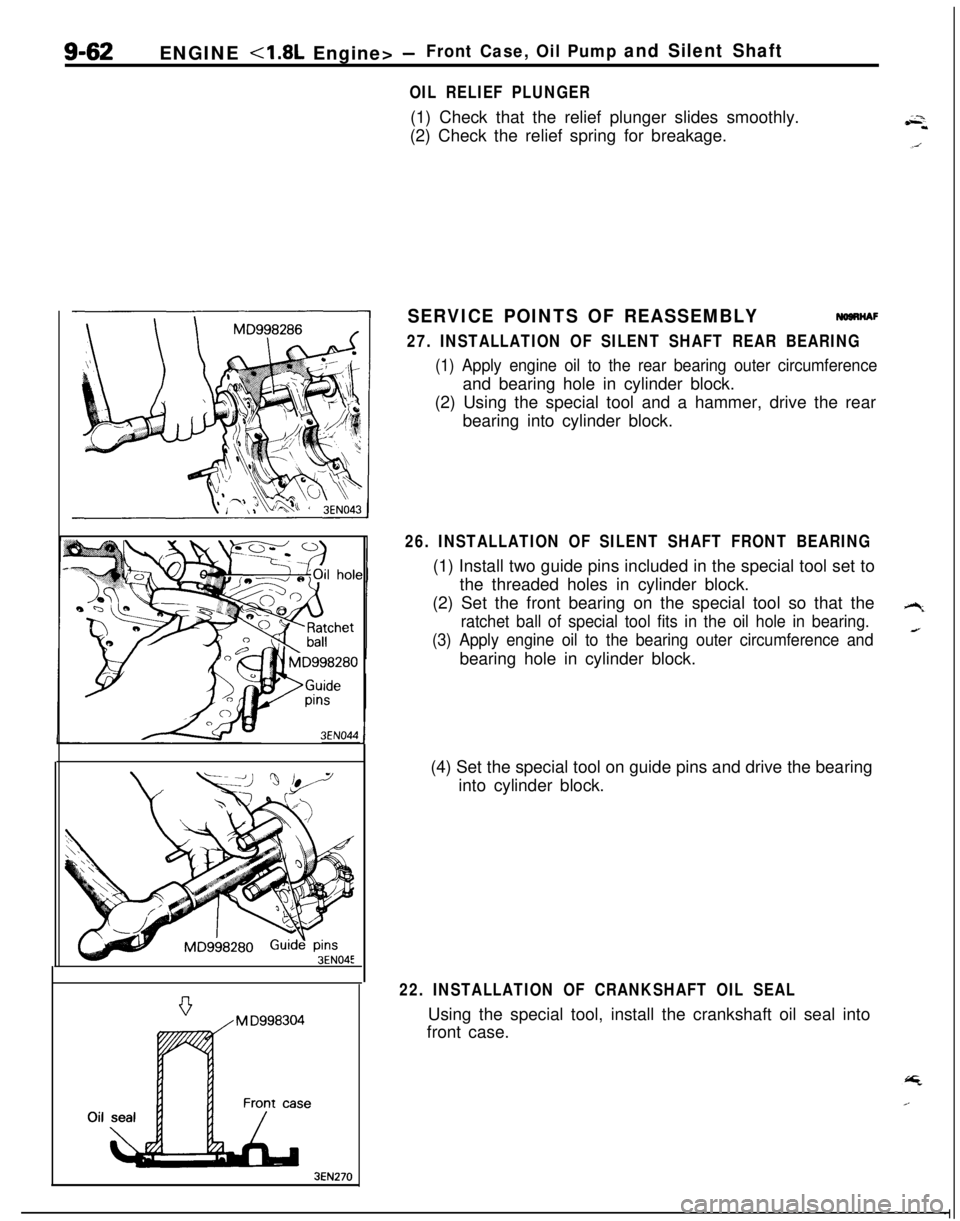
27. INSTALLATION OF SILENT SHAFT REAR BEARING
(1) Apply engine oil to the rear bearing outer circumferenceand bearing hole in cylinder block.
(2) Using the special tool and a hammer, drive the rear
bearing into cylinder block.
26. INSTALLATION OF SILENT SHAFT FRONT BEARING(1) Install two guide pins included in the special tool set to
the threaded holes in cylinder block.
(2) Set the front bearing on the special tool so that the
ratchet ball of special tool fits in the oil hole in bearing.
(3) Apply engine oil to the bearing outer circumference andbearing hole in cylinder block.
(4) Set the special tool on guide pins and drive the bearing
into cylinder block.
22. INSTALLATION OF CRANKSHAFT OIL SEALUsing the special tool, install the crankshaft oil seal into
front case.
Page 351 of 1216
ENGINE <1.8L Engine>- Piston and Connecting Rod9-67
Piston ring end gap:
Standard dimension
No. 10.30-0.45 mm (.0118-.0177 in.)
No.20.20-0.35 mm (.0079-.0138 in.)
Limit0.8 mm LO31in.)
Oil ring side rail:
Standard dimension0.2-0.7 mm (.008-.028 in.)
Limit1.0 mm (.039 in.)When replacing the ring only without correcting the
cylinder bore, check the gap with the ring positioned at a
lower part of cylinder that is less worn.
When replacing a ring, be sure to use a ring of the same
size.
Piston ring service size and mark:
STDNone0.25 mm
(.OlO in.) O.S. 25
0.50 mm
(020 in.) O.S. 50
0.75 mm
(030 in.) O.S. 75
1.00 mm (039 in.) B.S.100
CONNECTION RODSNOSTCCA
(1) Replace the connecting rod if it has damage on thrust faces
at either end. Also replace the connecting rod that has ridgewear or severely rough surface on the inside diameter of
the small end.
When using a new connecting rod, the cylinder number
should be stamped in two places, on the cap and on the
rod.(2) Using a connecting rod aligner, check the rod for bend and
twist. If the measured value is close to the limit, correct therod using a press. Any connecting rod that has been
severely bent or distorted should be replaced.
Bend of connecting rod:
0.05/100 mm (.0020/3.937 in.) or less
Twist of connecting rod:
O.l/lOO mm (.004/3.937 in.) or less
SERVICE POINTS OF REASSEMBLYNOSTGEA
9. INSTALLATION OF OIL RING
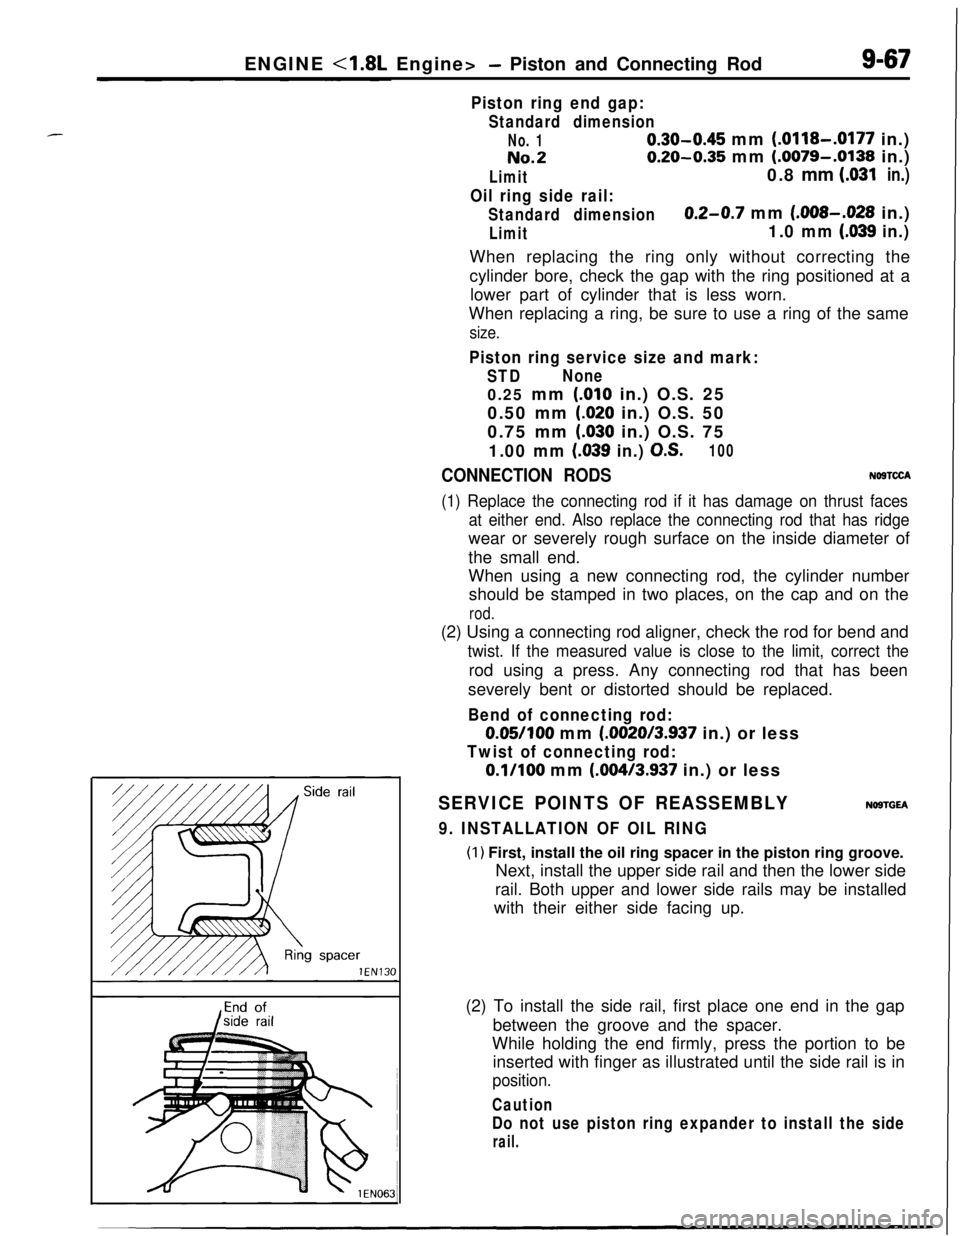
(1) First, install the oil ring spacer in the piston ring groove.
Next, install the upper side rail and then the lower side
rail. Both upper and lower side rails may be installed
with their either side facing up.
(2) To install the side rail, first place one end in the gap
between the groove and the spacer.
While holding the end firmly, press the portion to be
inserted with finger as illustrated until the side rail is in
position.
Caution
Do not use piston ring expander to install the side
rail.
Page 352 of 1216
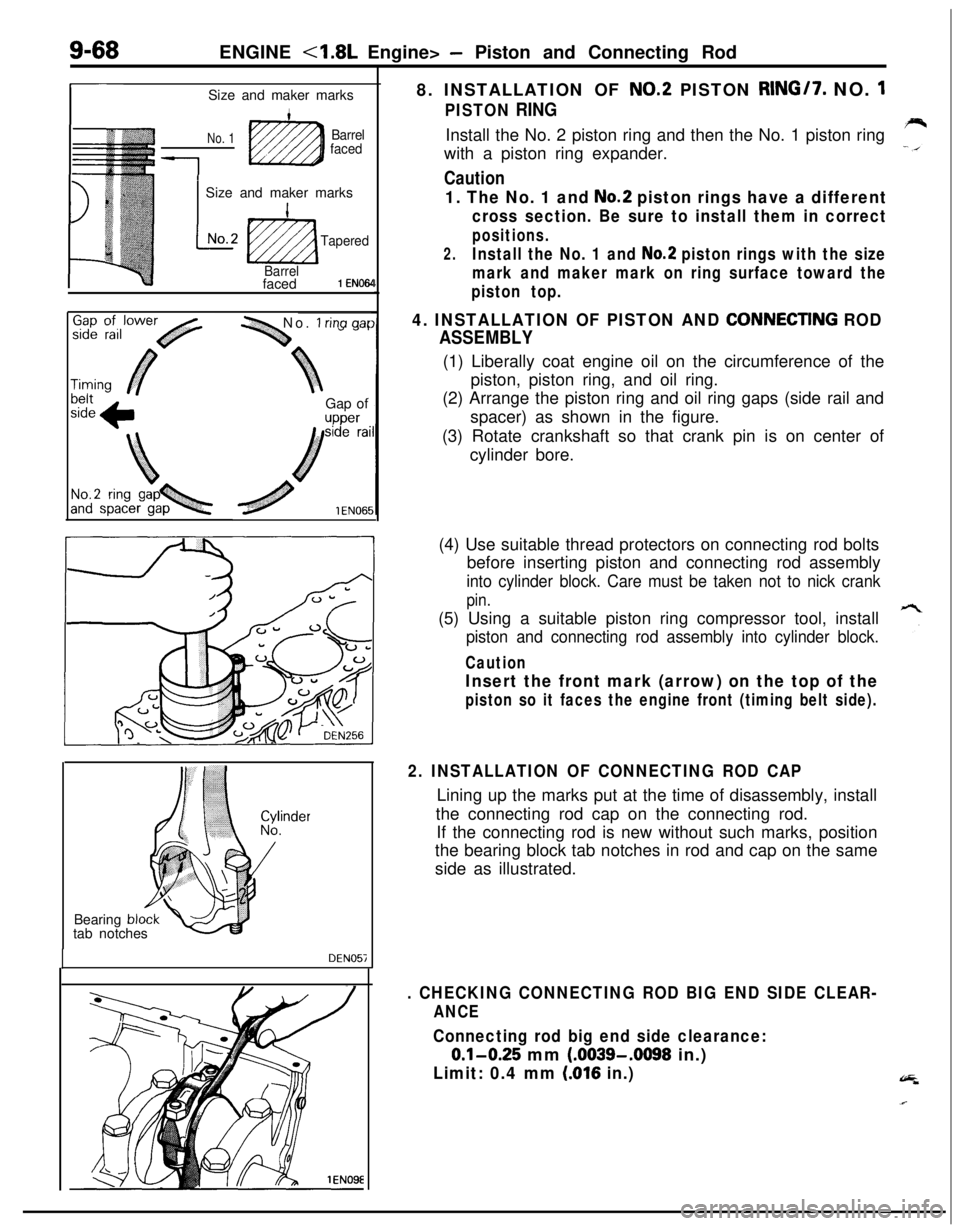
9-68ENGINE <1.8L Engine> - Piston and Connecting Rod
r-Size and maker marks
No. 1Barrel
faced
1
1 Size and maker marks
L
INo.2
ti2zza
Tapered
Barrelfaced
1 EN064
-1 No. 1 rina aarGap of
upper8. INSTALLATION OF
NO.2 PISTON RING/7. NO. 1
PISTON RINGInstall the No. 2 piston ring and then the No. 1 piston ring
with a piston ring expander.
Caution
1. The No. 1 and No.2 piston rings have a different
cross section. Be sure to install them in correct
positions.
2.Install the No. 1 and No.2 piston rings with the size
mark and maker mark on ring surface toward the
piston top.
4. INSTALLATION OF PISTON AND CONNECTlNG ROD
ASSEMBLY(1) Liberally coat engine oil on the circumference of the
piston, piston ring, and oil ring.
(2) Arrange the piston ring and oil ring gaps (side rail and
spacer) as shown in the figure.
(3) Rotate crankshaft so that crank pin is on center of
cylinder bore.
Bearing
bltab notches
DEN057(4) Use suitable thread protectors on connecting rod bolts
before inserting piston and connecting rod assembly
into cylinder block. Care must be taken not to nick crank
pin.(5) Using a suitable piston ring compressor tool, install
piston and connecting rod assembly into cylinder block.
Caution
Insert the front mark (arrow) on the top of the
piston so it faces the engine front (timing belt side).
2. INSTALLATION OF CONNECTING ROD CAPLining up the marks put at the time of disassembly, install
the connecting rod cap on the connecting rod.
If the connecting rod is new without such marks, position
the bearing block tab notches in rod and cap on the same
side as illustrated.
. CHECKING CONNECTING ROD BIG END SIDE CLEAR-
ANCE
Connecting rod big end side clearance:
0.1-0.25 mm (.0039-.0098 in.)
Limit: 0.4 mm (016 in.)
Page 353 of 1216
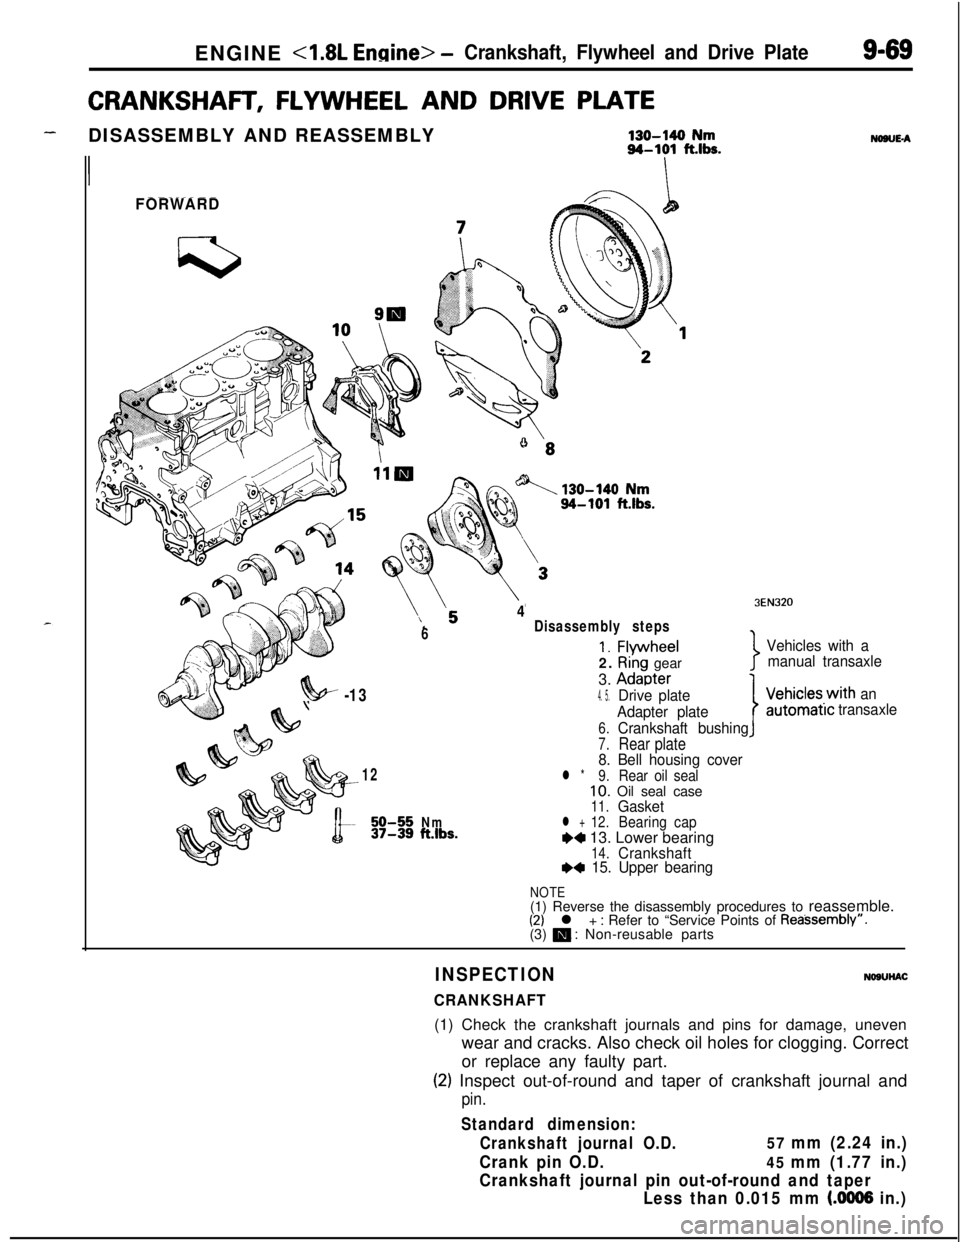
ENGINE <1.8L Engine> -Crankshaft, Flywheel and Drive PlateS-69
CRANKSHAFT, FLYWHEEL AND DRIVE PLATE
-DISASSEMBLY AND REASSEMBLY130-140 Nm94-101 fths.
II
FORWARD
6
4Disassembly steps
1. Flvwheel2.
Ri’ng gear
3.
Adaoter
NONE-A
3EN320
Vehicles with a
manual transaxle
7
?!w -134. 5.Drive plate
Adapter plate
6.Crankshaft bushing
7.Rear plate8. Bell housing cover12l *9.Rear oil seal10. Oil seal case11.Gasket50-55Nm12.37-39ft.lbs.l +BearingcapW 13. Lower bearing14.CrankshaftI)* 15. Upper bearing
IVehicles.with an
automatrctransaxle
NOTE(1) Reverse the disassembly procedures to reassemble.
(2) l + : Refer to “Service Points of Reassembly”.
(3) m : Non-reusable parts
INSPECTION
CRANKSHAFT
NOSUHAC(1) Check the crankshaft journals and pins for damage, uneven
wear and cracks. Also check oil holes for clogging. Correct
or replace any faulty part.
(2) Inspect out-of-round and taper of crankshaft journal and
pin.
Standard dimension:
Crankshaft journal O.D.
57 mm (2.24 in.)
Crank pin O.D.
45 mm (1.77 in.)
Crankshaft journal pin out-of-round and taper
Less than 0.015 mm
(.0006 in.)
Page 354 of 1216
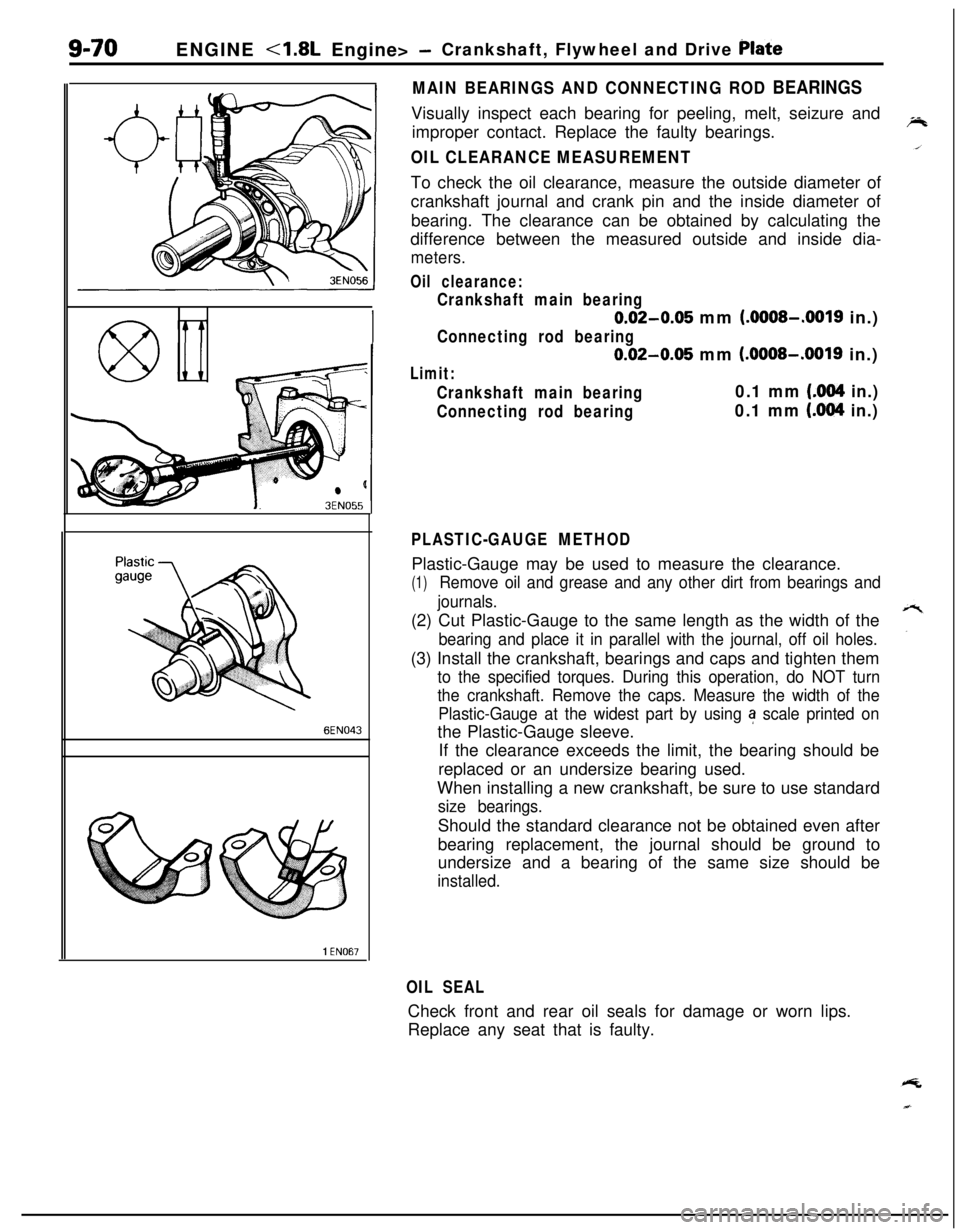
ENGINE <1.8L Engine> -Crankshaft, Flywheel and Drive Plate
3EN055
6EN043
1 EN067
MAIN BEARINGS AND CONNECTING ROD BEARINGSVisually inspect each bearing for peeling, melt, seizure and
improper contact. Replace the faulty bearings.
OIL CLEARANCE MEASUREMENTTo check the oil clearance, measure the outside diameter of
crankshaft journal and crank pin and the inside diameter of
bearing. The clearance can be obtained by calculating the
difference between the measured outside and inside dia-
meters.
Oil clearance:
Crankshaft main bearing
0.02-0.05 mm (.OOOS-.0019 in.)
Connecting rod bearing
0.02-0.05 mm (.OOOS-.0019 in.)
Limit:
Crankshaft main bearing0.1 mm (.004 in.)
Connecting rod bearing0.1 mm (.004 in.)
PLASTIC-GAUGE METHODPlastic-Gauge may be used to measure the clearance.
(1)Remove oil and grease and any other dirt from bearings and
journals.(2) Cut Plastic-Gauge to the same length as the width of the
bearing and place it in parallel with the journal, off oil holes.(3) Install the crankshaft, bearings and caps and tighten them
to the specified torques. During this operation, do NOT turn
the crankshaft. Remove the caps. Measure the width of the
Plastic-Gauge at the widest part by using
a scale printed onthe Plastic-Gauge sleeve.
If the clearance exceeds the limit, the bearing should be
replaced or an undersize bearing used.
When installing a new crankshaft, be sure to use standard
size bearings.Should the standard clearance not be obtained even after
bearing replacement, the journal should be ground to
undersize and a bearing of the same size should be
installed.
OIL SEALCheck front and rear oil seals for damage or worn lips.
Replace any seat that is faulty.