Page 712 of 1216
21-18MANUAL TRANSAXLE - Shift Lever Assembly
SHIFT LEVER ASSEMBLYDISASSEMBLY AND REASSEMBLY
19-28
Nm14-20 ft.lbs.
Disassembly steps
1.Shift lever
e+2.Bushing
*q~ 3. Return spring
1)44.Bushing
5.Lever (A)
*47.;;;;;w
I)+8:Bushing9.Snap ring
10.Lever (B).+ 11. Bushing12.Bracket assembly17-26
09A0173
NOTE(1) Reverse the disassembly procedures to reassemble.
(2) l +
: Refer to “Service Points of Reassembly”.
: Non-reusable parts.
i%s.SERVICE POINTS OF REASSEMBLY
NZlGHAP
11./8./6./4,/3./2. APPLICATIONOF GREASE TO
BUSHINGS
Apply multi-purpose grease to the sliding part of the
bushings shown in the figure.
Grease: MOPAR Front Wheel Bearing
Grease Part No.3837794 or equivalent
3. INSTALLATION OF RETURN SPRING
Make sure that the end of the spring contacts the part
(shown in the illustration) of the bracket.
Page 883 of 1216

AUTOMATIC TRANSAXLE - Troubleshooting21-189
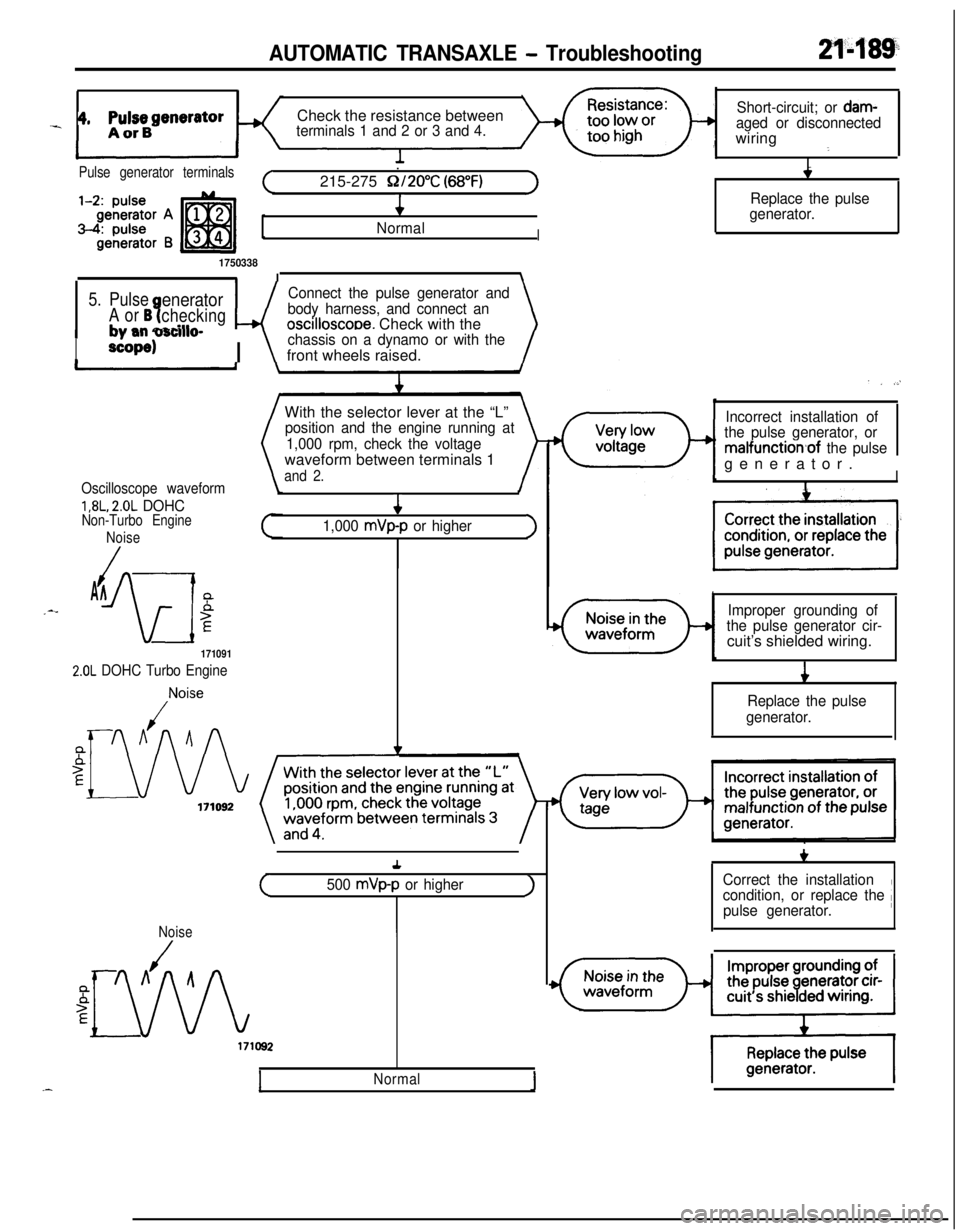
_ 4, ppBgeneratorCheck the resistance betweenterminals 1 and 2 or 3 and 4.Short-circuit; or
dam-aged or disconnectedwiring
:
I
.
4
/
NormalI
1750338II\
Pulse generator terminals.(215-275 Q/2O”C (68°F)1
5. PulseeneratorConnect the pulse generator and
A or B?checkingwbody harness, and connect an
+ mm narillroscilloscooe. Check with the\
I
#, -mm v3nlwdP
scope)I \
chassis on a dynamo or with thefront wheels raised.
With the selector lever at the “L”
position and the engine running at
1,000 rpm, check the voltagewaveform between terminals 1
and 2.
Oscilloscope waveform
1,8L, 2.0L DOHCNon-Turbo Engine
Noise
/AA_--
iw
5E4
1,000 mVp-p or higher>
171091
2.0L DOHC Turbo Engine
,Noise
Replace the pulse
generator.
. . .,’
Incorrect installation of
the pulse generator, or
malfunction,of the pulsegenerator.
II
Improper grounding of
the pulse generator cir-cuit’s shielded wiring.
i
Replace the pulse
generator.+
(500 mVp-p or higherJ
Noise
Normal1
+,I
Correct the installation
condition, or replace the /pulse generator.
Page 889 of 1216
AUTOMATIC TRANSAXLE - Troubleshooting21'495
OIL PRESSURE TESTS
1.
2.
3.
4.
5.Completely warm up the transaxle.
.”Raise the vehicle by using a jack so that the drive wheels
can be rotated.
Connect an engine tachometer and place it in a position
where it’s easy to see.
Attach the special oil-pressure gauge
(C-3292 or C-3293)and the adaptor
(MD998332) to each oil-pressure outlet
port.When the reverse pressure is to be tested, the 3,000
kPa(400 psi) type of gauge should be used.
Measure the oil pressure under various conditions , and
check to be sure that the measured results are within the
standard value range shown in the “Standard oil pressure
table” below.
If the oil pressure is not within the specified range, check
and repair as described in the section “Remedial steps if oilpressure is not normal” on the next page.
m // @ Kickdown brake
Page 896 of 1216

21-202AUTOMATIC TRANSAXLE - Troubleshooting
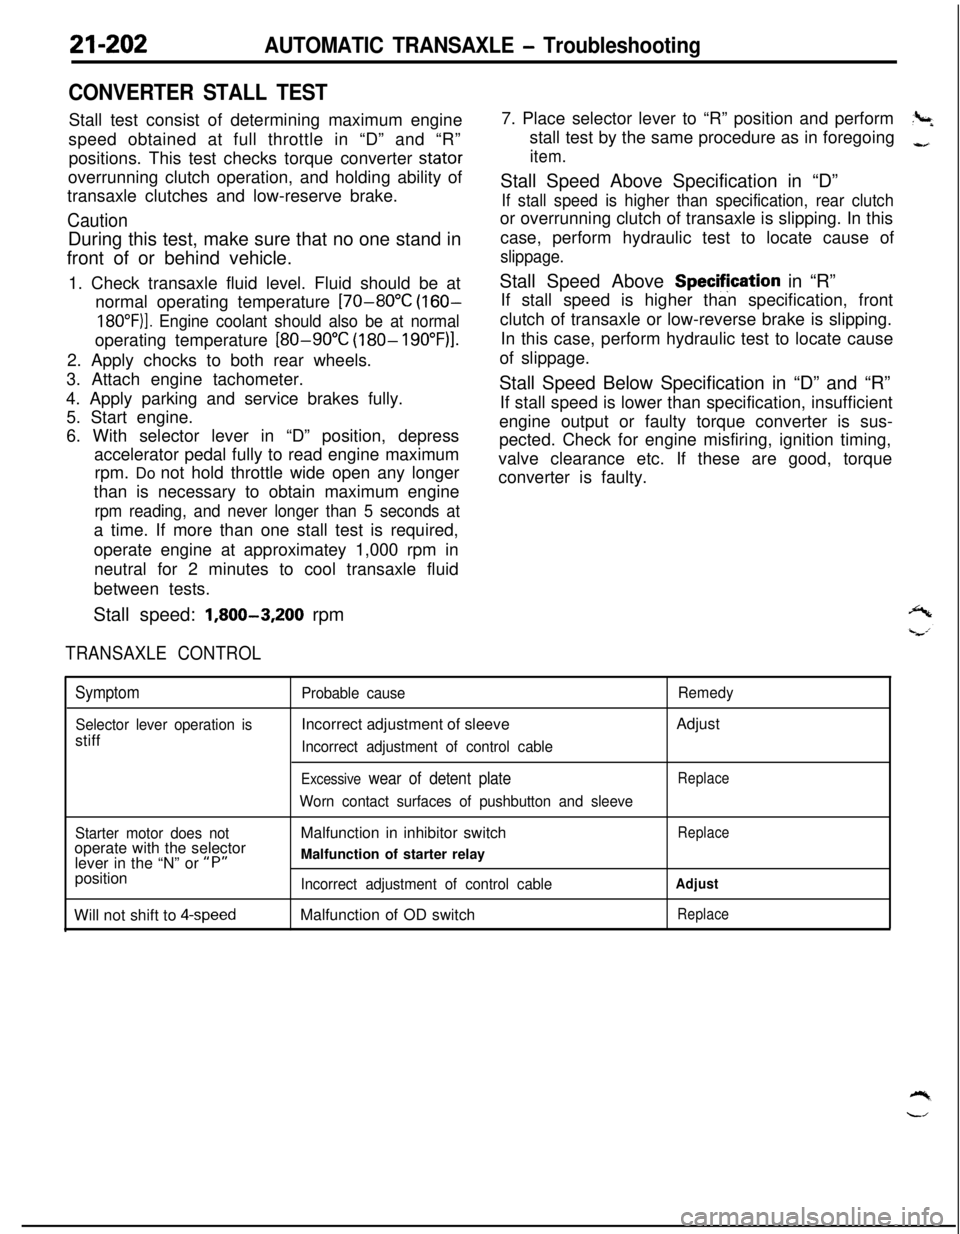
CONVERTER STALL TESTStall test consist of determining maximum engine
speed obtained at full throttle in “D” and “R”
positions. This test checks torque converter stator
overrunning clutch operation, and holding ability of
transaxle clutches and low-reserve brake.
CautionDuring this test, make sure that no one stand in
front of or behind vehicle.
1. Check transaxle fluid level. Fluid should be at
normal operating temperature
[70-80°C (160-
18O”F)]. Engine coolant should also be at normaloperating temperature
[80-90°C (180- 19O”F)l.2. Apply chocks to both rear wheels.
3. Attach engine tachometer.
4. Apply parking and service brakes fully.
5. Start engine.
6. With selector lever in “D” position, depress
accelerator pedal fully to read engine maximum
rpm. Do not hold throttle wide open any longer
than is necessary to obtain maximum engine
rpm reading, and never longer than 5 seconds ata time. If more than one stall test is required,
operate engine at approximatey 1,000 rpm in
neutral for 2 minutes to cool transaxle fluid
between tests.
Stall speed:
1,800-3,200 rpm
TRANSAXLE CONTROL7. Place selector lever to “R” position and perform
?+stall test by the same procedure as in foregoing
-,
item.Stall Speed Above Specification in “D”
If stall speed is higher than specification, rear clutchor overrunning clutch of transaxle is slipping. In this
case, perform hydraulic test to locate cause of
slippage.Stall Speed Above Specifjcation in “R”
If stall speed is higher than specification, front
clutch of transaxle or low-reverse brake is slipping.
In this case, perform hydraulic test to locate cause
of slippage.
Stall Speed Below Specification in “D” and “R”
If stall speed is lower than specification, insufficient
engine output or faulty torque converter is sus-
pected. Check for engine misfiring, ignition timing,
valve clearance etc. If these are good, torque
converter is faulty.
Symptom
Selector lever operation isstiff
Probable causeIncorrect adjustment of sleeve
Incorrect adjustment of control cable
Excessive wear of detent plate
Worn contact surfaces of pushbutton and sleeveRemedyAdjust
Replace
Starter motor does notoperate with the selector
lever in the “N” or
“P”position
Will not shift to
4-speedMalfunction in inhibitor switch
Malfunction of starter relay
Incorrect adjustment of control cableMalfunction of OD switch
Replace
Adjust
Replace
Page 1039 of 1216
22-l-.
WHEELS
AND TIRES
CONTENTSNZZAA-
SERVICE ADJUSTMENT PROCEDURES.......4TROUBLESHOOTING......................................3
Tire
InflationPressureCheck......................4Bald Spots
TireWearCheck..........................................4Cracked Treads
Wheel
RunoutCheck...................................4Feathered Edge
SPECIFICATIONSRapid Wear at Center.............................................2
General
Specifications..................................2Rapid Wear at Shoulders
ServiceSpecificationsScalloped Wear...................................2Wear on One Side
7TorqueSpecifications...................................2
WHEEL AND TIRE..........................................5
Page 1040 of 1216

5 22-2WHEELS AND TIRES - Specifications
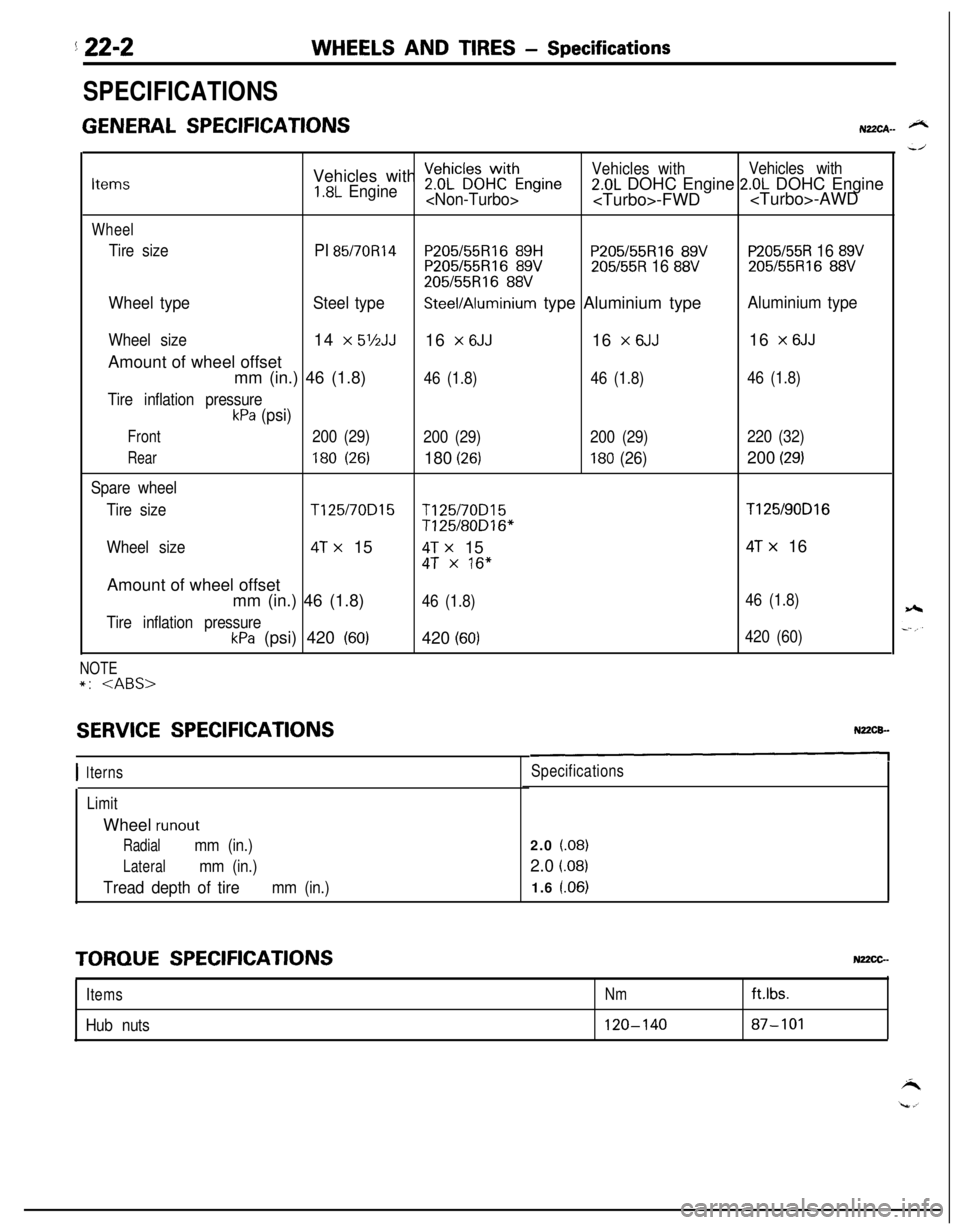
SPECIFICATIONS
GENERAL SPECIFICATIONSN22CA- @NVehicles with
~eDhL”~~HWCthEngineVehicles withVehicles withItems1.8L Engine2.0L DOHC Engine 2.0L DOHC Engine-FWD-AWD
Wheel
Tire sizePI 85/70R14P205155Rl6 89HP205/55R16 89VP205/55R 16 89VP205155R16 89V205/55R 16 88V205/55R16 88V
205/55R16 88V
Wheel typeSteel typeSteel/Aluminium type Aluminium typeAluminium type
Wheel size14 x 5’/2JJ16 x 6JJ16 x 6JJ16 x 6JJAmount of wheel offset
mm (in.) 46 (1.8)
46 (1.8)46 (1.8)46 (1.8)
Tire inflation pressure
kPa (psi)
Front200 (29)
200 (29)200 (29)220 (32)
Rear180 (26)180 (26)180 (26)200 (29)
Spare wheel
Tire size
T125/70D15T125/70D15T125/90D16
T125/80D16*
Wheel size
4T x 154T x 154T x 16
4T x 16”Amount of wheel offset
mm (in.) 46 (1.8)
46 (1.8)46 (1.8)
Tire inflation pressure
kPa (psi) 420 (60)420 (60)420 (60)
NOTE*:
SERVICE SPECIFICATIONS
I 1terns
LimitWheel
runout
Radialmm (in.)
Lateralmm (in.)
Tread depth of tiremm (in.)
Specifications2.0
(.08)2.0
i.08)1.6 l.06)
TORQUE SPECIFICATIONSNz2cG-
ItemsNm
Hub nuts120-140ftlbs.87-101
Page 1041 of 1216
WHEELS AND TIRES - Troubleshooting22-3
TROUBLESHOOTINGN22EA-
Symptom
Rapid wear
at shouldersProbable cause
Under-inflation or
lack of rotationRemedy
Adjust the tire pressure
Rapid wear
at centerOver-inflation or
lack of rotation
Cracked
treadsUnder-inflation
Wear onone side
Excessive
camberInspect the camber
Feathered
Adjust the imbalanced wheels
Rotate the tires Inspect the front sus-
pension alignment
Page 1042 of 1216
22-4WHEELS AND TIRES - Service Adjustment Procedures
Wear indicator
53r510
/ Lateral 11Y602
SERVICE ADJUSTMENT PROCEDURES
TIRE INFLATION PRESSURE CHECKN2ZFOACCheck the inflation pressure of the tires. If it is not within the
standard value, make the necessary adjustment.
TIRE WEAR CHECKN2zFsABMeasure the tread depth of tires.Limit:
1.6 mm (.06 in,)If the remaining tread depth is less than the limit, replace the
tire.
NOTEWhen the tread depth of tires is reduced to 1.6 mm
(.06 in.) or
less, wear indicators will appear.
WHEEL RUNOUT CHECKNZ2FCA5Jack up the vehicle so that the wheels are clear of the floor.
While slowly turning the wheel, measure wheel
runout with a
dial indicator.Limit:
Radial2.0 mm (.08 in.)
Lateral2.0 mm (.08 in.)If wheel
runout exceeds the limit, replace the wheel.