Page 3572 of 4087
NGOK
OKNG
INSPECTION PROCEDURE
1Check voltage between terminals #20 ~ 40 of engine & ECT ECU and body ground.\
C
OK
P(2) Connect the Check Harness A.(See page TR±30)
(2) Turn ignition switch on.
Measure voltage between terminals #10 ~ 40 of engine
& ECT ECU and body ground.
Voltage: 10 ± 14 V
Go to step 3.
2Check ignition relay.
C
OK
Hint
PRemove ignition relay from R/B No.2.
Check continuity between terminals of ignition relay
shown below.
(2) Apply battery voltage between terminals of ignition relay shown below.
(2) Check continuity between terminals 1 and 2.
Replace ignition relay.
TR±134
±
ENGINE TROUBLESHOOTING Circuit Inspection
WhereEverybodyKnowsYourName
Page 3573 of 4087
OKNG
OKNG
OKNG
3Check for open in harness and connector between terminal E01, E02 of eng\
ine & ECT ECU con-
nector and body ground (See page IN±27).
Repair or replace harness or connector.
4Check for open in harness and connector between ignition relay and injector, injector and en-
gine & ECT ECU (See page IN±27).
Repair or replace harness or connector.
5Check injectors.
C
OK
P
OK
C
Disconnect injector connector (See page FI±50).
Measure resistance of injector.
Resistance: 13.4 ± 14.2 � at 20 �C (68 �F)
Check injection volume of injector (See page FI±52).
�Injection volume
55±70 cc/15 sec. (3.4±4.3 cu in.)
Difference between each injector:
Less than 10 cc (0.6 cu in.)
�Leakage
Fuel drop: Once drop or less per minute.
Replace injector.
Proceed to next circuit inspection shown on ma-
trix chart (See page TR±35).
±
ENGINE TROUBLESHOOTING Circuit InspectionTR±135
WhereEverybodyKnowsYourName
Page 3578 of 4087

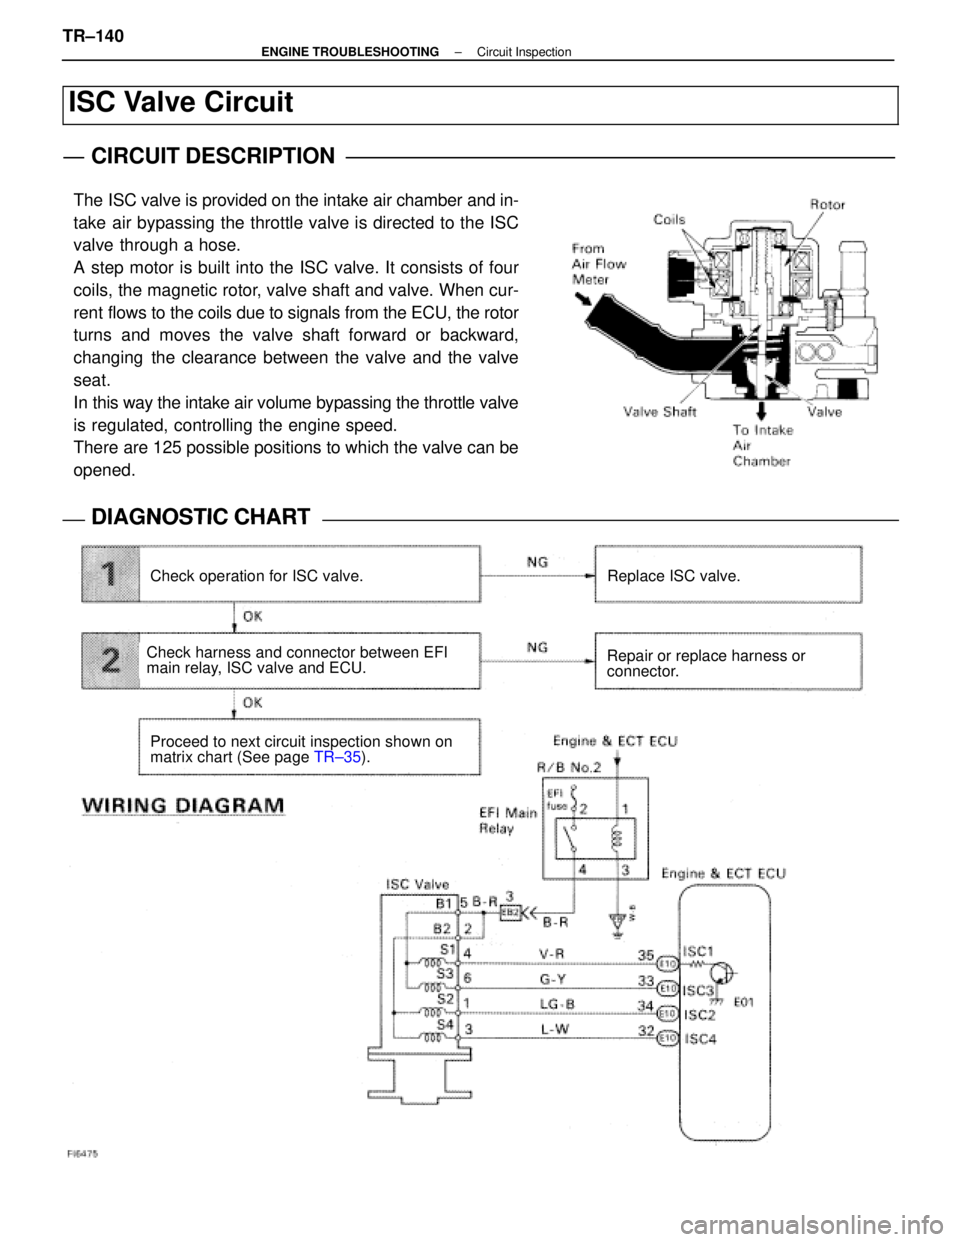
ISC Valve Circuit
CIRCUIT DESCRIPTION
The ISC valve is provided on the intake air chamber and in-
take air bypassing the throttle valve is directed to the ISC
valve through a hose.
A step motor is built into the ISC valve. It consists of four
coils, the magnetic rotor, valve shaft and valve. When cur-
rent flows to the coils due to signals from the ECU, the rotor
turns and moves the valve shaft forward or backward,
changing the clearance between the valve and the valve
seat.
In this way the intake air volume bypassing the throttle valve
is regulated, controlling the engine speed.
There are 125 possible positions to which the valve can be
opened.
DIAGNOSTIC CHARTDIAGNOSTIC CHART
Check operation for ISC valve.Replace ISC valve.
Repair or replace harness or
connector.
Proceed to next circuit inspection shown on
matrix chart (See page TR±35).
Check harness and connector between EFI
main relay, ISC valve and ECU.
TR±140±
ENGINE TROUBLESHOOTING Circuit Inspection
WhereEverybodyKnowsYourName
Page 3579 of 4087
OKNG
OKNG
INSPECTION PROCEDURE
1Check ISC value.
C
OK
P
P
OK
C
Disconnect ISC connector.
Measure resistance between terminals shown below.
Remove ISC Valve
(2) Connect the battery positive lead to terminals B1and B2, and the negative lead to terminals
S1±S2±S3±S4 in that order.
(2) Connect the battery positive lead to terminals B1 and B2, and the negative lead to terminals
S4±S3±S2±S1 in that order.
(2) The valve moves in the closing direction.
(2) The value moves in the opening direction.
Replace ISC valve.
2Check for open and short in harness and connector between EFI main relay and \
ISC valve, ISC
valve and engine & ECT ECU (See page IN±27).
Repair or replace harness or connector.
Proceed to next circuit inspection shown on ma-
trix chart (See page TR±35).
±
ENGINE TROUBLESHOOTING Circuit InspectionTR±141
WhereEverybodyKnowsYourName
Page 3580 of 4087
Fuel Pressure Control VSV Circuit
CIRCUIT DESCRIPTION
The ECU turns on a VSV (Vacuum Switching Valve)
to draw the air into the diaphragm chamber of the
pressure regulator if it detects that the temperature of
the coolant is too high during engine starting.
The air drawn into the chamber increases the fuel
pressure to prevent fuel vapor lock at high engine
temperature in order to help the engine start when it
is warm.
Fuel pressure control ends approx. 100 secs. after
the engine is started.
DIAGNOSTIC CHARTDIAGNOSTIC CHART
Check operation for fuel pressure control
VSV.Replace fuel pressure control VSV.
Repair or replace harness or
connector.
Proceed to next circuit inspection
shown on matrix chart (See page
TR±35).
Check for open and short in harness and
connector between main relay and ECU.
Check voltage of VSV power source.
Check and replace ECU.
WIRING DIAGRAM
TR±142±
ENGINE TROUBLESHOOTING Circuit Inspection
WhereEverybodyKnowsYourName
Page 3582 of 4087
NGOK
OKNG
2Check voltage between terminal FPU of engine & ECT ECU connector and body gro\
und.
C
OK
Hint
P(2) Connect the Check Harness A.(See page TR±30)
(2) Turn ignition switch on.
Measure voltage between terminal FPU of engine &
ECT ECU connector and body ground.
Voltage: 10 ± 14 V
Proceed to next circuit inspection shown on matrix chart
(See page TR±35).
3
Check for open and short in harness and connector between engine & ECT ECU an\
d VSV, VSV
and EFI main relay (See page IN±27).
Repair or replace harness or connector
Check and replace engine & ECT ECU.
TR±144±
ENGINE TROUBLESHOOTING Circuit Inspection
WhereEverybodyKnowsYourName
Page 3604 of 4087

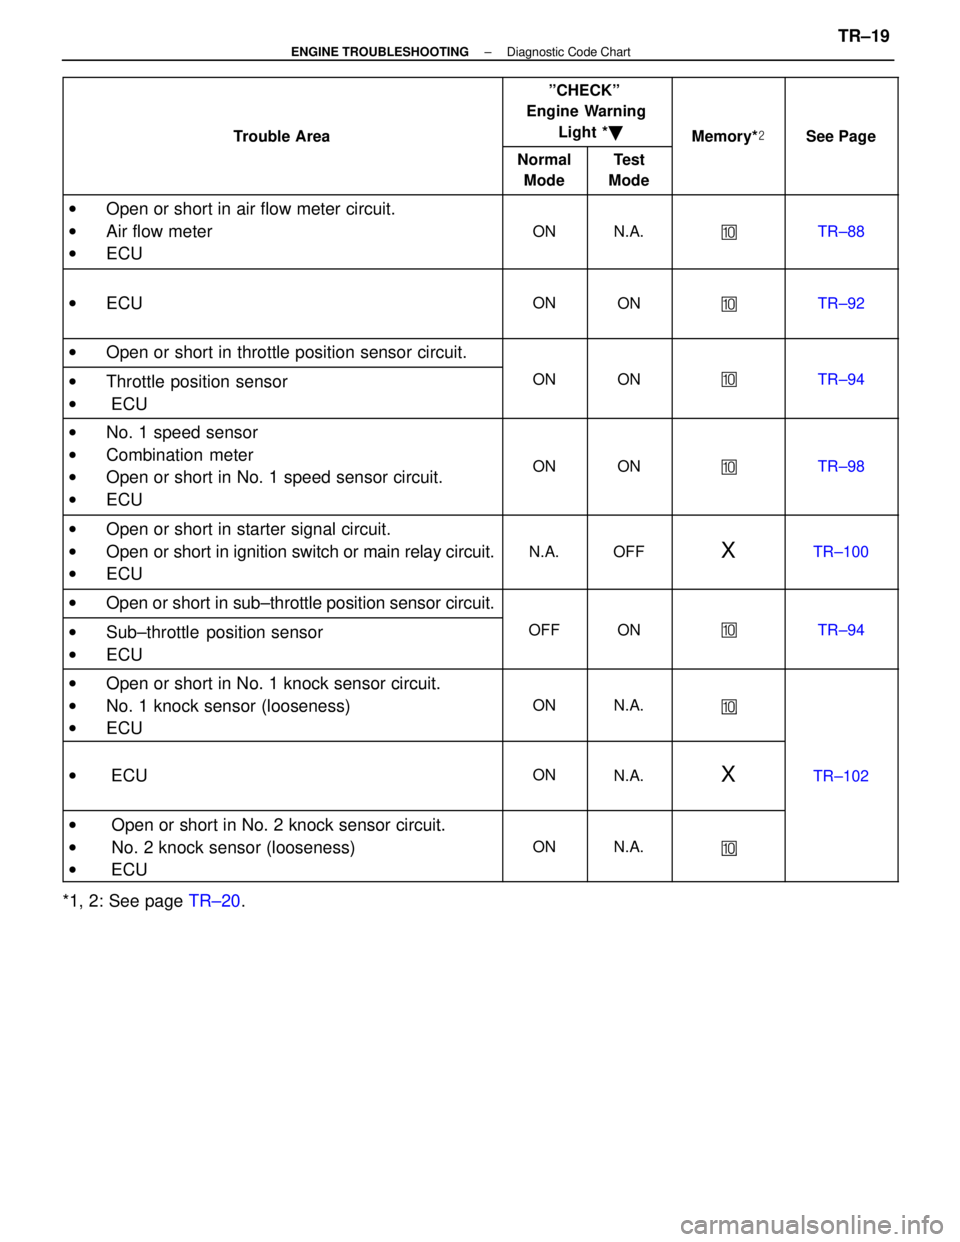
Trouble Area
ºCHECKº
Engine Warning
Light * �
Memory* �See PageTrouble Area
Normal
ModeTest
Mode
MemorySee Page
w Open or short in air flow meter circuit.
w Air flow meter
w ECU
ONN.A.�TR±88
wECUONON�TR±92
wOpen or short in throttle position sensor circuit.
wThrottle position sensorONON�TR±94Throttle osition sensor
w ECU
wNo. 1 speed sensor
w Combination meter
w Open or short in No. 1 speed sensor circuit.
w ECU
ONON�TR±98
wOpen or short in starter signal circuit.
w Open or short in ignition switch or main relay circuit.
w ECU
N.A.OFFXTR±100
wOpen or short in sub±throttle position sensor circuit.
wSub±throttle position sensorOFFON�TR±94Sub throttle osition sensor
wECU
wOpen or short in No. 1 knock sensor circuit.wOen or short in No. 1 knock sensor circuit.
w No. 1 knock sensor (looseness)
ONN.A.�No. 1 knock sensor (looseness)
wECU
�
w ECUONN.A.XTR±102
w Open or short in No. 2 knock sensor circuit.w Oen or short in No. 2 knock sensor circuit.
w No. 2 knock sensor (looseness)
ONN.A.� No. 2 knock sensor (looseness)
w ECU
�
*1, 2: See page TR±20.
±
ENGINE TROUBLESHOOTING Diagnostic Code ChartTR±19
WhereEverybodyKnowsYourName
Page 3661 of 4087

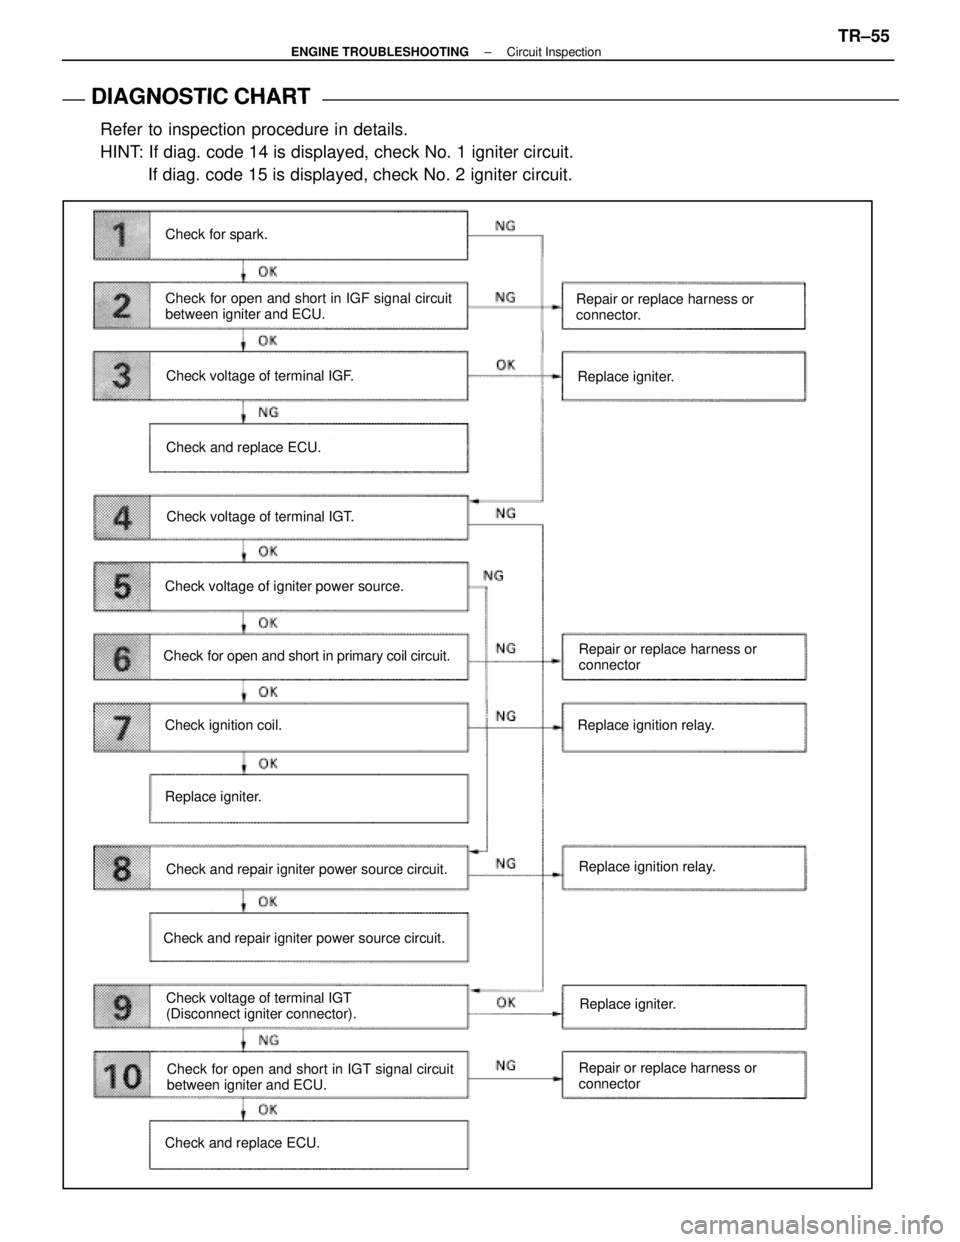
DIAGNOSTIC CHART
DIAGNOSTIC
CHART
Refer to inspection procedure in details.
HINT: If diag. code 14 is displayed, check No. 1 igniter circuit. If diag. code 15 is displayed, check No. 2 igniter circuit.
Check for spark.
Check for open and short in IGF signal circuit
between igniter and ECU.
Check voltage of terminal IGF.
Check and replace ECU.
Check voltage of terminal IGT.
Check voltage of igniter power source.
Check for open and short in primary coil circuit.
Check ignition coil.
Replace igniter.
Check and repair igniter power source circuit.
Check voltage of terminal IGT
(Disconnect igniter connector).
Check and repair igniter power source circuit. Repair or replace harness or
connector.
Replace igniter.
Repair or replace harness or
connector
Replace ignition relay.
Replace ignition relay.
Check for open and short in IGT signal circuit
between igniter and ECU.
Check and replace ECU. Repair or replace harness or
connectorReplace igniter.
±
ENGINE TROUBLESHOOTING Circuit InspectionTR±55
WhereEverybodyKnowsYourName