Page 2851 of 4087

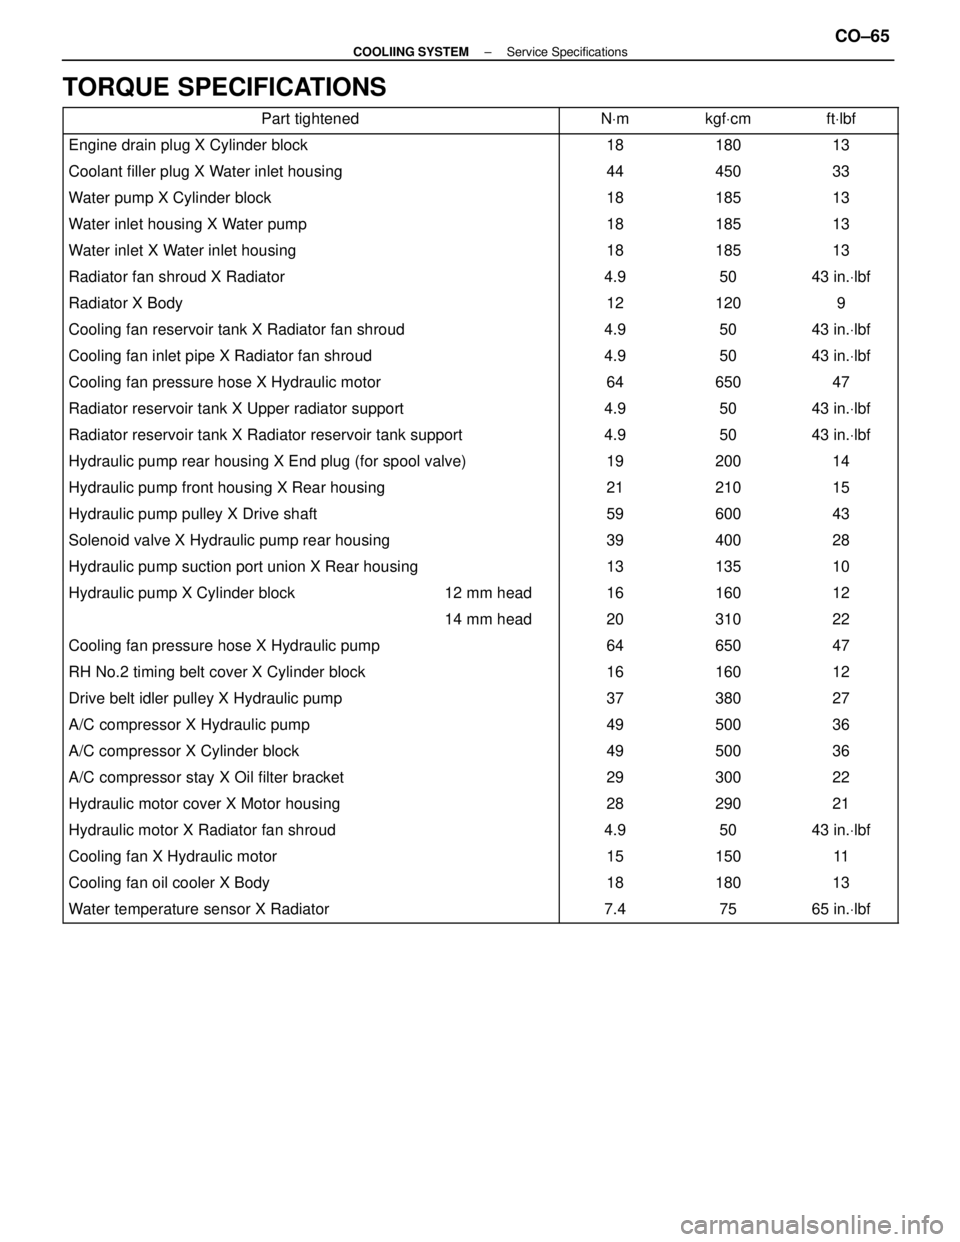
TORQUE SPECIFICATIONS
Part tightenedNVmkgf Vcmft Vlbf
Engine drain plug X Cylinder block1818013
Coolant filler plug X Water inlet housing44450 33
Water pump X Cylinder block18185 13
Water inlet housing X Water pump18185 13
Water inlet X Water inlet housing18185 13
Radiator fan shroud X Radiator4.950 43 in. Vlbf
Radiator X Body12120 9
Cooling fan reservoir tank X Radiator fan shroud4.950 43 in. Vlbf
Cooling fan inlet pipe X Radiator fan shroud4.950 43 in. Vlbf
Cooling fan pressure hose X Hydraulic motor64650 47
Radiator reservoir tank X Upper radiator support4.950 43 in. Vlbf
Radiator reservoir tank X Radiator reservoir tank support4.950 43 in. Vlbf
Hydraulic pump rear housing X End plug (for spool valve)19200 14
Hydraulic pump front housing X Rear housing21210 15
Hydraulic pump pulley X Drive shaft59600 43
Solenoid valve X Hydraulic pump rear housing39400 28
Hydraulic pump suction port union X Rear housing13135 10
����������������� �����������������Hydraulic pump X Cylinder block������ ������12 mm head����� �����16������ ������160������ ������12
����������������� ����������������������� ������14 mm head����� �����20������ ������310������ ������22
������������������\
���� ������������������\
����Cooling fan pressure hose X Hydraulic pump����� �����64������ ������650������ ������47
������������������\
���� ������������������\
����RH No.2 timing belt cover X Cylinder block����� �����16������ ������160������ ������12
������������������\
���� ������������������\
����Drive belt idler pulley X Hydraulic pump����� �����37������ ������380������ ������27
������������������\
���� ������������������\
����A/C compressor X Hydraulic pump����� �����49������ ������500������ ������36
������������������\
���� ������������������\
����A/C compressor X Cylinder block����� �����49������ ������500������ ������36������������������\
���� ������������������\
����A/C compressor stay X Oil filter bracket����� �����29������ ������300������ ������22������������������\
���� ������������������\
����Hydraulic motor cover X Motor housing����� �����28������ ������290������ ������21������������������\
���� �
������������������\
���
������������������\
����Hydraulic motor X Radiator fan shroud
����� �
����
�����4.9
������ �
�����
������50
������ �
�����
������43 in.
Vlbf
������������������\
���� ������������������\
����Cooling fan X Hydraulic motor����� �����15������ ������150������ ������11
������������������\
���� ������������������\
����Cooling fan oil cooler X Body����� �����18������ ������180������ ������13
������������������\
���� ������������������\
����Water temperature sensor X Radiator����� �����7.4������ ������75������ ������65 in. Vlbf
±
COOLIING SYSTEM Service SpecificationsCO±65
WhereEverybodyKnowsYourName
Page 3776 of 4087

TSIB
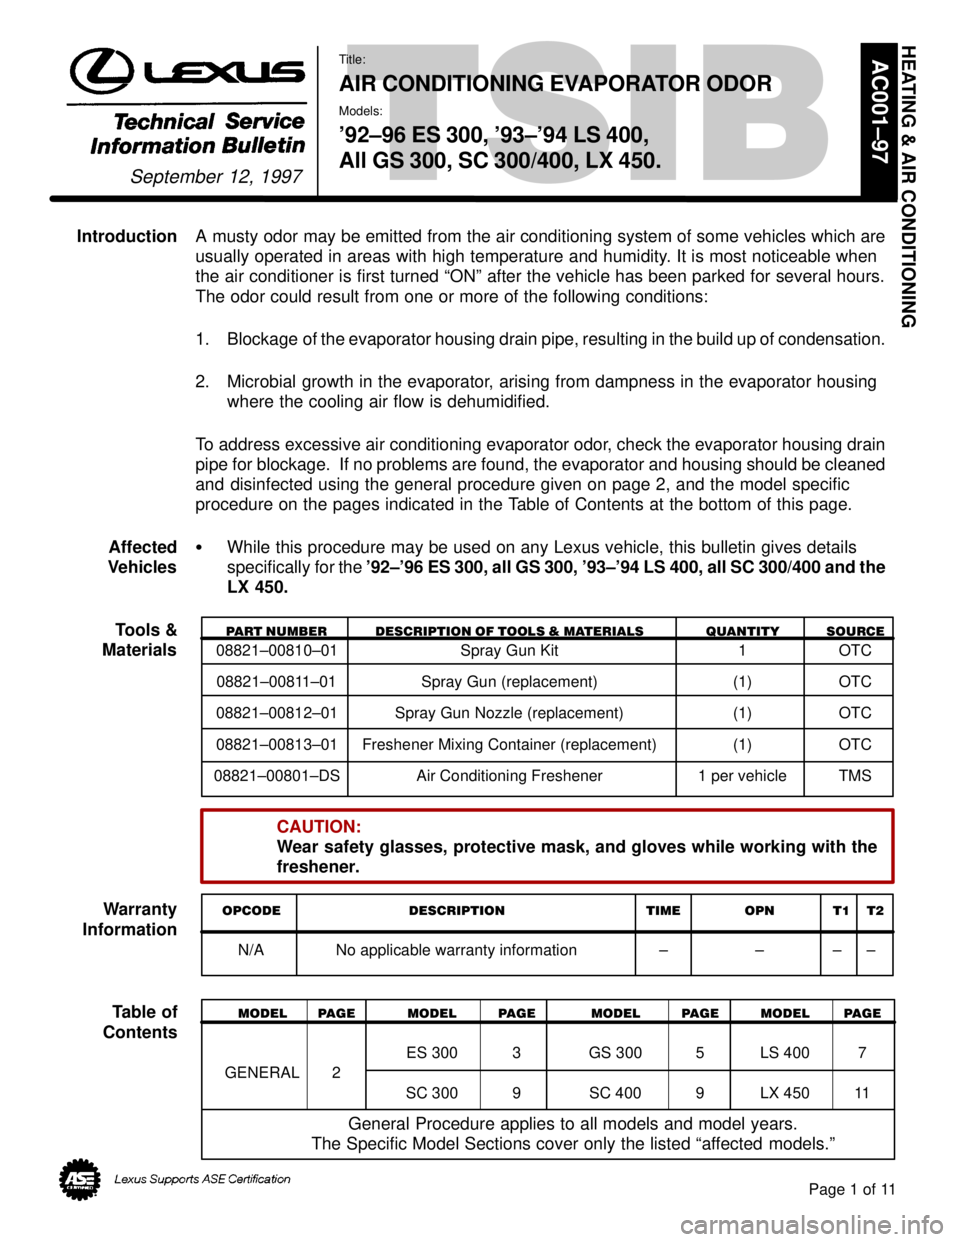
IntroductionA musty odor may be emitted from the air conditioning system of some vehicles which are
usually operated in areas with high temperature and humidity. It is most noticeable when
the air conditioner is first turned ªONº after the vehicle has bee\
n parked for several hours.
The odor could result from one or more of the following conditions:
1. Blockage of the evaporator housing drain pipe, resulting in the build up of cond\
ensation.
2. Microbial growth in the evaporator, arising from dampness in the evaporator housing
where the cooling air flow is dehumidified.
To address excessive air conditioning evaporator odor, check the evaporator housing drain
pipe for blockage. If no problems are found, the evaporator and housing\
should be cleaned
and disinfected using the general procedure given on page 2, and the model \
specific
procedure on the pages indicated in the Table of Contents at the bottom of this page.
Affected �While this procedure may be used on any Lexus vehicle, this bulletin giv\
es details
Vehicles specifically for the '92±'96 ES 300, all GS 300, '93±'94 LS 400, all SC 300/400 and the\
LX 450.
Tools &
PART NUMBER DESCRIPTION OF TOOLS & MATERIALS QUANTITY SOURCE
Materials08821±00810±01 Spray Gun Kit 1 OTC 08821±00811±01 Spray Gun (replacement) (1) OTC
08821±00812±01 Spray Gun Nozzle (replacement) (1) OTC
08821±00813±01 Freshener Mixing Container (replacement) (1) OTC
08821±00801±DS Air Conditioning Freshener 1 per vehicle TMS
CAUTION:
Wear safety glasses, protective mask, and gloves while working with the
freshener.
Warranty
OPCODE DESCRIPTION TIME OPN T1 T2
Information
N/A No applicable warranty information ± ± ± ±
Table ofMODEL PAGE MODEL PAGE MODEL PAGE MODEL PAGE
Contents
ES 300 3 GS 300 5 LS 400 7
GENERAL 2
SC 300 9 SC 400 9 LX 450 11
General Procedure applies to all models and model years.
The Specific Model Sections cover only the listed ªaffected models.º
HEATING & AIR CONDITIONING
September 12, 1997
Title:
AIR CONDITIONING EVAPORATOR ODOR
Models:
'92±96 ES 300, '93±'94 LS 400,
All GS 300, SC 300/400, LX 450.
Page 1 of 11
AC001±97
WhereEverybodyKnowsYourName
Page 3780 of 4087
Page 5 of 11
AIR CONDITIONING EVAPORATOR ODOR ± AC001±97 September 12, 1997
GS 3001. Removal of parts.
(a) Remove the undercover.
NOTE:
Pull down the clip areas (3 places) of
the Undercover to remove.
(b) Remove the lamp.
(c) Remove the (2) wing nuts and the plate on the bottom of the cooling
unit.
CAUTION:
The plate and wing nuts will be reused.
(d) Remove the (2) filters from the cooling unit.
2. Clean the Evaporator. � Follow the general procedures given on
page 2.
NOTE:
Location for insertion of spray nozzle is
indicated by the red arrow in the
illustration.
WhereEverybodyKnowsYourName
Page 3781 of 4087
AIR CONDITIONING EVAPORATOR ODOR ± AC001±97 September 12, 1997
GS 3003. Reinstallation of parts.
(Continued) (a) Insert the (2) filters into the cooling
unit as shown in the illustration.
NOTE:
Insert a clean air filter with it's knob
facing downwards, then slide it forward
and install the second filter in the same
manner.
(b) Assemble the rubber insulator on the plate.
CAUTION:
To prevent the cooling unit from leaking
water, pull the three rubber projections
from the other side of the plate to make
sure that the rubber insulator seals
properly against the plate.
(c) Install the plate on the cooling unit and secure with the (2) wing nuts.
CAUTION:
To prevent water leaks, verify that the
cooling unit and plate are fully secure
before tightening the wing nuts.
NOTE:
Before installing the plate on the cooling
unit, coat the rubber insulator with water
for easier assembly.
(d) Reinstall the lamp.
(e) Reassemble the Undercover.
Page 6 of 11
WhereEverybodyKnowsYourName
Page 3782 of 4087
Page 7 of 11
AIR CONDITIONING EVAPORATOR ODOR ± AC001±97 September 12, 1997
LS 4001. Removal of parts.
('93±'94) (a) Remove the undercover.
NOTE:
�Remove the front of ªAº clips.
� Pull down the three ªBº clip areas
of the Undercover to remove.
(b) Remove the lamp.
(c) Remove the (2) wing nuts and the plate on the bottom of the cooling unit.
CAUTION:
The plate and wing nuts will be reused.
(d) Remove the (2) filters from the cooling unit.
2. Clean the Evaporator � Follow the general procedures given on
page 2.
NOTE:
Location for the insertion of spray
nozzle is indicated by the red arrow
in the illustration.
WhereEverybodyKnowsYourName
Page 3783 of 4087

AIR CONDITIONING EVAPORATOR ODOR ± AC001±97 September 12, 1997
LS 4003. Reinstallation of parts.
('93±'94)
(Continued) (a) Insert the (2) filters into the cooling
unit as shown in the illustration.
NOTE:
Insert a clean air filter with it's knob
facing downwards, then slide it forward
and install the second filter in the same
manner.
(b) Assemble the rubber insulator on the plate.
CAUTION:
To prevent the cooling unit from leaking
water, pull the three rubber projections
from the other side of the plate to make
sure that the rubber insulator seals
properly against the plate.
(c) Install the plate on the cooling unit and secure with the (2) wing nuts.
CAUTION:
To prevent water leaks, verify that the
cooling unit and plate are fully secure
before tightening the wing nuts.
NOTE:
Before installing the plate on the
cooling unit, coat the rubber insulator
with water for easier assembly.
(d) Reinstall the lamp.
(e) Reassemble the Undercover.
Page 8 of 11
WhereEverybodyKnowsYourName
Page 3784 of 4087
Page 9 of 11
AIR CONDITIONING EVAPORATOR ODOR ± AC001±97 September 12, 1997
SC 3001. Removal of parts.
SC 400 (a) Remove two clips using the clip
remover then remove the undercover.
NOTE:
Pull down the clip areas (4 places) of
the Undercover to remove.
(b) Remove the (2) wing nuts and the plate on the bottom of the cooling unit.
CAUTION:
The plate and wing nuts will be reused.
(c) Remove the (2) filters from the cooling unit.
2. Clean the Evaporator � Follow the general procedures given on
page 2.
NOTE:
Location for the insertion of spray
nozzle is indicated by the red arrow
in the illustration.
WhereEverybodyKnowsYourName
Page 3785 of 4087
AIR CONDITIONING EVAPORATOR ODOR ± AC001±97 September 12, 1997
SC 3003. Reinstallation of parts.
SC 400
(Continued) (a) Insert the (2) filters into the cooling
unit as shown in the illustration.
NOTE:
Insert a clean air filter with it's knob
facing downwards, then slide it forward
and install the second filter in the same
manner.
(b) Assemble the rubber insulator on the plate.
CAUTION:
To prevent the cooling unit from leaking
water, pull the three rubber projections
from the other side of the plate to make
sure that the rubber insulator seals
properly against the plate.
(c) Install the plate on the cooling unit and secure with the (2) wing nuts.
CAUTION:
To prevent water leaks, verify that the
cooling unit and plate are fully secure
before tightening the wing nuts.
NOTE:
Before installing the plate on the
cooling unit, coat the rubber insulator
with water for easier assembly.
(d) Reassemble the Undercover.
Page 10 of 11
WhereEverybodyKnowsYourName