Page 2819 of 4087
(b) Using a plastic±faced hammer, carefully tap out the front
housing.
(c) Remove the O±ring from the casing.
7. REMOVE FRONT THRUST WASHER AND DRIVE SHAFT
8. REMOVE DRIVE AND DRIVEN ROTORS
9. REMOVE REAR THRUST WASHER
10. REMOVE CASING (a) Remove the casing.
(b) Remove the O±ring from the rear housing.
11. REMOUNT REAR HOUSING HINT: Mount the parts in a vise as shown in the illustration.
±
COOLIING SYSTEM Electronically Controlled Hydraulic
Cooling Fan (Hydraulic Pump)CO±33
WhereEverybodyKnowsYourName
Page 2820 of 4087

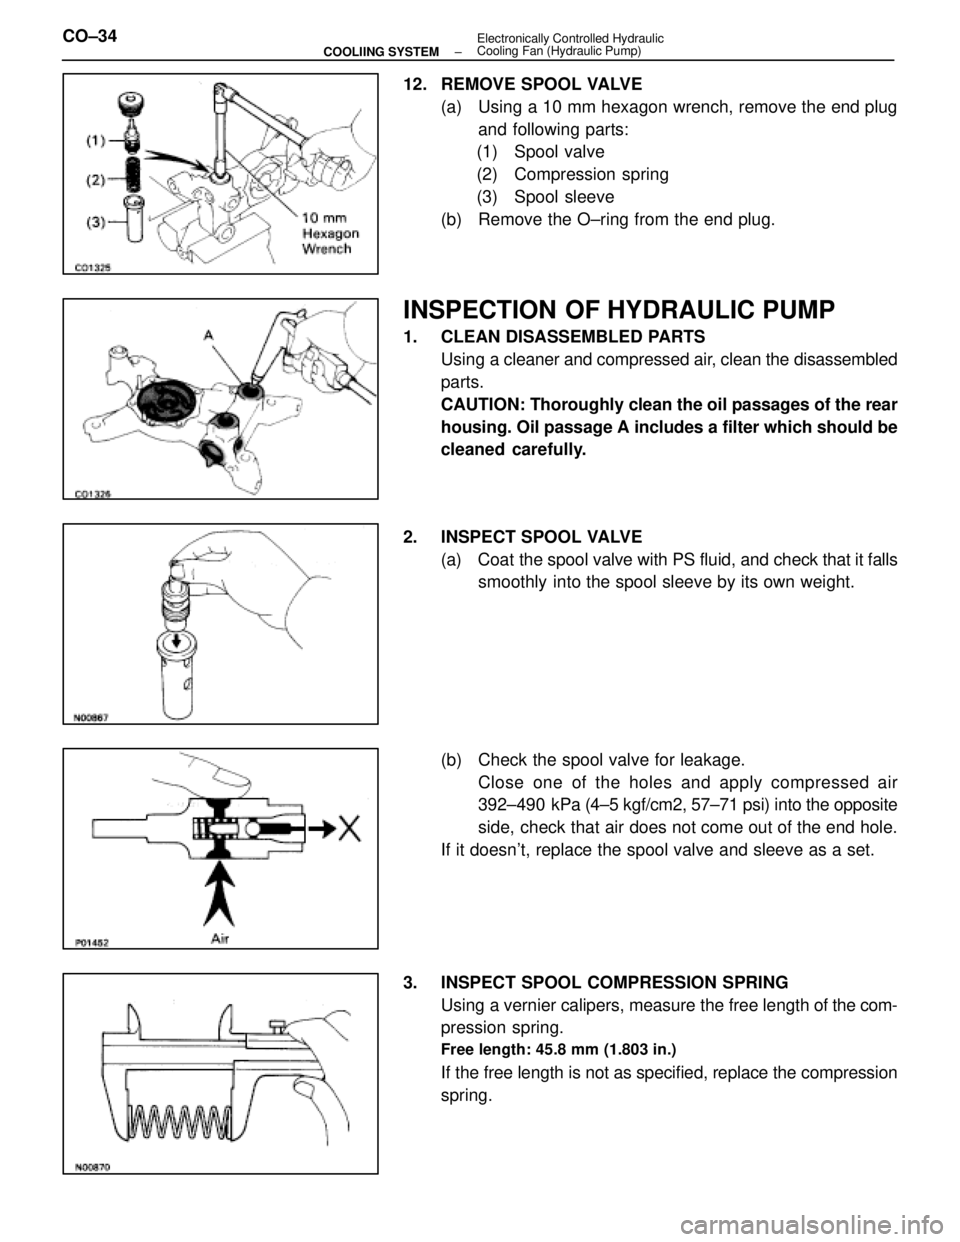
12. REMOVE SPOOL VALVE(a) Using a 10 mm hexagon wrench, remove the end plugand following parts:
(1) Spool valve
(2) Compression spring
(3) Spool sleeve
(b) Remove the O±ring from the end plug.
INSPECTION OF HYDRAULIC PUMP
1. CLEAN DISASSEMBLED PARTS Using a cleaner and compressed air, clean the disassembled
parts.
CAUTION: Thoroughly clean the oil passages of the rear
housing. Oil passage A includes a filter which should be
cleaned carefully.
2. INSPECT SPOOL VALVE (a) Coat the spool valve with PS fluid, and check that it falls
smoothly into the spool sleeve by its own weight.
(b) Check the spool valve for leakage. Close one of the holes and apply compressed air
392±490 kPa (4±5 kgf/cm2, 57±71 psi) into the opposite
side, check that air does not come out of the end hole.
If it doesn't, replace the spool valve and sleeve as a set.
3. INSPECT SPOOL COMPRESSION SPRING Using a vernier calipers, measure the free length of the com-
pression spring.
Free length: 45.8 mm (1.803 in.)
If the free length is not as specified, replace the compression
spring.
CO±34
±
COOLIING SYSTEM Electronically Controlled Hydraulic
Cooling Fan (Hydraulic Pump)
WhereEverybodyKnowsYourName
Page 2821 of 4087

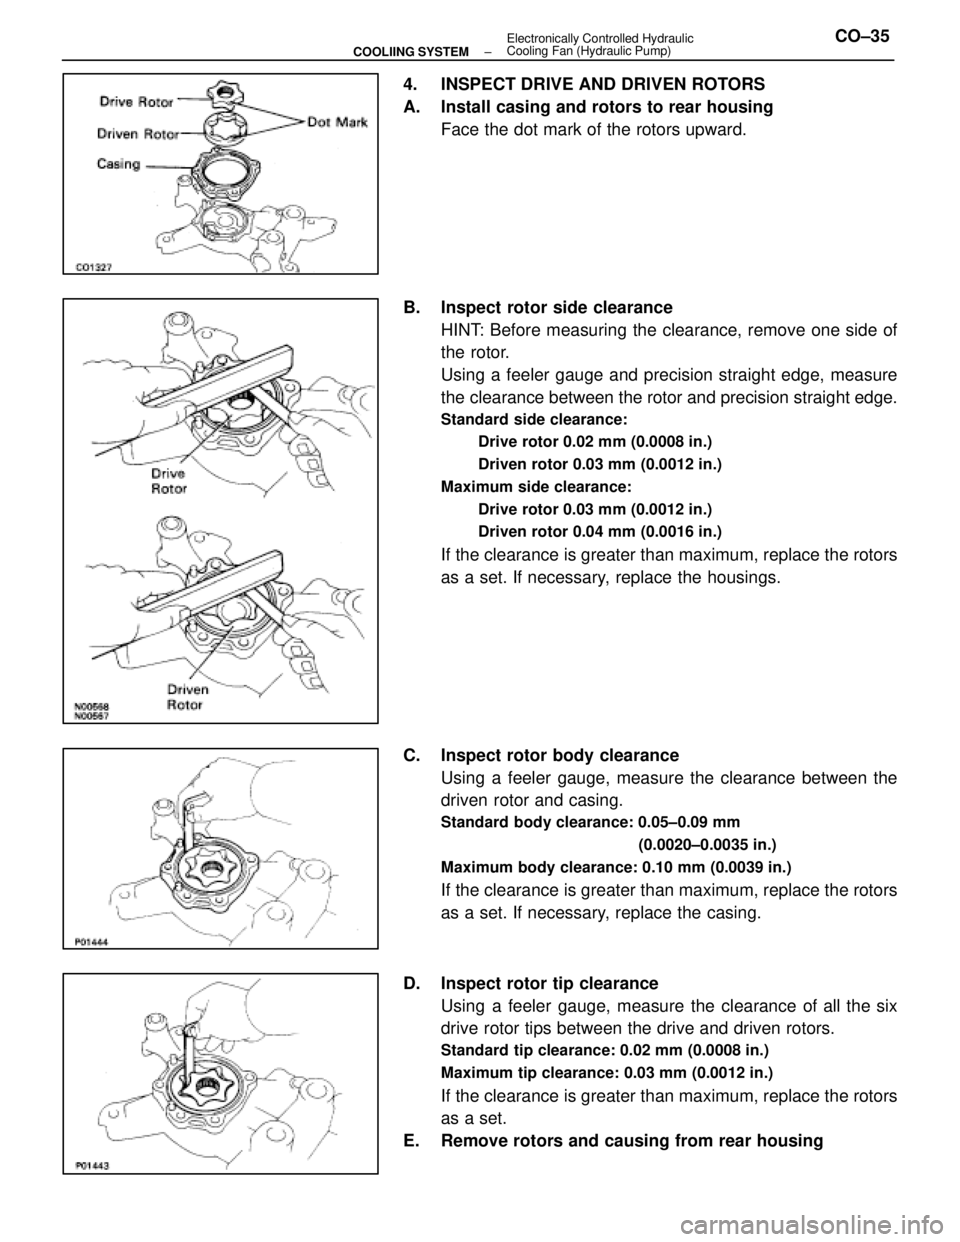
4. INSPECT DRIVE AND DRIVEN ROTORS
A. Install casing and rotors to rear housingFace the dot mark of the rotors upward.
B. Inspect rotor side clearance HINT: Before measuring the clearance, remove one side of
the rotor.
Using a feeler gauge and precision straight edge, measure
the clearance between the rotor and precision straight edge.
Standard side clearance:
Drive rotor 0.02 mm (0.0008 in.)
Driven rotor 0.03 mm (0.0012 in.)
Maximum side clearance: Drive rotor 0.03 mm (0.0012 in.)
Driven rotor 0.04 mm (0.0016 in.)
If the clearance is greater than maximum, replace the rotors
as a set. If necessary, replace the housings.
C. Inspect rotor body clearance Using a feeler gauge, measure the clearance between the
driven rotor and casing.
Standard body clearance: 0.05±0.09 mm
(0.0020±0.0035 in.)
Maximum body clearance: 0.10 mm (0.0039 in.)
If the clearance is greater than maximum, replace the rotors
as a set. If necessary, replace the casing.
D. Inspect rotor tip clearance Using a feeler gauge, measure the clearance of all the six
drive rotor tips between the drive and driven rotors.
Standard tip clearance: 0.02 mm (0.0008 in.)
Maximum tip clearance: 0.03 mm (0.0012 in.)
If the clearance is greater than maximum, replace the rotors
as a set.
E. Remove rotors and causing from rear housing
±
COOLIING SYSTEM Electronically Controlled Hydraulic
Cooling Fan (Hydraulic Pump)CO±35
WhereEverybodyKnowsYourName
Page 2822 of 4087
5. INSPECT OIL CLEARANCE OF DRIVE SHAFT(a) Using a caliper gauge, measure the bushing insidediameter on the housing.
Bushing inside diameter: 17.00±17.05 mm
(0.6693±0.6713 in.)
(b) Using a micrometer, measure the drive shaft diameter.
Shaft diameter: 16.97±16.98 mm(0.6681±0.6685 in.)
(c) Subtract the drive shaft diameter measurement from the
bushing inside diameter measurement.
Standard clearance: 0.02±0.08 mm
(0.0008±0.0031 in.)
Maximum clearance: 0.08 mm (0.0031 in.)
If the clearance is greater than maximum, replace the shaft.
If necessary, replace the housings.
6. INSPECT SOLENOID VALVE RESISTANCE Using an ohmmeter, measure the resistance between the ter-
minals.
Resistance (Cold): 7.5±8.5 �
CO±36±
COOLIING SYSTEM Electronically Controlled Hydraulic
Cooling Fan (Hydraulic Pump)
WhereEverybodyKnowsYourName
Page 2823 of 4087
REPLACEMENT OF OIL SEAL
1. REMOVE OIL SEALUsing SST and a hammer, tap out the oil seal.
SST 09631±10030
2. INSTALL OIL SEAL (a) Using a 22 mm socket wrench and hammer, tap in a new
oil seal until its surface is flush with the housing edge.
(b) Apply fluid to the oil seal lip.
ASSEMBLY OF HYDRAULIC PUMP
(See Components on page CO±31)
HINT:
w Thoroughly clean all parts to be assembled.
w Before installing the parts, apply new fluid to all sliding
and rotating surfaces.
1. MOUNT REAR HOUSING HINT: Mount the parts in a vise as shown in the illustration.
2. INSTALL SPOOL VALVE (a) Align the small hole of the spool sleeve with the hole ofthe rear housing, and insert the spool body into the rear
housing.
±
COOLIING SYSTEM Electronically Controlled Hydraulic
Cooling Fan (Hydraulic Pump)CO±37
WhereEverybodyKnowsYourName
Page 2824 of 4087
(b) Insert the compression spring and spool valve into therear housing.
(c) Install a new O±ring to the end plug.
(d) Apply fluid to the O±ring.
(e) Temporarily install the end plug.
(f) Insert a 5 mm (0.19 in.) straight pin through the holes of the rear housing and spool sleeve.
(g) Using a 10 mm hexagon wrench, install the end plug.
Torque: 19 N Vm (200 kgf Vcm, 14 ft Vlbf)
(h) Pull out the straight pin.
CO±38
±
COOLIING SYSTEM Electronically Controlled Hydraulic
Cooling Fan (Hydraulic Pump)
WhereEverybodyKnowsYourName
Page 2825 of 4087
3. REMOUNT REAR HOUSINGHINT: Mount the parts in a vise as shown in the illustration.
4. INSTALL CASING HINT: If rubber from the O±rings adheres to the O±ring instal-
lation location, replace the casing.
(a) Install a new O±ring to the rear housing groove.
(b) Align the pin hole of the casing with the straight pin onthe rear housing, and install the casing.
5. INSTALL REAR THRUST WASHER
6. INSTALL DRIVEN AND DRIVE ROTORS Install the d rive and driven rotors with the dot mark facing up-
ward.
7. INSTALL DRIVE SHAFT
8. INSTALL FRONT THRUST WASHER
±
COOLIING SYSTEM Electronically Controlled Hydraulic
Cooling Fan (Hydraulic Pump)CO±39
WhereEverybodyKnowsYourName
Page 2826 of 4087
9. INSTALL FRONT HOUSING(a) Install a new O±ring to the casing groove.
(b) Align the pin holes of the front housing with the straightpin.
(c) Apply a light coat of fluid on the threads and under the heads of the mounting bolts.
(d) Install the front housing with the five bolts.
Torque: 21 N Vm (210 kgf Vcm, 15 ft Vlbf)
10. INSTALL DRIVE SHAFT PRELOAD
(a) Check that the drive shaft rotates smoothly withoutabnormal noise.
(b) Temporarily install the pulley nut, and check the rotating torque.
Rotating torque:
0.3 N Vm (3.0 kgf Vcm, 2.6 in. Vlbf)
11. INSTALL PUMP PULLEY
(a) Slide the pulley onto the drive shaft.
(b) Measure the clearance between the pulley end anddrive shaft end.
Standard: 1.3±1.7 mm (0.051±0.067 in.)
Minimum: 1.0 mm (0.039 in.)
If the clearance is less than minimum, replace the pulley.
CO±40
±
COOLIING SYSTEM Electronically Controlled Hydraulic
Cooling Fan (Hydraulic Pump)
WhereEverybodyKnowsYourName