Page 3744 of 4087
DIAGNOSTIC CHART
WIRING DIAGRAM
Check voltage of terminal EGR 1 ~ 4.
Check voltage of EGR Step motor power
source.
Check resistance of EGR step motor.
Check for open and short in harness and
connector between EGR step motor and
ECU.
Check and replace ECU.
Check operation for EGR step motor.
Check resistance of EGR gas temp. sensor.
Check for open and short in harness and
connector between EGR gas temp. sensor
and ECU.
Check and replace ECU.
Replace EGR gas temp. sensor.
Replace EGR step motor.
Replace EGR step motor.
Repair or replace harness or
connector.
Repair or replace harness or
connector.
Check for ECU power source
circuit.
TR±110±
ENGINE TROUBLESHOOTING
WhereEverybodyKnowsYourName
Page 3747 of 4087
OKNG
OKNG
6Check resistance of EGR gas temp. sensor.
C
OK
PDisconnect EGR gas temp. sensor connector
(See page FI±103).
Measure resistance between terminals of EGR gas
temp. sensor connector.
Resistance: 69 ± 89 k � at 50 �C (122 �F)
12 ± 15 k � at 100 �C (212 �F)
2 ± 4 k � at 150 �C (302 �F)
Replace EGR gas temp. sensor.
7Check for open and short in harness and connector between EGR gas temp. sensor and\
engine
& ECT ECU (See IN±27).
Repair or replace harness or connector.
Check and replace engine & ECT ECU.
±
ENGINE TROUBLESHOOTING Circuit InspectionTR±113
WhereEverybodyKnowsYourName
Page 3756 of 4087

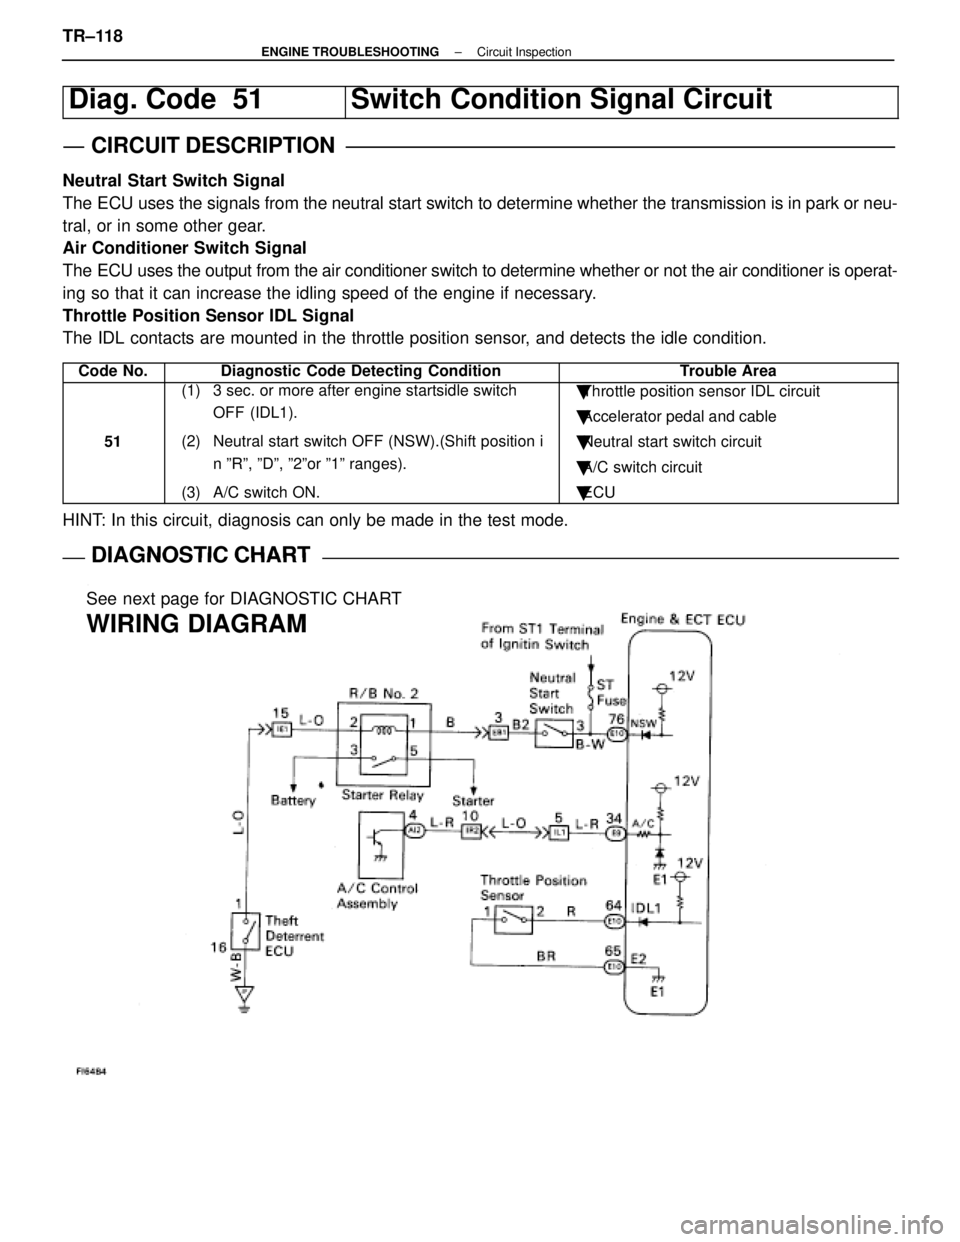
Diag. Code 51Switch Condition Signal Circuit
CIRCUIT DESCRIPTION
Neutral Start Switch Signal
The ECU uses the signals from the neutral start switch to determine whether\
the transmission is in park or neu-
tral, or in some other gear.
Air Conditioner Switch Signal
The ECU uses the output from the air conditioner switch to determine whethe\
r or not the air conditioner is operat-
ing so that it can increase the idling speed of the engine if necessary.
Throttle Position Sensor IDL Signal
The IDL contacts are mounted in the throttle position sensor, and detects the idle condition.
Code No.Diagnostic Code Detecting ConditionTrouble Area
51
(1) 3 sec. or more after engine startsidle switch OFF (IDL1).
(2) Neutral start switch OFF (NSW).(Shift position i n ºRº, ºDº, º2ºor º1º ranges).
(3) A/C switch ON.� Throttle position sensor IDL circuit
� Accelerator pedal and cable
� Neutral start switch circuit
� A/C switch circuit
� ECU
HINT: In this circuit, diagnosis can only be made in the test mode.
DIAGNOSTIC CHARTDIAGNOSTIC CHART
See next page for DIAGNOSTIC CHART
WIRING DIAGRAM
TR±118±
ENGINE TROUBLESHOOTING Circuit Inspection
WhereEverybodyKnowsYourName
Page 3757 of 4087
DIAGNOSTIC CHART
DIAGNOSTIC
CHART
NG (NSW)
Check for input signal.
Proceed to next circuit inspection shown
on maxtrix chart (See page TR±35).
Check resistance of throttle
position sensor.
Check input circuit of A/C.
Check and repair harness or connector
between sensor and ECU.
Check for open and short in harness
and connector beteen A/C control assy.
and ECU.
Repair or replace harness or
connector.
Check and replace A/C control
assembly.
Adjust or replace throttle position
sensor (See page FI-73).
See page TR±122.
Check and replace ECU.
±
ENGINE TROUBLESHOOTING Circuit InspectionTR±119
WhereEverybodyKnowsYourName
Page 3758 of 4087

OKNG
OKNG
INSPECTION PROCEDURE
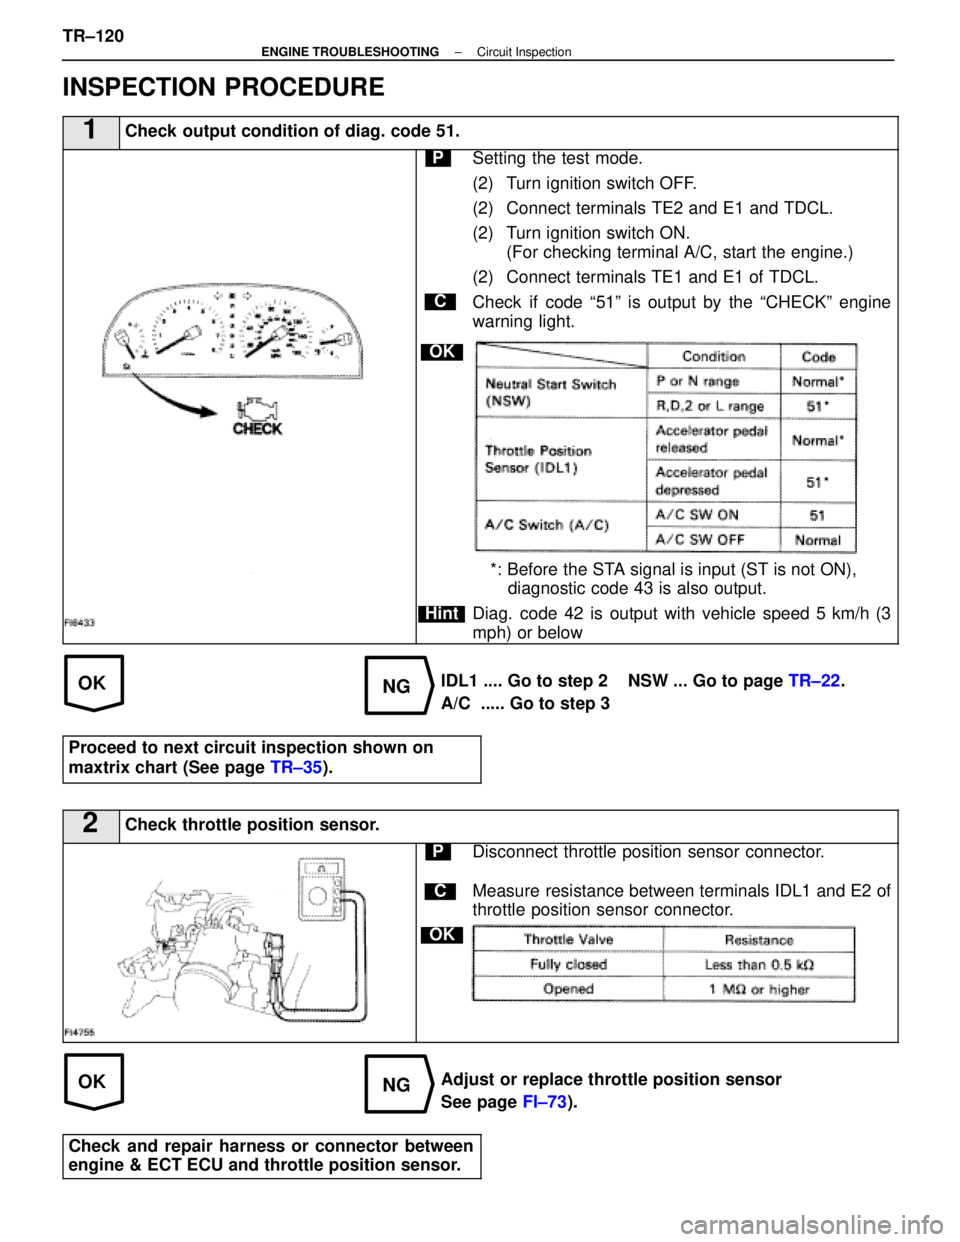
1Check output condition of diag. code 51.
C
OK
Hint
PSetting the test mode.
(2) Turn ignition switch OFF.
(2) Connect terminals TE2 and E1 and TDCL.
(2) Turn ignition switch ON.(For checking terminal A/C, start the engine.)
(2) Connect terminals TE1 and E1 of TDCL.
Check if code ª51º is output by the ªCHECKº engine
warning light.
*: Before the STA signal is input (ST is not ON), diagnostic code 43 is also output.
Diag. code 42 is output with vehicle speed 5 km/h (3
mph) or below
IDL1 .... Go to step 2 NSW ... Go to page TR±22.
A/C ..... Go to step 3
Proceed to next circuit inspection shown on
maxtrix chart (See page TR±35).
2Check throttle position sensor.
C
OK
PDisconnect throttle position sensor connector.
Measure resistance between terminals IDL1 and E2 of
throttle position sensor connector.
Adjust or replace throttle position sensor
See page FI±73).
Check and repair harness or connector between
engine & ECT ECU and throttle position sensor.
TR±120±
ENGINE TROUBLESHOOTING Circuit Inspection
WhereEverybodyKnowsYourName
Page 3787 of 4087
Lexus Supports ASE CertificationPage 1 of 12
Title:
SENSOR INSPECTION FOR AIR
CONDITIONING SYSTEM
Models:
'90 ± Current All Models
Technical Service
Information Bulletin
December 16, 2004
AC005-04
This service bulletin contains inspection procedures to more precisely confi\
rm proper
operation of the following temperature sensors of the air conditioning s\
ystem. Follow the
procedures in this service bulletin when inspecting these sensors. These\
contents will be
reflected in future repair manuals.
� Room Temperature Sensor
� Ambient Temperature Sensor
� Air Duct Sensor
� Evaporator Temperature Sensor
� Solar Sensor
� Room Humidity Sensor
� All 1990 ± Current model year Lexus vehicles.
OP CODEDESCRIPTIONTIMEOFPT1T2
N/ANot Applicable to Warranty±±±±
HEATING & AIR CONDITIONING
Introduction
Applicable Vehicles
Warranty
Information
WhereEverybodyKnowsYourName
Page 3788 of 4087
SENSOR INSPECTION FOR AIR CONDITIONING SYSTEM ± AC005-04 December 16, 2004
Page 2 of 12
1. Inspect Room Temperature Sensor.
A. Measure the sensor resistance.
Resistance Value at 77 5F
(25 5C)1700 +/± 85 W
NOTE:
�Even slightly touching the sensor
may change the resistance value.
Be sure to hold the connector of
the sensor.
� When measuring, the sensor
temperature must be the same as
the ambient temperature.
HINT:
As the temperature increases, the
resistance decreases.
TEMPERATURE 5F ( 5C)SPECIFICATION k W
50 (10)3.00 to 3.73
59 (15)2.45 to 2.88
68 (20)1.95 to 2.30
77 (25)1.60 to 1.80
86 (30)1.28 to 1.47
95 (35)1.00 to 1.22
104 (40)0.80 to 1.00
113 (45)0.65 to 0.85
122 (50)0.50 to 0.70
131 (55)0.44 to 0.60
140 (60)0.36 to 0.50
Inspection
Procedure
Resistance
k W
4.0
3.5
3.0
2.5
2.0
1.5
1.0
0.5
0.0
32
(0) 68
(20) 104
(40) 140
(60)
Temperature 5F ( 5C)
Max
Min
WhereEverybodyKnowsYourName
Page 3789 of 4087
SENSOR INSPECTION FOR AIR CONDITIONING SYSTEM ± AC005-04 December 16, 2004
Page 3 of 12
2. Inspect Ambient
Temperature Sensor.
A. Measure the sensor resistance according to the selected graph
(specification).
Resistance Value at 77 5F
(25 5C)1700 +/± 85 W
NOTE:
�Even slightly touching the sensor
may change the resistance value.
Be sure to hold the connector of
the sensor.
� When measuring, the sensor
temperature must be the same as
the ambient temperature.
HINT:
As the temperature increases, the
resistance decreases.
TEMPERATURE 5F ( 5C)SPECIFICATION k W
50 (10)3.00 to 3.73
59 (15)2.45 to 2.88
68 (20)1.95 to 2.30
77 (25)1.60 to 1.80
86 (30)1.28 to 1.47
95 (35)1.00 to 1.22
104 (40)0.80 to 1.00
113 (45)0.65 to 0.85
122 (50)0.50 to 0.70
131 (55)0.44 to 0.60
140 (60)0.36 to 0.50
Inspection
Procedure
(Continued)
Resistance
k W
4.0
3.5
3.0
2.5
2.0
1.5
1.0
0.5
0.0
32
(0) 68
(20) 104
(40) 140
(60)
Temperature 5F ( 5C)
Max
Min
WhereEverybodyKnowsYourName