Page 392 of 4087
3. INSPECT KEY INTERLOCK SOLENOID
(a) Disconnect the solenoid connector.
(b) Usin g an oh mme te r, me a su re th e re sista n ce be twe e nterminals 7 and 8.
Standard resistance:
12±17 �
If resistance value is not as specified, replace the solenoid.
(c) Touch the solenoid with your finger and check that solenoid operation can be felt when battery positive voltage.
If solenoid operation is not as specified, replace the solenoid.
4. INSPECT SHIFT LOCK CONTROL SWITCH Inspect that there is continuity between each terminal.
±
A304E (1UZ±FE) AUTOMATIC TRANSMISSION SHIFT LOCK SYSTEMAT±29
WhereEverybodyKnowsYourName
Page 531 of 4087
14. REMOVE FRONT DOOR INNER WEATHERSTRIPPry loose the clips from the edge of the panel and remove the
belt moulding.
15. REMOVE FRONT GLASS GUIDE Remove three screws and the guide.
16. REMOVE REAR GLASS GUIDE AND DOOR GLASS (a) Remove four screws from the guide.
(b) Remove joining the window regulator and glass.
(c) Pull the door glass with the guide out of the panel carefully.
HINT: Do not remove the guide from the glass.
17. REMOVE WINDOW REGULATOR Remove six nuts and the regulator.
18. REMOVE DOOR LOCK (a) Disconnect the two links from the outside handle andkey cylinder.
(b) Disconnect the connector.
(c) Using a trox rench, remove three screws and the door lock.
BO±36
±
BODY Front Door
WhereEverybodyKnowsYourName
Page 532 of 4087
19. REMOVE OUTSIDE HANDLE AND KEY CYLINDER(a) Disconnect the connector from key cylinder.
(b) Remove three bolts, key cylinder and outside handle.
20. REMOVE SIDE PROTECTION MOULDING (a) Remove two nuts.
(b) Using a clip remover, pry out the moulding.
REPLACEMENT OF DOOR GLASS
REMOVE FOLLOWING PARTS:
(a) Front door glass channel
(b) Glass guide roller
(c) Glass guide roller No. 2
(d) Washer
(e) Nut
(f) Bolt
±
BODY Front DoorBO±37
WhereEverybodyKnowsYourName
Page 533 of 4087

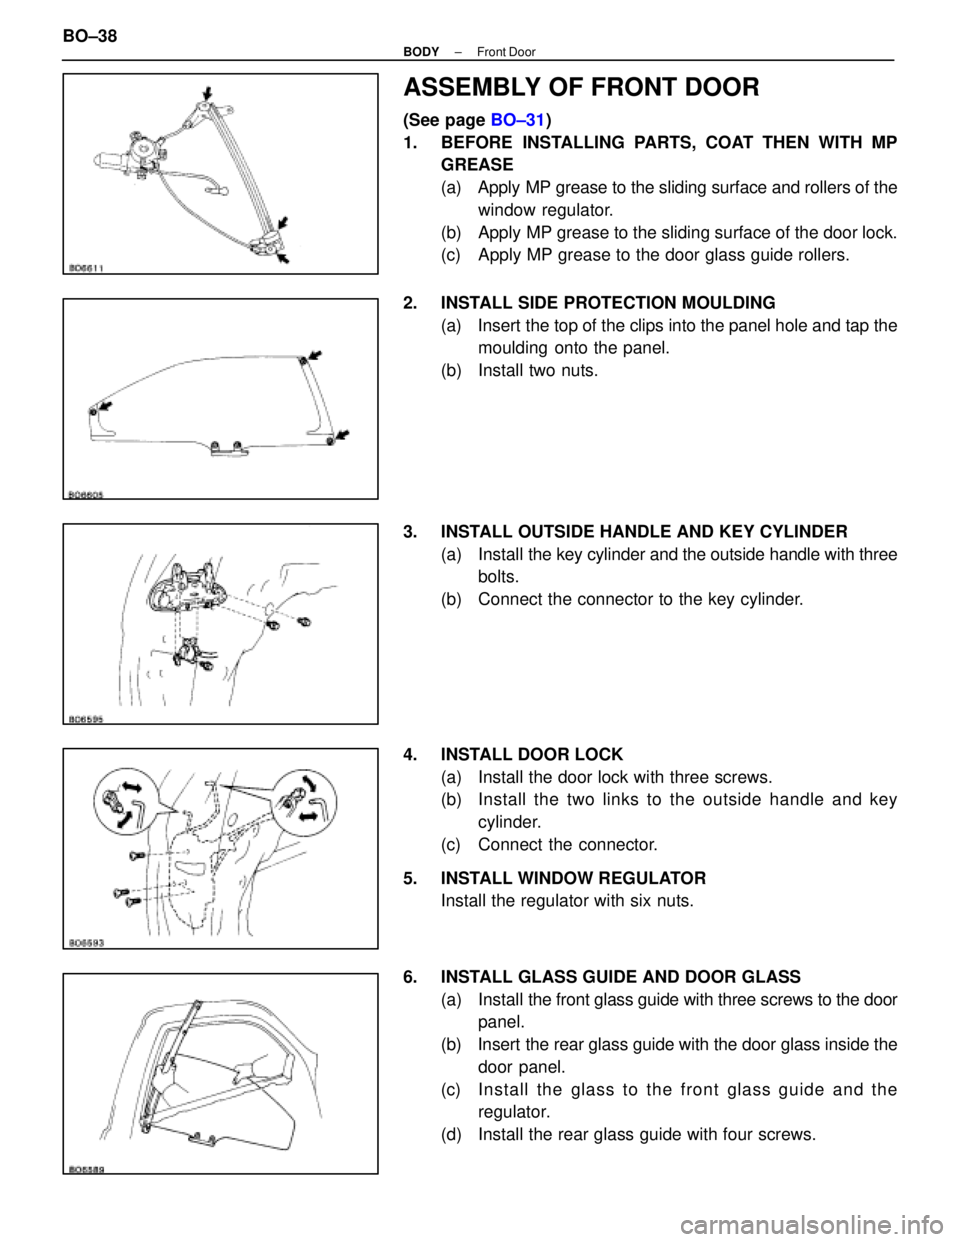
ASSEMBLY OF FRONT DOOR
(See page BO±31)
1. BEFORE INSTALLING PARTS, COAT THEN WITH MP GREASE
(a) Apply MP grease to the sliding surface and rollers of the
window regulator.
(b) Apply MP grease to the sliding surface of the door lock.
(c) Apply MP grease to the door glass guide rollers.
2. INSTALL SIDE PROTECTION MOULDING (a) Insert the top of the clips into the panel hole and tap themoulding onto the panel.
(b) Install two nuts.
3. INSTALL OUTSIDE HANDLE AND KEY CYLINDER (a) Install the key cylinder and the outside handle with three
bolts.
(b) Connect the connector to the key cylinder.
4. INSTALL DOOR LOCK (a) Install the door lock with three screws.
(b) Install the two links to the outside h andle and key
cylinder.
(c) Connect the connector.
5. INSTALL WINDOW REGULATOR Install the regulator with six nuts.
6. INSTALL GLASS GUIDE AND DOOR GLASS (a) Install the front glass guide with three screws to the door
panel.
(b) Insert the rear glass guide with the door glass inside the door panel.
(c) In sta ll th e gla ss to th e fro n t gla ss gu id e an d th e regulator.
(d) Install the rear glass guide with four screws.
BO±38
±
BODY Front Door
WhereEverybodyKnowsYourName
Page 549 of 4087

Troubleshooting
You will find the cause of trouble more easily by properly using the table \
shown below. In this table, the
numbers indicate the order of priority of the causes of trouble. Check each part in \
the order shown. If neces-
sary, replace the part.
See page
BE±4 ,21BE±4,21BE±4,20BE±4,20BE±156BE±152BE±149BE±151BE±152BE±26BE±392BE±4,20 ±±
Part
name
Trouble
AM1 FuseDOME FuseDOOR FusePOWER FuseTheft Deterrent and Door Lock Control ECUPower Window Main RelayPower Window Master SwitchPower Window SwitchPower Window MotorIgnition SwitchDoor Open Detection SwitchECU±IG FuseWire Harness
*1 Power window does not operate.1234
*2 Power window does not operate.35467218
ªOne Touch Power Window Systemº does
not operate.1
Only one window glass does not move.1234
ªWindow Lock Systemº does not operate1
ªWindow Lock Illuminationº does not light
up.1
Key±off power window does not operate124536
*1: Dook Lock does not operate.
*2: Dook Lock is normal.
±
BODY ELECTRICAL SYSTEM Power Window Control SystemBE±157
WhereEverybodyKnowsYourName
Page 550 of 4087
LIQUID CRYSTAL INNER MIRROR
SYSTEM
Description
The liquid crystal inner mirror replaces the previous mirror, which mechanically switched between the ªDayº and
ªNightº settings, with liquid crystal inside the mirror which changes the bright\
ness of the mirror surface. The com-
ponent parts of this system and their functions are shown in the table below.
Parts NameFunction
Liquid Crystal Inner
MirrorReceives current from the fuse DOME and changes the surface brightness o\
f the mirror
when switch is operated.
Key Unlock Warning
SwitchOpens the circuit so that the mirror can be operated only when the ignit\
ion key is set.
Parts Location
BE±164±
BODY ELECTRICAL SYSTEM Liquid Crystal Inner Mirror System
WhereEverybodyKnowsYourName
Page 552 of 4087

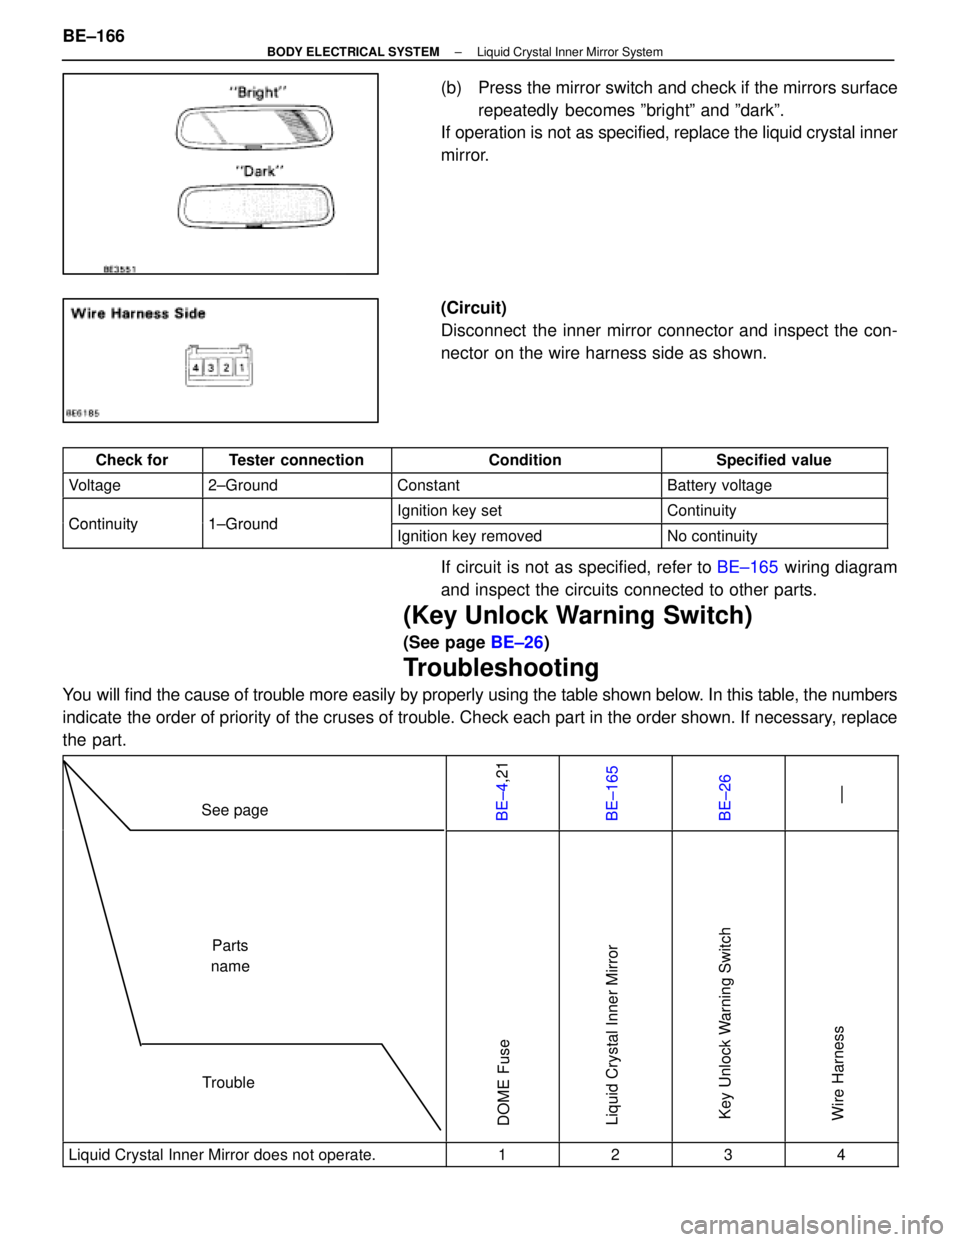
(b) Press the mirror switch and check if the mirrors surfacerepeatedly becomes ºbrightº and ºdarkº.
If operation is not as specified, replace the liquid crystal inner
mirror.
(Circuit)
Disconnect the inner mirror connector and inspect the con-
nector on the wire harness side as shown.
Check forTester connectionConditionSpecified value
Voltage2±GroundConstantBattery voltage
Continuity1 GroundIgnition key setContinuityContinuity1±GroundIgnition key removedNo continuity
If circuit is not as specified, refer to BE±165 wiring diagram
and inspect the circuits connected to other parts.
(Key Unlock Warning Switch)
(See page BE±26)
Troubleshooting
You will find the cause of trouble more easily by properly using the table \
shown below. In this table, the numbers
indicate the order of priority of the cruses of trouble. Check each part in the \
order shown. If necessary, replace
the part.
See pageBE±4,21BE±165BE±26 ±±
TroubleParts
name
DOME FuseLiquid Crystal Inner MirrorKey Unlock Warning SwitchWire Harness
Liquid Crystal Inner Mirror does not operate.1234
BE±166±
BODY ELECTRICAL SYSTEM Liquid Crystal Inner Mirror System
WhereEverybodyKnowsYourName
Page 566 of 4087

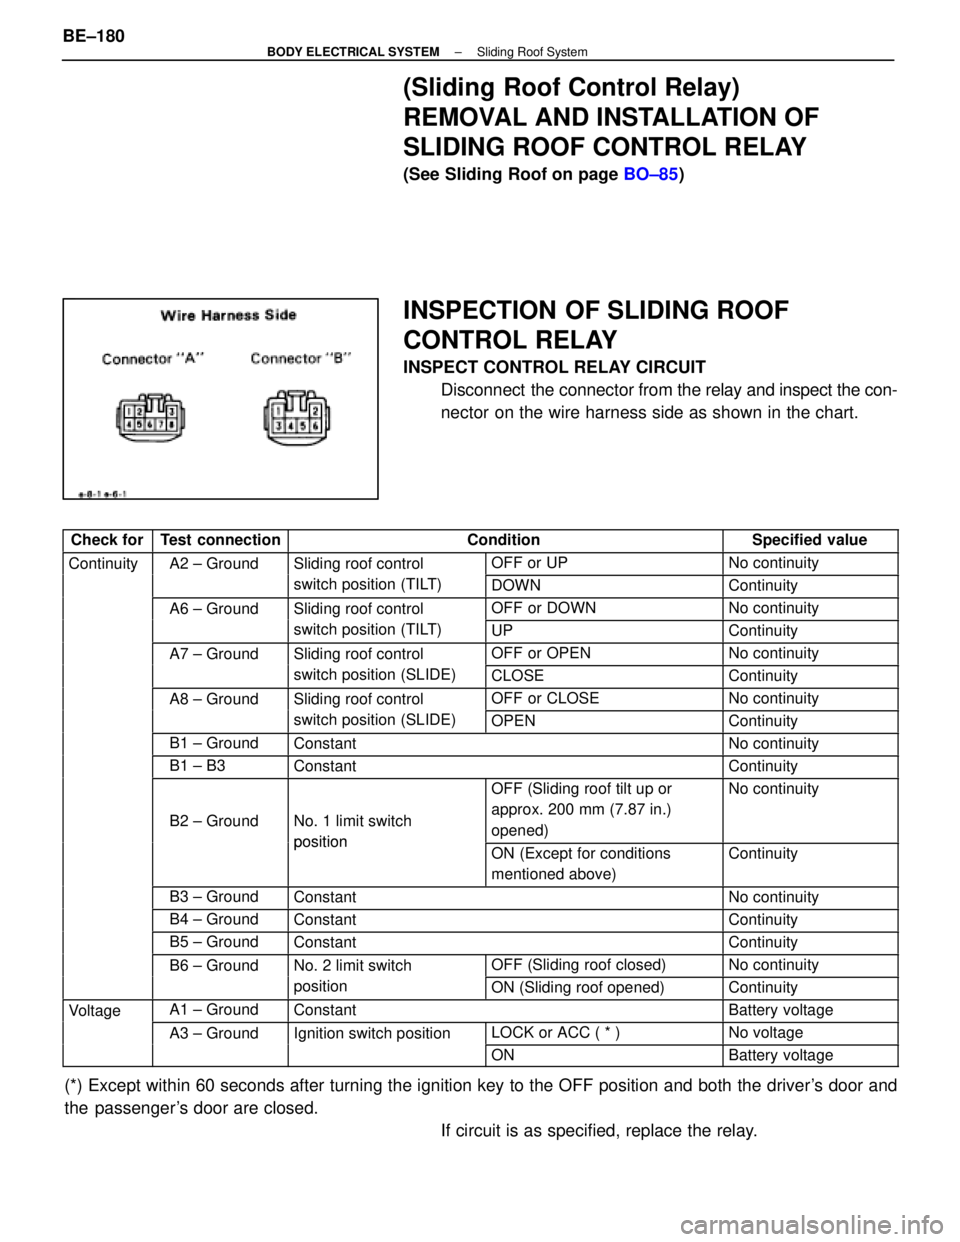
(Sliding Roof Control Relay)
REMOVAL AND INSTALLATION OF
SLIDING ROOF CONTROL RELAY
(See Sliding Roof on page BO±85)
INSPECTION OF SLIDING ROOF
CONTROL RELAY
INSPECT CONTROL RELAY CIRCUIT
Disconnect the connector from the relay and inspect the con-
nector on the wire harness side as shown in the chart.
Check forTest connectionConditionSpecified value
ContinuityA2 ± GroundSliding roof control OFF or UPNo continuityyg
switch position (TILT)DOWNContinuity
A6 ± GroundSliding roof control OFF or DOWNNo continuityg
switch position (TILT)UPContinuity
A7 ± GroundSliding roof control OFF or OPENNo continuityg
switch position (SLIDE)CLOSEContinuity
A8 ± GroundSliding roof control OFF or CLOSENo continuityg
switch position (SLIDE)OPENContinuity
B1 ± GroundConstantNo continuity
B1 ± B3ConstantContinuity
B2 ± GroundNo. 1 limit switch
p
osition
OFF (Sliding roof tilt up or
approx. 200 mm (7.87 in.)
opened)No continuity
positionON (Except for conditions
mentioned above)Continuity
B3 ± GroundConstantNo continuity
B4 ± GroundConstantContinuity
B5 ± GroundConstantContinuity
B6 ± GroundNo. 2 limit switch OFF (Sliding roof closed)No continuity
positionON (Sliding roof opened)Continuity
VoltageA1 ± GroundConstantBattery voltageg
A3 ± GroundIgnition switch positionLOCK or ACC ( * )No voltageg
ONBattery voltage
(*) Except within 60 seconds after turning the ignition key to the OFF\
position and both the driver's door and
the passenger's door are closed. If circuit is as specified, replace the relay.
BE±180
±
BODY ELECTRICAL SYSTEM Sliding Roof System
WhereEverybodyKnowsYourName