Page 1758 of 4087

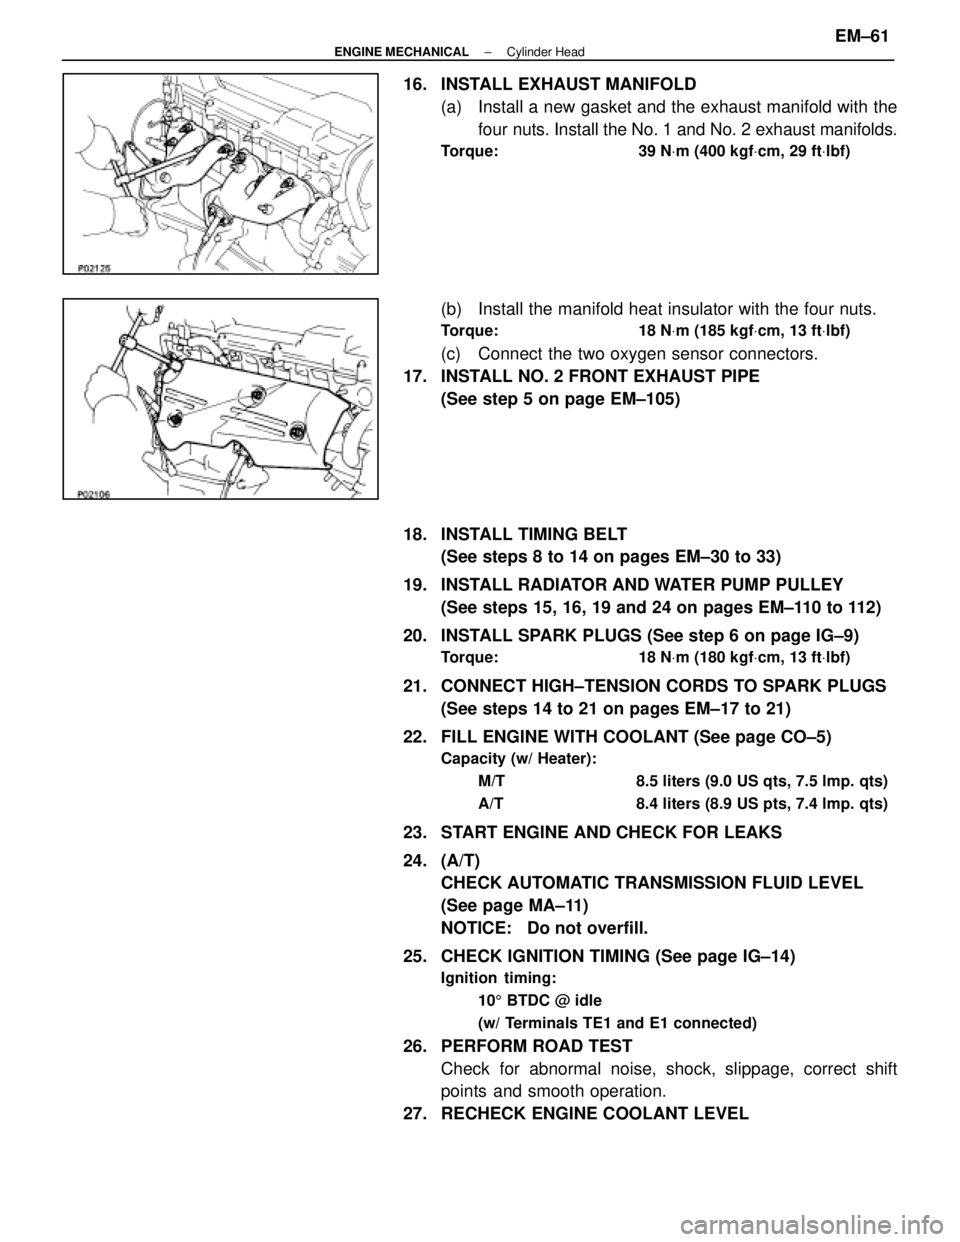
16. INSTALL EXHAUST MANIFOLD(a) Install a new gasket and the exhaust manifold with thefour nuts. Install the No. 1 and No. 2 exhaust manifolds.
Torque: 39 N Vm (400 kgf Vcm, 29 ft Vlbf)
(b) Install the manifold heat insulator with the four nuts.
Torque: 18 N Vm (185 kgf Vcm, 13 ft Vlbf)
(c) Connect the two oxygen sensor connectors.
17. INSTALL NO. 2 FRONT EXHAUST PIPE (See step 5 on page EM±105)
18. INSTALL TIMING BELT (See steps 8 to 14 on pages EM±30 to 33)
19. INSTALL RADIATOR AND WATER PUMP PULLEY (See steps 15, 16, 19 and 24 on pages EM±110 to 112)
20. INSTALL SPARK PLUGS (See step 6 on page IG±9)
Torque: 18 N Vm (180 kgf Vcm, 13 ft Vlbf)
21. CONNECT HIGH±TENSION CORDS TO SPARK PLUGS
(See steps 14 to 21 on pages EM±17 to 21)
22. FILL ENGINE WITH COOLANT (See page CO±5)
Capacity (w/ Heater): M/T 8.5 liters (9.0 US qts, 7.5 lmp. qts)
A/T 8.4 liters (8.9 US pts, 7.4 lmp. qts)
23. START ENGINE AND CHECK FOR LEAKS
24. (A/T)CHECK AUTOMATIC TRANSMISSION FLUID LEVEL
(See page MA±11)
NOTICE: Do not overfill.
25. CHECK IGNITION TIMING (See page IG±14)
Ignition timing: 105 BTDC @ idle
(w/ Terminals TE1 and E1 connected)
26. PERFORM ROAD TEST Check for abnormal noise, shock, slippage, correct shift
points and smooth operation.
27. RECHECK ENGINE COOLANT LEVEL
±
ENGINE MECHANICAL Cylinder HeadEM±61
WhereEverybodyKnowsYourName
Page 2091 of 4087
SYSTEM CIRCUIT
OPERATION
To maintain the most appropriate ignition timing, the ECU sends a control \
signal so that the igniter sends
current to the ignition coil and the spark plugs produce a spark. IG±4
±
IGNITION SYSTEM System Circuit, Operation
WhereEverybodyKnowsYourName
Page 2094 of 4087

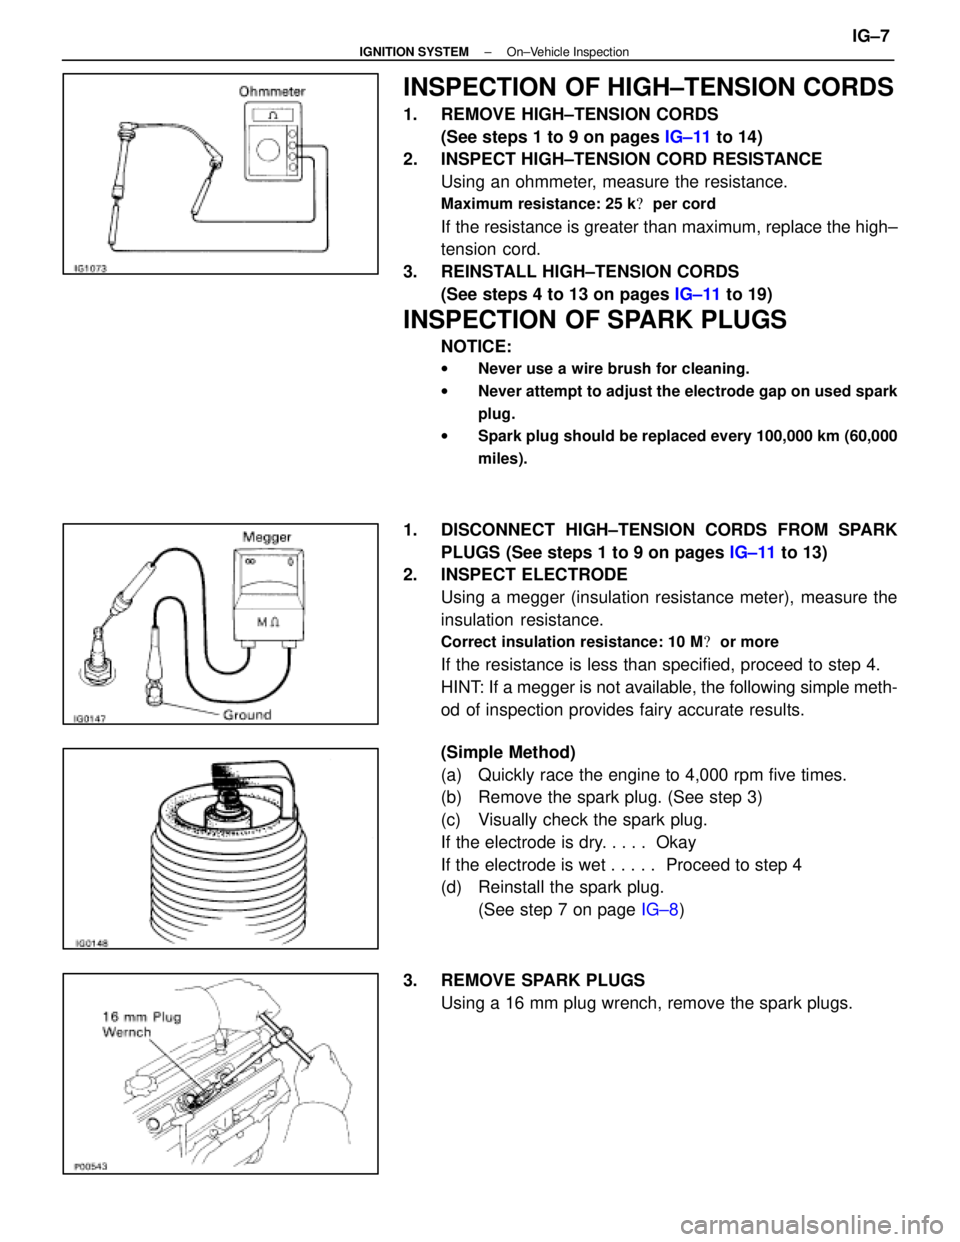
INSPECTION OF HIGH±TENSION CORDS
1. REMOVE HIGH±TENSION CORDS(See steps 1 to 9 on pages IG±11 to 14)
2. INSPECT HIGH±TENSION CORD RESISTANCE
Using an ohmmeter, measure the resistance.
Maximum resistance: 25 k � per cord
If the resistance is greater than maximum, replace the high±
tension cord.
3. REINSTALL HIGH±TENSION CORDS (See steps 4 to 13 on pages IG±11 to 19)
INSPECTION OF SPARK PLUGS
NOTICE:
wNever use a wire brush for cleaning.
w Never attempt to adjust the electrode gap on used spark
plug.
w Spark plug should be replaced every 100,000 km (60,000
miles).
1. DISCONNECT HIGH±TENSION CORDS FROM SPARK
PLUGS (See steps 1 to 9 on pages IG±11 to 13)
2. INSPECT ELECTRODE
Using a megger (insulation resistance meter), measure the
insulation resistance.
Correct insulation resistance: 10 M � or more
If the resistance is less than specified, proceed to step 4.
HINT: If a megger is not available, the following simple meth-
od of inspection provides fairy accurate results.
(Simple Method)
(a) Quickly race the engine to 4,000 rpm five times.
(b) Remove the spark plug. (See step 3)
(c) Visually check the spark plug.
If the electrode is dry. . . . . Okay
If the electrode is wet . . . . . Proceed to step 4
(d) Reinstall the spark plug.
(See step 7 on page IG±8)
3. REMOVE SPARK PLUGS Using a 16 mm plug wrench, remove the spark plugs.
±
IGNITION SYSTEM On±Vehicle InspectionIG±7
WhereEverybodyKnowsYourName
Page 2095 of 4087

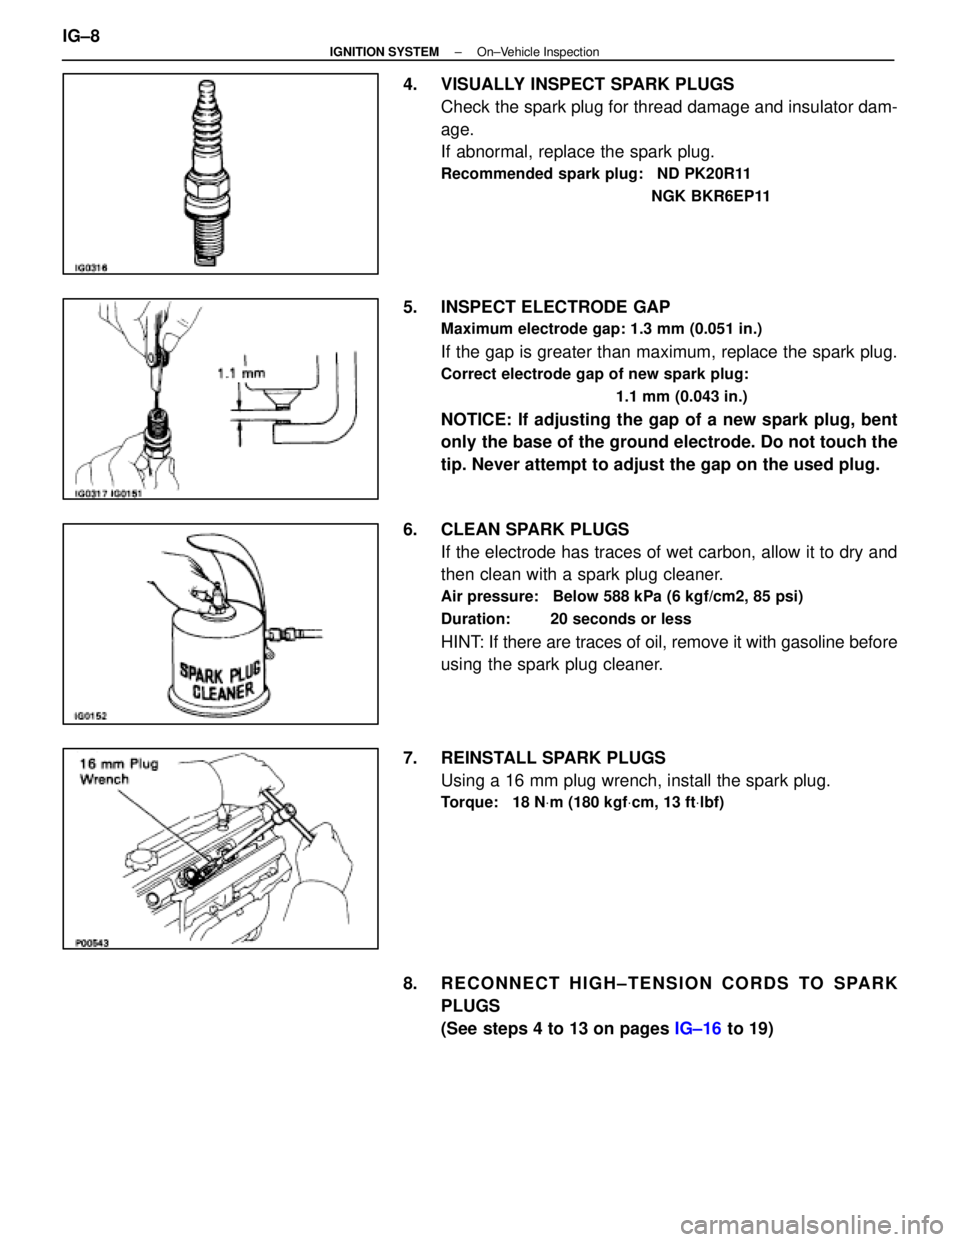
4. VISUALLY INSPECT SPARK PLUGSCheck the spark plug for thread damage and insulator dam-
age.
If abnormal, replace the spark plug.
Recommended spark plug: ND PK20R11
NGK BKR6EP11
5. INSPECT ELECTRODE GAP
Maximum electrode gap: 1.3 mm (0.051 in.)
If the gap is greater than maximum, replace the spark plug.
Correct electrode gap of new spark plug:1.1 mm (0.043 in.)
NOTICE: If adjusting the gap of a new spark plug, bent
only the base of the ground electrode. Do not touch the
tip. Never attempt to adjust the gap on the used plug.
6. CLEAN SPARK PLUGS If the electrode has traces of wet carbon, allow it to dry and
then clean with a spark plug cleaner.
Air pressure: Below 588 kPa (6 kgf/cm2, 85 psi)
Duration: 20 seconds or less
HINT: If there are traces of oil, remove it with gasoline before
using the spark plug cleaner.
7. REINSTALL SPARK PLUGS Using a 16 mm plug wrench, install the spark plug.
Torque: 18 N Vm (180 kgf Vcm, 13 ft Vlbf)
8. RECONNECT HIGH±TENSION CORDS TO SPARK
PLUGS
(See steps 4 to 13 on pages IG±16 to 19)
IG±8
±
IGNITION SYSTEM On±Vehicle Inspection
WhereEverybodyKnowsYourName
Page 2100 of 4087
6. REMOVE VSV FOR EVAP SYSTEMRemove the two bolts, and disconnect the VSV from cylinder
head and timing belt cover.
7. REMOVE RH NO.3 TIMING BELT COVER Remove the three bolts and timing belt cover.
8. REMOVE LH NO.3 TIMING BELT COVER (a) Remove the four mounting bolts.
(b) Disconnect the cord grommet from the timing belt cover,
and remove the timing belt cover.
(c) Remove the cord grommet from the high±tension cord.
9. REMOVE HIGH±TENSION CORDS (a) Disconnect the high±tension cords from the spark plugs
and distributor caps. Disconnect the high±tension cords
at the rubber boot. Do not pull on the cords.
NOTICE: Pulling on or bending the cords may damage
the conductor inside.
±
IGNITION SYSTEM High±Tension Cords and Cord ClampsIG±13
WhereEverybodyKnowsYourName
Page 2103 of 4087
4. INSTALL HIGH±TENSION CORDS(a) Connect the high±tension cords to the spark plugs anddistributor caps.
(b) Secure the high±tension cords with the cord clamps as
shown in the illustration.
(b) Connect the high±tension cords to the ignition coils.w Insert the grommet portion into the terminal hole of
the ignition coil.
IG±16
±
IGNITION SYSTEM High±Tension Cords and Cord Clamps
WhereEverybodyKnowsYourName
Page 2159 of 4087
5. REPLACE SPARK PLUGS(See Ignition System, steps 1 to 8 on pages IG±16 to 18)
(a) Remove the No.3 timing belt covers.
(b) Disconnect the high±tension cords at the rubber boot. Do not
pull on the high±tension cords.
NOTICE: Pulling on or bending the cords may damage
the conductor inside.
(c) Using a 16 mm plug wrench, remove the 8 spark plugs.
(d) Check the electrode gap of new spark plugs.
Correct electrode gap: 1.1 mm (0.043 in.)
Recommended spark plug: PK20R11 for ND
BKR6EP11 for NGK
NOTICE: If adjusting the gap of a new spark plug, bend
only the base of the ground electrode. Do not touch the
tip.
(e) Using a 16 mm plug wrench, reinstall the 8 spark plugs.
Torque: 18 N Vm (180 kgf Vcm, 13 ft Vlbf)
(f) Reconnect the high±tension cords.
(g) Reinstall the No.3 timing belt covers.
(See Ignition System, steps 5 to 13 on pages IG±22 to 24)
MA±8
±
MAINTENANCE (1UZ ± FE)
WhereEverybodyKnowsYourName
Page 2214 of 4087
(c) Remove the two bolts and two nuts, disconnect thethrottle body from the air intake chamber.
(d) Disconnect the following hoses, and remove the throttle body:
(1) PCV hose from throttle body
(2) Water by±pass hose from throttle body
(e) Remove the throttle body gasket.
17. REMOVE RH CYLINDER HEAD COVER (a) Remove the two bolts holding the cord clamp to thecylinder head.
(b) Disc onnect the high±tension cords from the spark
plugs.
(c) Disconnect the high±tension cords from the front high±tension cord clamp.
(d) Remove the eight bolts, seal washers, cylinder head cover and gasket.
EM±14
±
ENGINE MECHANICAL Engine Tune±Up
WhereEverybodyKnowsYourName