Page 912 of 4087

TROUBLESHOOTING
How to proceed with troubleshooting
Perform troubleshooting in accordance with the procedure on the followin\
g page.
� CUSTOMER PROBLEM ANALYSIS
Using the customer problem analysis check sheet for reference, ask the c\
ustomer in as much detail as
possible about the problem.
CHECK AND CLEAR THE DIAGNOSTIC TROUBLE CODES (PRECHECK)
If the TRAC indicator light lights up, and the TRAC control does not ope\
rate, the ECU stores diagnostic
trouble codes corresponding to the problem in memory.
Before confirming the trouble, first check the diagnostic trouble code for any\
malfunction codes stored in
memory. When there are malfunction codes, make a note of them, then clear them and proceed to ª �
Problem Symptom Confirmationº.
� PROBLEM SYMPTOM CONFIRMATION, � SYMPTOM SIMULATION
Confirm the problem symptoms. If the problem does not reoccur, simulate the problem by initially checking
the circuits indicated by the diagnostic trouble code in step , using ªProblem simulation methodº.
� DIAGNOSTIC TROUBLE CODE CHECK
Check the diagnostic trouble codes. If a malfunction code is output, proceed \
to ª � Diagnostic Trouble
Code Chartº.
If the normal code is output, proceed to ª � Problem Symptoms Chartº.
Be sure to proceed to ª � diagnostic Trouble Code Chartº after steps and � are completed.
If troubleshooting is attempted only by following the malfunction code sto\
red in the memory, errors could
be made in the diagnosis.
� DIAGNOSTIC TROUBLE CODE CHART
If a malfunction code is confirmed in the diagnostic trouble code check,\
proceed to the inspection proce-
dure indicated by the matrix chart for each diagnostic trouble code.
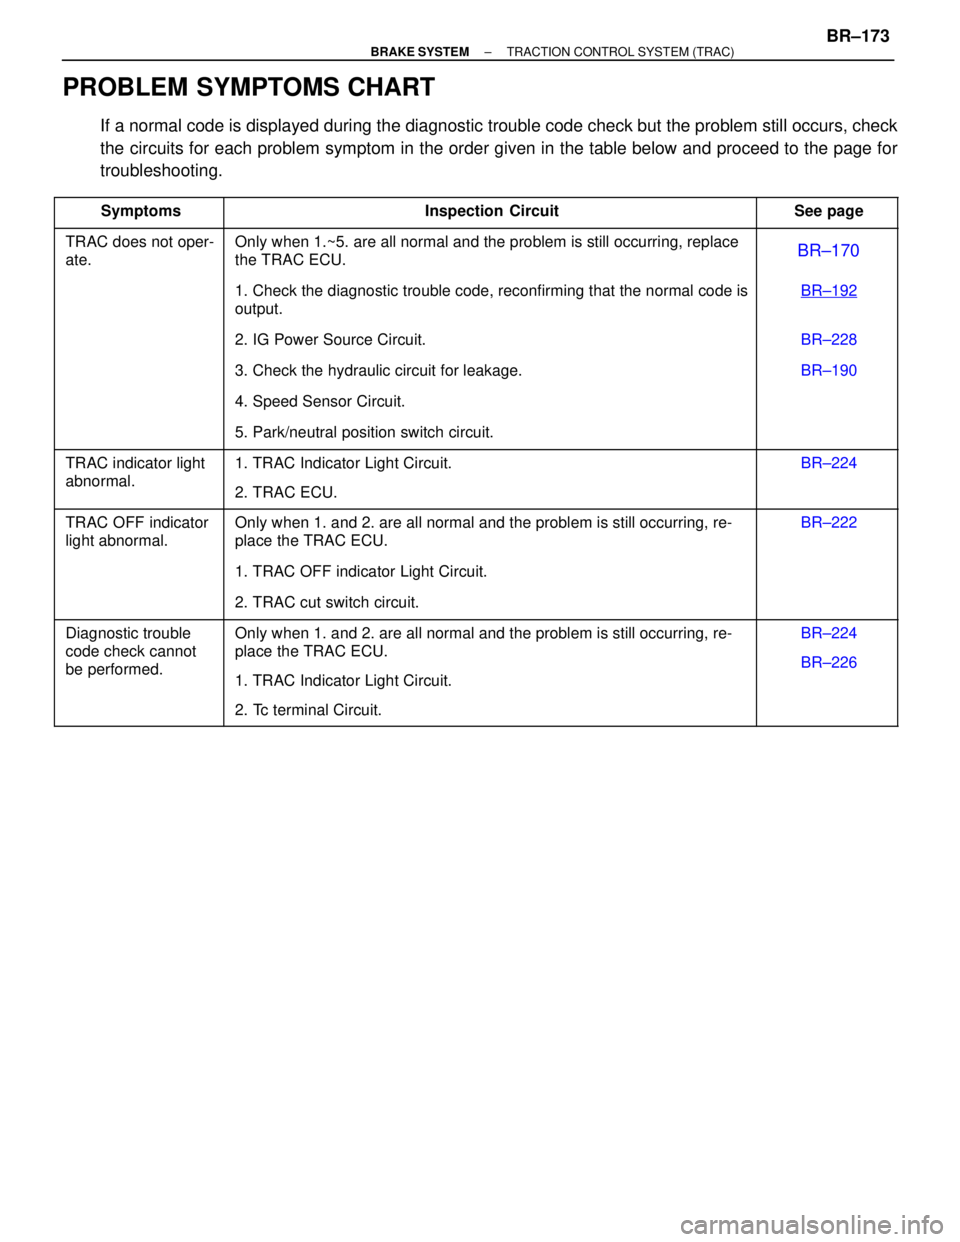
� PROBLEM SYMPTOMS CHART
If the normal code is confirmed in the diagnostic trouble code check, perf\
orm inspection in accordance with
the inspection order in the problem symptoms chart.
� CIRCUIT INSPECTION
Proceed with diagnosis of each circuit in accordance with the inspection\
order confirmed in � and �.
Determine whether the cause of the problem is in the sensor, actuators, wire harness and connectors or
the ECU.
\b SENSOR CHECK
Use the ABS warning light to check if each of the signals from speed sensors is \
being input correctly to
the ECU. Instructions for this check are given in the circuit inspection\
.
[10] REPAIRS After the cause of the problem is located, perform repairs by following the i\
nspection and replacement pro-
cedures in this manual.
[11] CONFIRMATION TEST
After completing repairs, confirm not only that the malfunction is eliminated\
, but also conduct a test drive
to make sure the entire TRAC system is operating correctly. And also check the ABS is operating correctly.
BR±166
±
BRAKE SYSTEM TRACTION CONTROL SYSTEM (TRAC)
WhereEverybodyKnowsYourName
Page 916 of 4087

DIAGNOSIS SYSTEM
INDICATOR CHECK
When the ignition switch is turned on, check that the TRAC
indicator light goes on for 3 seconds.
HINT: If the indicator check result is not normal, proceed to
troubleshooting for the TRAC indicator light circuit (see page
BR±225 ).
DIAGNOSTIC TROUBLE CODE CHECK
1. Turn the ignition switch ON.
2. Using SST, connect terminals Tc and E1 of DLC2 or DLC 1.
SST 09843±18020
3. Read the diagnostic trouble code from the TRAC indicator light on the combination meter.
HINT: If no code appears, inspect the diagnostic circuit or
TRAC indicator light circuit ( BR±226 orBR±225 ).
As an example, the blinking patterns for normal code and
codes 11 and 21 are shown on the left.
4. Codes are explained in the code table on the next page.
5. After completing the check, disconnect terminals Tc and
E1, and turn off the display.
If two or more malfunctions are indicated at the same time,
the lowest numbered diagnostic trouble code will be dis-
played 1st.
ECU DATA MONITOR USING LEXUS
HAND±HELD TESTER
1. Hook up the LEXUS hand±held tester to the DLC2.
2. Monitor the ECU data by following the prompts on thetester screen.
HINT: LEXUS hand±held tester has a ªSnapshotº function
which records the monitored data.
Please refer to the LEXUS hand±held tester operator's
manual for further details.
BR±170
±
BRAKE SYSTEM TRACTION CONTROL SYSTEM (TRAC)
WhereEverybodyKnowsYourName
Page 917 of 4087
DIAGNOSTIC TROUBLE CODE
CLEARANCE
1. Using SST, connect terminals Tc and E1 of DLC2 or DLC1.SST 09843±18020
2. IG switch ON.
3. Clear the diagnostic trouble codes stored in ECU by depressing the brake pedal 8 or more times within 3 seconds.
4. Check that the TRAC indicator light shows the normal code.
5. Remove the SST from the terminals of DLC2 or DLC1.
HINT: Cancellation can also be done by removing the DOME
fuse, but in this case, other memory systems will also be can-
celled out.
±
BRAKE SYSTEM TRACTION CONTROL SYSTEM (TRAC)BR±171
WhereEverybodyKnowsYourName
Page 918 of 4087
DIAGNOSTIC TROUBLE CODE CHART
If a malfunction code is displayed during the diagnostic trouble code chec\
k, check the circuit listed for that code
in the table below and proceed to the page given.
HINT: If the TRAC indicator light lights up and the TRAC indicator light doe\
s not blink when the Diag. code is
checked, check the blinking pattern of the ABS warning light and perform trouble\
shooting of the ABS system.
BR±186BR±189
BR±190
BR±192
BR±196 BR±198
BR±200
BR±208
BR±216
BR±218
BR±220BR±189
BR±189
BR±190
BR±190
BR±190
BR±200 BR±208
*1: If a malfunction is detected, the TRAC OFF indicator light lights up.
*2: Indicator light does not lights up even if an error is detected.
*3: If a malfunction is detected, the TRAC OFF indicator light or TRAC i\
ndicator light light up.
BR±172
±
BRAKE SYSTEM TRACTION CONTROL SYSTEM (TRAC)
WhereEverybodyKnowsYourName
Page 919 of 4087

PROBLEM SYMPTOMS CHART
If a normal code is displayed during the diagnostic trouble code check but\
the problem still occurs, check
the circuits for each problem symptom in the order given in the table below\
and proceed to the page for
troubleshooting.
�������� ��������Symptoms������������������\
����� ������������������\
�����Inspection Circuit������� �������See page
�������� �
�������
��������
TRAC does not oper-
ate.������������������\
����� �
������������������\
����
������������������\
�����
Only when 1.~5. are all normal and the problem is still occurring, repla\
ce
the TRAC ECU.������� �
������
�������BR±170
�������� �
�������
��������
������������������\
����� �
������������������\
����
������������������\
�����
1. Check the diagnostic trouble code, reconfirming that the normal code \
is
output.������� �
������
�������
BR±192
�������� ��������������������������\
����� ������������������\
�����2. IG Power Source Circuit.������� �������BR±228
�������� �
�������
��������
������������������\
����� �
������������������\
����
������������������\
�����3. Check the hydraulic circuit for leakage.������� �
������
�������BR±190
�������� ��������������������������\
����� ������������������\
�����4. Speed Sensor Circuit.������� �������
�������� ��������������������������\
����� ������������������\
�����5. Park/neutral position switch circuit.������� �������
�������� �
�������
�
�������
��������
TRAC indicator light
abnormal.������������������\
����� �
������������������\
����
�
������������������\
����
������������������\
�����
1. TRAC Indicator Light Circuit.
2. TRAC ECU.������� �
������
�
������
�������
BR±224
�������� �
�������
��������
TRAC OFF indicator
light abnormal.������������������\
����� �
������������������\
����
������������������\
�����
Only when 1. and 2. are all normal and the problem is still occurring, r\
e-
place the TRAC ECU.������� �
������
�������
BR±222
�������� ��������������������������\
����� ������������������\
�����1. TRAC OFF indicator Light Circuit.������� �������
�������� ��������������������������\
����� ������������������\
�����2. TRAC cut switch circuit.������� �������
�������� �
�������
�
�������
�
�������
�
�������
��������
Diagnostic trouble
code check cannot
be performed.������������������\
����� �
������������������\
����
�
������������������\
����
�
������������������\
����
�
������������������\
����
������������������\
�����
Only when 1. and 2. are all normal and the problem is still occurring, r\
e-
place the TRAC ECU.
1. TRAC Indicator Light Circuit.
2. Tc terminal Circuit.������� �
������
�
������
�
������
�
������
�������
BR±224
BR±226
±
BRAKE SYSTEM TRACTION CONTROL SYSTEM (TRAC)BR±173
WhereEverybodyKnowsYourName
Page 964 of 4087
TR±11
WIRING DIAGRAM
DTC51Engine Malfunction Detection Circuit
CIRCUIT DESCRIPTION
If trouble (trouble which causes the malfunction indicator light to light\
up) occurs in the engine control system,
this circuit senses the trouble and prohibits TRAC control.
DTC No.DTC Detecting ConditionTrouble Area
51
Either of the following (1) and (2) continues formore
than 1 sec.:
(1) Engine speed: 500 RPM or more
(2) Voltage of TRAC ECU terminal TR5: 1 V or less
Short in TR5 circuit
ECM
TRAC ECU
DIAGNOSTIC CHARTDIAGNOSTIC CHART
BR±218±
BRAKE SYSTEM TRACTION CONTROL SYSTEM (TRAC)
WhereEverybodyKnowsYourName
Page 968 of 4087
TRAC OFF Indicator, TRAC Cut Switch Circuit
CIRCUIT DESCRIPTION
This is the TRAC control main switch. When the TRAC cut switch is pushed on,\
TRAC control goes off and
the TRAC OFF indicator lights up. This indicator is also used for warnings \
when the trouble occurs.
DIAGNOSTIC CHARTDIAGNOSTIC CHART
BR±222±
BRAKE SYSTEM TRACTION CONTROL SYSTEM (TRAC)
WhereEverybodyKnowsYourName
Page 970 of 4087

NOYES
OKNG
OKNG
OKNG
OKNG
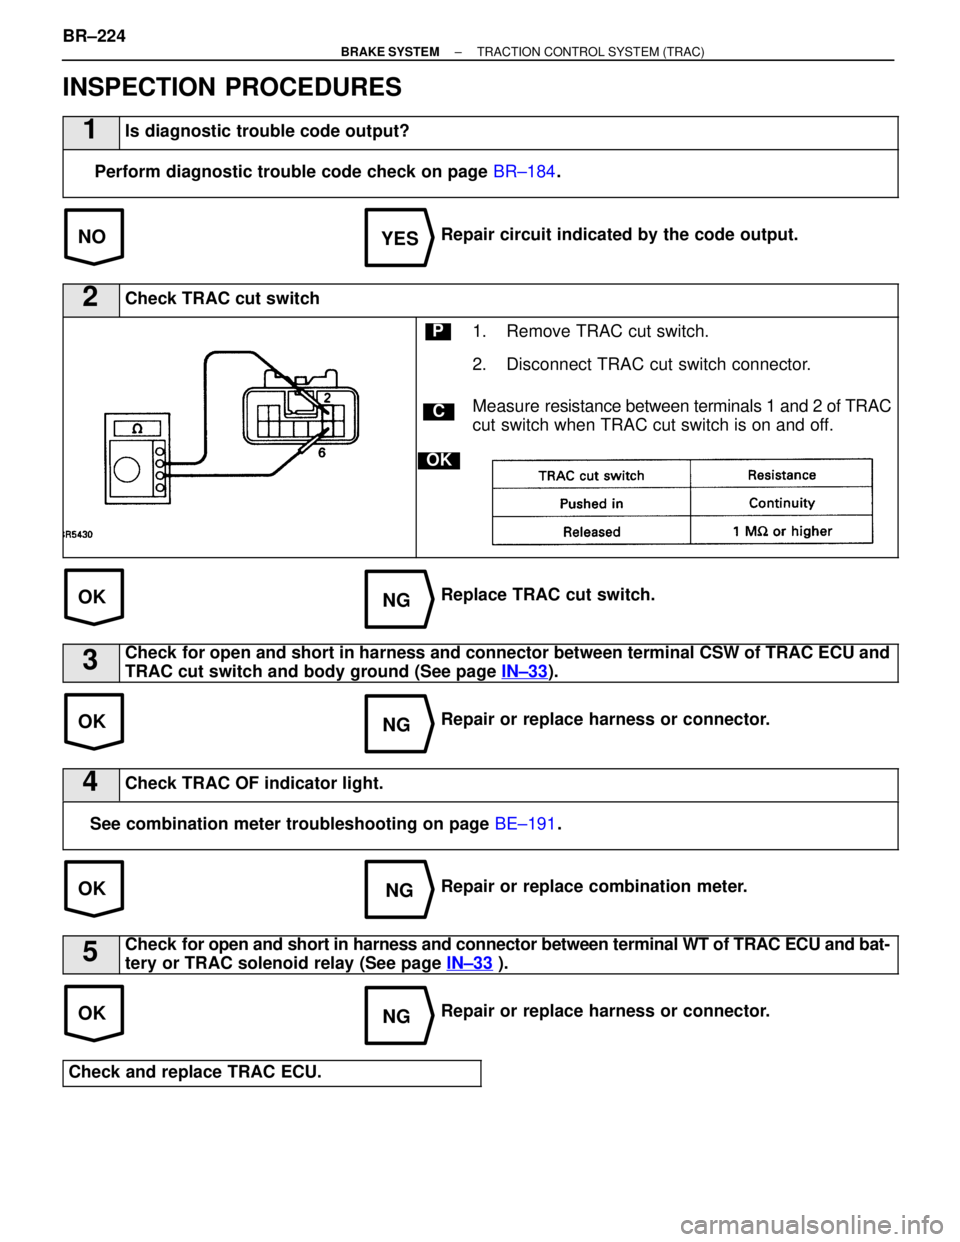
INSPECTION PROCEDURES
1Is diagnostic trouble code output?
Perform diagnostic trouble code check on page BR±184.
Repair circuit indicated by the code output.
2Check TRAC cut switch
C
OK
P1. Remove TRAC cut switch.
2. Disconnect TRAC cut switch connector.
Measure re sistance between terminals 1 and 2 of TRAC
cut switch when TRAC cut switch is on and off.
Replace TRAC cut switch.
3Check for open and short in harness and connector between terminal CSW of TRA\
C ECU and
TRAC cut switch and body ground (See page IN±33
).
Repair or replace harness or connector.
4Check TRAC OF indicator light.
See combination meter troubleshooting on page BE±191.
Repair or replace combination meter.
5Check for open and short in harness and connector between terminal WT of TRAC ECU \
and bat-
tery or TRAC solenoid relay (See page IN±33
).
Repair or replace harness or connector.
Check and replace TRAC ECU.
BR±224±
BRAKE SYSTEM TRACTION CONTROL SYSTEM (TRAC)
WhereEverybodyKnowsYourName